How to Create Invoices from Airtable (Step-by-Step Guide)
Creating and sending invoices is an essential but time-consuming task for any business. According to Aberdeen Group research, the average cost of processing an invoice manually is $15, compared to just $2.36 when automated. It's one of the most common automation requests in the Airtable community. If you're using Airtable to manage your clients and projects, you're already halfway to a more efficient invoicing system.
In this step-by-step tutorial, we'll show you how to automatically generate professional invoices directly from your Airtable data using TypeFlow - no coding required. For a complete overview of invoice and billing automation, see our guide to Airtable invoice automation.
By the end of this guide, you'll have a fully automated invoice generation system that:
- Creates professional-looking invoices with your branding
- Automatically pulls client and project data from your Airtable base
- Saves hours of manual work each month
- Ensures accuracy by eliminating manual data entry
What Is Automated Invoicing in Airtable?
Automated invoicing in Airtable is the process of using a connected tool like TypeFlow to automatically create professional PDF invoices directly from your data. Since Airtable doesn't natively generate documents, this workflow is essential for saving time and reducing errors.
The process works in three simple steps:
- Data Pull: Information is pulled directly from your Airtable records.
- Template Merge: The data is merged into a pre-designed Google Docs template.
- PDF Generation: A final, polished PDF invoice is created and saved back to Airtable.
Why Automate Invoices in Airtable?
Automating your invoicing process in Airtable offers significant advantages beyond just saving time.
-
Eliminate Errors: Automation ensures data is transferred perfectly from your Airtable base to your invoice every time. The APQC benchmarks show top-performing organizations process invoices at $1.77 each, while bottom performers spend over $10 - the difference is automation.
-
Save Time: Stop wasting hours on repetitive tasks and focus on growing your business. Research from Smartsheet found that over 40% of workers spend at least a quarter of their work week on manual, repetitive tasks like data entry.
-
Ensure Consistent Branding: Every invoice uses the same professional, branded template for a consistent look.
-
Get Paid Faster: Invoices go out the moment a project is completed, which helps shorten your payment cycle.
-
Improve Client Experience: Clients receive timely, accurate, and professional invoices, building trust in your business.
-
Scale Effortlessly: The same workflow can handle 10 or 1,000 invoices, allowing your operations to grow easily. As McKinsey research highlights, 60-70% of time spent on language-heavy workflows like invoicing and reporting can be automated.
Ready to automate your invoices?
Connect Airtable to Google Docs templates. Generate professional invoices in seconds.
Start free with 20 documents →Real-World Invoice Automation Examples
Here's how different businesses can use this workflow:
-
Freelance Designers: Automatically generate an invoice the moment a project is marked "Complete." The invoice pulls the hourly rate, project hours, and client details with no manual entry.
-
Small Agencies: Generate monthly retainer invoices on the 1st of each month. An Airtable automation can create and email invoices to all active clients in a single workflow.
-
Consulting Businesses: Click a button in Airtable to generate a detailed invoice with line items for each project phase when a project ends.
Cost Comparison: TypeFlow vs. Traditional Invoicing Tools
Here's how TypeFlow stacks up against traditional invoicing software for users whose work is centered in Airtable:
| Solution | Monthly Cost | Airtable Integration | Best For |
|---|---|---|---|
| TypeFlow | From $17/mo | Native | Airtable users who want flexibility |
| QuickBooks | $15-50/mo | Via Zapier (extra cost) | Full accounting needs |
| FreshBooks | $19-60/mo | Via Zapier (extra cost) | Service businesses needing accounting |
When TypeFlow makes sense: You already use Airtable for client management and need a flexible, low-cost way to generate documents without a full accounting suite.
When traditional tools make sense: You need features like expense tracking, built-in payment processing, and comprehensive financial reporting in one platform.
Why TypeFlow for Airtable Invoices?
TypeFlow is built for teams who already run client and project workflows in Airtable and want fast, consistent invoice PDFs.
- Built for Airtable users: Connect your existing base with no migration.
- You control the design: Build templates in Google Docs (no rigid invoice editor).
- No lock-in: Your data stays in Airtable and your templates stay in Google Docs.
Need to send quotes before invoices? Check out the guide to creating professional quotes from Airtable — the workflow is similar.
Prerequisites
Before we dive in, make sure you have these basics ready:
| Tool | Purpose | Notes |
|---|---|---|
| Airtable Account | To store client and project data | Your base should be ready with your data. |
| Google Account | To create the invoice template | You'll use Google Docs for the design. |
| TypeFlow Account | To connect Airtable and Google Docs | A free account is all you need to start. |
Set Up Your Airtable Base for Invoicing
A clean base structure is the foundation of invoice automation. You can adapt an existing client base or use the four-table setup below.
Goal: One place to store clients, projects, line items, and the final invoice PDF.
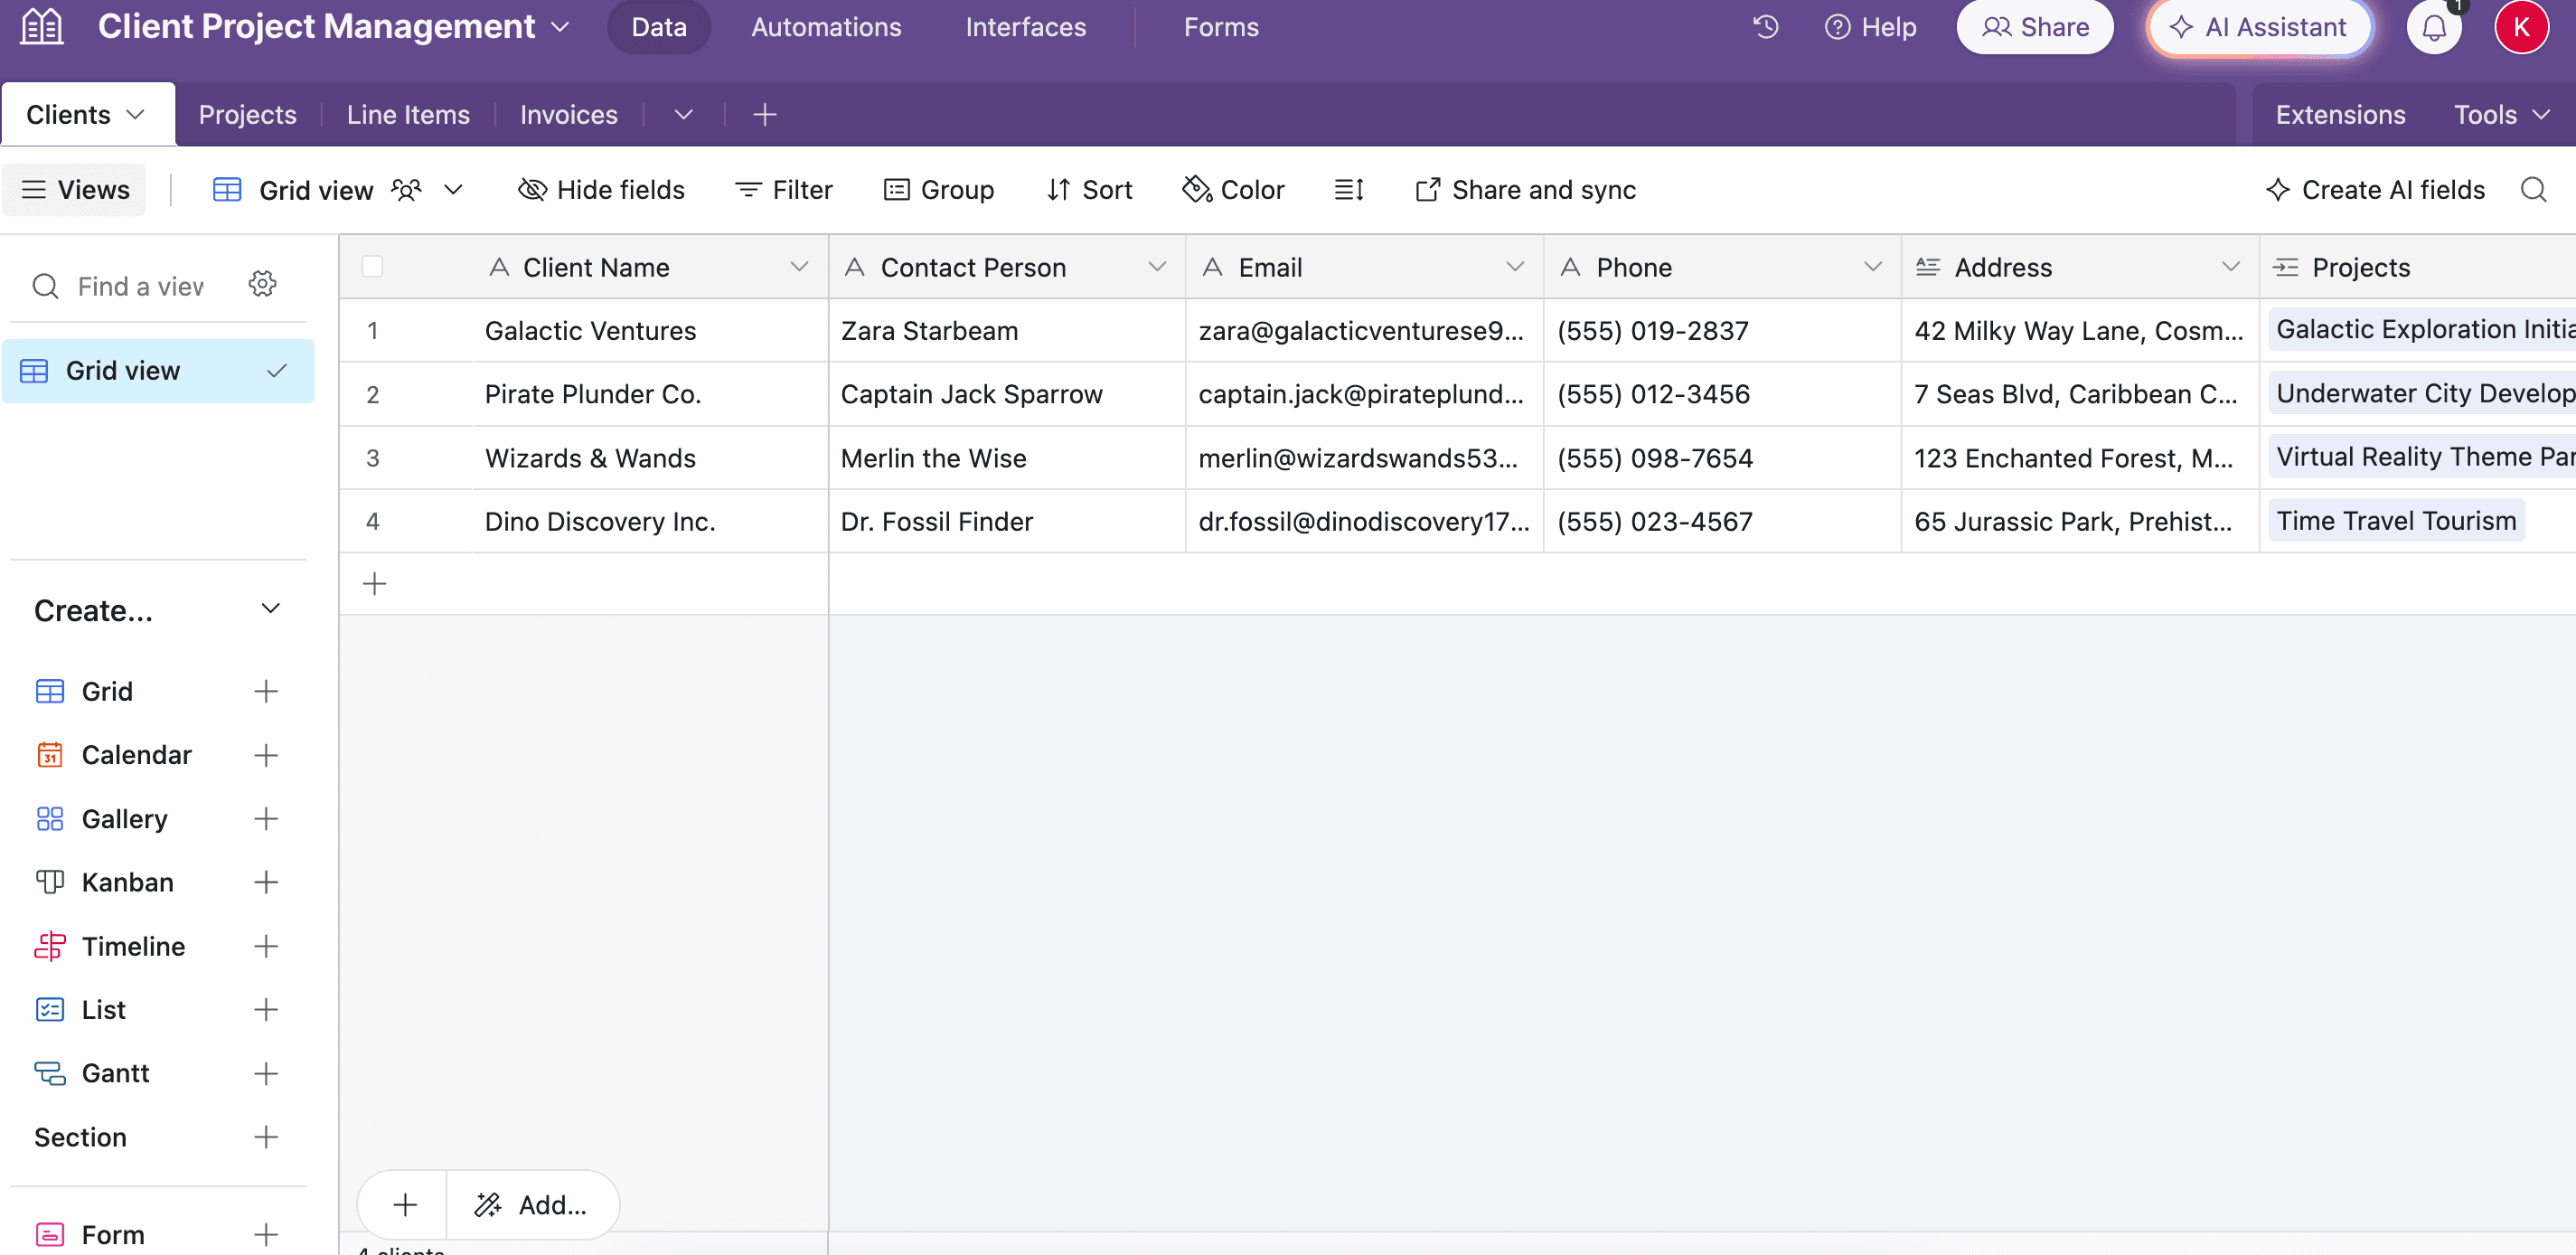
Clients Table
- Client Name (Single line text)
- Contact Person (Single line text)
- Email (Email)
- Phone (Phone number)
- Address (Long text)
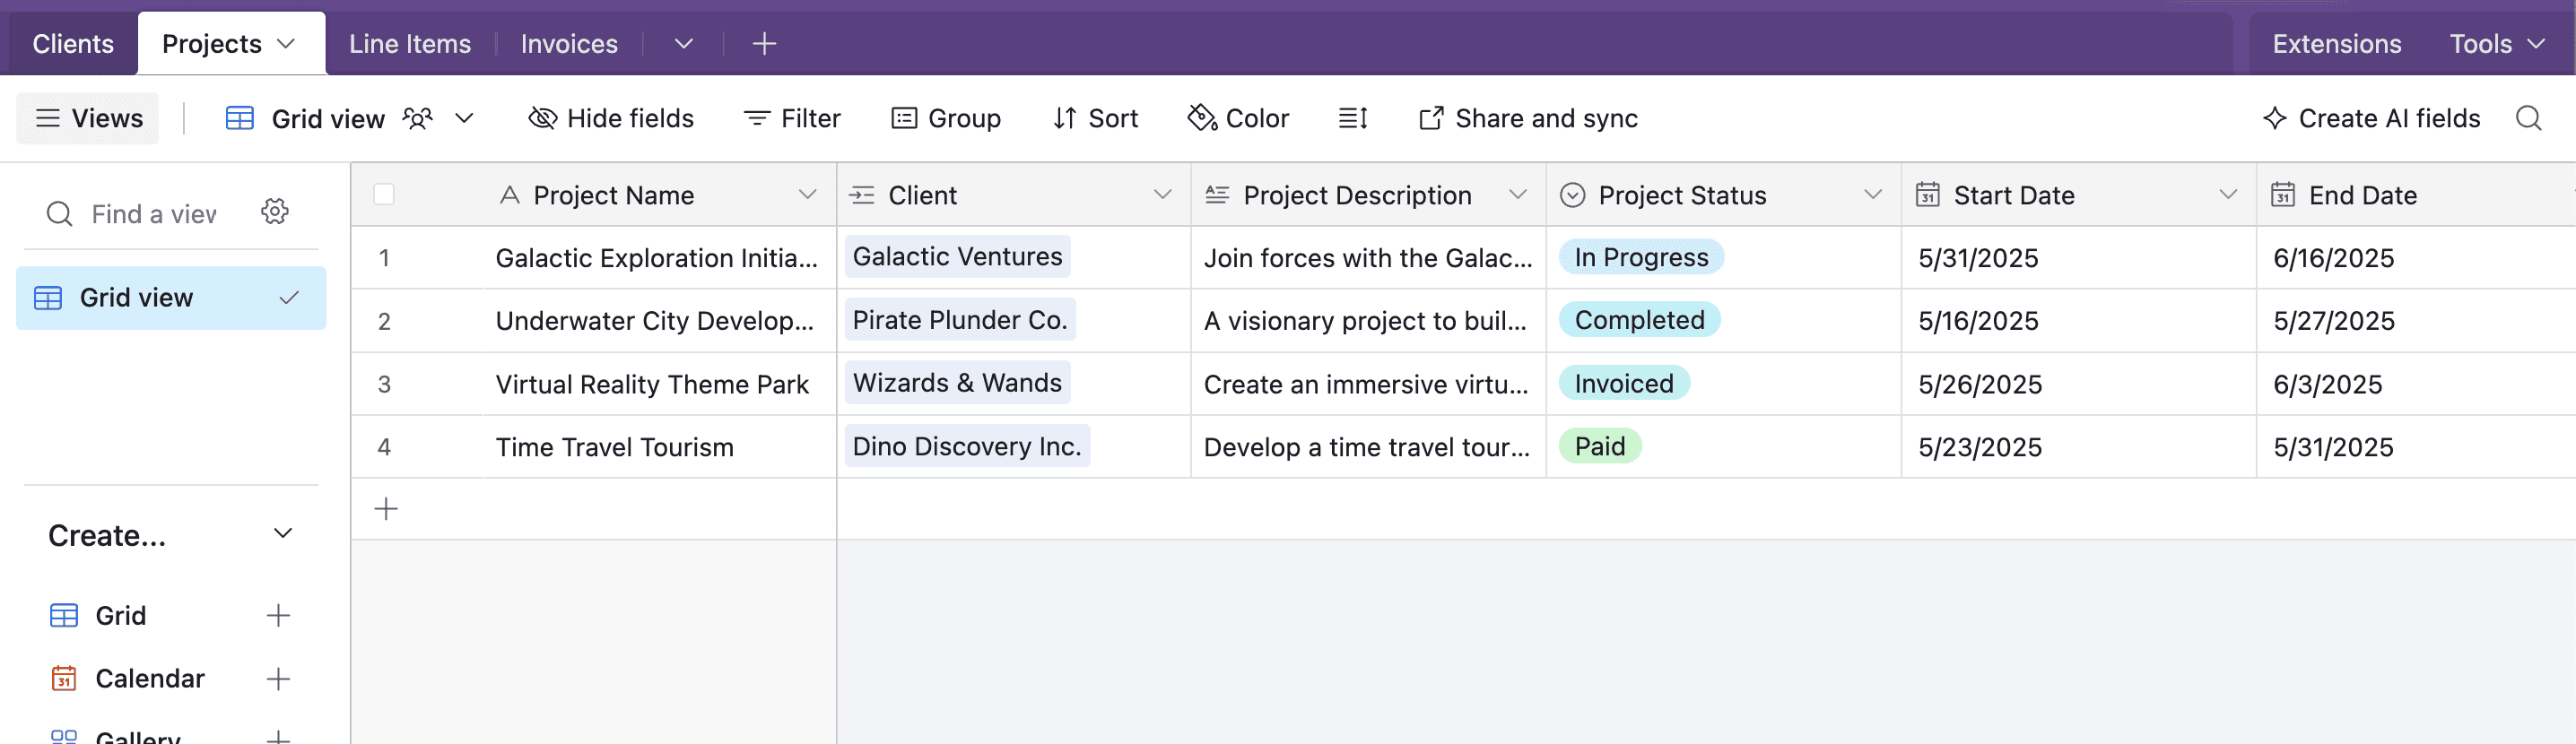
Projects Table
- Project Name (Single line text)
- Client (Link to Clients table)
- Project Description (Long text)
- Project Status (Single select: In Progress, Completed, Invoiced, Paid)
- Start Date (Date)
- End Date (Date)
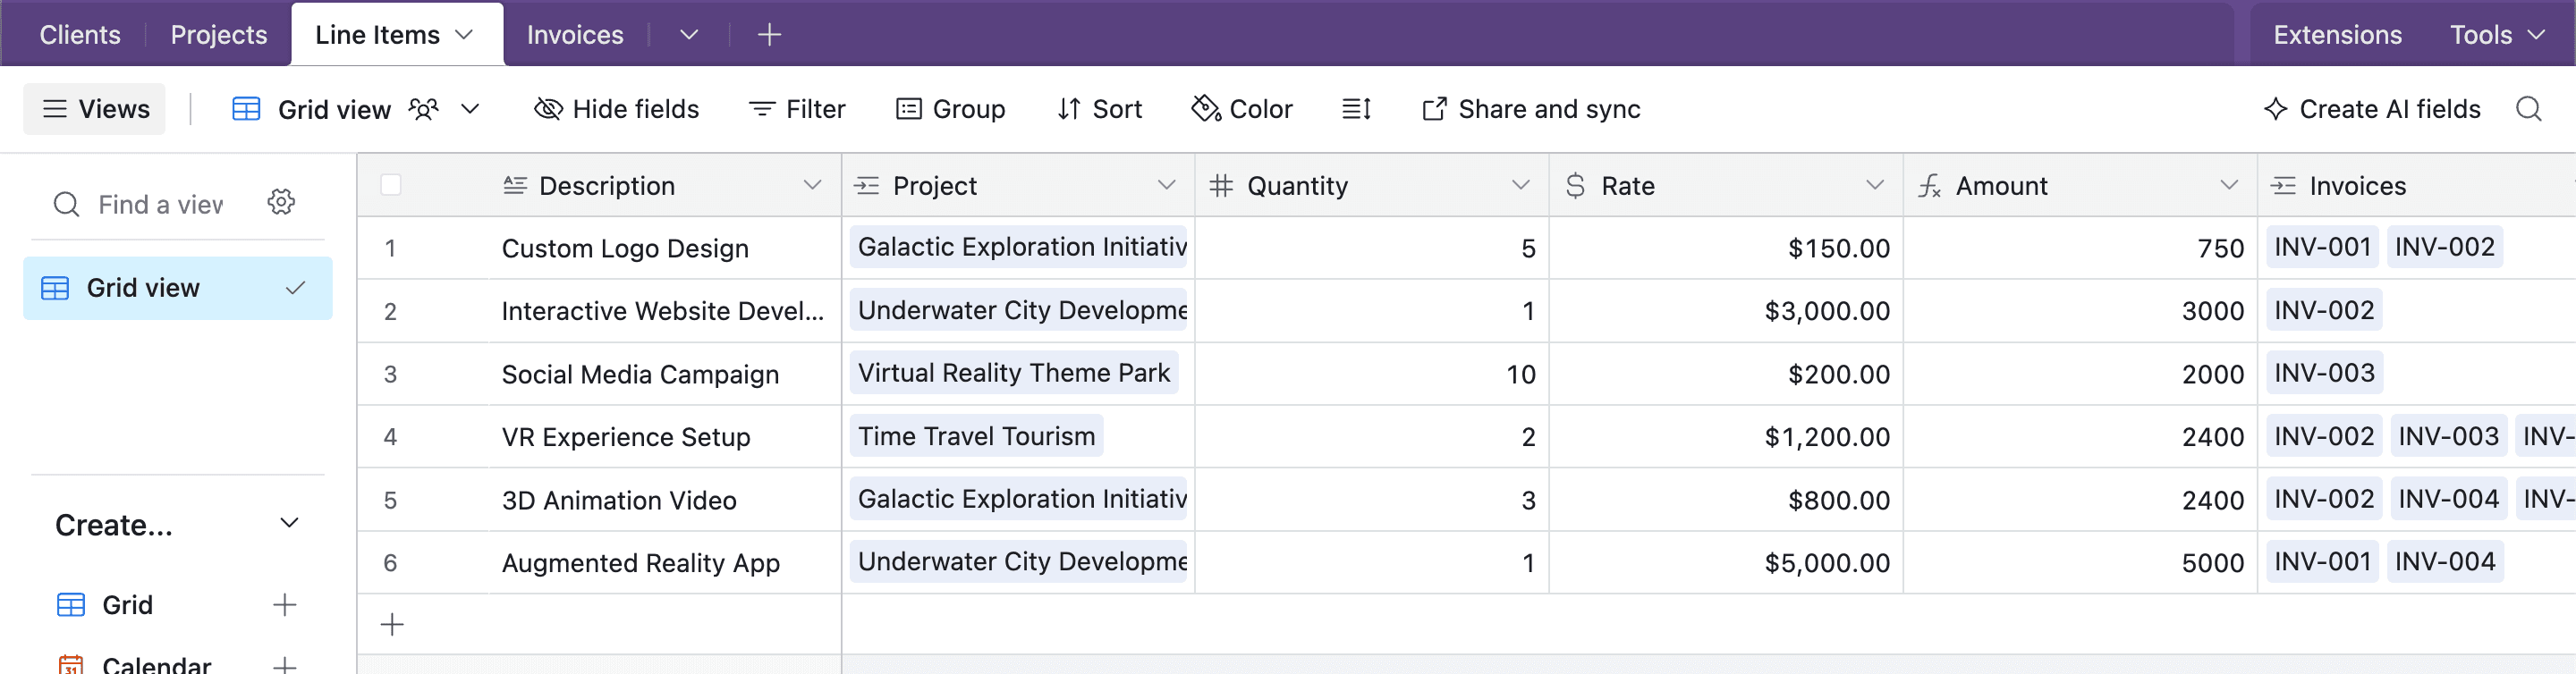
Line Items Table
- Description (Single line text)
- Project (Link to Projects table)
- Quantity (Number)
- Rate (Currency)
- Amount (Formula:
{Quantity} * {Rate})
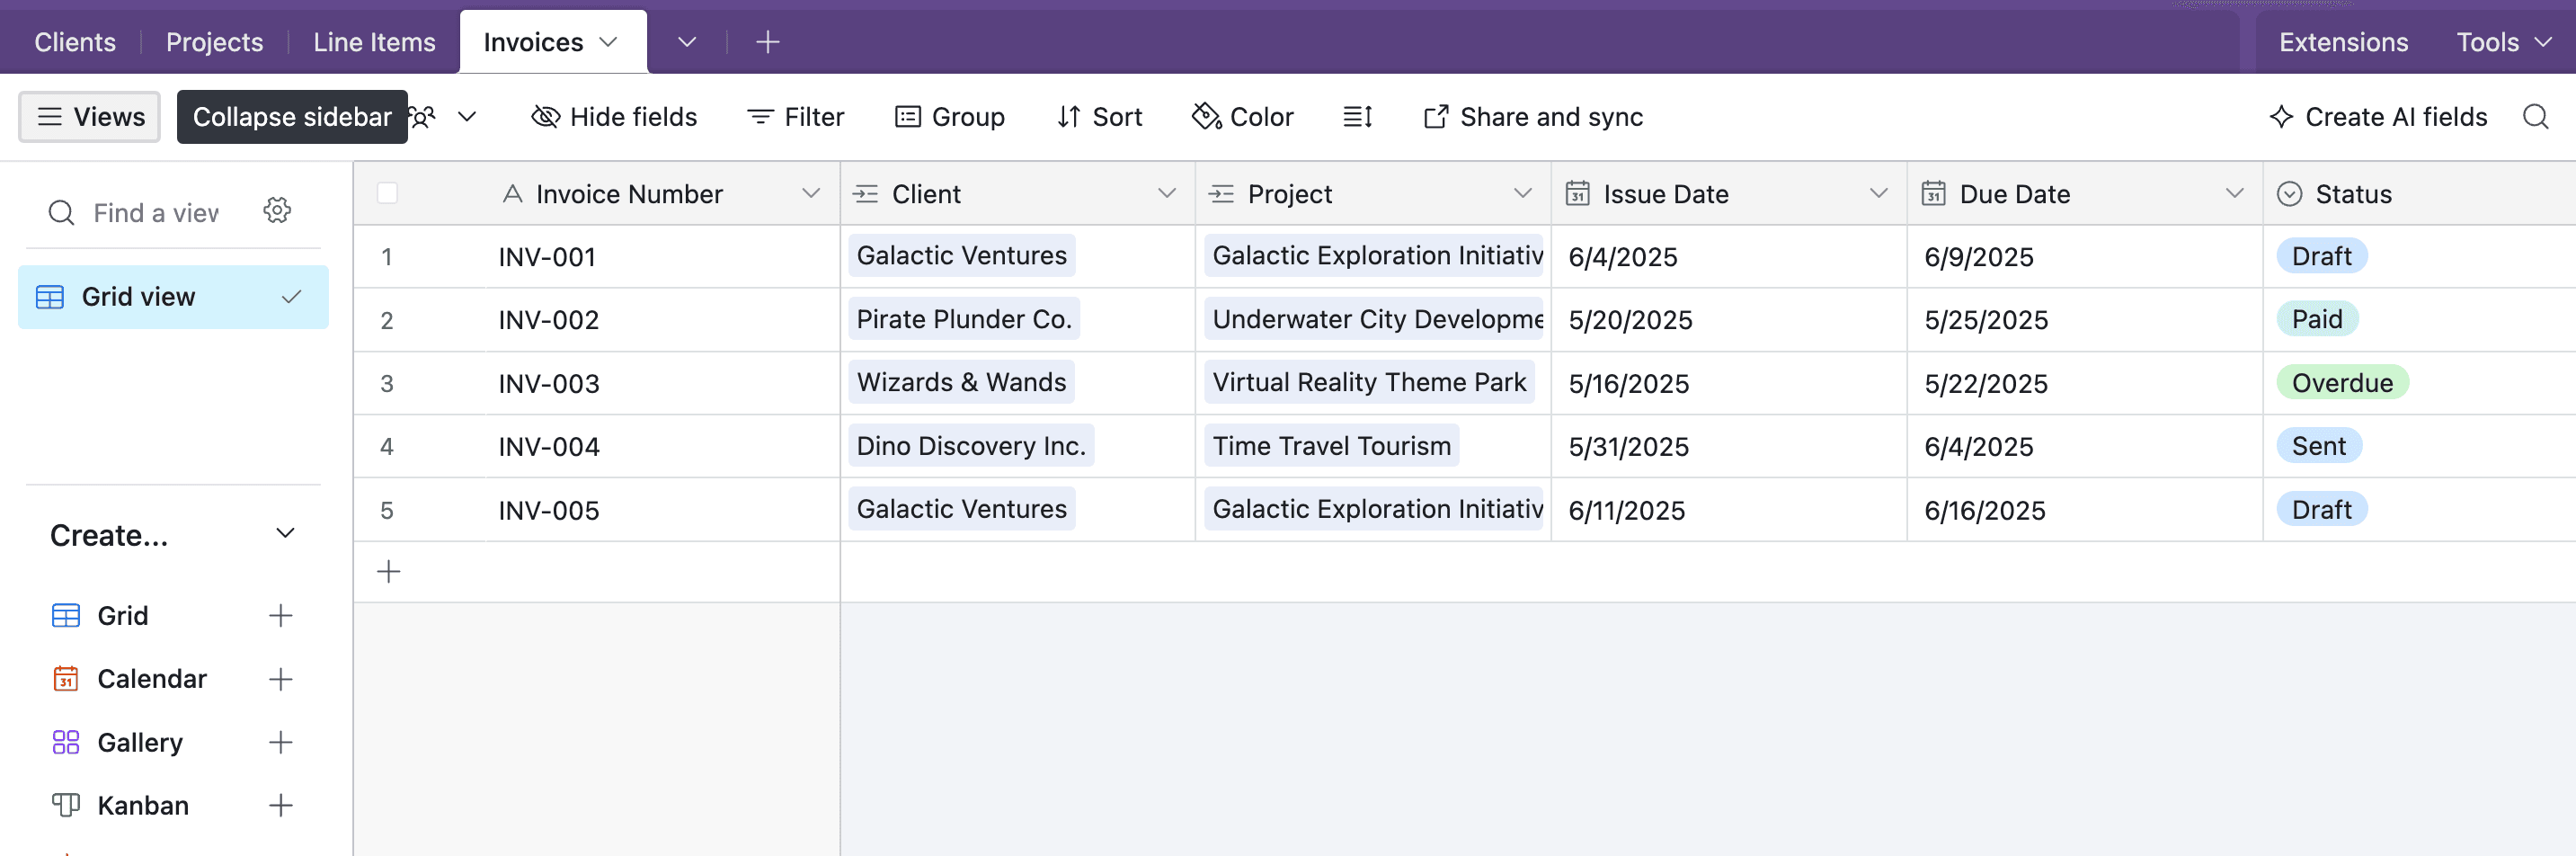
Invoices Table
- Invoice Number (Auto-number or Formula)
- Client (Link to Clients table)
- Project (Link to Projects table)
- Issue Date (Date)
- Due Date (Date)
- Status (Single select: Draft, Sent, Paid, Overdue)
- Line Items (Link to Line Items table)
- Subtotal (Rollup: SUM of
{Line Items}→{Amount}) - Tax Rate (Percent)
- Tax Amount (Formula:
{Subtotal} * {Tax Rate}) - Total (Formula:
{Subtotal} + {Tax Amount}) - Notes (Long text)
- Invoice PDF (Attachment - this is where TypeFlow will store your generated invoice)
If you want to copy the base, click here!
Pro Tip
You can create a view in your Projects table that filters for "Completed" projects that haven't been invoiced yet. This makes it easy to see what needs to be billed.
Create Your Invoice Template in Google Docs
TypeFlow uses Google Docs as its template engine. This makes it easy to design professional invoices without learning a new system.
Simply create a new Google Doc and add placeholders for your data using double curly braces, like {{placeholder}}.
Template Design Tips
-
Match Field Names: Use placeholders that match your Airtable field names (e.g.,
{{Invoice_Date}}for a field named "Invoice Date") to simplify mapping. -
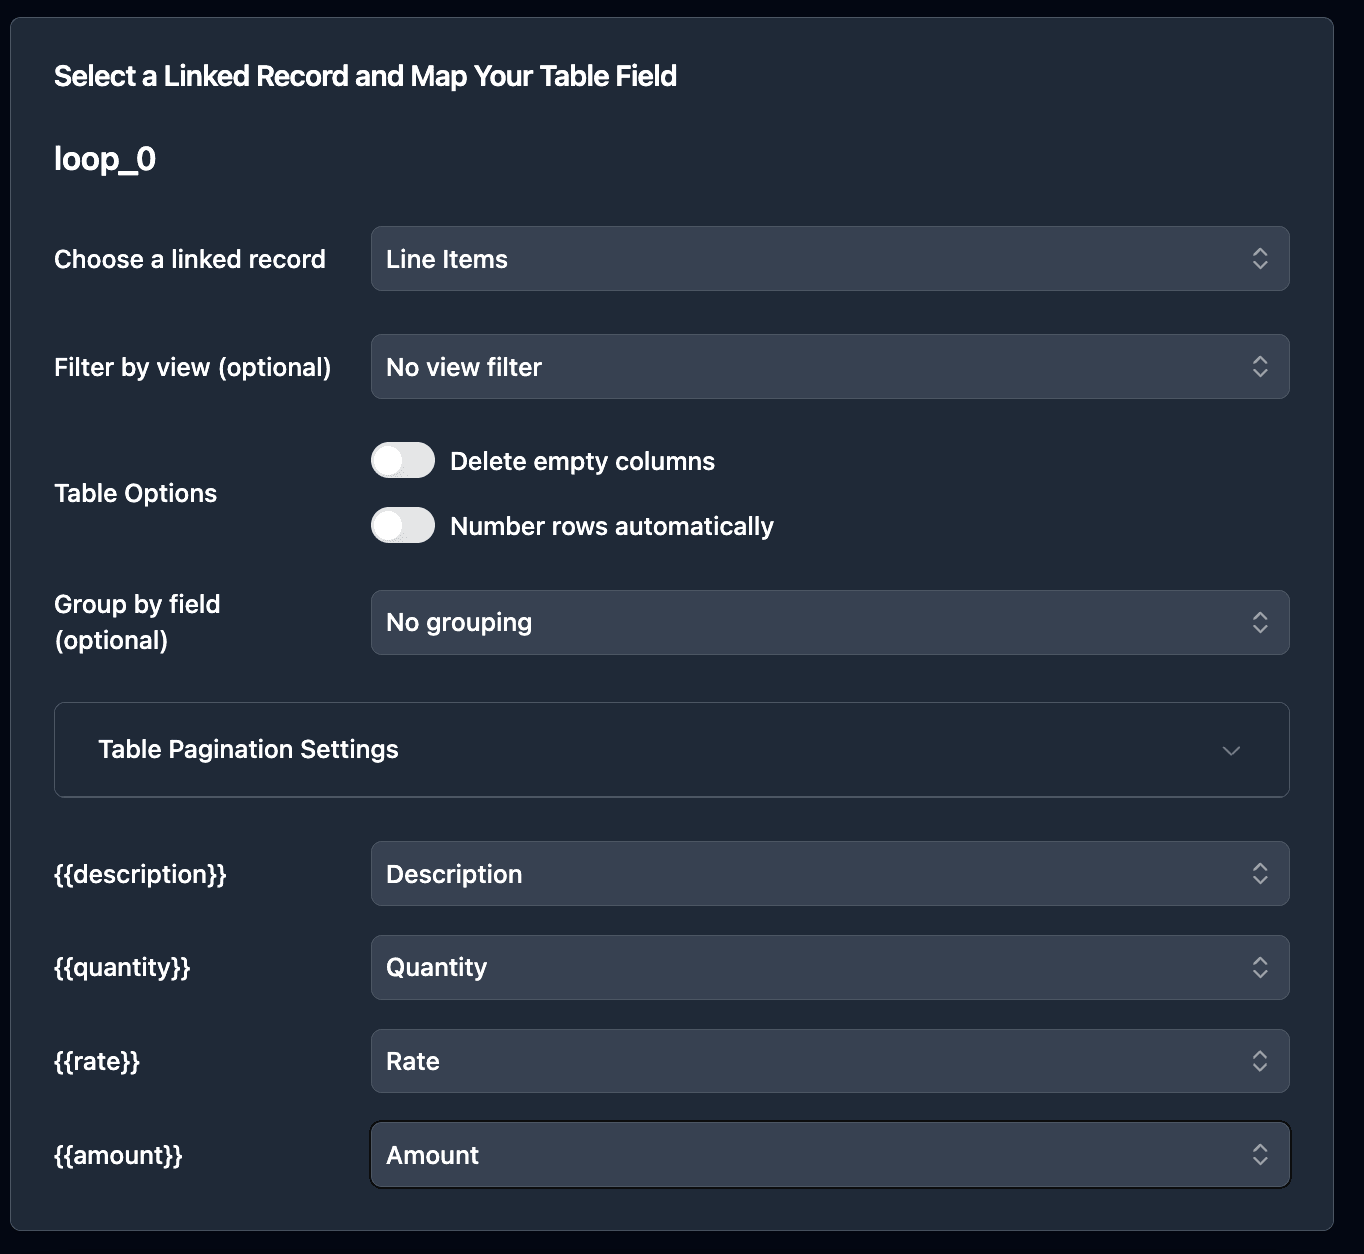
Use Loops for Line Items: The special
{{loop_0}}variable automatically repeats table rows for each linked line item record. -
Include Required Elements: Ensure your template has placeholders for all essential invoice details, like invoice number, dates, and totals.
-
Test with Real Data: Use a test record with long names or multiple line items to check for layout issues early on.
Save your template in Google Docs with a clear name like "Invoice Template".
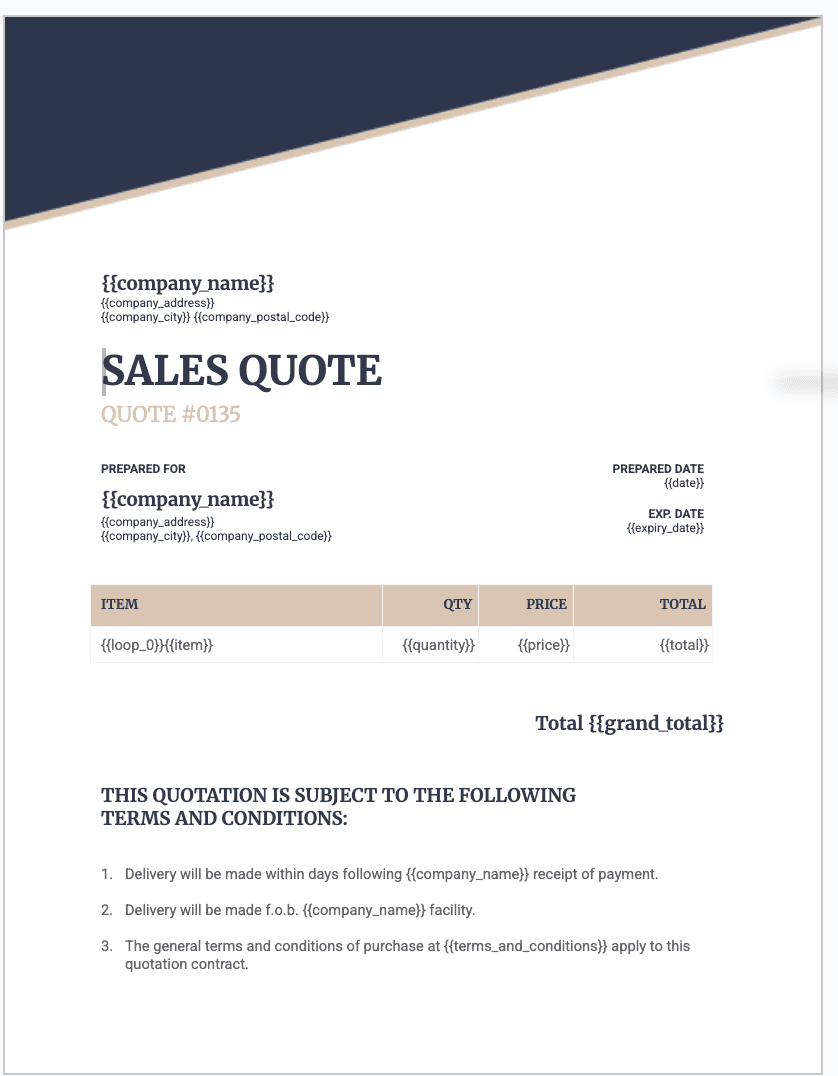
Example Invoice Template Layout
Here's a simple layout you can copy into Google Docs and then map to Airtable fields in TypeFlow.
{{company_name}}                    {{image_company_logo}}
                    INVOICE
Invoice #: {{invoice_number}}
Date: {{invoice_date}}
Due: {{due_date}}

Bill To:
{{client_name}}
{{client_address}}

| Description | Qty | Unit Price | Amount |
|-------------|-----|------------|--------|
| {{loop_0}}{{description}} | {{quantity}} | {{rate}} | {{amount}} |

                    Subtotal: {{subtotal}}
                    Tax: {{tax_amount}}
                    Total: {{total}}
Tip: Keep placeholder names consistent (e.g., {{invoice_number}}) to make mapping faster.
Connect TypeFlow to Your Airtable Base
If not already done, Now it's time to connect TypeFlow to your Airtable base:
-
Sign in to your TypeFlow account
-
Visit this link to integrate Airtable with TypeFlow: Integrate Airtable with TypeFlow
-
Select "Connect to Airtable"
-
Authorize TypeFlow to access your Airtable account
-
Select the base and table you want to use (in this case, your Invoices table)
Configure Your Invoice Generation Workflow
Once connected, you'll need to configure your flow in TypeFlow:
-
Sign in to your TypeFlow account
-
Click "Start a new automation workflow"
-
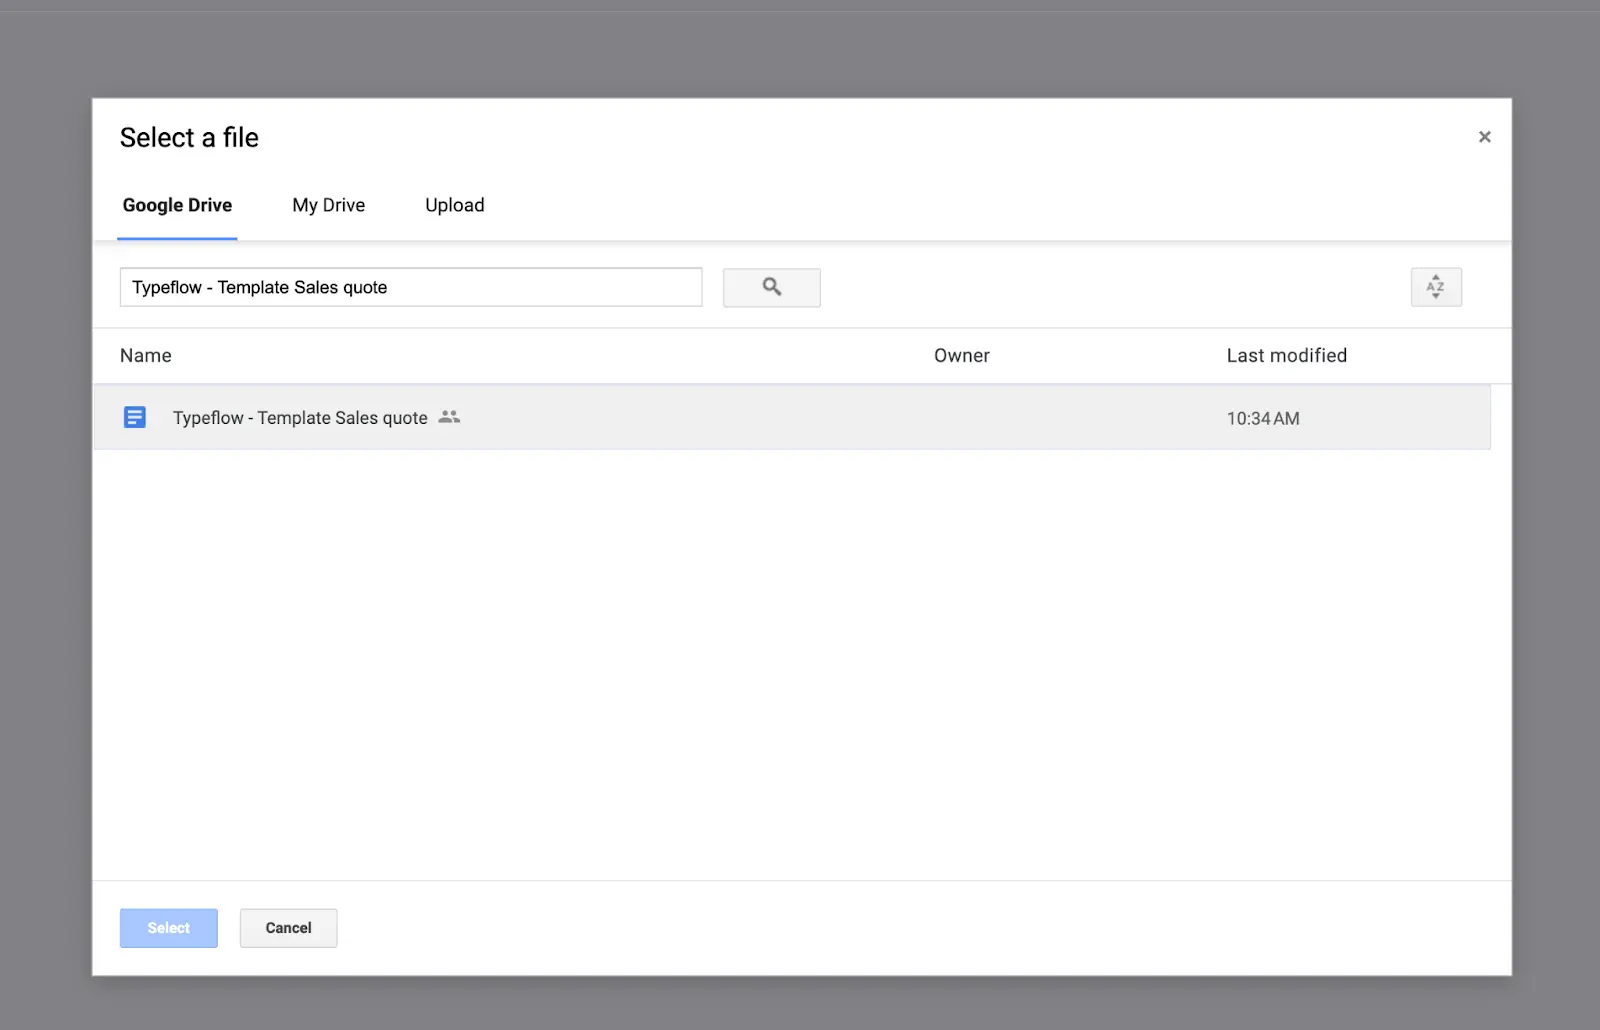
Select "Google Docs"
-
Pick your template
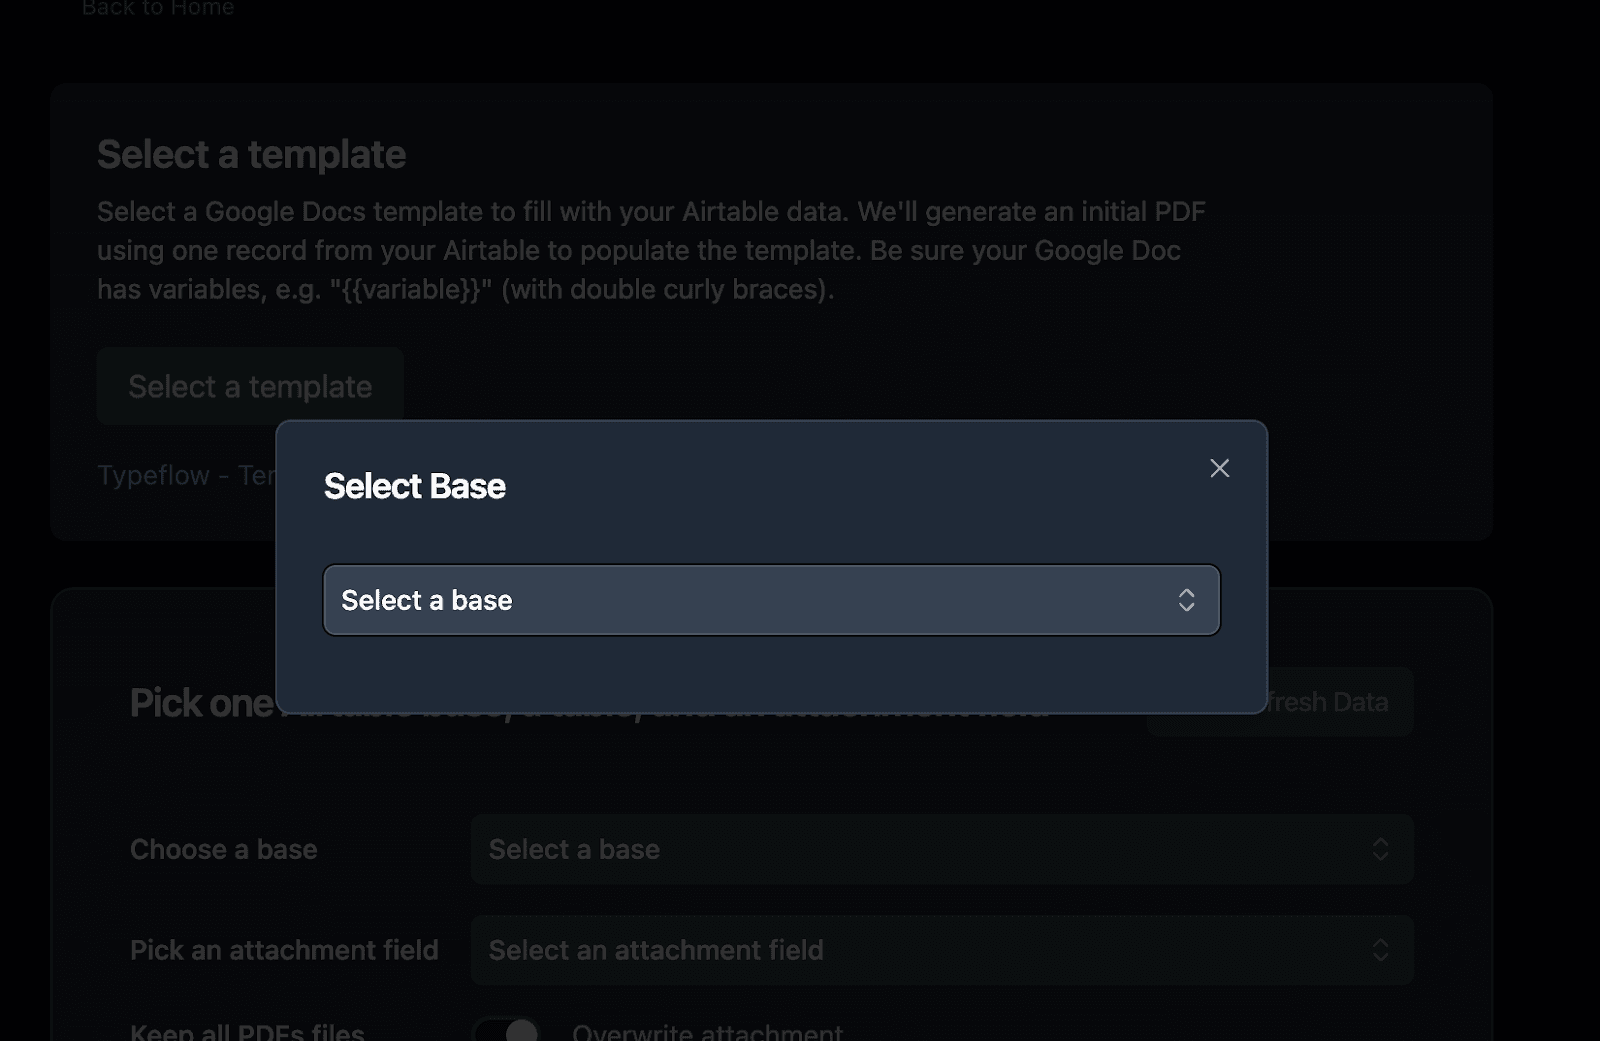
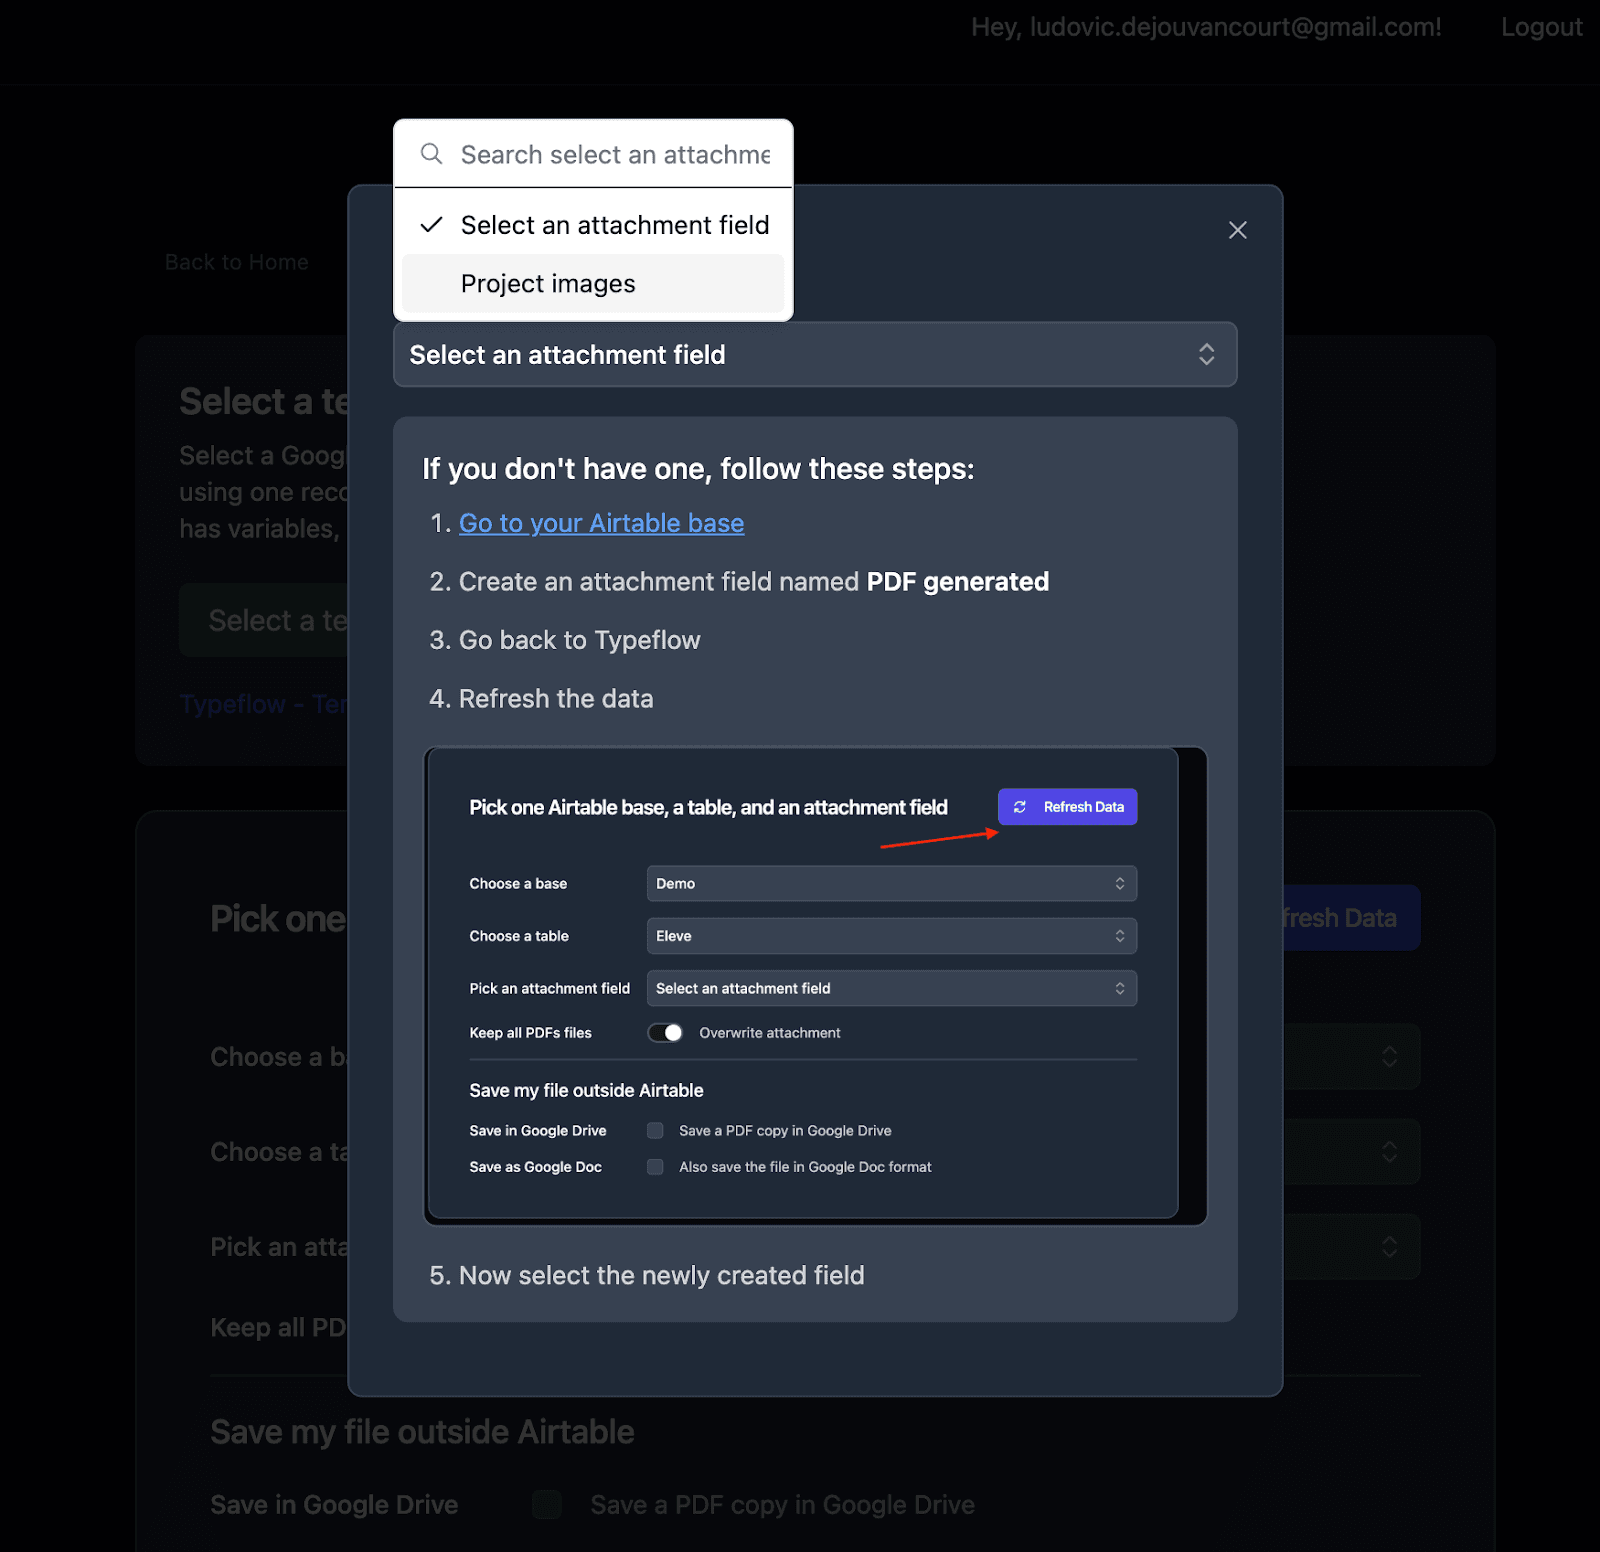
Now connect TypeFlow to your Airtable base:
- Select your Airtable base from the dropdown menu
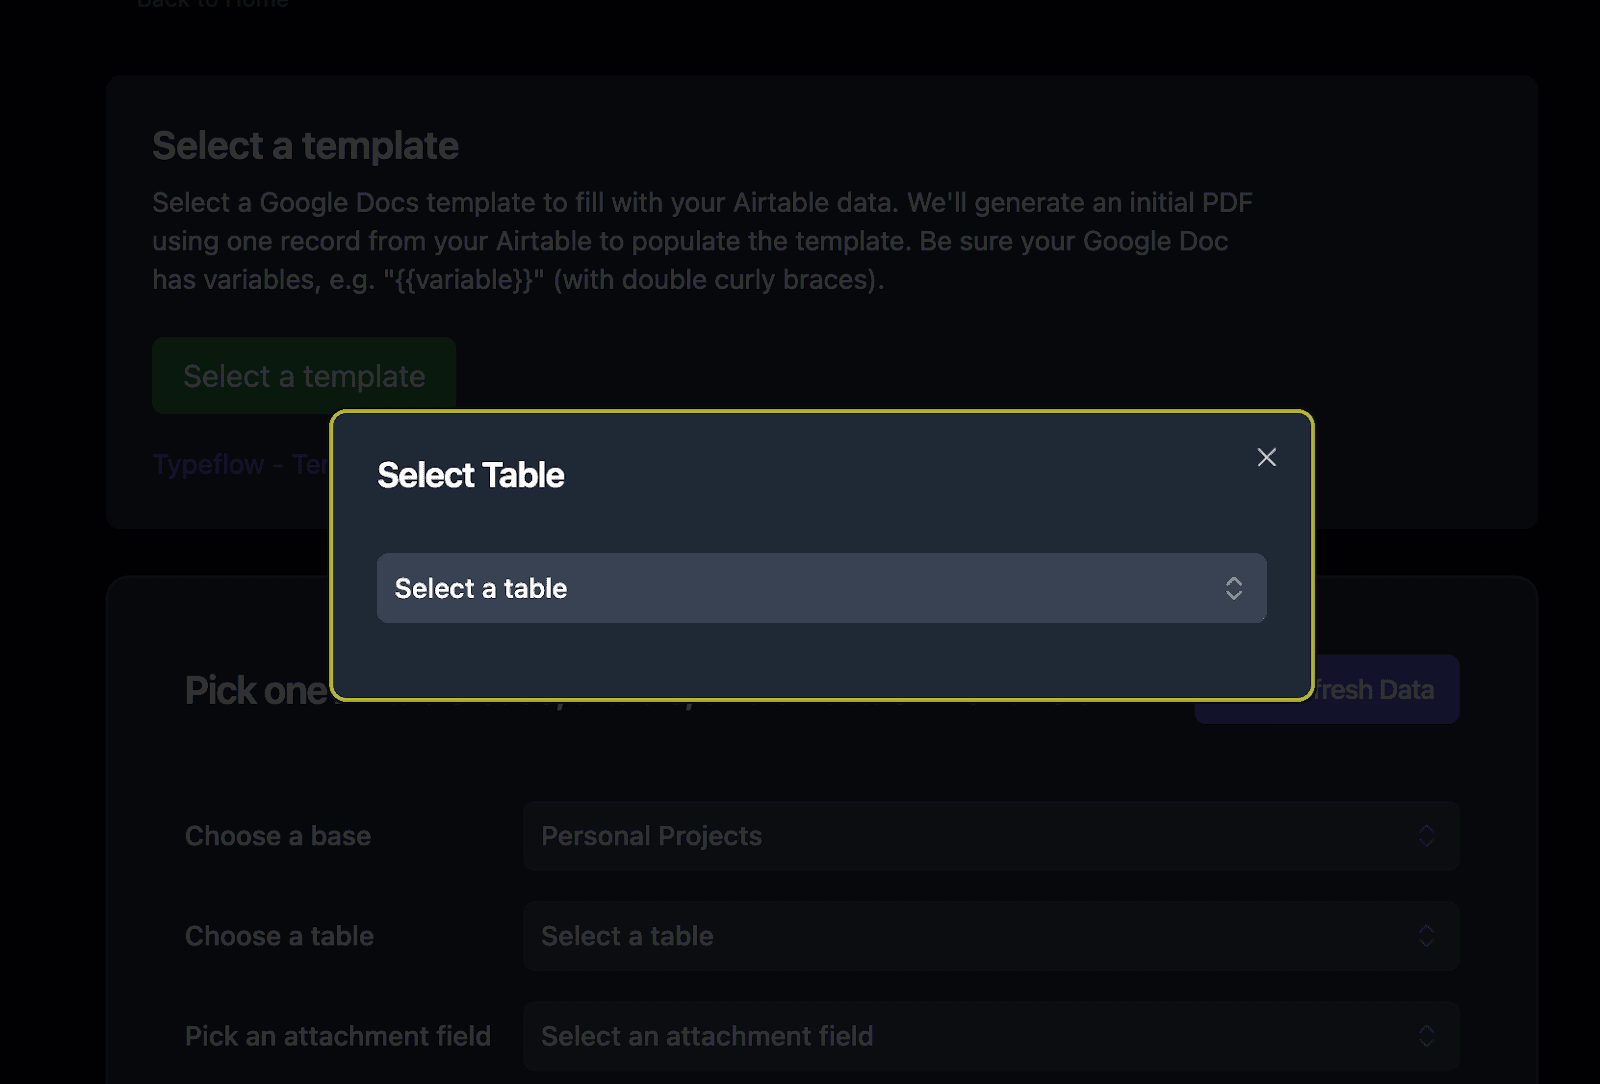
- Choose the specific table where you want to generate your PDF (in your case the Invoices table)
- Set up the attachment field where generated PDFs will be saved
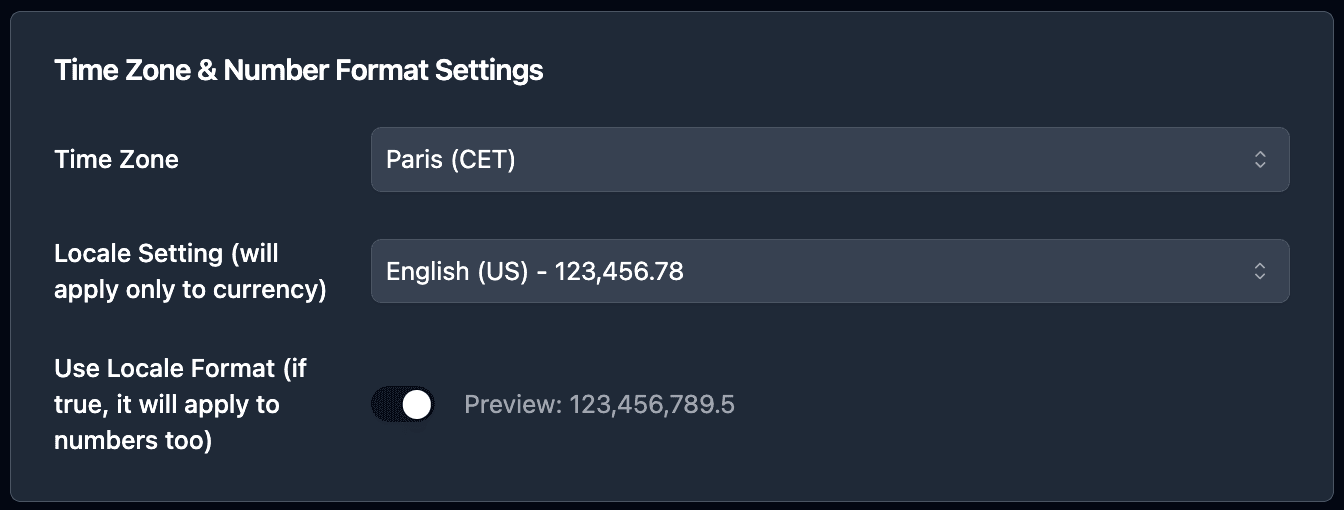
Pro Tip
If you want to adjust the currency formatting of your invoice, you can use adjust your locale settings and check the locale format. It will return the currency formatting of your locale.
- Map Airtable fields to your template variables
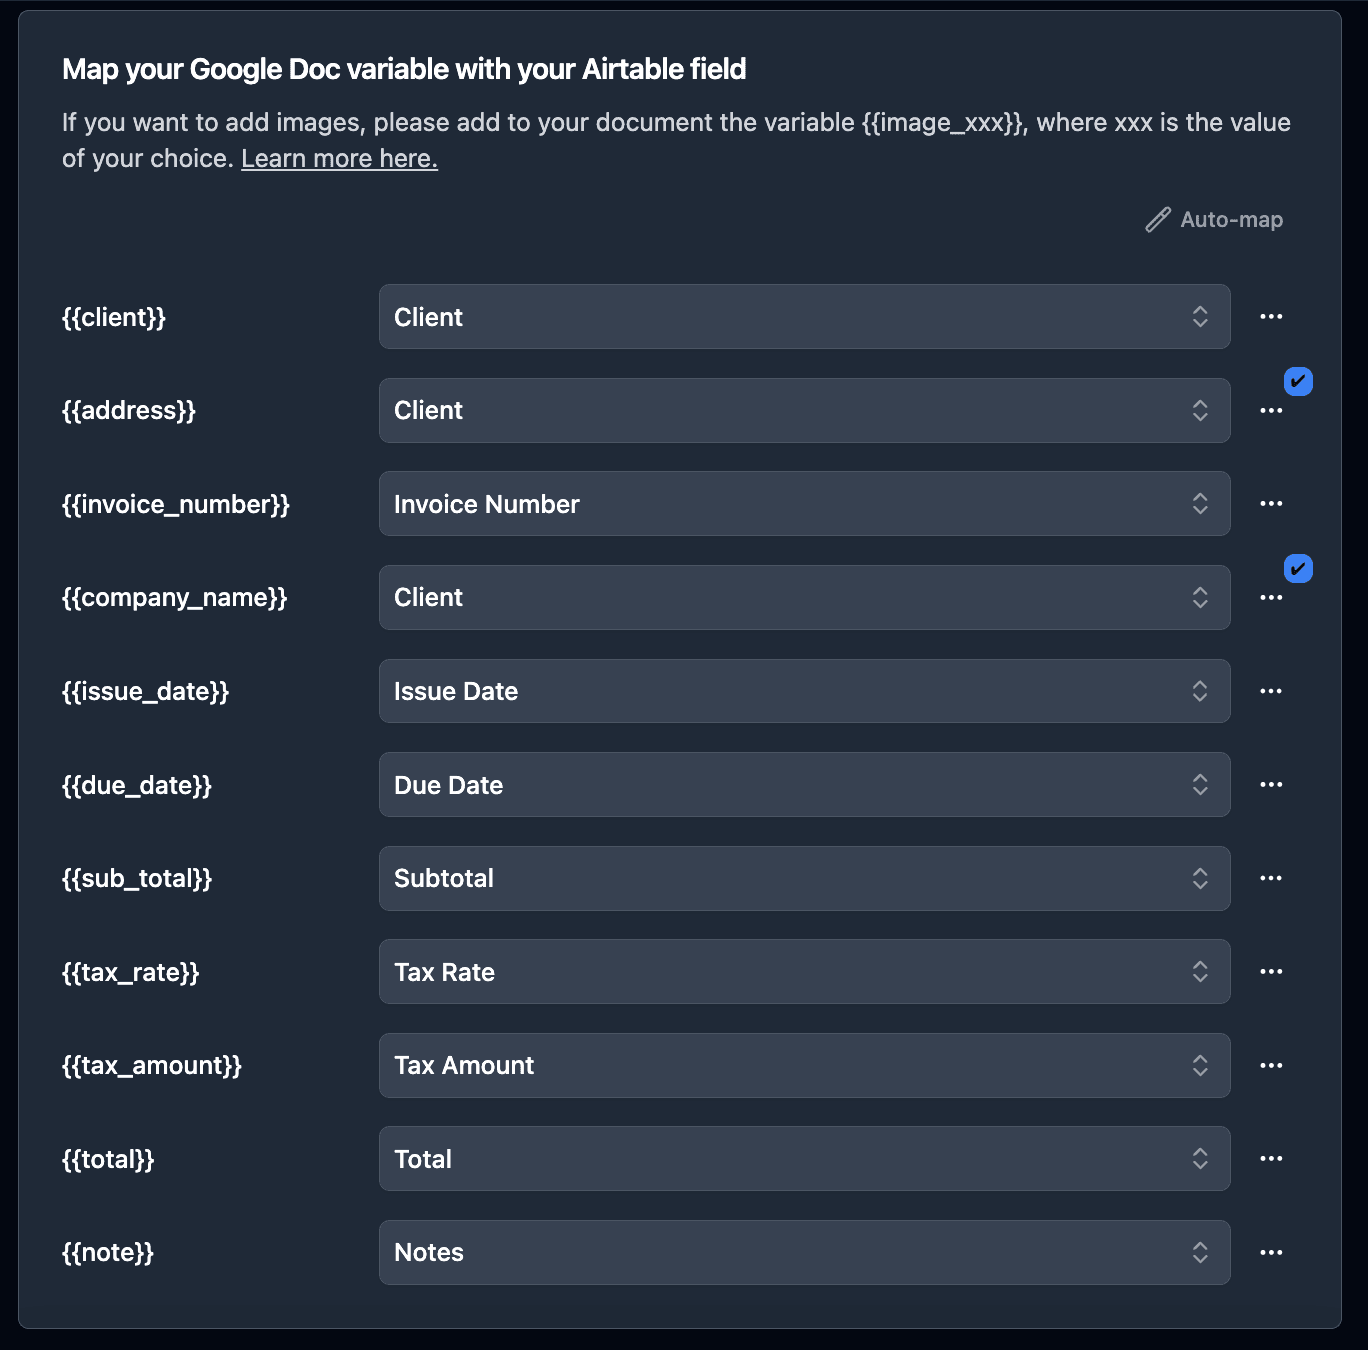
Pro Tip
No need to add rollup fields to have access to fields from another table!
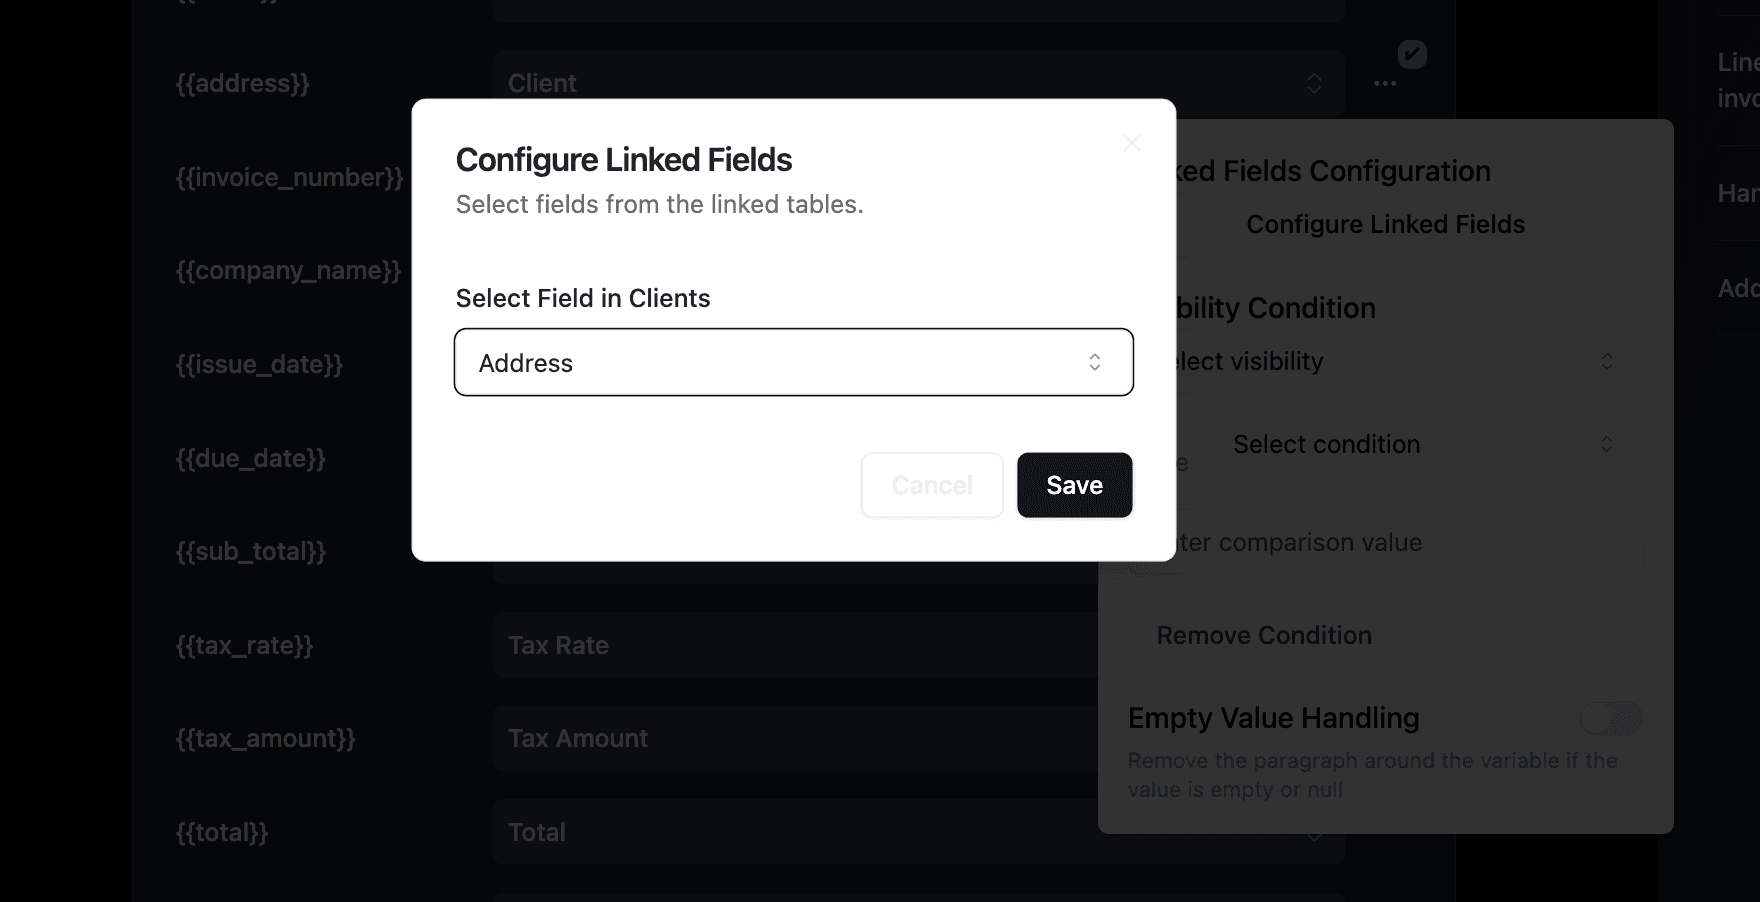
- Pick the linked record field from your main table
- Click the three dots and select "Configure Linked Fields"
- From there select the field you want to access
And if you need to access a field from a lower table, you can do the same process!
- For the line items, select your linked Line Items field
-
Identify any attachment fields you want to include
-
Verify field accessibility and permissions
-
Optionally set a custom filename format like "Invoice-
{{Invoice_Number}}-{{Client_Name}}"
Pro Tip
Test your template with a few records to ensure proper mapping, before moving forward.
Configure Output Actions (Email, Save PDF)
Your core output is the generated PDF saved into an Airtable attachment field. From there, you can trigger follow-up steps like emailing the invoice and updating the invoice status.
How to Trigger Invoice Generation
Once your workflow is configured, you have two ways to generate invoices. Choose the method that best fits your desire for manual control versus full automation.
Method 1: Button-Triggered Invoice Generation
Use this method for manual control over when an invoice is generated. It's perfect for reviewing invoices before sending.
-
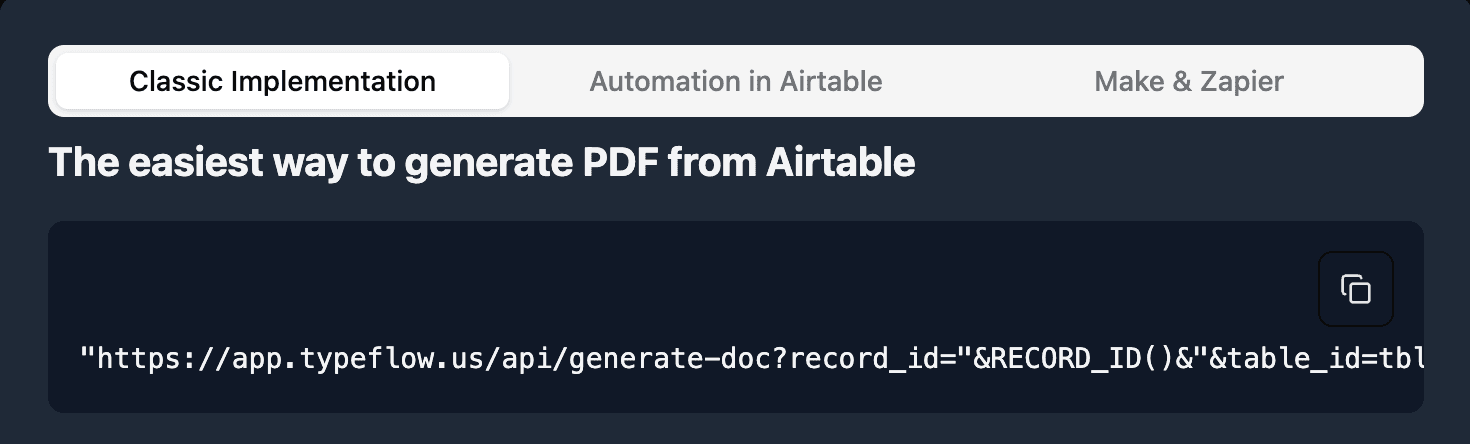
In TypeFlow scroll to the bottom of the page and click on "Classic Implementation"
-
Copy the URL, it should look like this:
"https://app.typeflow.us/api/generate-doc?record_id="&RECORD_ID()&"&table_id=xxx&flow_id=xxx"
- Go to your Airtable table
Invoicesand add a new button field

- Paste the URL from TypeFlow to the URL Formula
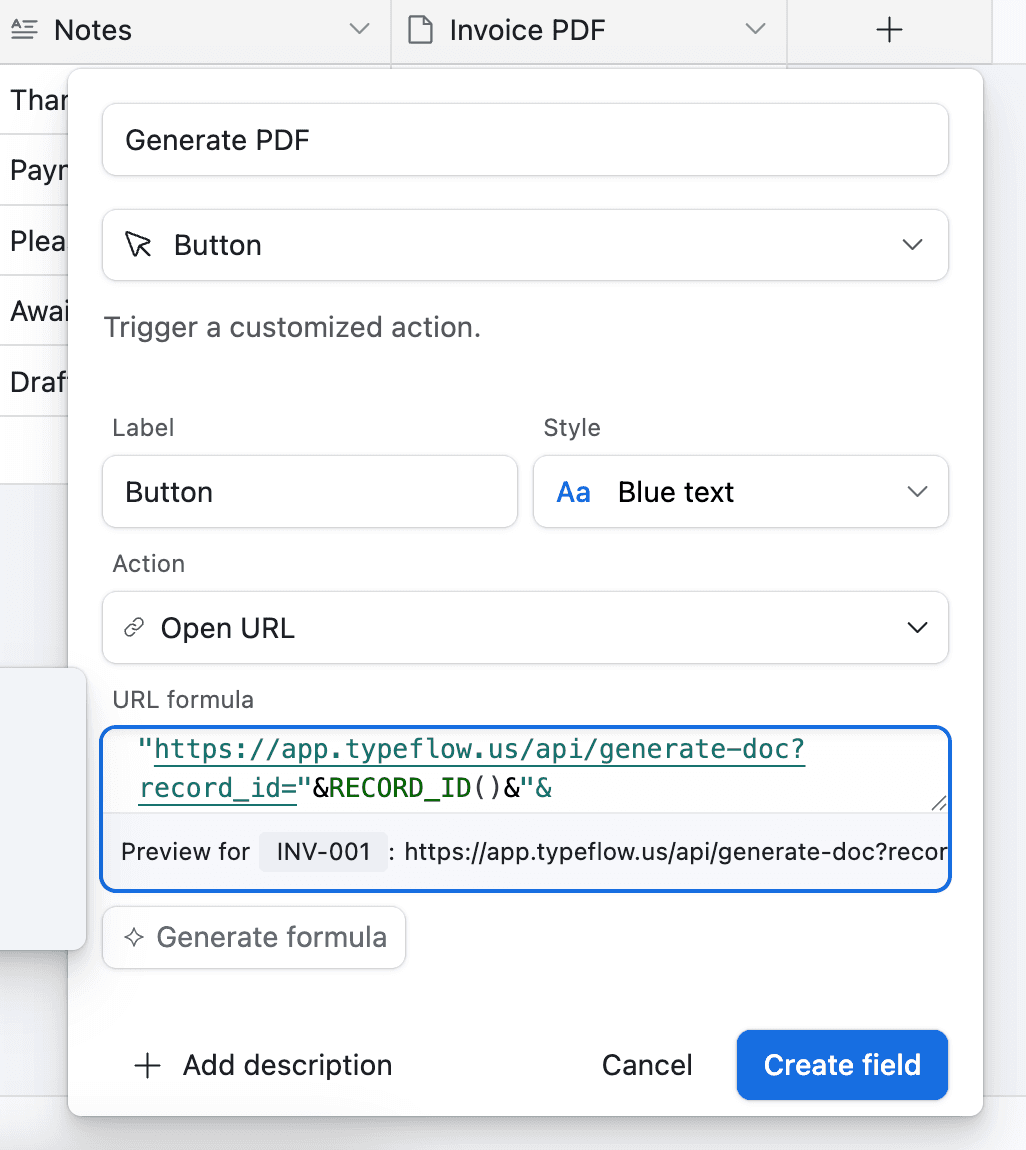
Now whenever you want to generate an invoice, you can click the button in Airtable and it will generate the PDF for you.
Method 2: Fully Automated Invoice Generation
This method removes all manual work, generating invoices automatically based on conditions you set. It requires a paid Airtable plan for Airtable Automations or a tool like Make.com.
In this example, we'll trigger the automation when an invoice's status is changed to "Ready."
-
Go to Automation in Airtable
-
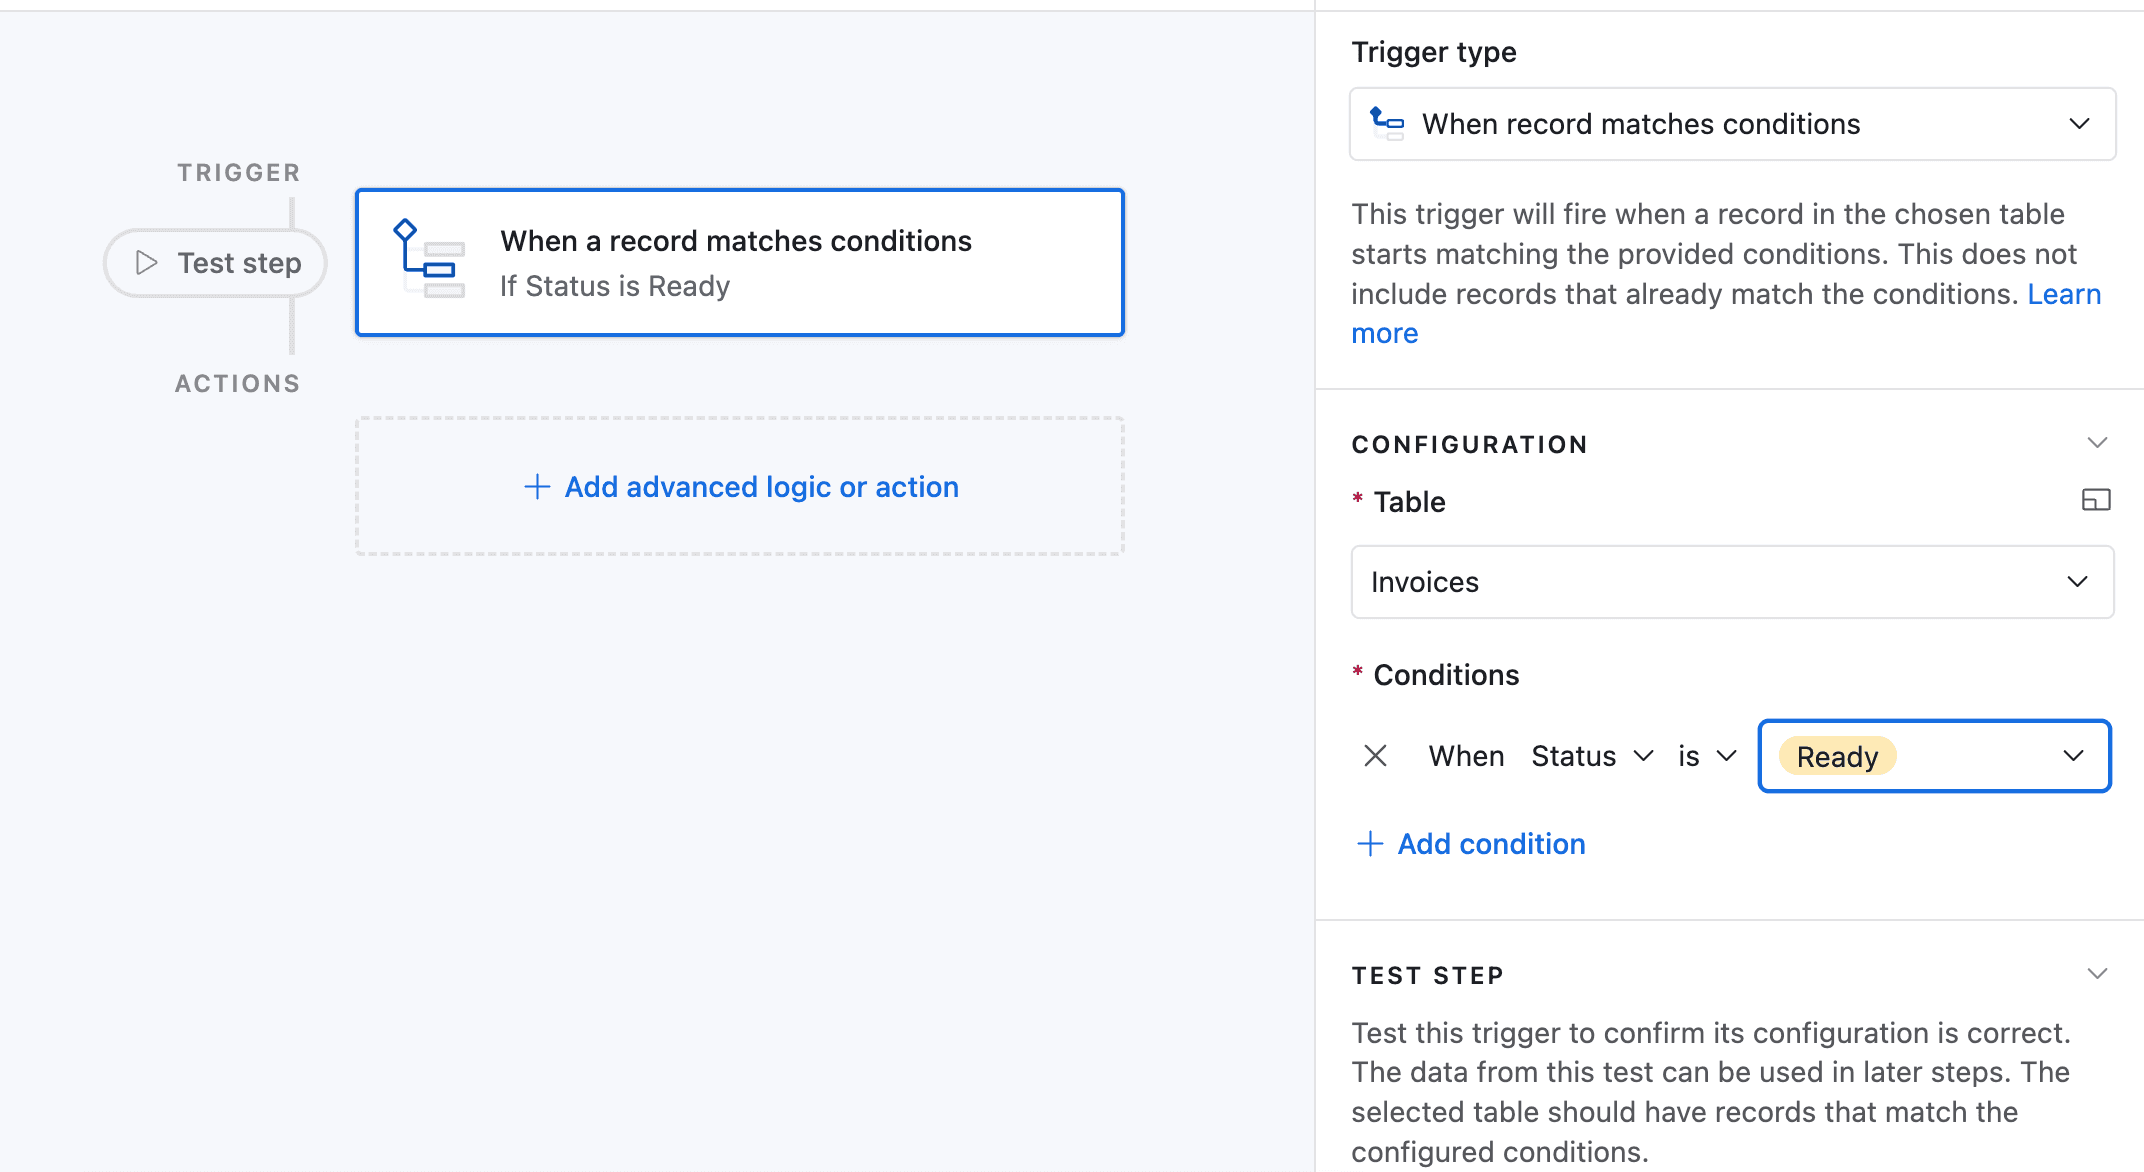
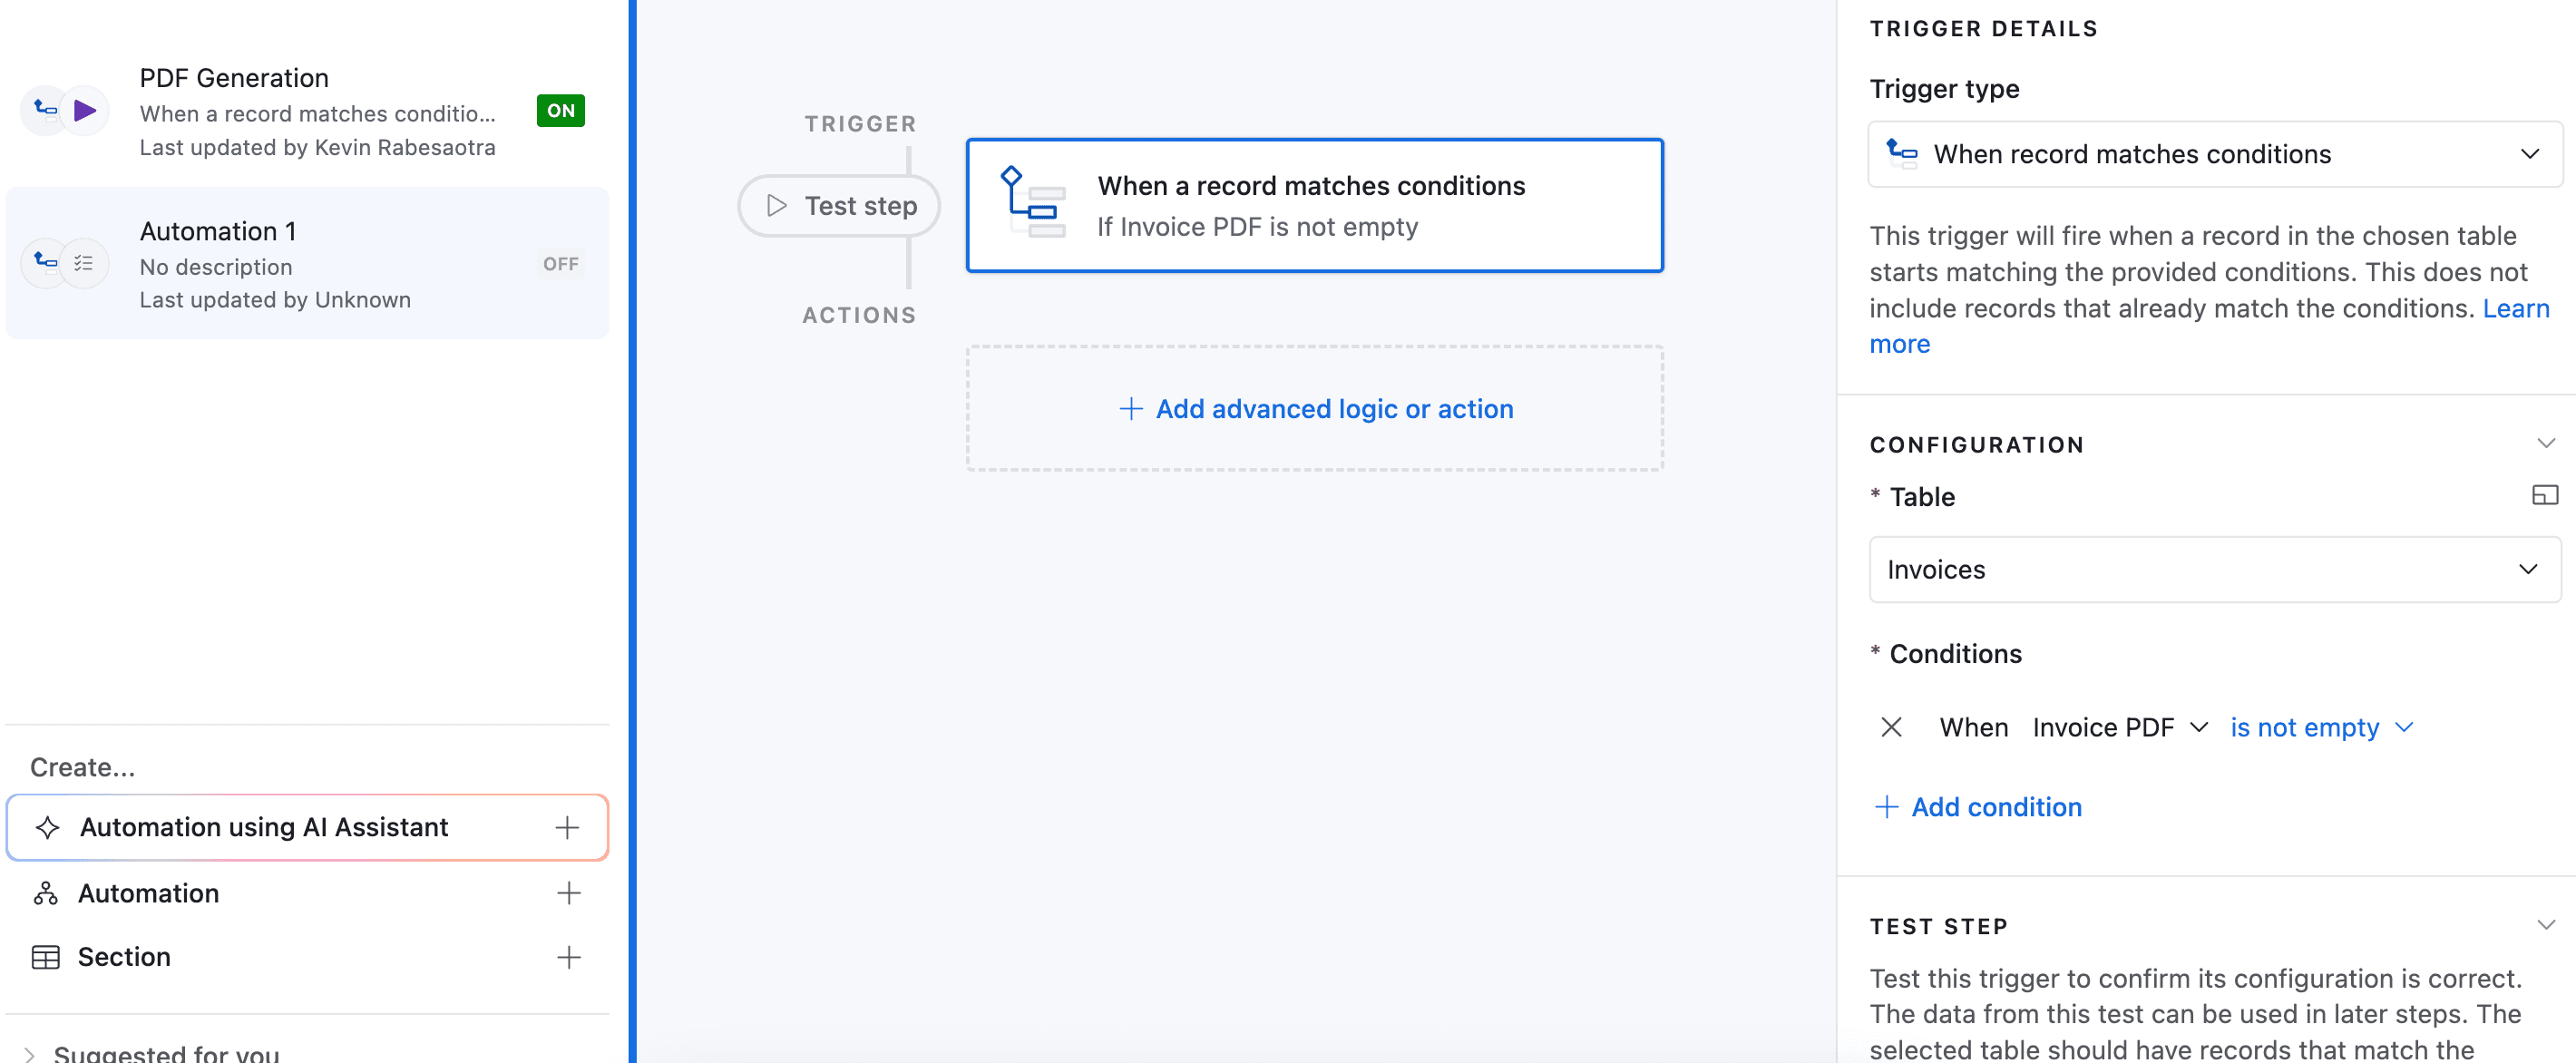
Click on "Add a trigger" and Choose When a Record matches a condition
-
Select the table you want to trigger the automation on (in this case the Invoices table)
-
Select the field you want to trigger the automation on (in this case the Status field)
-
Select the condition you want to trigger the automation on (in this case "is")
-
Select the value you want to trigger the automation on (in this case "Ready")
-
Now choose a record that matches the condition
-
Now click on Add an advanced logic or action
-
Pick Run Script. A new popup appears.
-
Go back to TypeFlow and select Automation in Airtable. Copy the script.
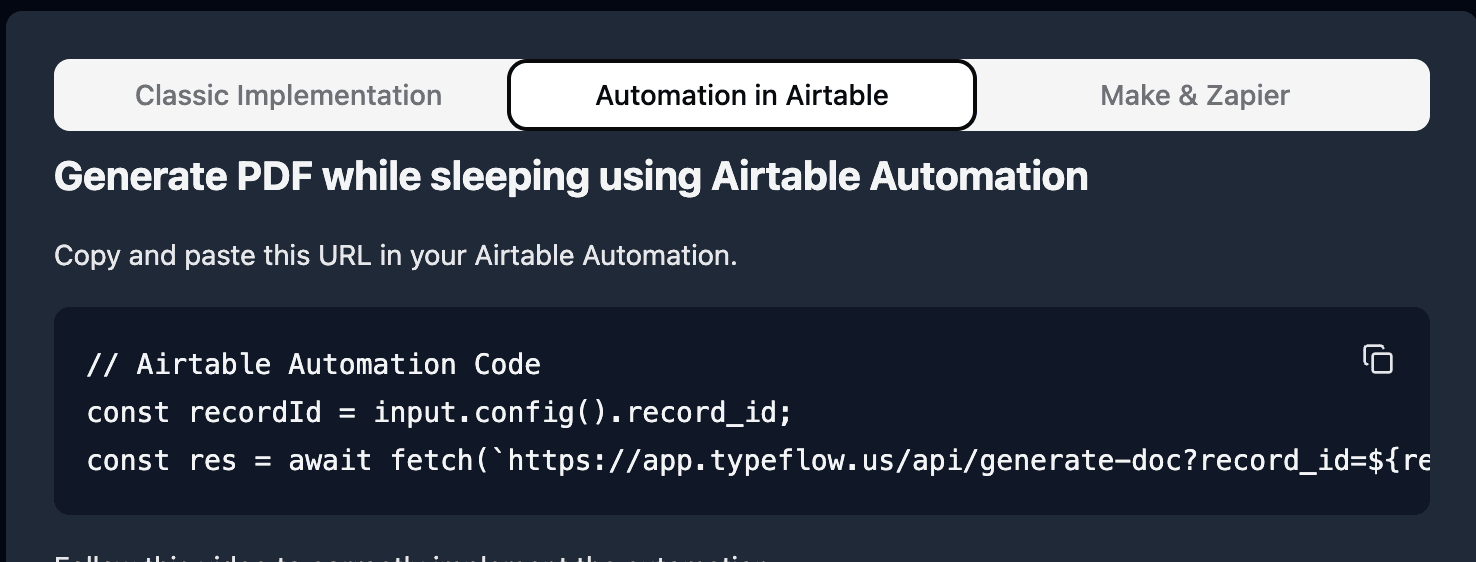
- Paste the script in the popup.
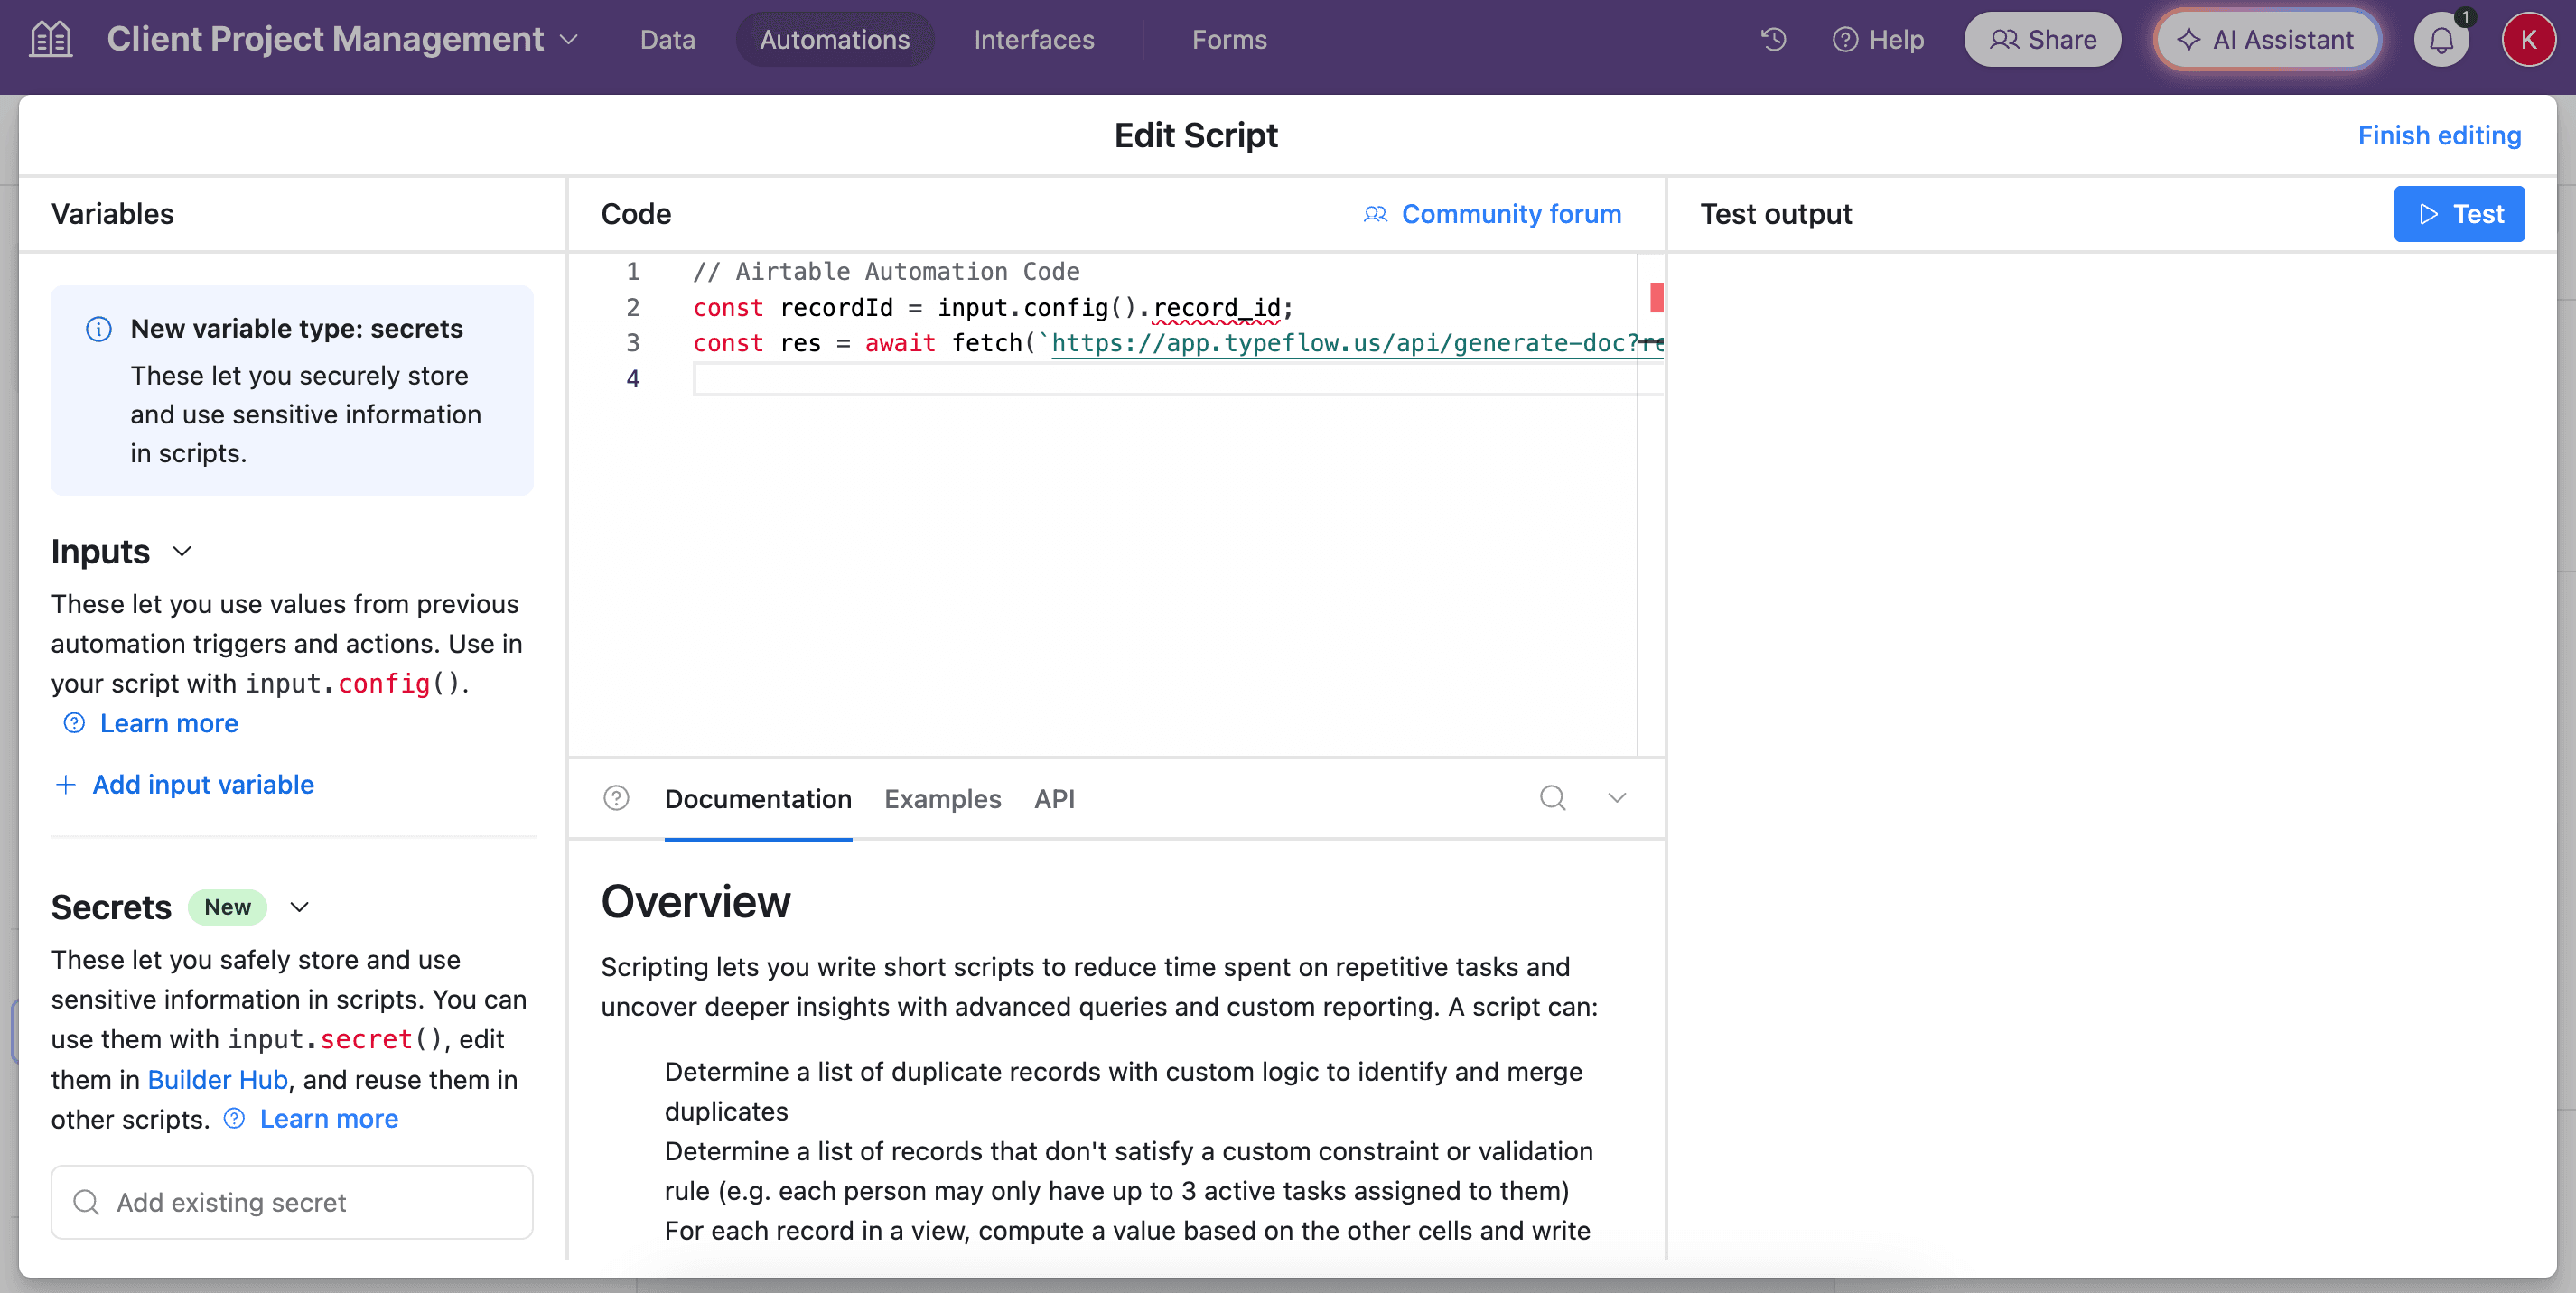
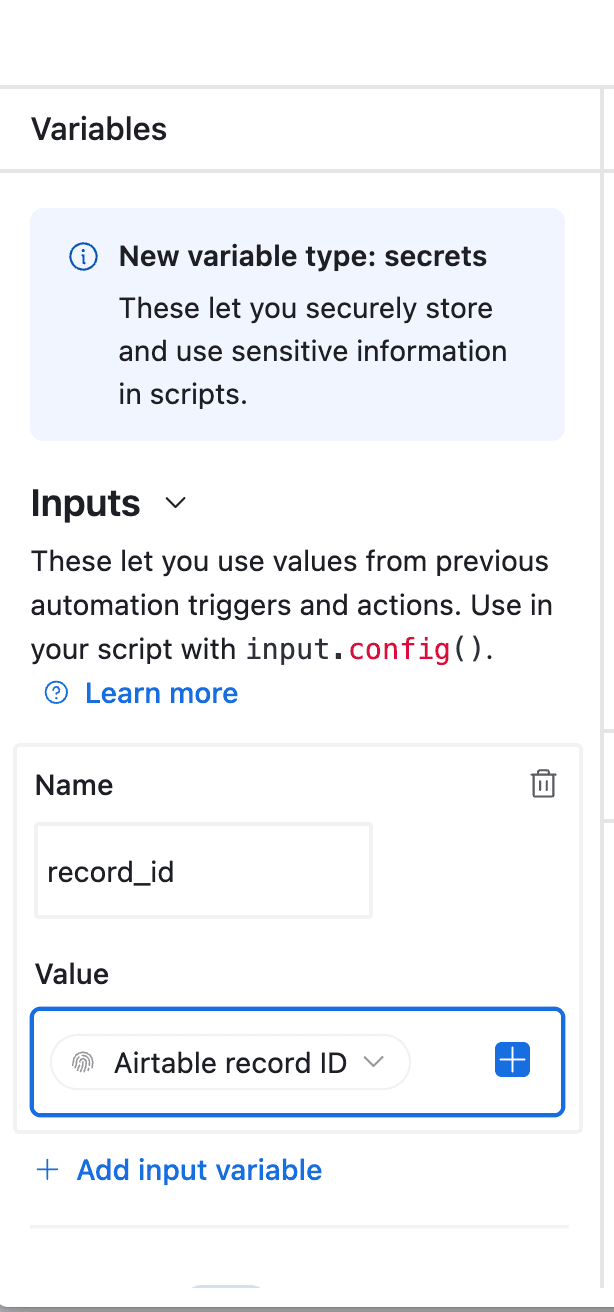
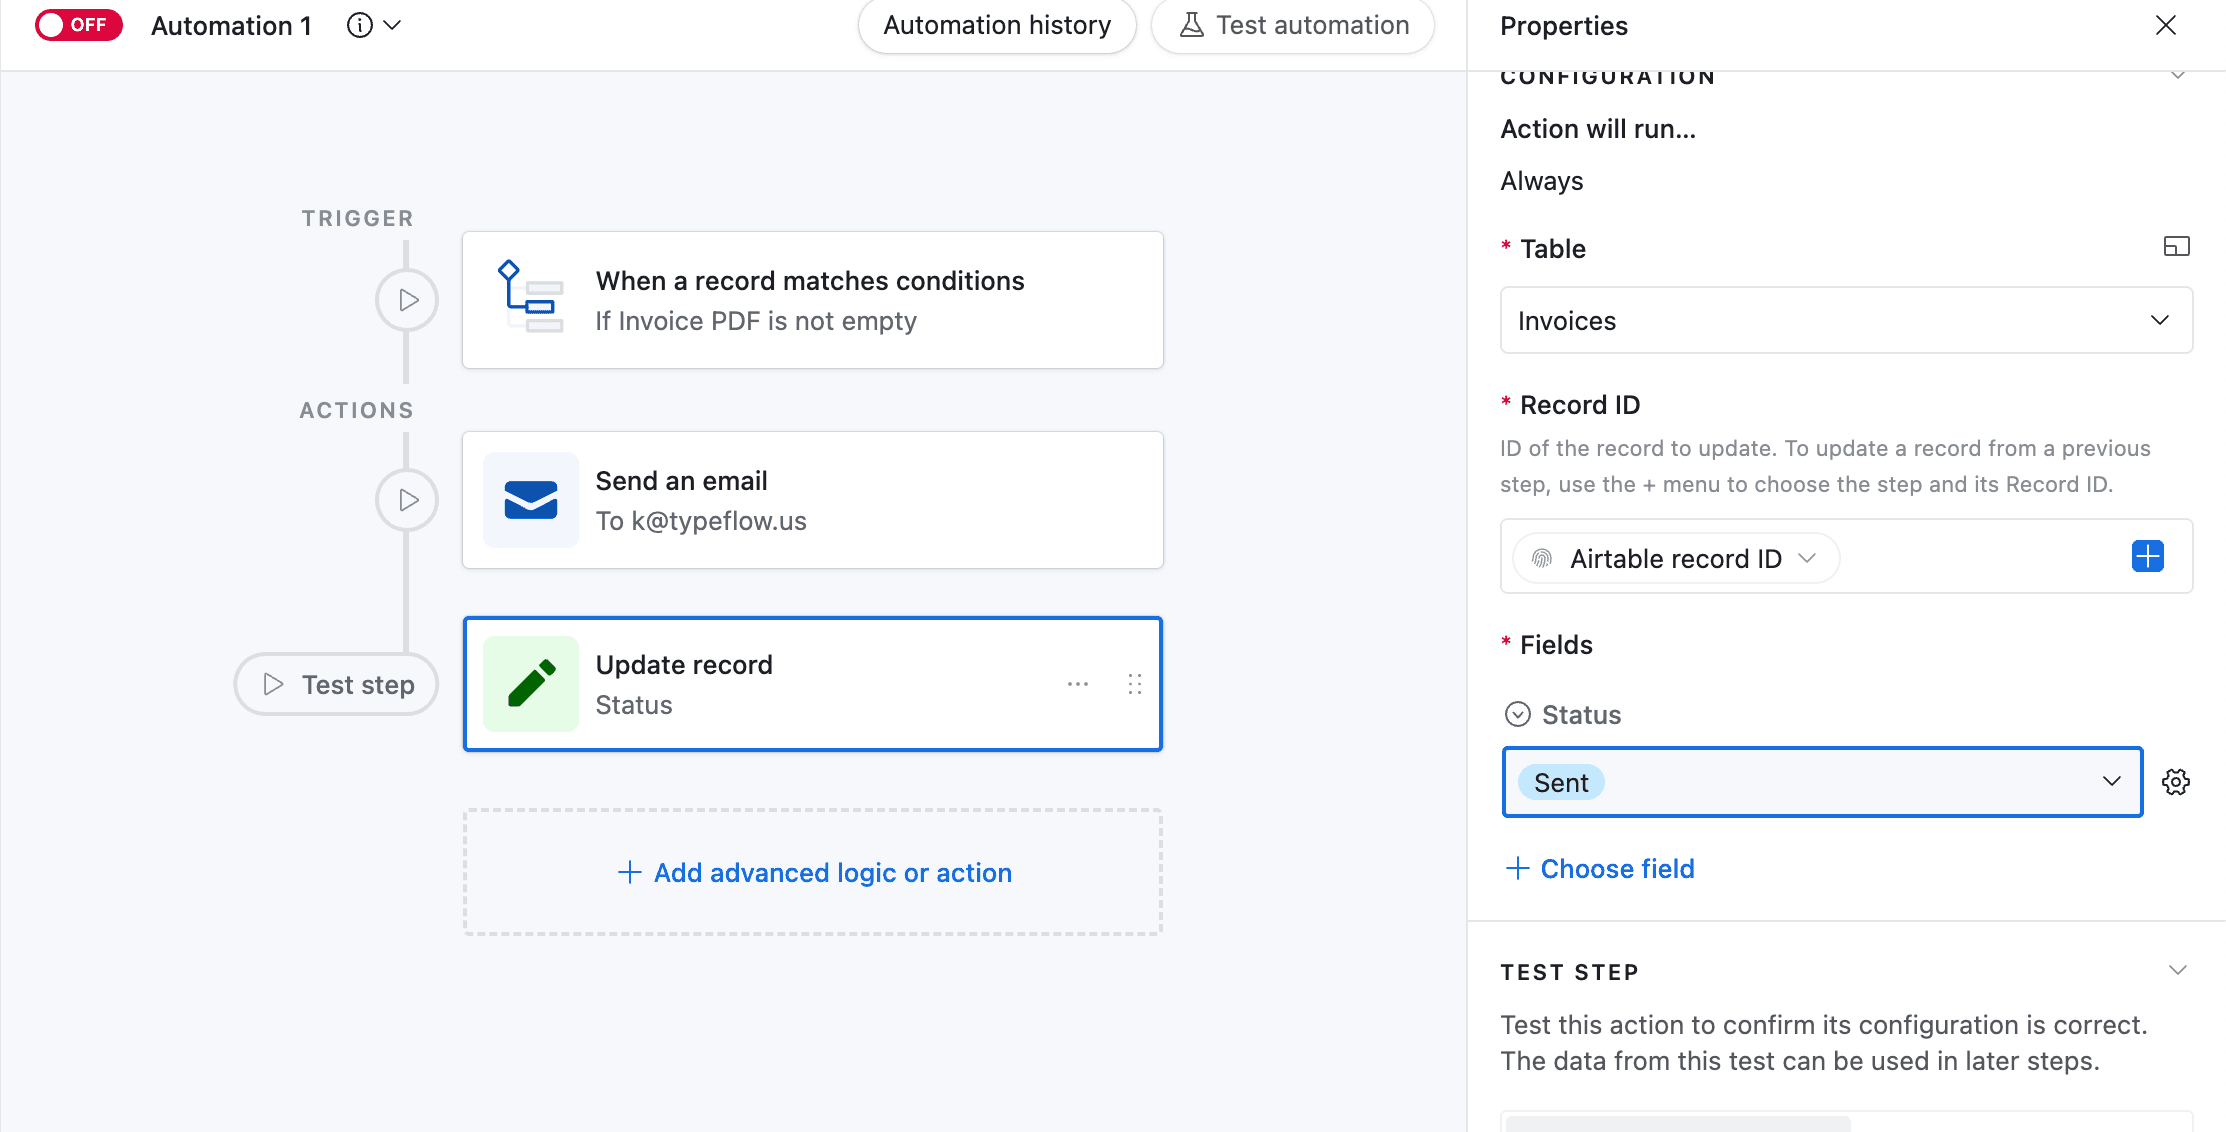
- In the left-side of the popup, do not forget to configure the variable input, record_id. You need to select Airtable Record ID from the dropdown. See the image.
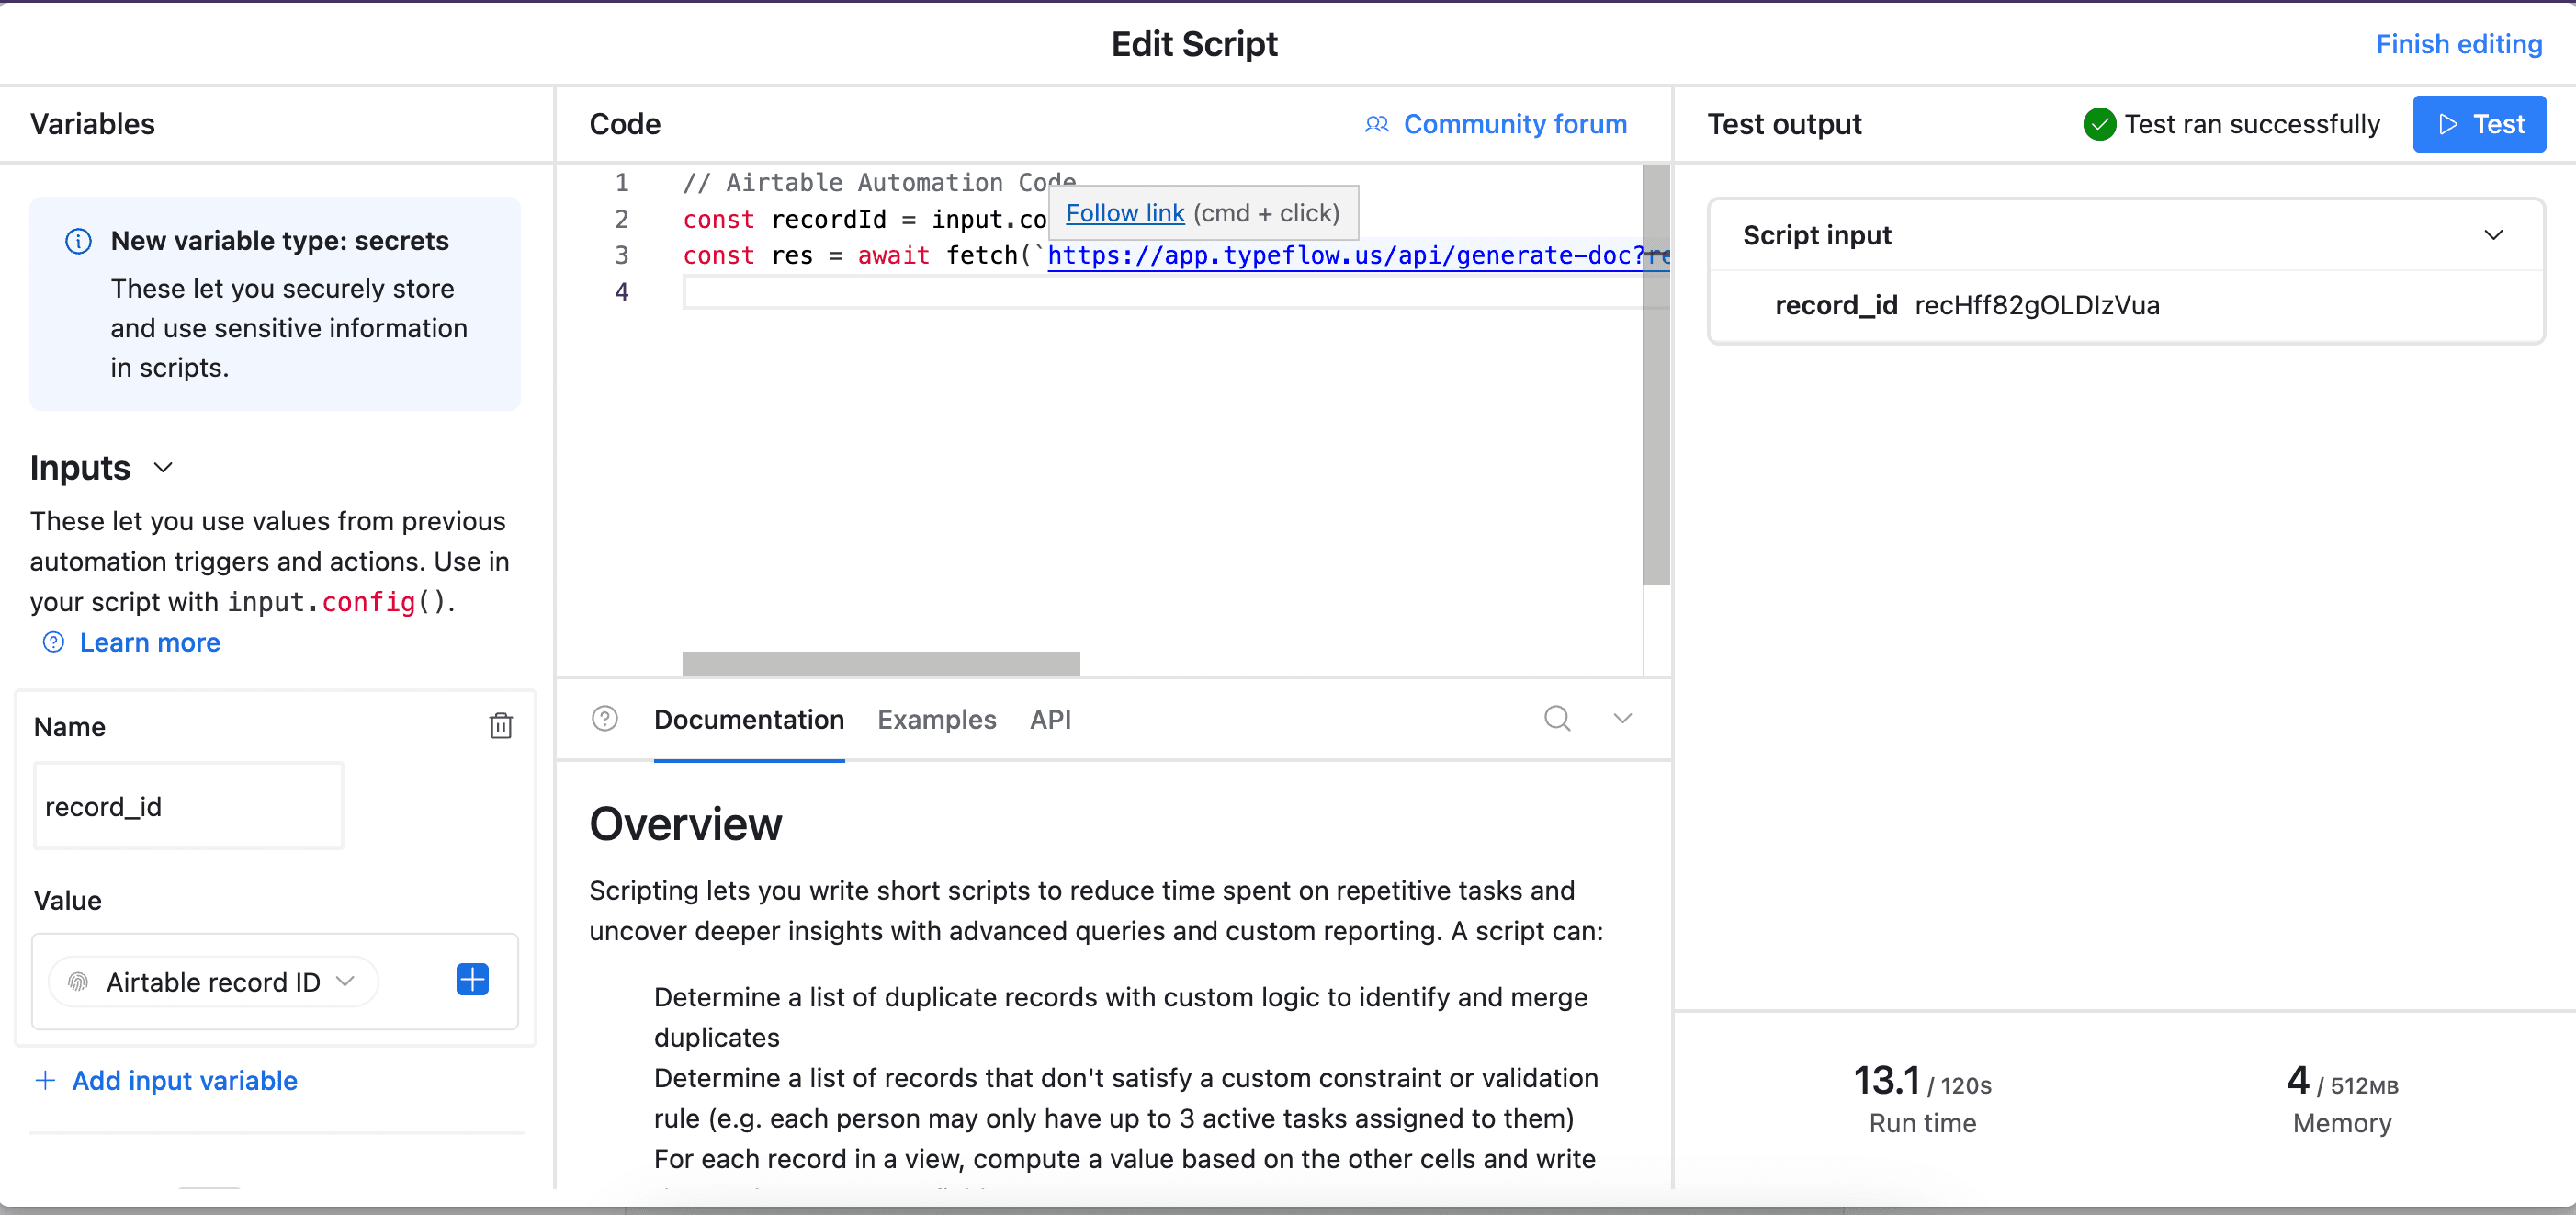
- Test your script, and see if it works. Adjust if needed (most of the time the error comes from the record_id variable - see step 12).
-
Now name your automation and save it.
-
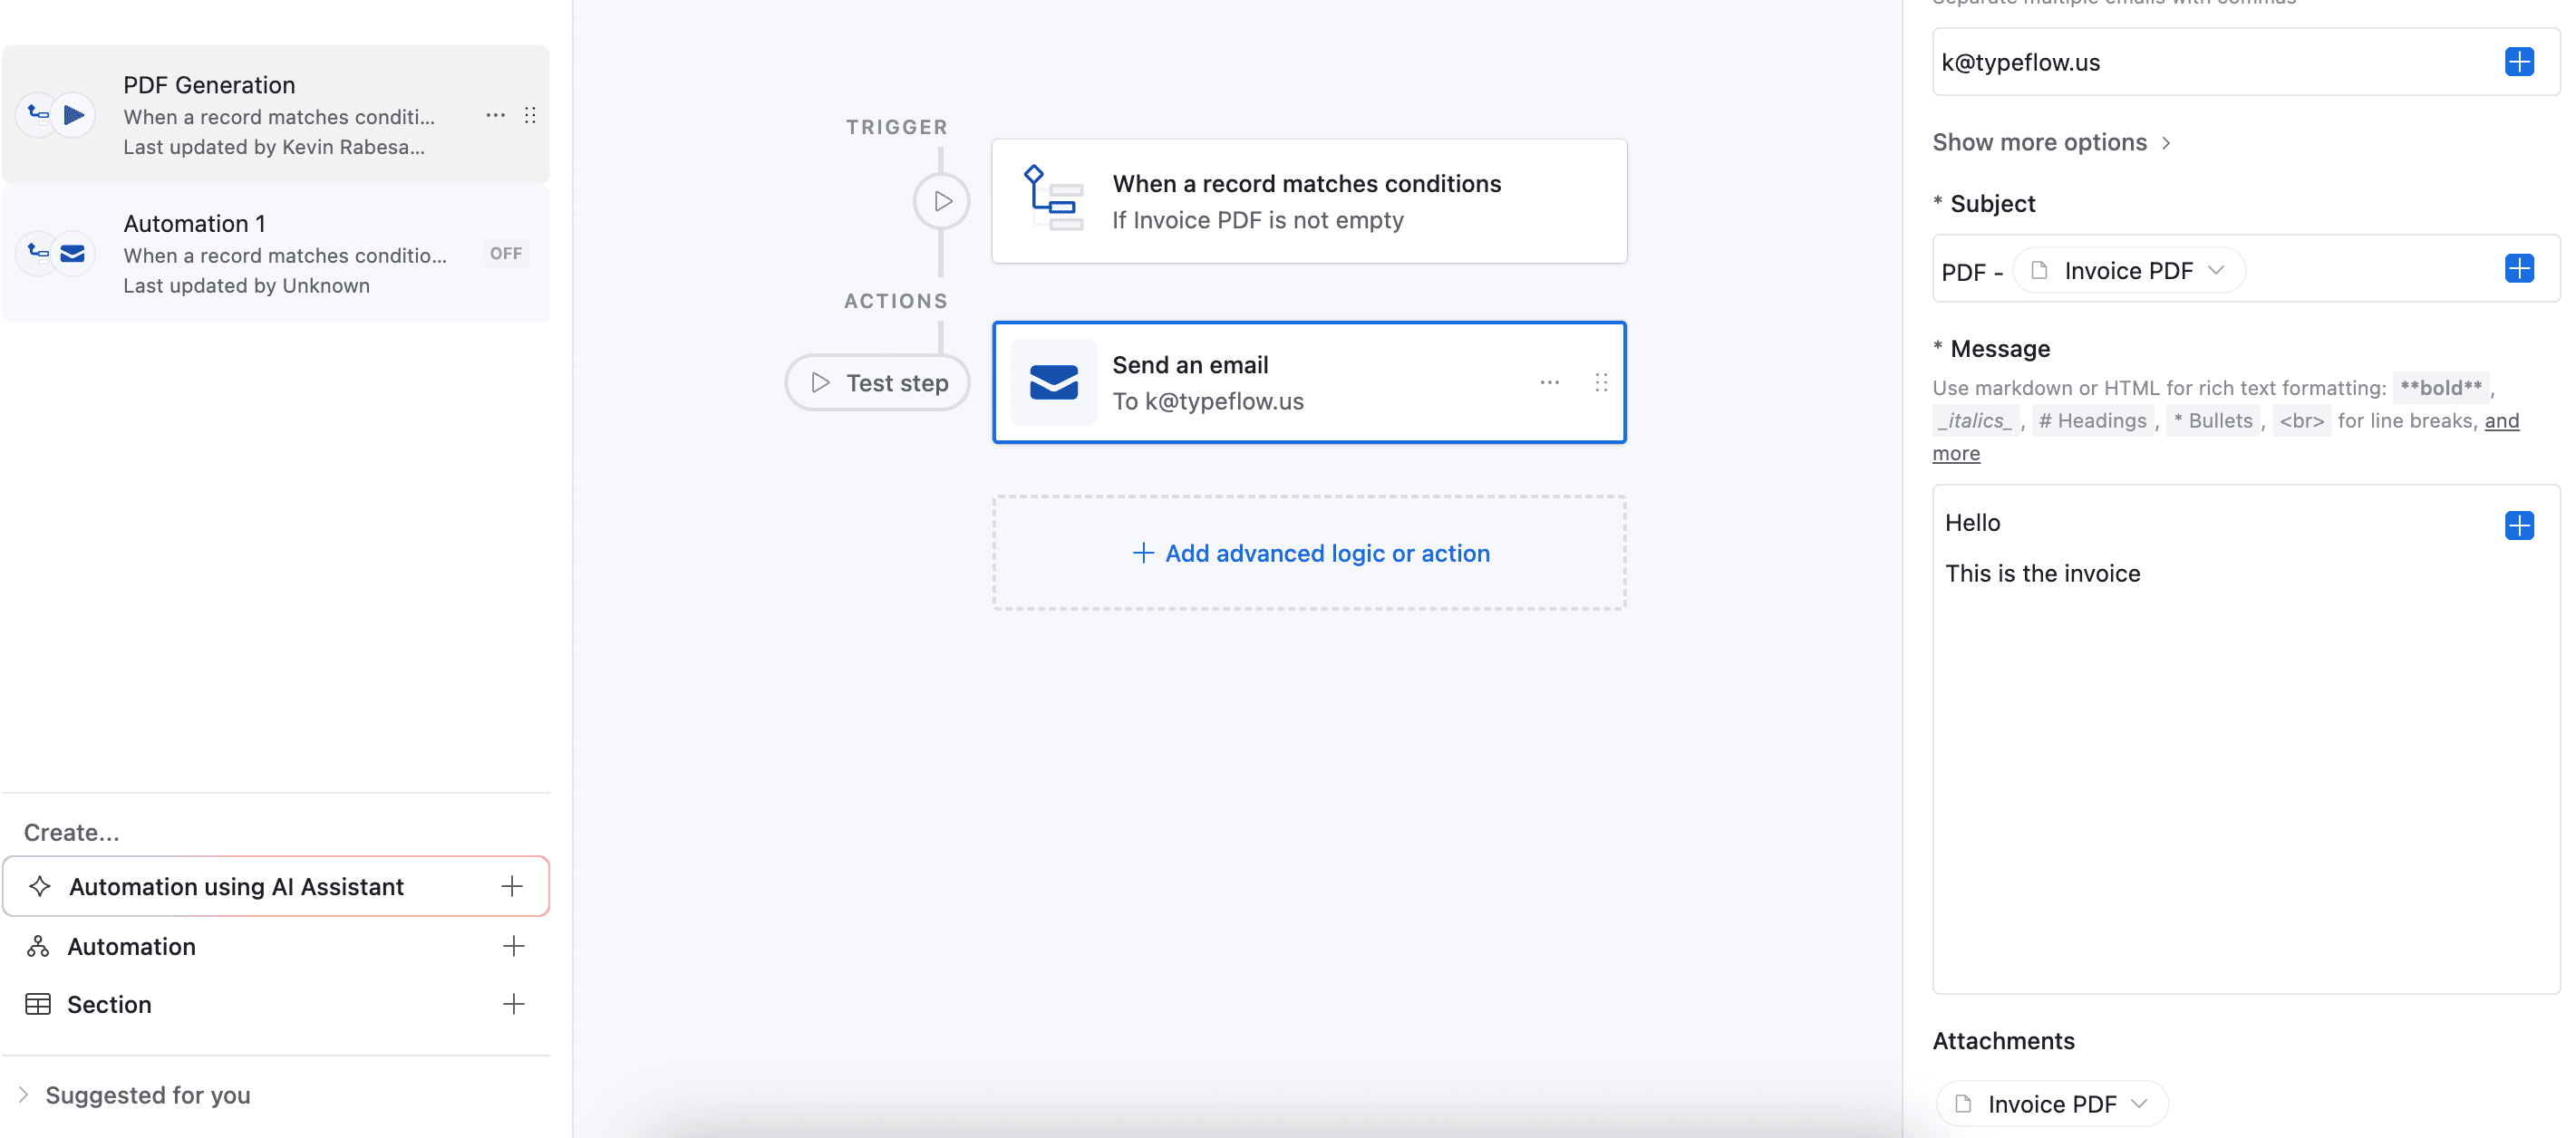
Create a new automation, we will use it to send the PDF to the client.
-
Add a trigger. We will use the When a Record matches a condition trigger.
-
This time, the trigger is when the Invoice PDF is generated.
Pro Tip
Do not necessarily reproduce this trigger. Always try to find the best trigger for your use case. Sending invoices to clients without double checking can be risky. Feel free to implement safeguard.
- Add another action, to send the PDF to the client via email.
-
Test your automation and make sure it works.
-
Add another step to update the status of the invoice to "Sent".
Now your flow is ready. Test it carefully to see if it works well.
How to Track and Manage Invoice Status in Airtable
Generating an invoice is only half the battle. Use Airtable's features to track each invoice from creation to payment.
Here are a few powerful ways to manage your invoice status:
-
Status Field: Your 'Status' single-select field (e.g., Draft, Sent, Paid) is your command center. Keep it updated.
-
Filtered Views: Create views in your 'Invoices' table to see what matters most, such as 'Unpaid Invoices' or 'Overdue Invoices'.
-
Automated Reminders: Set up an Airtable Automation to send a reminder when an invoice becomes 'Overdue'.
-
Conditional Coloring: Apply color-coding to your 'Status' field to visually identify overdue (red) and paid (green) invoices instantly.
-
Interface Dashboards: Build a simple dashboard in Airtable Interfaces to get a high-level overview of key metrics like total amount overdue.
Best Practices for Airtable Invoice Automation
To ensure your invoicing system runs smoothly long-term, follow these key best practices.
Testing Your Automation
Before going live, always test your workflow thoroughly:
-
Start with 2-3 sample records to validate your template and data mapping
-
Check field mapping for accuracy, especially with formulas and linked records.
-
Ensure all dynamic content, like line items and dates, renders correctly.
Ongoing Maintenance
Keep your system healthy with these regular checks:
-
Consistent Naming: Use a clear naming convention for fields and tables to prevent your automation from breaking.
-
Workflow Organization: Use Airtable Views to organize invoices by status (e.g., 'Ready to Send', 'Overdue').
-
Regular Backups: Regularly back up your Airtable base using snapshots to protect your data.
-
Simple Documentation: Keep a brief document explaining how your automation works for your team.
-
Unique Invoice Numbers: Set up a numbering system that prevents duplicate invoice numbers.
-
Log Reviews: Periodically check your Airtable automation run history to catch any silent errors.
Troubleshooting Common Issues
If your automation isn't working as expected, check these common culprits:
-
Incorrect Data in PDF: Verify your placeholder names in the template match your Airtable field names exactly, including case.
-
Automation Not Triggering: Double-check that your trigger conditions in Airtable Automations perfectly match your test record's data.
-
PDF Not Attaching: Confirm the attachment field in your TypeFlow setup is correctly mapped to the attachment field in Airtable.
-
Line Items Not Looping: Ensure the special
{{loop_0}}variable is used correctly in your template and the linked record field is properly configured.
Pro Tip
Using Make for robust automation is a solid choice. Indeed, while Airtable automation is powerful, it is not as flexible as Make. Besides, it can fail from time to time in some situation like sending an email with an attachment field. Other alternatives include Zapier and n8n.
TypeFlow Pricing
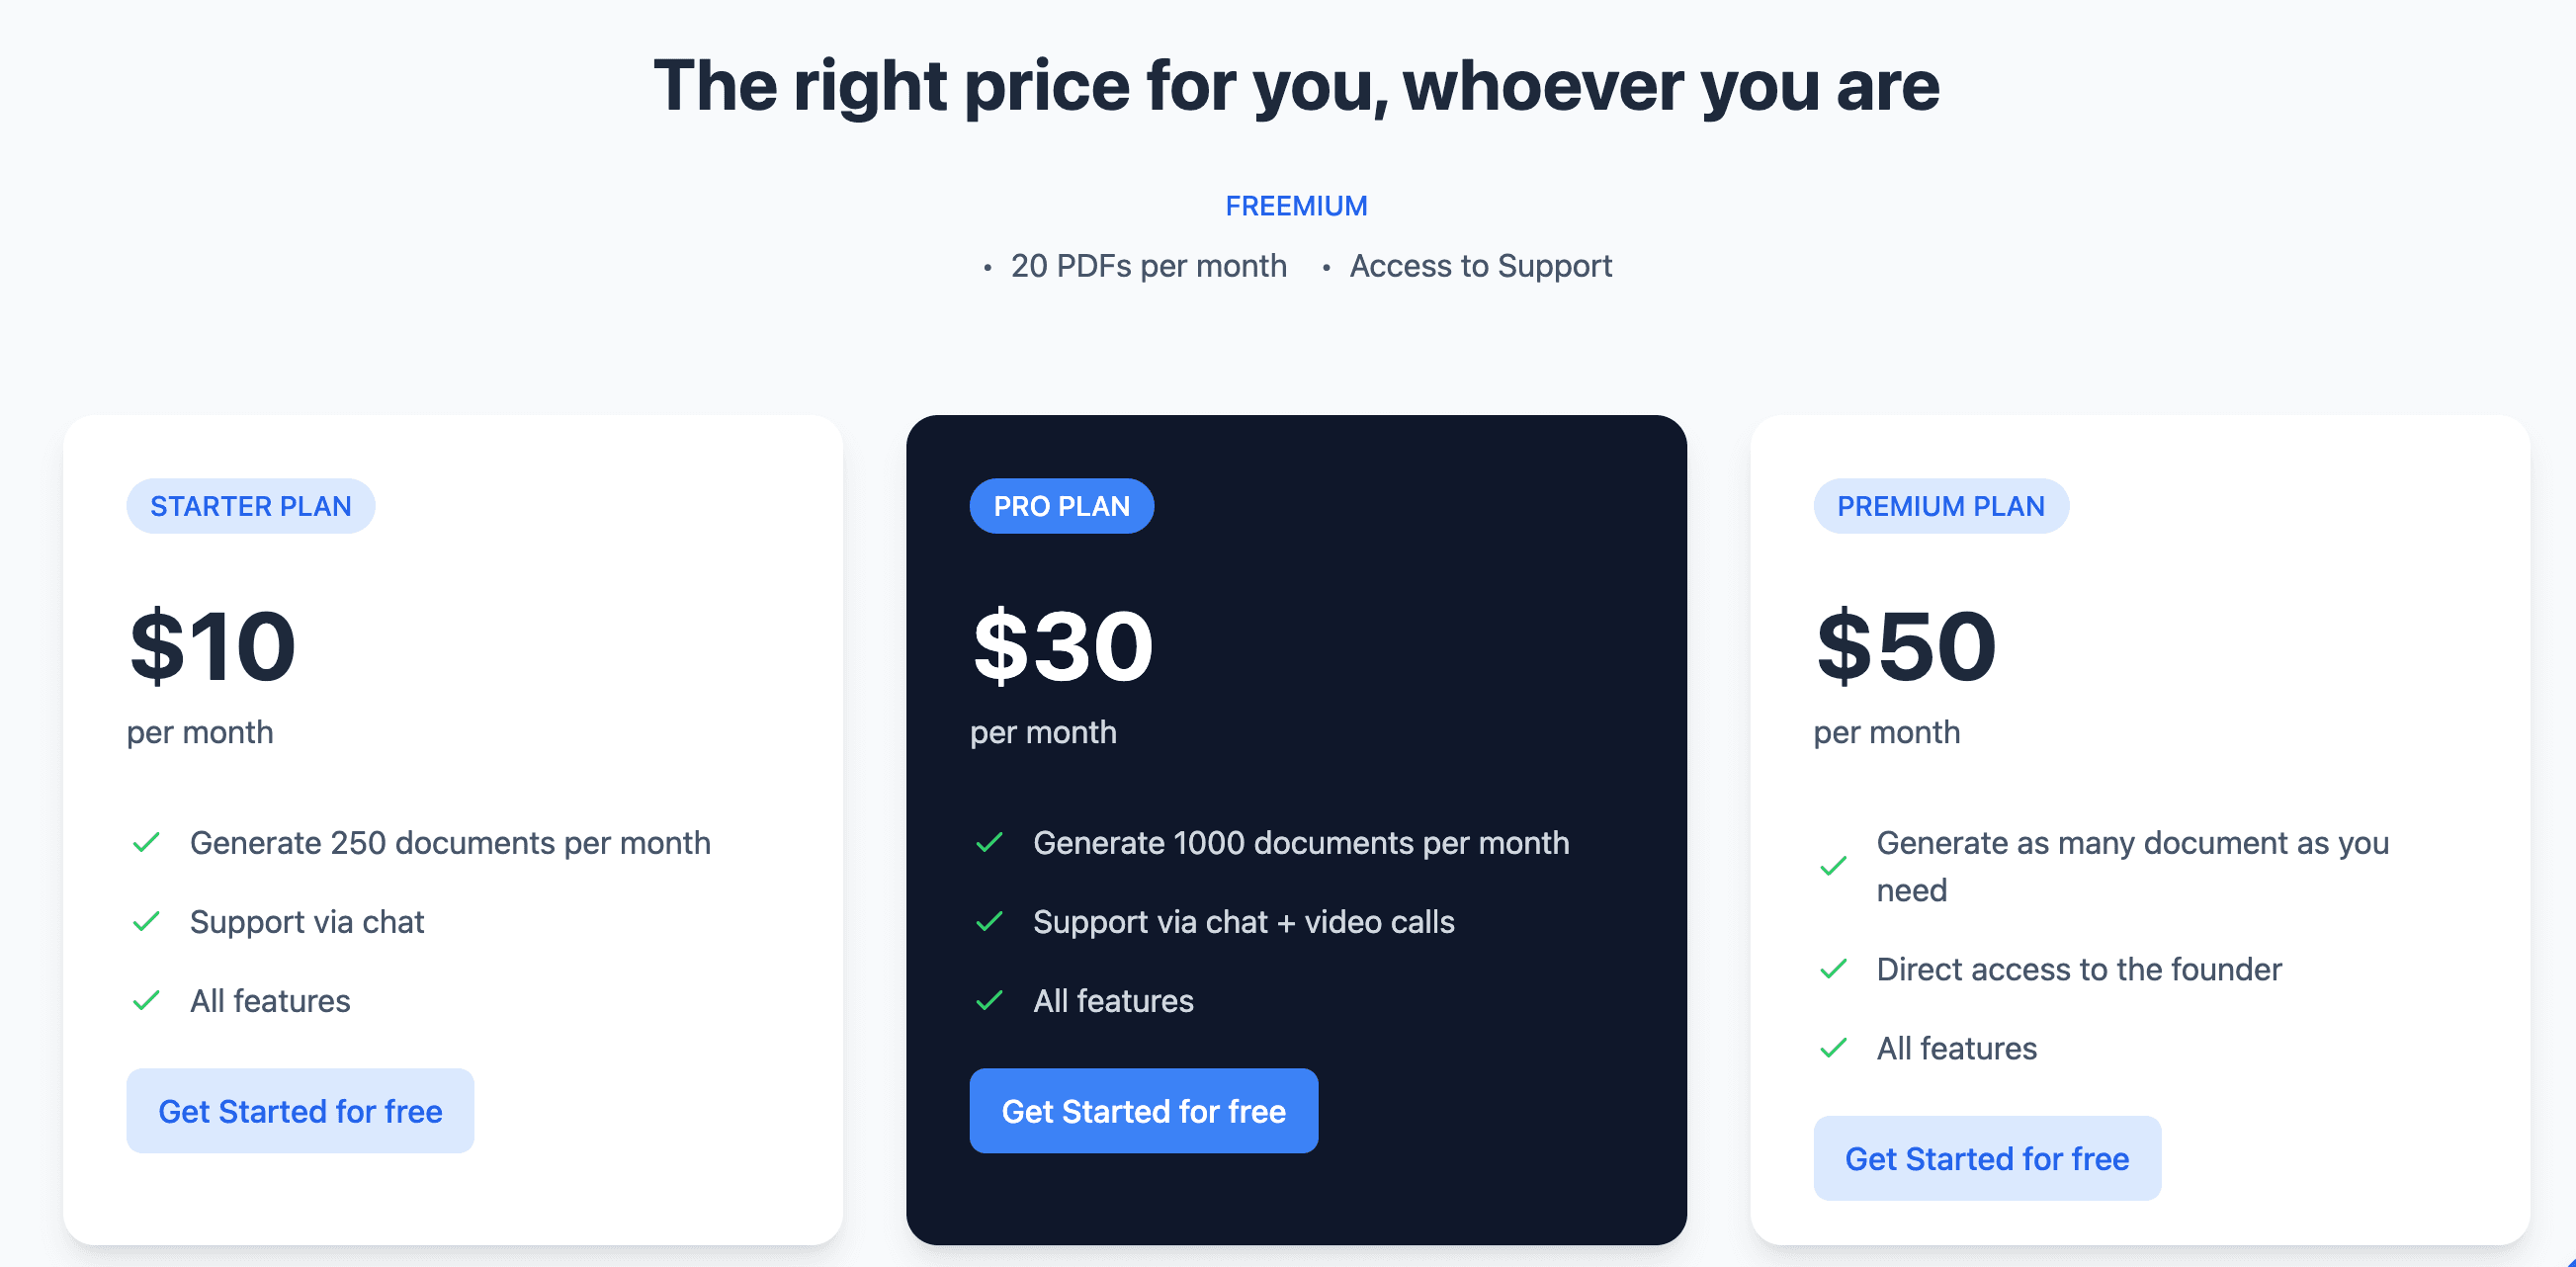
Our pricing model is designed to be transparent and flexible, making it accessible for businesses of all sizes.
- Free Plan: 20 documents lifetime
- Starter Plan: $17/month for 200 documents
- Pro Plan: $28/month for 500 documents
- Scale Plan: $68/month for 1,500 documents
The free plan is often enough to test your workflow. You can upgrade anytime as your business grows.
Next Steps
If you liked this workflow, you can automate other documents the same way.
- Quotes: Create quotes from Airtable and convert accepted quotes into invoices.
- Contracts: Generate agreements from Airtable client and project data.
- More templates: Explore other document types you can generate with TypeFlow.
According to Goldman Sachs research, the total cost of manually processing a single invoice is $16 for medium-size businesses and $22.26 for small businesses. Automating this process pays for itself quickly.
Try TypeFlow for free and build your first automated workflow today.
Automate your document generation
Start with 20 free documents. Built for businesses using Airtable.
Frequently Asked Questions
Find answers to the most common questions about this feature.
Popular Questions
All Questions
Need more help?
Our team is here to help you solve all your problems and answer your questions.
Contact Us
Kevin from TypeFlow
•AuthorKevin Rabesaotra is a growth engineer and automation specialist with 8+ years of experience building no-code solutions. As Founder & CEO of TypeFlow, he has helped hundreds of businesses automate document generation and streamline workflows with Airtable integrations. Previously, Kevin was a Product Lead specializing in growth engineering, running experiments to drive revenue, retention, and lead generation.
More articles
Airtable Invoice Automation: Complete Guide to Automated Invoicing
Set up automated invoicing from Airtable. Generate professional invoices with line items, send by email, track payments, and automate overdue reminders.
Read articleHow to Print an Airtable View and Export It to PDF
Learn how to print Airtable views and export them to PDF. Step-by-step guide covering native print, Page Designer, view types, and automated PDF reports with branding and e-signature.
Read articleHow to Print Labels from Airtable (Product, Shipping, Inventory)
Learn how to print labels from Airtable with barcodes. Product labels, shipping labels, inventory tags - with EAN-13, Code 128, and QR codes.
Read article