Published November 16, 2026 · Updated November 18, 2026 · By TypeFlow
Scan to Update: Update an Airtable Record by Scanning a QR Code
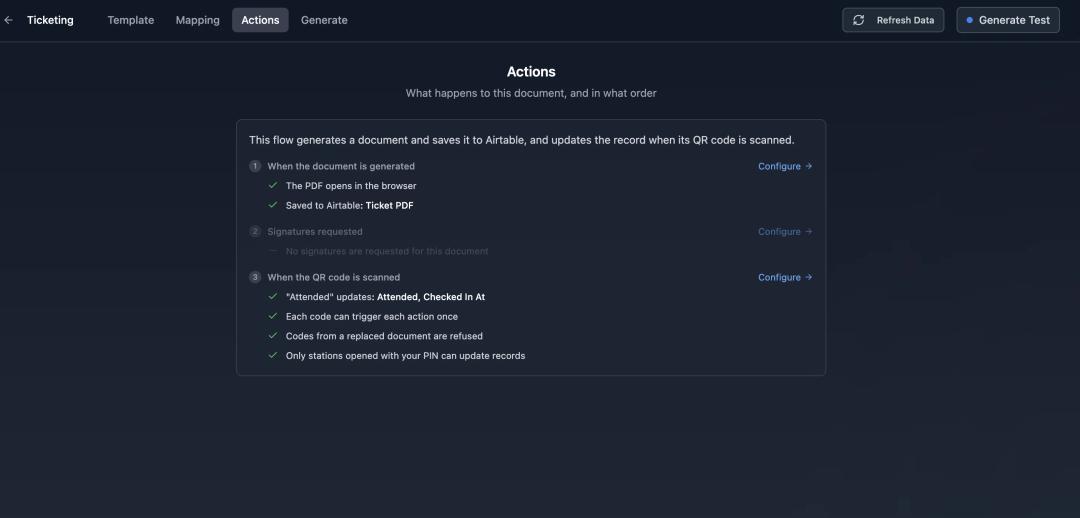
Scan to Update makes the barcode on a TypeFlow document do something in Airtable. When someone scans it at a TypeFlow station, TypeFlow changes the record the document came from (Status = Checked in), adds a record to another table (a stock movement), or both.
Overview
You already print documents with a code on them: event tickets, delivery notes, box labels, work orders. Until now, marking the record when the code was scanned meant searching for it in an Interface or using another tool.
With Scan to Update:
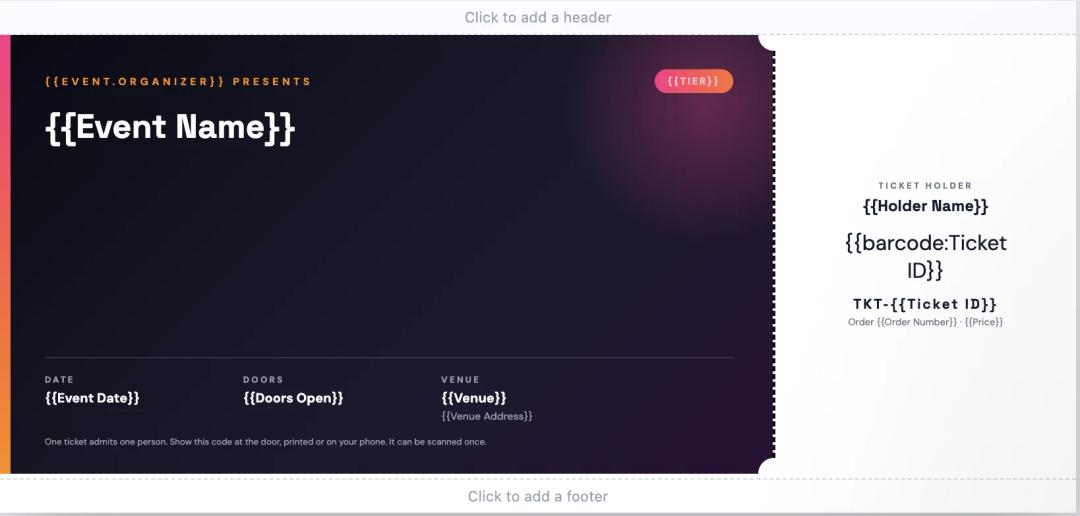
- TypeFlow generates the document with a code: a QR code tied to its Airtable record, or a barcode you already use (a SKU, a ticket number, a unit number) built from a field. You do not need a TypeFlow-specific code.
- Someone scans the code at a station: a web page on a computer with a handheld barcode scanner, a phone or a tablet.
- TypeFlow writes to Airtable, and the station shows the result full screen, with a sound.
A scan does one or both of these:
| A scan... | Example | Guide |
|---|---|---|
| changes its record | Attended ticked, Checked In At = scan time | Update the scanned record |
| adds a record to another table | a stock movement: Quantity -3, Customer, Location | Add a record with each scan |
Before You Start
- Plan: Pro and above, and during the free trial.
- Template: Template Builder (HTML) templates, with Airtable as the data source.
- Airtable: the fields the scan writes to. To add records, a second table with a link field to the scanned one (for example Movements linked to Equipment).
How to Set Up
Step 1: Put a barcode on the template
In the Template Builder, add a barcode variable where the code should print. Two kinds can be scanned:
| Barcode | How | Use it for |
|---|---|---|
| Scan link | In Mapping, set the barcode's type to Scan link. TypeFlow makes a QR code tied to the record. | Tickets, work orders: one document, one code. A code from an older version of the document is refused. |
| From a field | Any Code 128, QR Code or EAN-13 built from a field, for example {{barcode:Unit Number}}. | Labels, including labels printed several times. |

Step 2: Set up the scan, in 3 steps
In the Actions tab, open When a code is scanned. The setup takes the whole window. On the right, What the station will look like draws the station from your settings as you go.
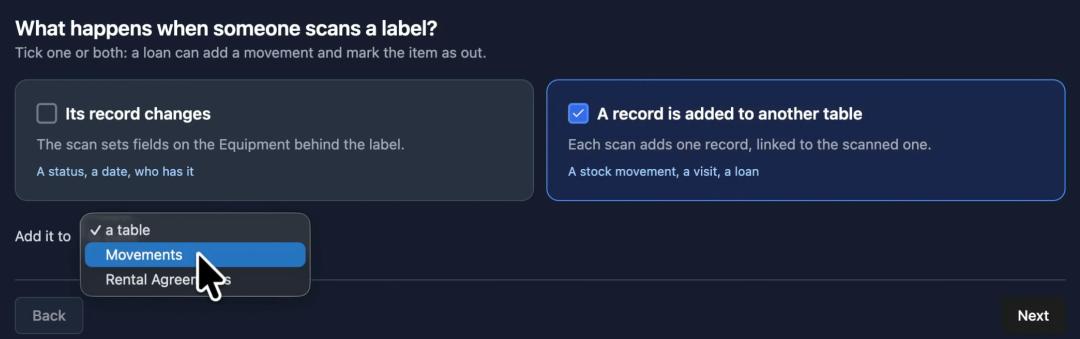
1. What a scan does. Tick one or both:
- Its record changes: the scan sets fields on the record behind the code.
- A record is added to another table: each scan adds one record, linked to the scanned one. Then choose the table in Add it to.
2. Buttons. The person scanning picks one button, for example Check Out or Check In. For each button:
| Block | What you set |
|---|---|
| On the scanned [table] | Set [field] to a value, the scan time, the station name, or ask at the scan |
| On the new [table] | Quantity in (and Removes from stock), Set [field] to ..., and the links Chosen at the station before scanning (a customer, a location: up to 3) |
| Can be scanned again | Off: a second scan of the same code says "Already". On: every scan counts. |
ask at the scan puts a question on the station screen after each scan, for example the condition on return (up to 3 per button). Turn off Required to allow Skip.
Below the buttons:
- Shown after a scan: the fields the person scanning sees, for example Ticket ID, Holder Name and Tier.
- A code on no document (when a scan adds records): create the record, or refuse the code.
3. Station. Copy the Link and the 6-digit PIN, then click Turn on scanning. The panel shows Scanning is on, and every production document generated from now on carries a working code, whether you generate it from an Airtable button or an Airtable automation. Turn off stops all stations.
Under Advanced:
| Option | Choices |
|---|---|
| A code from an older version of the document | Refuse it (recommended), Accept it, with a warning, or Accept it |
| Someone scans the code with their own phone | Show only whether it is valid (recommended), Show the station fields, or Show nothing |
Every choice is saved as you make it.
Guides
Each guide gives the settings in detail, with a worked example, the Airtable fields and what happens at the station:
- Update the scanned record: set fields, write the scan time, scan once or again. Example: an event ticket.
- Add a record with each scan: linked records, quantities, fields picked at the station, a question at the scan, the cart. Example: stock movements.
Scanning at the Station
- Open the station link on the device.
- Type the PIN and a name for who or where is scanning (for example "Door A").
- Pick the button, and what is chosen before scanning (a customer, a location) if the button has any.
- Scan codes with:
- a handheld barcode scanner (USB or Bluetooth scanner gun) on a computer: nothing to install, the station reads it like a keyboard, even on a French AZERTY keyboard. Last scans on the right lists the station's 10 latest scans, and a question asked at the scan is answered with 1, 2 or 3;
- the camera of a phone or tablet: it opens on its own, and a question slides up from the bottom;
- or type the code by hand.
On a button that adds a record, Cart lets you scan a whole delivery, check the lines, then Validate them at once.
With white label (Enterprise), your logo and company name from the e-signature branding show at the top of the station instead of TypeFlow's.
Each scan shows a full-screen result:
| Color | Meaning |
|---|---|
| Green | Applied: Airtable is being updated |
| Amber | Already scanned, with when and where |
| Red | Replaced by a newer document, cancelled, or not a code for this flow |
Codes from test generations show a TEST banner and never write to Airtable.
Security: 5 wrong PINs lock the device for 15 minutes. Generating a new PIN closes every open station.
Scan Log, Undo and Retry
Every scan is listed in History > Scans, newest first, with the record, the flow, the button, the station, the time and its status: Written, Writing, Failed, Test, Already scanned, Refused or Undone.
- Undo frees the code. If Airtable was already updated, TypeFlow restores the previous values on the fields that still hold what the scan wrote.
- Retry Airtable sync sends a failed write again, for example after you reconnect a base. It never applies the scan twice.
Limits
- Scan link: one record, one code. A record that prints several copies of the same label (Repeat X Times) cannot get a Scan link. Use a barcode built from a field instead.
- Generate after Turn on. Documents generated before scanning was on are not recognised: regenerate them.
- Airtable is updated within seconds, not instantly: the station confirms the scan first, then TypeFlow writes to Airtable in the background.
- Scanning a code with a phone's own camera opens a read-only page. It never updates the record: only a station does.
Related
- Variables and field mapping: barcodes - barcode syntax and the other barcode types (EAN-13, Code 128, UPC-A, Code 39)
- Print Labels - Repeat X Times - one label per item from a quantity field
- Document Versioning - why a code from a replaced document is refused
- How to Generate Barcodes from Airtable Data
- How to Create Inventory Labels with Barcodes in Airtable