How to Print Shipping Labels from Airtable Using a Thermal Printer
You can print 4x6 shipping labels from Airtable on any thermal printer - Rollo, Zebra, DYMO, or Munbyn. TypeFlow generates a standard PDF from your Airtable order data, and your printer handles the rest. No carrier API needed, no copy-pasting addresses.
For all label types including product and inventory labels, see our complete label printing guide. For return labels, see our return label guide. To compare TypeFlow with Airtable's built-in tools, see Page Designer vs TypeFlow for labels.
Print Shipping Labels from Airtable (4x6 Thermal Printer)
What You Need Before Starting
To print shipping labels from Airtable, you generate a 4x6 PDF from your order data, then send that PDF to your printer. Airtable does not have a built-in print button for label formats, so you use a document generation tool to create the label file. The setup takes about 15 minutes.
A Thermal Label Printer
Any thermal printer that accepts 4x6 labels works. Rollo, Zebra, DYMO, Munbyn - they all receive PDF files the same way. You do not need a specific brand.
An Airtable Base with Orders
Your base needs the data that goes on a shipping label: recipient name, street address, city, state, and zip code. A tracking number field is optional but useful for barcodes.
A Label Template
Use TypeFlow's HTML/CSS template builder for pixel-perfect 4x6 layouts. You can also use a Google Docs template for simpler designs. Set the page size to 4 inches wide and 6 inches tall.
TypeFlow to Connect Them
TypeFlow sits between Airtable and your template. It pulls your order data, fills in the variables, and generates a print-ready PDF.
Why Use a Thermal Printer for Airtable Shipping Labels
Thermal printers are the standard for shipping because they are fast and reliable. Unlike inkjet printers, they use heat on special paper instead of ink cartridges. According to Supply Chain Dive, thermal printing is the dominant technology in warehouse and fulfillment operations because of its speed and low operating cost.
- No ink costs: The printer uses heat to create the image. No cartridges to buy or replace.
- Speed: A label prints in 1-2 seconds. When you ship 50 orders, that adds up.
- Peel-and-stick labels: Most thermal labels have adhesive backing. Peel, stick, done.
- 4x6 standard size: UPS, FedEx, and USPS all accept 4x6 labels. One size works for everything.
Thermal Printers That Work with Airtable
TypeFlow generates a standard PDF, so any printer that can print a PDF works. The printer does not know or care where the file came from.
| Printer | Label Size | Best For |
|---|---|---|
| Rollo | 4x6 | Small e-commerce businesses |
| Zebra ZD420 | 4x6, 4x4 | Warehouses and high volume |
| DYMO LabelWriter 4XL | 4x6 | Offices with mixed label needs |
| Munbyn | 4x6 | Budget-friendly option |
Rollo
Popular with Etsy and Shopify sellers. Works on Mac and Windows. Prints directly from PDF without extra software.
Zebra ZD410 and ZD420
Industrial grade - the kind you see in warehouses. Handles high volume and supports both ZPL (a label programming language) and standard PDF printing.
DYMO LabelWriter 4XL
Works well if you print both shipping labels and smaller address labels from the same desk. Needs DYMO software installed.
Munbyn
Affordable starting point. Handles 20-50 labels per day without issues, which covers most small businesses.
How to Set Up Your Airtable Base for Shipping
Your Airtable base provides the data that appears on each label.
Fields to Include in Your Orders Table
At minimum:
- Recipient name: Full name printed on the label.
- Street address: Include apartment or unit numbers.
- City, state, zip: Separate fields or one combined field - either works.
- Tracking number: Optional, but required for a scannable barcode.
- Order ID: Useful for reference on the printed label.
Status Field to Track Shipping
A single select field called "Status" helps you filter orders. Options like "Ready to Ship" and "Shipped" let you see which orders still need labels. This becomes important when you generate labels in bulk - or pairing them with packing lists for each shipment.
Shipping Label Sizes for Thermal Printers
Label size depends on your carrier and what you are shipping.
4x6 Inches
The standard. UPS, FedEx, and USPS all accept 4x6 labels, and most thermal printers are built for this size. Start here.
4x4 Inches
Smaller option for return labels or international customs forms. Some carriers accept 4x4 for domestic shipments too.
Custom Sizes
TypeFlow lets you set any dimension in the template builder. Enter the exact width and height in inches or millimeters.
How to Create a 4x6 Shipping Label Template
The template is where you design your label layout. Once set up, you reuse it for every order.
Step 1: Set the Page Size to 4x6
In TypeFlow's HTML/CSS template builder, select "Label 100 x 150 mm" from the page format dropdown - this is the standard 4x6 inch shipping label size, pre-configured. Margins are set to minimal by default. For Google Docs: File > Page Setup > Custom, enter 4 inches x 6 inches.
Step 2: Design the Label Layout
Place your sender address at the top in smaller text. The recipient address goes in the center - this is the largest text on the label since it is what the carrier reads. Leave space at the bottom for a barcode.
Step 3: Add Variables for Airtable Fields
Use double curly braces as placeholders: {{Recipient Name}}, {{Street Address}}, {{City}}, {{State}}, {{Zip}}. TypeFlow replaces each variable with the actual value from your Airtable record.
For the barcode, add {{barcode:tracking_number}}. TypeFlow renders a scannable Code 128 barcode from your tracking number field.

Here is what the generated label looks like with real Airtable data:

Step 4: Configure the Print Label Mode
Add {{print_label_0}} at the top of your label template. This marker tells TypeFlow where each label starts and how to repeat the layout when generating multiple labels. For single shipping labels (one per record), this ensures each record gets its own 4x6 page.

How to Map Airtable Fields to Your Shipping Label
Mapping connects your Airtable data to your template variables.
Step 1: Connect Your Airtable Base
Sign up at app.typeflow.us and connect your Airtable account via OAuth. Select your base and the table containing your orders.
Step 2: Select Your Orders Table
Choose the table with your shipping data. TypeFlow reads the field names automatically.
Step 3: Match Each Variable to a Field
For each variable in your template, pick the corresponding Airtable field:
{{Recipient Name}}-> Customer Name field{{Street Address}}-> Address field{{City}}-> City field{{State}}-> State field{{Zip}}-> Zip Code field{{barcode:tracking_number}}-> Tracking Number field
The variable names do not need to match your Airtable field names exactly - you are just telling TypeFlow which data goes where.
How to Add a Tracking Barcode to Your Label
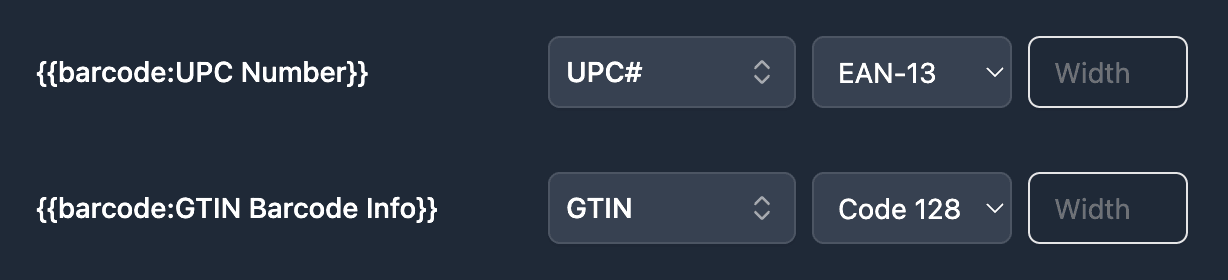
Barcodes let carriers scan packages for tracking updates. TypeFlow generates barcodes from text fields in your Airtable base. For more on barcode formats, see our barcode generation guide.
Code 128 for Tracking Numbers
Code 128 is the standard barcode type for shipping. It works with UPS, FedEx, and USPS tracking numbers. If you are not sure which type to use, Code 128 is the safe choice.
QR Codes for Order Links
QR codes can link to a tracking page or order details. Your customer scans it with their phone to check delivery status. Optional but useful for customer experience.
Other Supported Barcode Types
TypeFlow also supports Code 39, EAN-13, and UPC-A. These are less common for shipping labels but useful for product labels or inventory management.

How to Filter Which Orders Get a Shipping Label
You probably do not want to generate labels for every record. Some orders are still pending, some already shipped.
TypeFlow lets you set display conditions. For example: Status field equals "Ready to Ship." Only records matching that condition get labels. Everything else is skipped.
How to Print Shipping Labels from Airtable
Once your template and mapping are set up, you have three ways to generate and print.
From a Button Field
Add a button field in Airtable that triggers TypeFlow. Click the button on a record, TypeFlow generates the PDF. Download and print. Works well for one-at-a-time processing.
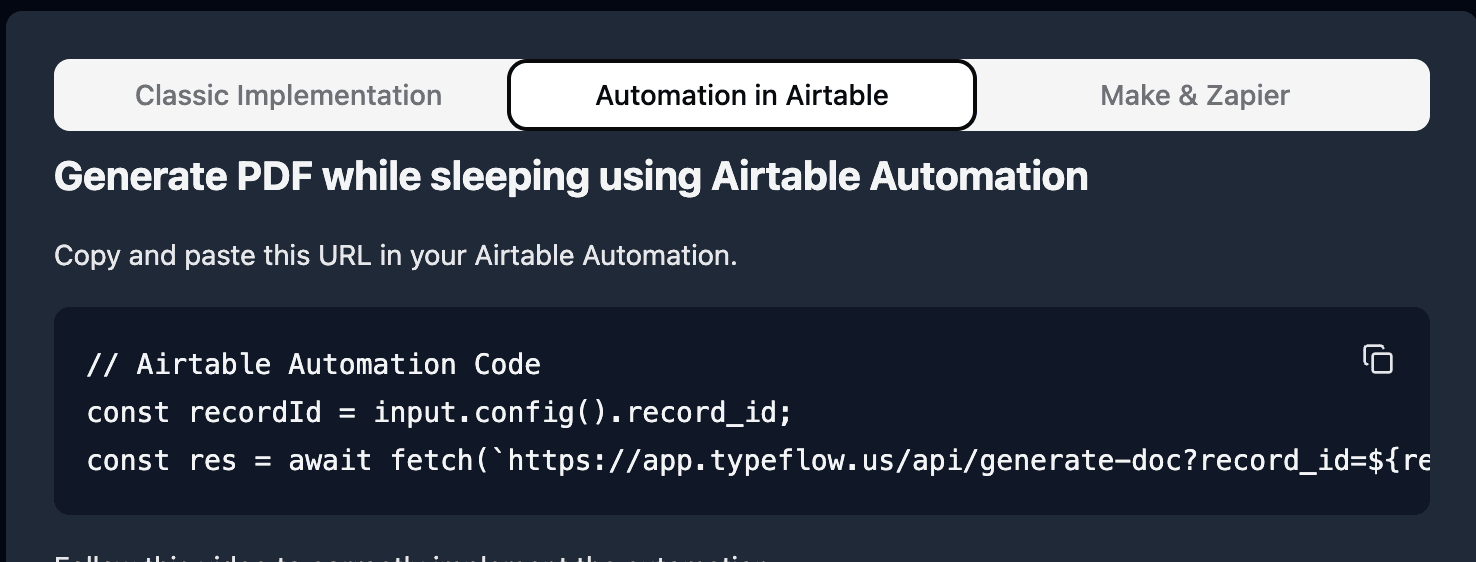
With an Airtable Automation
Set up an Airtable automation: when the Status field changes to "Ready to Ship," TypeFlow generates the label automatically. The PDF attaches to the record or sends to your email. No clicking required. Deloitte estimates that document automation can reduce processing time by up to 80%.
In Bulk for a Batch of Orders
Select multiple records in Airtable and generate all labels in one PDF. Print the entire batch at once. This saves time when you ship 10, 20, or 50 orders at the end of the day.
Send Directly to Your Printer via Email
TypeFlow's built-in email delivery can send the generated PDF to an email address right after generation. Many thermal printers support email-to-print - you assign an email address to your printer, and any PDF sent to that address prints automatically.
This means fully hands-off label printing: Airtable automation triggers TypeFlow, TypeFlow generates the label and emails it to your printer, and the label prints without anyone touching a computer. On Pro plans and above, TypeFlow can send from your own Gmail address.
Common Issues and Fixes for Thermal Label Printing
Label Cuts Off or Prints Blank
The page size in your template and your printer settings need to match. If your template is 4x6 but your printer expects letter size, the label will not print correctly. Also check that printer driver margins are set to zero or minimum.
Barcode Does Not Scan
The barcode might be too small, or your tracking number field has extra spaces. Open the field in Airtable and check for hidden characters at the beginning or end.
Wrong Label Size
Template size and printer size need to match. A 4x6 template sent to a printer expecting 4x4 labels will misalign. Check both settings.
Address Text Too Small
Increase the font size in your template. Minimum 10pt for address text and 12pt or larger for the recipient name. Carriers need to read the label quickly.
Start Printing Shipping Labels from Airtable with TypeFlow
TypeFlow connects your Airtable orders to a label template and generates print-ready PDFs for your thermal printer. Design the label once, map your fields, and the automation handles the rest. See what users say about TypeFlow on G2.
Start for Free and print your first shipping label in minutes.
Automate your document generation
Start with 20 free documents. Built for businesses using Airtable.
Frequently Asked Questions
Find answers to the most common questions about this feature.
Popular Questions
All Questions
Need more help?
Our team is here to help you solve all your problems and answer your questions.
Contact UsFor more guides, see How to Print Labels from Airtable, Product Labels with Barcodes, Return Shipping Labels, Page Designer vs TypeFlow, and Shipping Document Automation.

Kevin from TypeFlow
•AuthorKevin Rabesaotra is a growth engineer and automation specialist with 8+ years of experience building no-code solutions. As Founder & CEO of TypeFlow, he has helped hundreds of businesses automate document generation and streamline workflows with Airtable integrations. Previously, Kevin was a Product Lead specializing in growth engineering, running experiments to drive revenue, retention, and lead generation.
More articles
How to Print Labels from Airtable with Quantity Control (Step by Step)
Print multiple labels per Airtable record based on a quantity field. Step-by-step guide for linked records mode and quantity repeat mode with barcodes and Avery sheets.
Read articleHow to Print Avery Mailing Labels from Airtable
Print Avery mailing labels (5160, 5161, 5162) from Airtable without Word mail merge. Step-by-step guide with print label mode, automation, and bulk generation.
Read articleHow to Create Inventory Labels with Barcodes in Airtable
Create inventory labels with Code 128, EAN-13, or QR barcodes from Airtable. Step-by-step guide for warehouse, retail, and asset tracking with thermal and Avery printers.
Read article