Airtable Integrations for Document Generation: Complete Guide
The best way to generate documents from Airtable is to connect a document automation tool like TypeFlow, create a template with Google Docs or an HTML/CSS editor, and let it handle data mapping, generation, and delivery - including built-in e-signatures with no per-signature fees. Other options include DocsAutomator, Documint, and Plumsail. Most teams go from setup to first document in about 15 minutes. For contract workflows with e-signatures, see our contracts solution page. For a quick-start approach, see our guide on exporting Airtable data to PDF.
This guide covers invoices, contracts, certificates, and reports - with integration options, setup steps, and automation methods.
What Is Airtable Document Generation?
You can turn any Airtable record into a finished PDF or Google Doc by connecting your base to a template with placeholder variables. The core concept is simple: template + data = finished document.
To generate documents from Airtable, connect your base to a document automation tool like TypeFlow, Documint, Plumsail, or DocsAutomator, create a template with placeholder variables, and map your Airtable fields to those variables. The tool pulls data from your records and populates your template automatically - no manual copying required.
Your Airtable base already contains the information you need: client names, project details, payment amounts, etc. The automation tool reads this data and places it into your pre-designed template.
Many companies still generate documents manually. According to the Zapier Automation Report 2024, 76% of workers spend 1-3 hours daily moving data between tools-opening records, copying fields, pasting into templates, repeating for every document.
This manual process creates two problems.
-
Wasted time: Hours spent on copy-paste work that automation handles in seconds.
-
Data entry errors: Human error rates of 1-5% (Dr. Raymond Panko, University of Hawaii) mean mistyped amounts or wrong addresses damage your professional reputation.
When automating this process, you solve both problems at once.
Here's what changes when you move from manual to automated document generation:
| Manual Process | Automated Process |
|---|---|
| Open Airtable, find record, copy data | Click one button or trigger runs automatically |
| Open template, paste data into fields | System populates all fields instantly |
| Format document, check for errors | Template maintains consistent formatting |
| Export to PDF, save to folder | PDF saves to designated location automatically |
| 15-30 minutes per document* | 5-10 seconds per document* |
*Based on 2000+ TypeFlow customer implementations, 2024-2025
Additional benefits of automated document generation:
- Consistency: Every document follows the same format and structure. No variations between team members.
- Accuracy: Direct Airtable integration eliminates manual retyping errors, which range from 0.55% to 3.6% in research settings (Behavior Research Methods, 2019). What's in your Airtable base is exactly what appears in your documents.
- Scalability: Whether generating one document or one thousand, the process stays the same. KPMG reports that organizations can go from manual document processing to 95% automation with the right tools.
Consider an accounting team generating fifty invoices monthly. At 15-30 minutes per manual document versus 5-10 seconds automated, that's 12+ hours saved. IDC research found that businesses lose up to 21.3% of productivity to document-related challenges - making this kind of automation a direct productivity win.
Ready to automate your document generation?
Connect Airtable to Google Docs templates. Generate invoices, contracts, and reports in seconds.
Start free with 20 documents →Why Airtable's Native Tools Fall Short
Airtable's built-in Page Designer is limited to single-page layouts with no line items, no automation, and no e-signatures - making it insufficient for professional document generation at scale.
Page Designer limitations:
- Single-page only: Cannot create multi-page documents like detailed invoices or contracts
- No line items: Cannot dynamically repeat rows for itemized entries
- Manual process: Must export each document individually—no bulk generation
- Single-page only: For multi-page PDFs, see our guide on creating multi-page PDFs without Page Designer
- No e-signatures: Cannot send documents for signing directly
- Basic formatting: Limited control over fonts, spacing, and layouts
- No automation: Cannot trigger document creation based on record changes
For one-off simple layouts, Page Designer works. But for professional documents at scale—invoices with line items, contracts requiring signatures, or reports generated automatically—you need a third-party integration.
Airtable Document Integration Options
The three main approaches are native Airtable extensions like TypeFlow, Airtable Automations with webhook scripts, and third-party platforms like Zapier or Make that connect Airtable to a document tool. Each has trade-offs depending on your workflow complexity and existing tech stack. You can also export an entire Airtable view to PDF if you need a quick snapshot rather than templated documents.
Native Airtable Extensions
Extensions like TypeFlow and Documint install directly in your Airtable base from the Airtable Marketplace.
- Pros: Direct integration, easy setup, works within Airtable interface
- Cons: May require specific Airtable plans for some features
Automation-Based Integrations
Use Airtable's built-in automation features (button fields, Airtable Automations, scripts) to trigger document generation.
- Pros: Flexible triggers, works with all Airtable plans, event-based automation
- Cons: Slightly more setup, requires configuring automation rules
Third-Party Automation Platforms
Connect Airtable to document tools via Zapier or Make.
- Pros: Connect to 1000+ apps, trigger from external events
- Cons: Additional subscription cost, more complexity, potential latency
Integration Comparison
| Feature | Native Extension | Automation Script | Zapier/Make |
|---|---|---|---|
| Setup difficulty | Easy | Medium | Medium |
| Works with all Airtable plans | Varies | Yes | Yes |
| Bulk generation | Yes | Limited | Limited |
| External app triggers | No | No | Yes |
| E-signature support | Some tools | No | Via separate tool |
For most teams, a native extension like TypeFlow offers the best balance of features and simplicity. Use Zapier/Make when you need to trigger documents from events outside Airtable.
Common Document Types You Can Generate
The most common documents generated from Airtable are invoices, contracts, certificates, reports, quotes, purchase orders, shipping labels, and spec sheets. Here are the most common use cases:
- Invoices: With line items, totals, and payment terms pulled from your records. See also our guides on invoice automation, quote-to-invoice workflows, and freelance invoicing.
- Contracts and agreements: Pre-filled with client details, terms, and ready for e-signature. For the full lifecycle from creation to renewal, see our contract lifecycle management guide or the dedicated contract management guide.
- Certificates: Course completions, awards, compliance certifications
- Reports and summaries: Project status, monthly metrics, client deliverables. For compliance-ready output, see our guide on audit-ready PDF reports.
- Quotes and proposals: Itemized pricing with terms and branding. If you are comparing quote tools, see our Airtable quote generator comparison.
- Packing slips and shipping labels: Order details for fulfillment workflows. For barcode and address labels, see our Airtable print labels guide.
Each document type follows the same pattern: create a template, map your fields, and configure a trigger.
How to Create a Document Template for Airtable
Create a Google Docs document and add placeholders using double curly braces like {{Client Name}} where you want Airtable data to appear. The placeholder names must match your Airtable field names exactly.
A template is a pre-designed file with placeholder variables that your Airtable data replaces. Design your layout once in Google Docs-add your logo, choose fonts-then insert placeholders that tell the system where to insert dynamic content from each record.
These variables look like this:
{{Client Name}} or {{Invoice Amount}}
When the automation runs, it finds these placeholders and replaces them with actual data from your Airtable record. The double curly braces tell the system put the data here.
This approach works for any document type you create repeatedly:
- Certificates for course completions.
- Monthly performance reports for each team member.
- Client agreements with their details pre-filled.
- Product catalogs that update when inventory changes.
- Receipts for purchases or donations.
A good template has clear placeholders that are easy to identify and update. The information flows in a natural order that makes sense for the reader. Your branding, fonts, and colors remain consistent across all generated documents.
The workflow follows a simple path: your data lives in Airtable, your design lives in Google Docs, and the automation tool connects them.
When the automation is triggered, the system reads your Airtable record, finds the matching placeholders in your template, replaces them with your data, and converts the result to PDF.
You don't need to learn new software to create templates. If you can use Google Docs, you can build a template. Add your company logo at the top. Type your standard contract language. Insert {{Client Name}} where the client's name should appear. Save the document. Your template is ready.
How to Set Up Airtable Document Generation
To set up Airtable document generation, connect your Airtable base to TypeFlow, create a Google Docs template with placeholders, map your Airtable fields to those placeholders, and configure a trigger (button, automation, or extension). Most users complete their first automation in 10-30 minutes.
Here are the four steps:
- Connect your Airtable account.
- Build your template.
- Map your fields to template variables.
- Configure when documents should generate.
The process doesn't require coding knowledge. If you already know/can use Airtable and Google Docs, you have all the skills needed.
Most users complete their first automation in 10-30 minutes (based on 2000+ TypeFlow customer implementations, 2024-2025). Most time goes into template design - the technical connection takes just a few clicks.
Step 1: Connect Your Airtable Base to TypeFlow
First, you need to create a TypeFlow account and authorize access to your Airtable workspace (you can connect your Airtable account here).
This connection allows TypeFlow to read data from your bases when generating documents. You can select only the bases you want to work with. 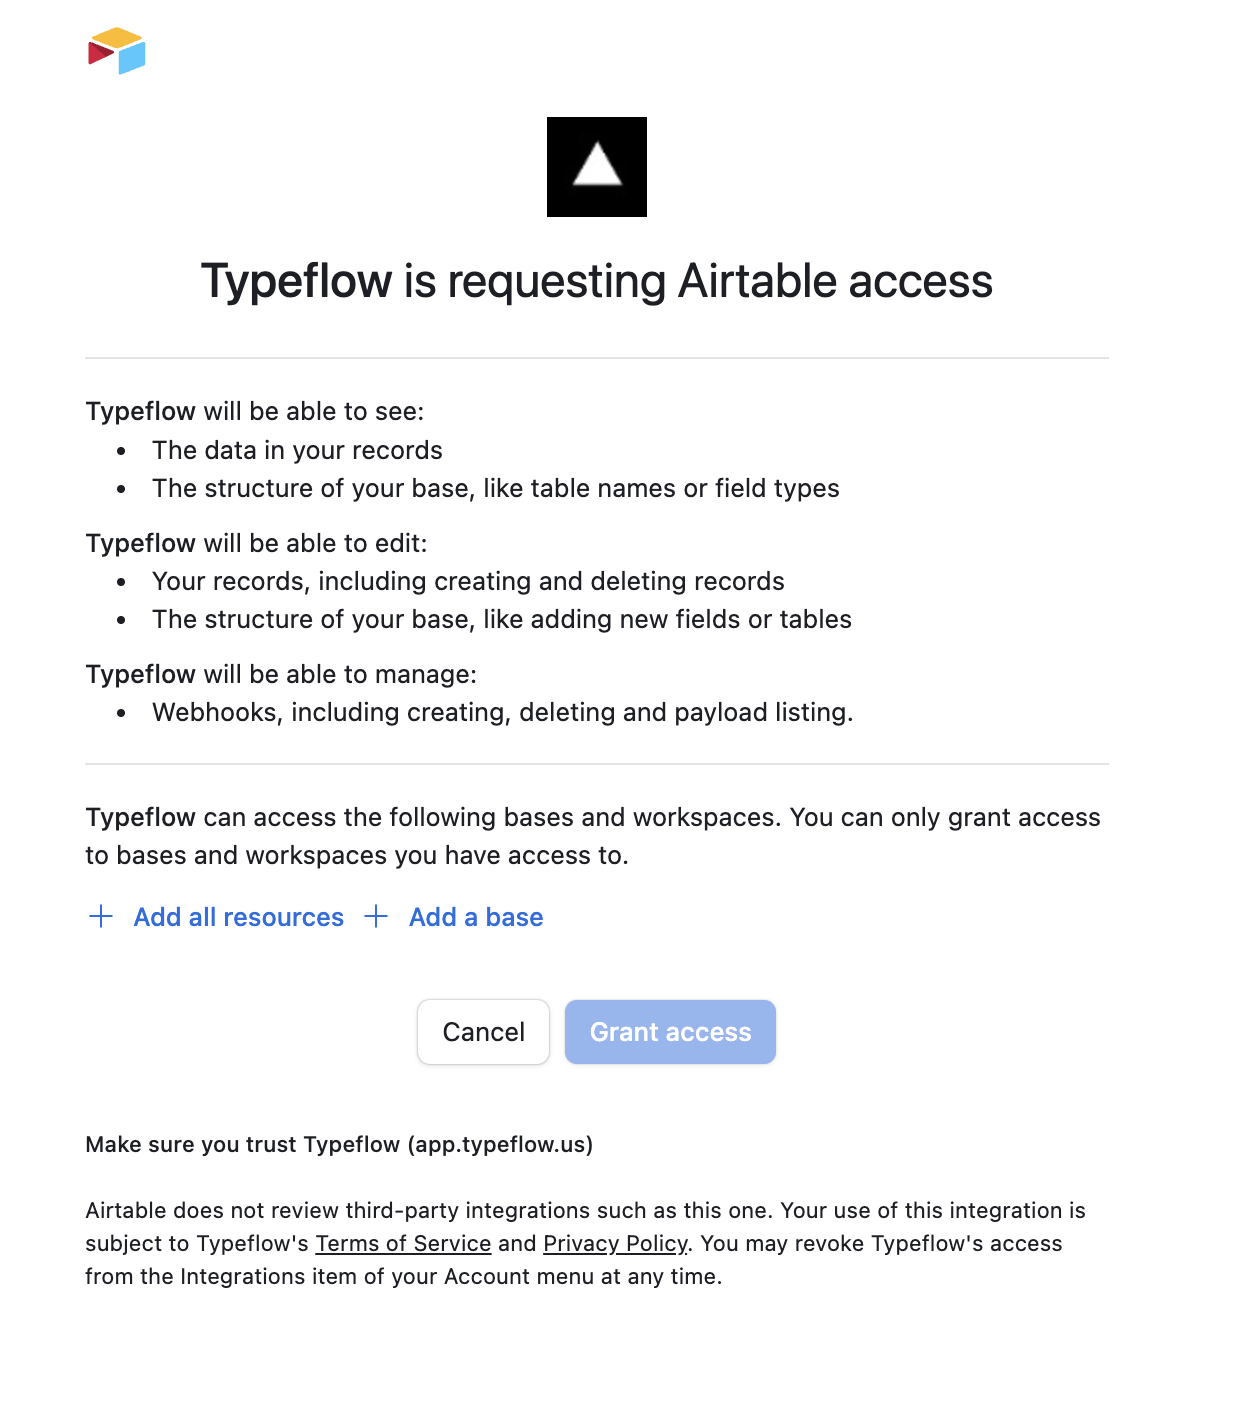
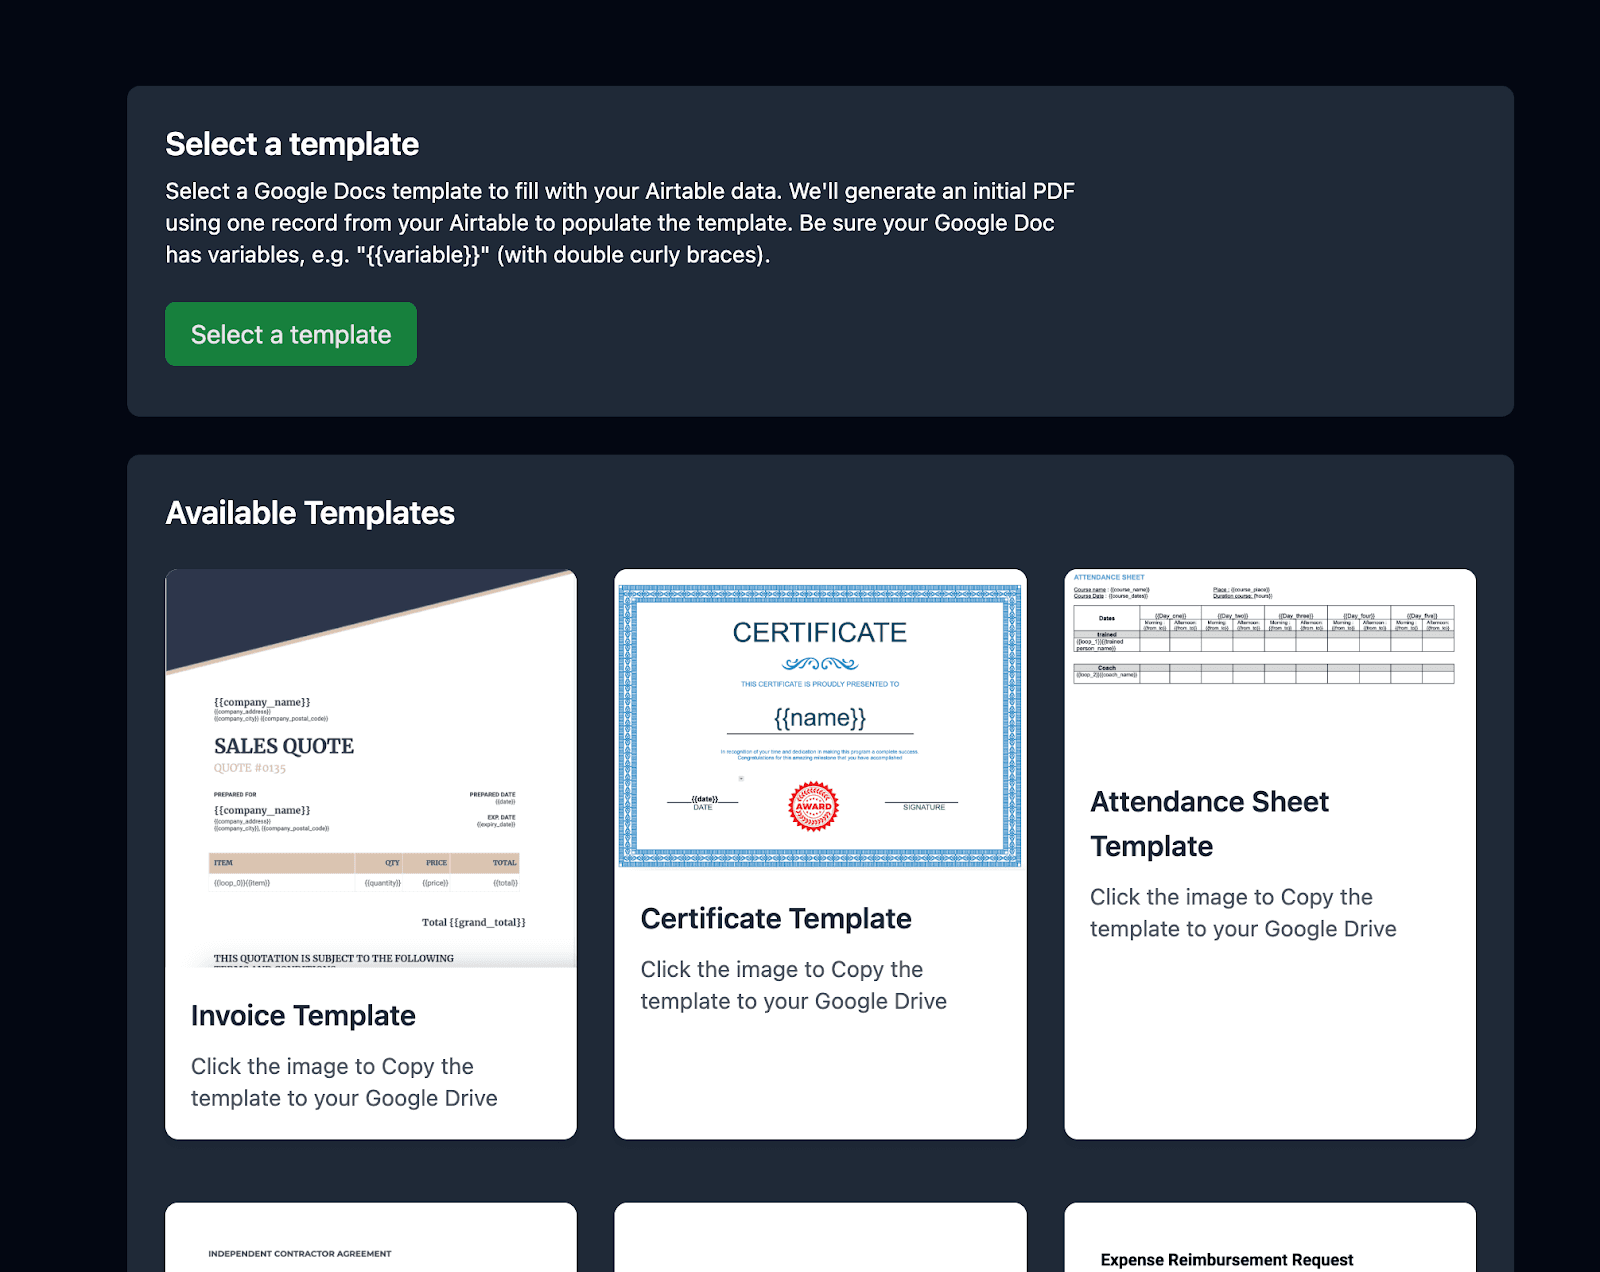
Step 2: Build Your Template
2.1 Pick or build a template
Choose a template from our library or from your Google Drive. If you choose a template from our library, then TypeFlow is going to duplicate the chosen template to your Google Drive.
2.2 Understanding Template Variables
Variables in your Google Docs template use double curly braces: {{Field Name}}
Case sensitivity matters:
{{Client Name}}≠{{client name}}- It's recommended that your variable match your Airtable field so if you field is Client Name, then it's better to use
{{Client_Name}}or{{Client Name}}or{{client name}}
Special characters:
- Spaces are OK:
{{Invoice Number}} - Avoid:
/ \ | * ? < > :in field names
2.3 Working with Line Items (Loop_0)
Line items are essential for invoices, purchase orders, or any document requiring itemized entries. They create a hierarchical relationship between a main record (like an invoice) and its sub-items (like individual products or services).
Example: Invoice Line Items
You need two tables with a linked relationship:
Invoices table:
| Invoice Number | Client Name | Line Items |
|---|---|---|
| INV-2024-042 | Acme Corporation | → Widget A, Widget B, Service Package |
| INV-2024-043 | Tech Solutions | → Consulting, Setup Fee |
Line Items table:
| Product | Quantity | Price |
|---|---|---|
| Widget A | 2 | €50 |
| Widget B | 1 | €75 |
| Service Package | 1 | €200 |
| Consulting | 5 | €150 |
| Setup Fee | 1 | €500 |
Step 1: Create your Google Docs template
In Google Docs, create a table with one row containing both {{loop_0}} AND your field variables:
{{loop_0}} {{Product}} | {{Quantity}} | {{Price}} |
|---|
The {{loop_0}} variable tells TypeFlow this row should repeat for each linked record.
Step 2: Configure in TypeFlow
- From your main table (Invoices), select the linked record field (Line Items)
- TypeFlow now shows all fields from your linked table
- Map your variables to the Airtable fields
- Generate a test PDF
The generated PDF:
| Product | Quantity | Price |
|---|---|---|
| Widget A | 2 | €50 |
| Widget B | 1 | €75 |
| Service Package | 1 | €200 |
The table size adjusts automatically based on the number of line items.
Multiple Line Item Tables
Need a second line items table? Use {{loop_1}} in a separate table for the second set of linked records. For a detailed walkthrough on pulling data from linked records without creating lookup fields, see our linked records PDF guide.
2.4 Advanced Variables Reference
TypeFlow supports different variable types for various use cases:
| Variable Syntax | Use Case | Example |
|---|---|---|
{{loop_0}} | Line items in tables | {{loop_0}} {{Product}} for invoice line items |
{{table_loop_x}} | Product cards feature | Display products in card layout |
{{image_x}} | Dynamic image in main document | {{image_Company Logo}} for images |
{{loop_image_x}} | Dynamic image in line items | {{loop_image_Product Photo}} for product thumbnails |
{{table_image_x}} | Dynamic image in product cards | Product images within card layouts |
{{section_name}} ... {{/section_name}} | Conditional sections | Show/hide content based on conditions |
{{URL:text}} | Clickable links | {{URL:Visit our website}} creates hyperlink |
{{nested_x}} (main row) + {{nested_items_x}} (row below) | Nested line items | Multi-level itemized data |
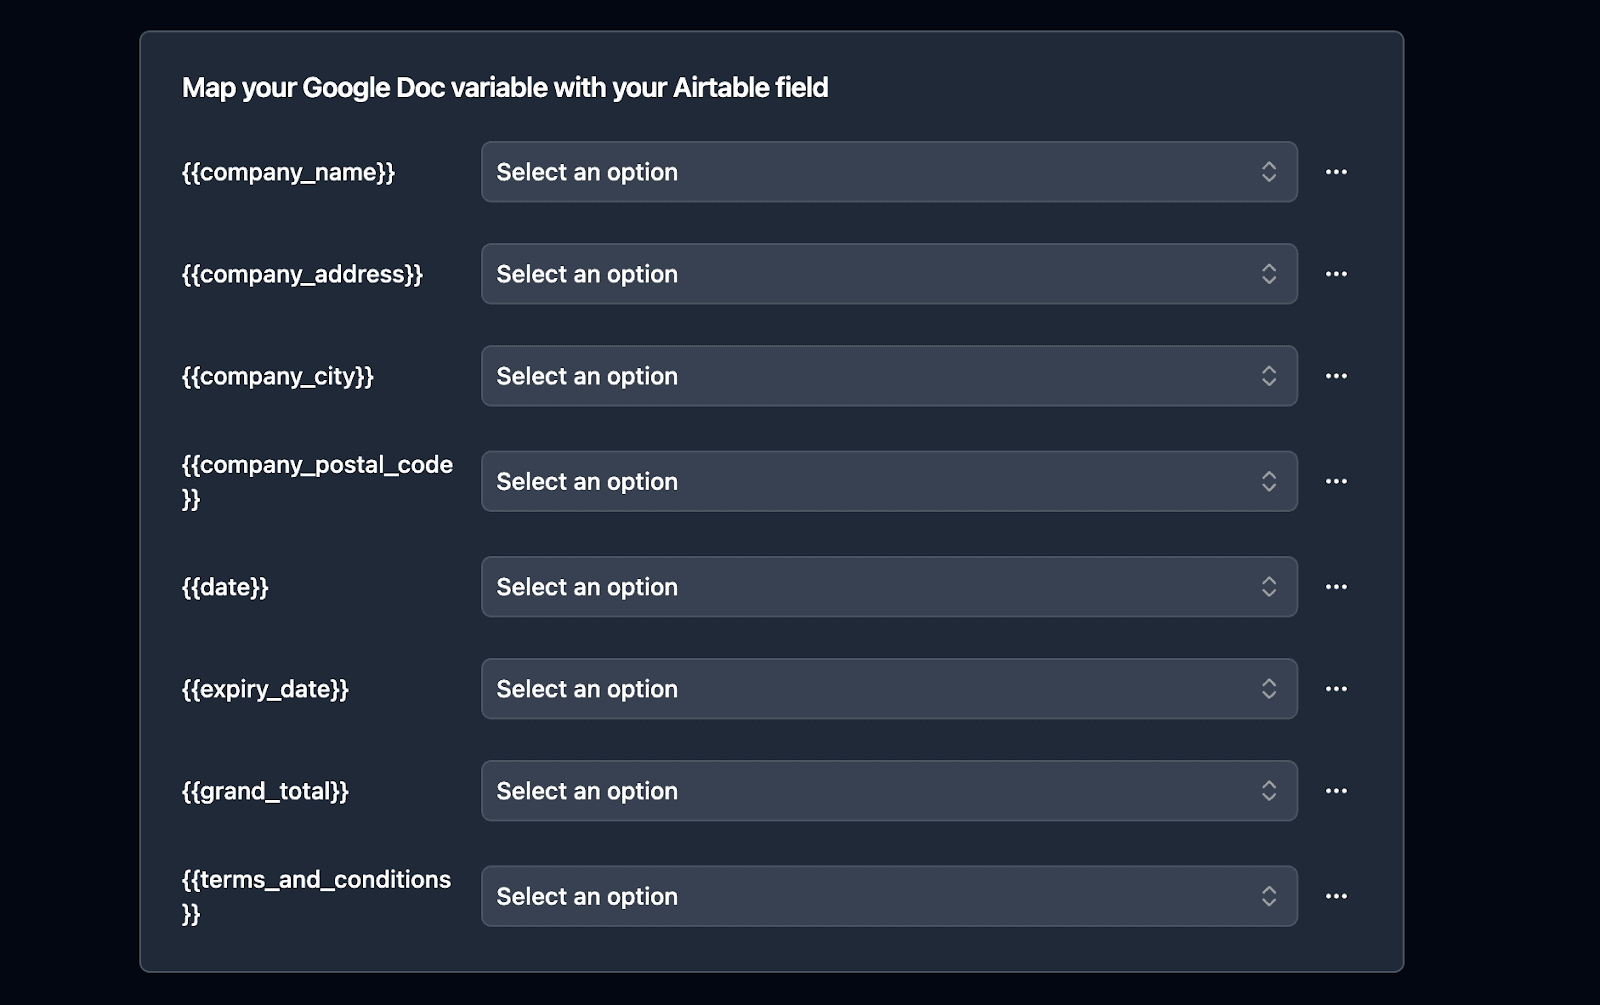
Step 3: Map Your Fields to Google Docs Variables
Once you have built your template, you can pick it in TypeFlow, and the configuration starts.
Pick your base.
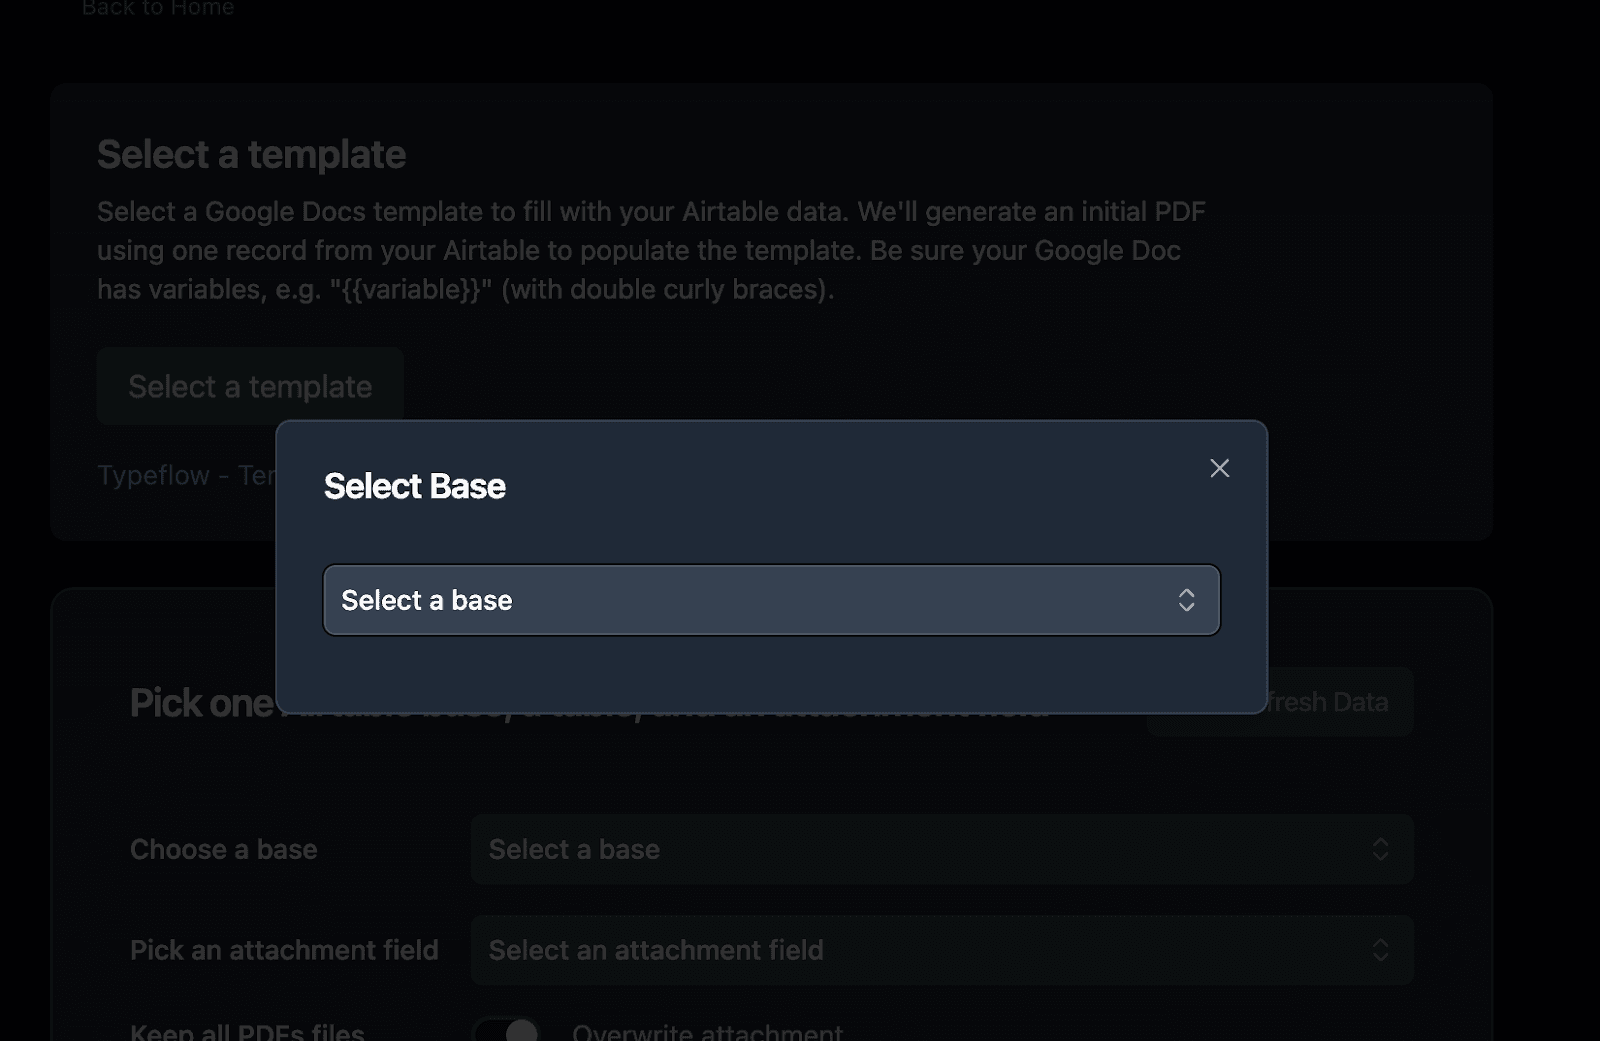
Pick your table
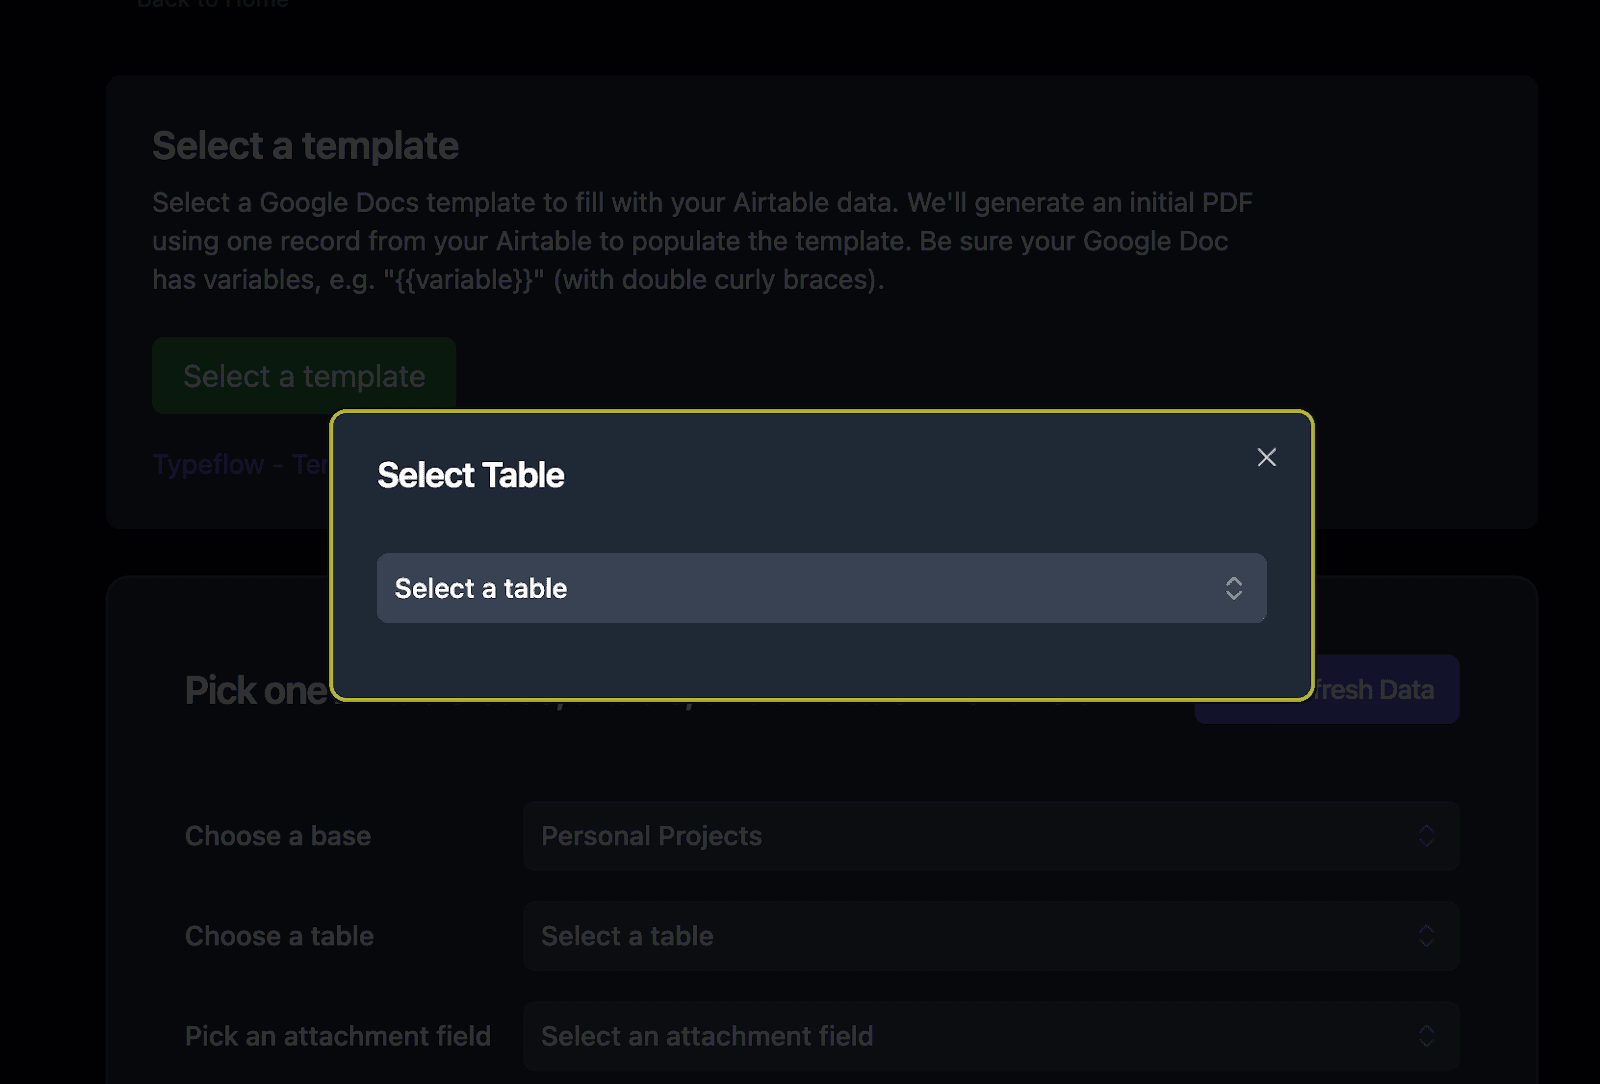
Pick an attachment field. We will save the generated document into it.
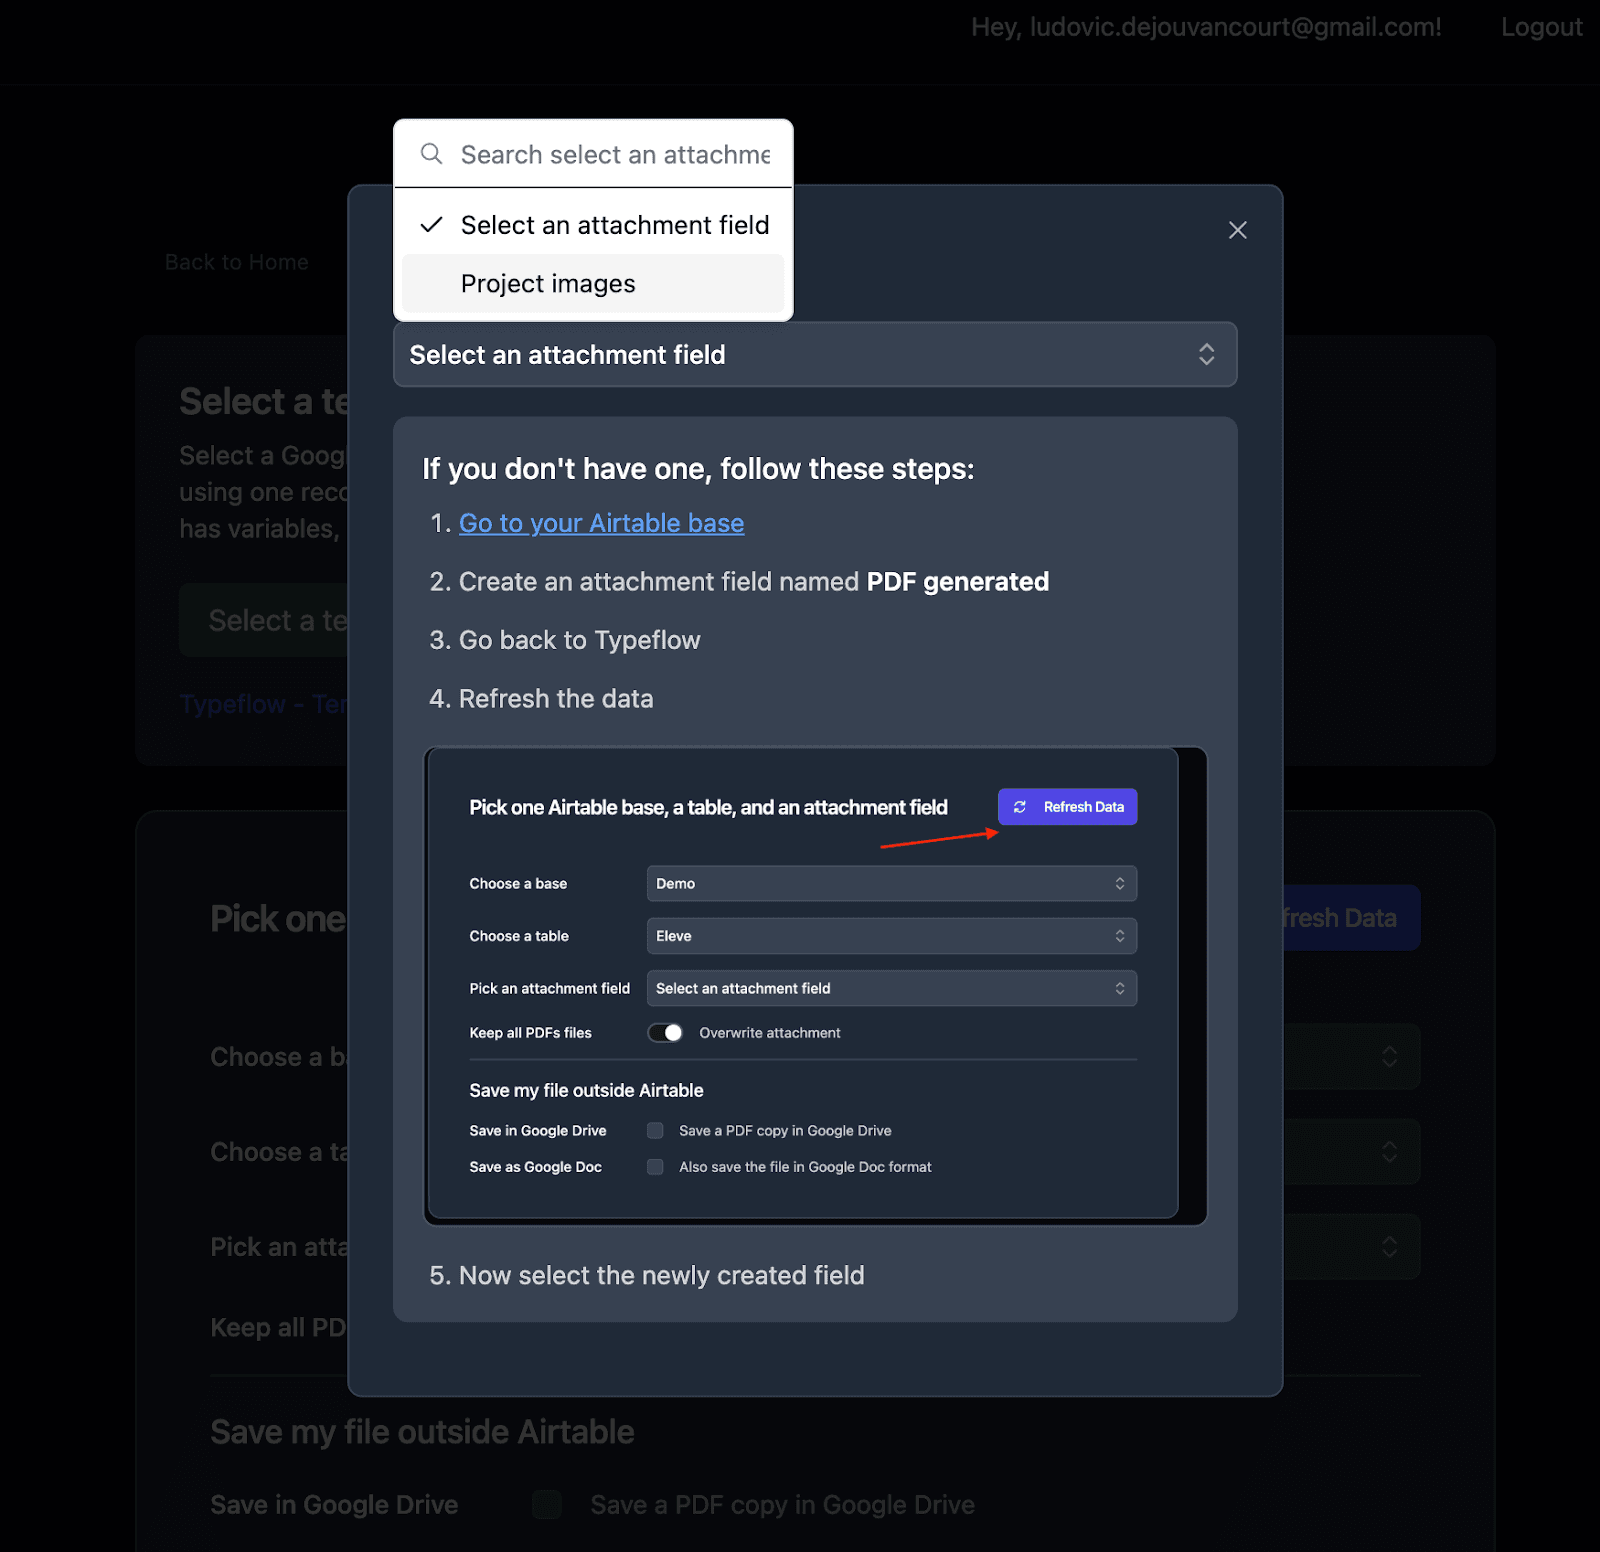
Now you can map the data.
If you have implemented loop_0 to access a linked record in a table, then you will see this section. You can choose a linked record field, and now map the Airtable fields from your linked record to your variables from the table.

After having mapped the data, always test with sample data before running on your full dataset. Generate one document and verify that all fields populate correctly. Check formatting, spacing, and that no variables remain unreplaced in your output.
How to Automate Document Generation in Airtable
You can automate document generation in Airtable using four methods: a button field for manual triggers, Airtable Automations for event-based triggers, the TypeFlow Extension for bulk generation, or third-party platforms like Zapier/Make. Choose the method that fits your workflow.
Once you've tested your flow, it's time to import TypeFlow to Airtable.
Method 1: Generate Document with a Button
To make invoice generation easy, you can add a button directly in your Airtable base:
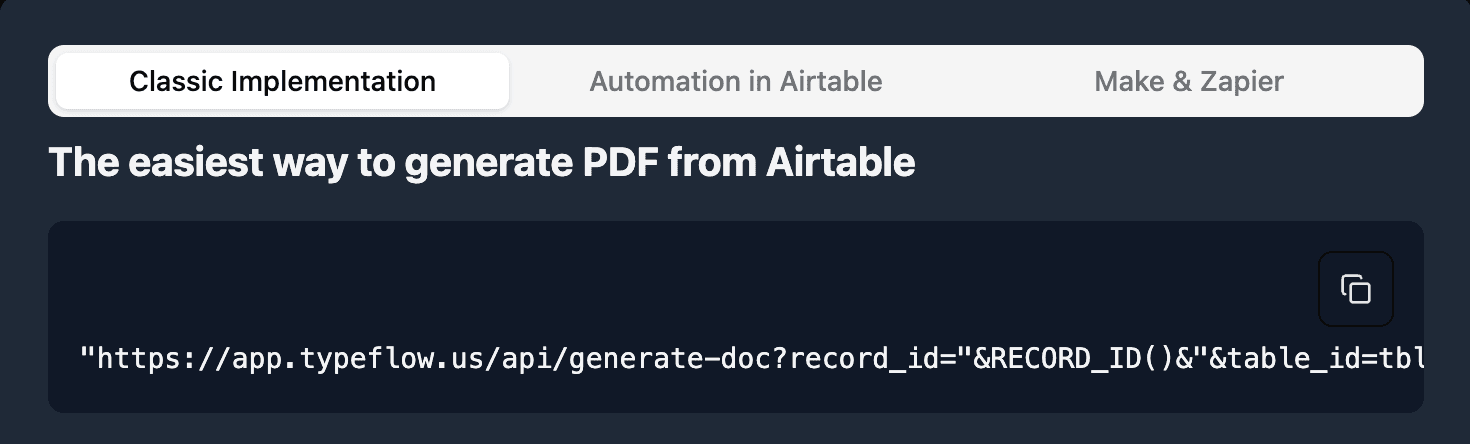
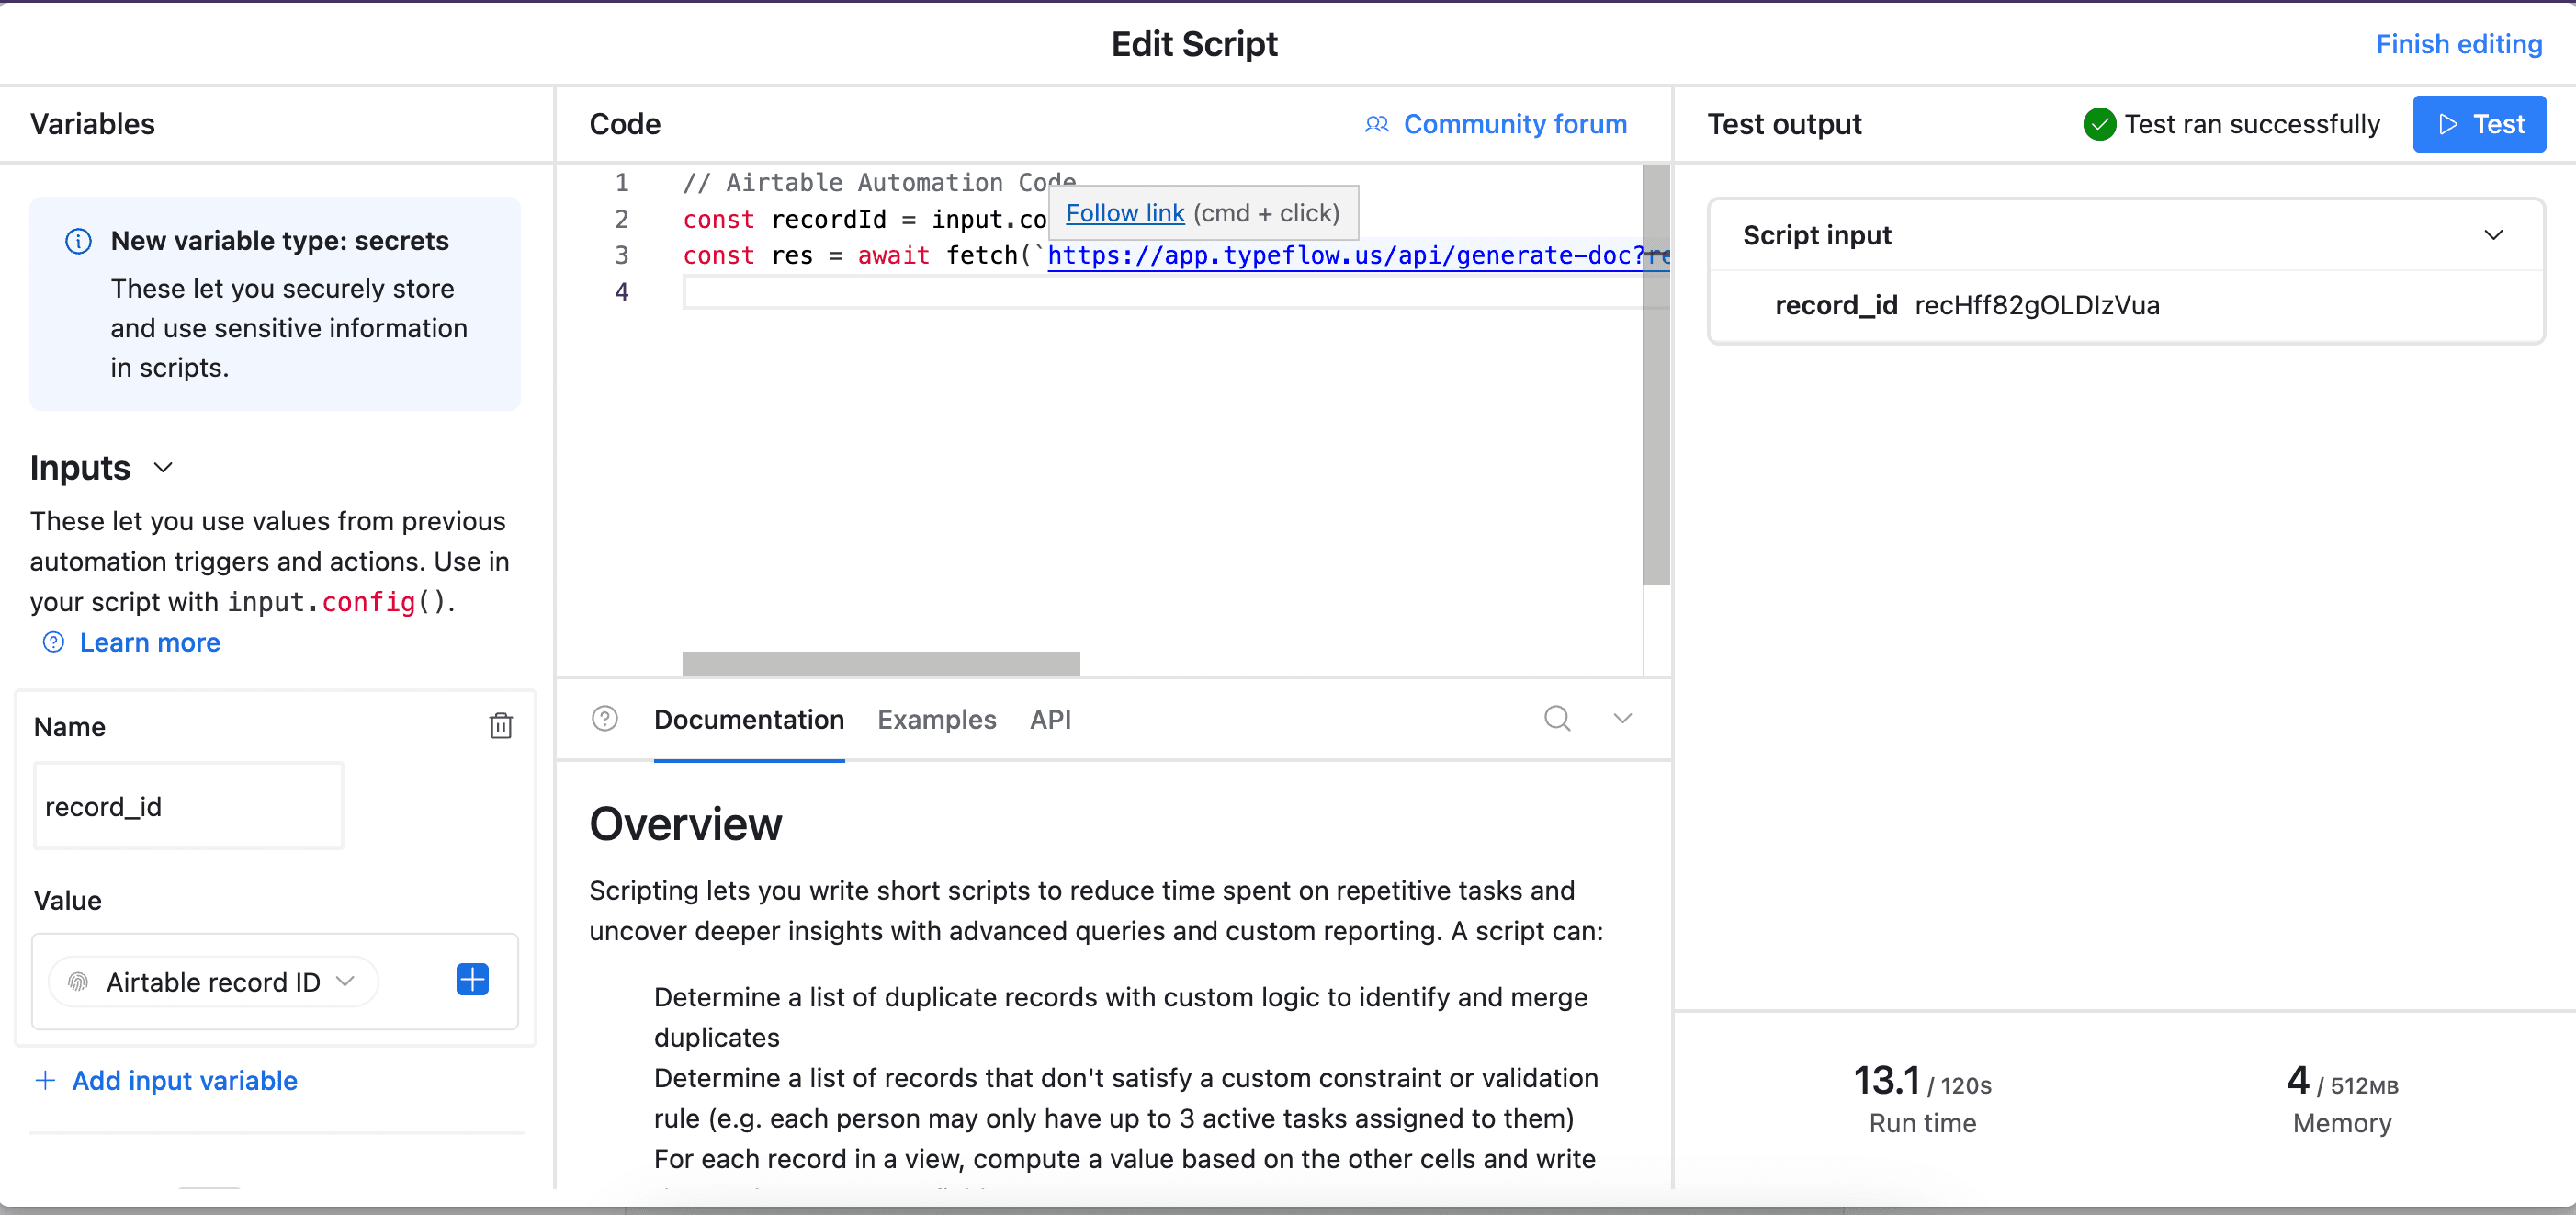
1. In TypeFlow scroll to the bottom of the page and click on " Classic Implementation"
2. Copy the URL, it should look like this: "https://app.typeflow.us/api/generate-doc?record_id="&RECORD_ID()&"&table_id=xxx&flow_id=xxx"
3. Go to your Airtable table and add a new button field

4. Paste the URL from TypeFlow to the URL Formula
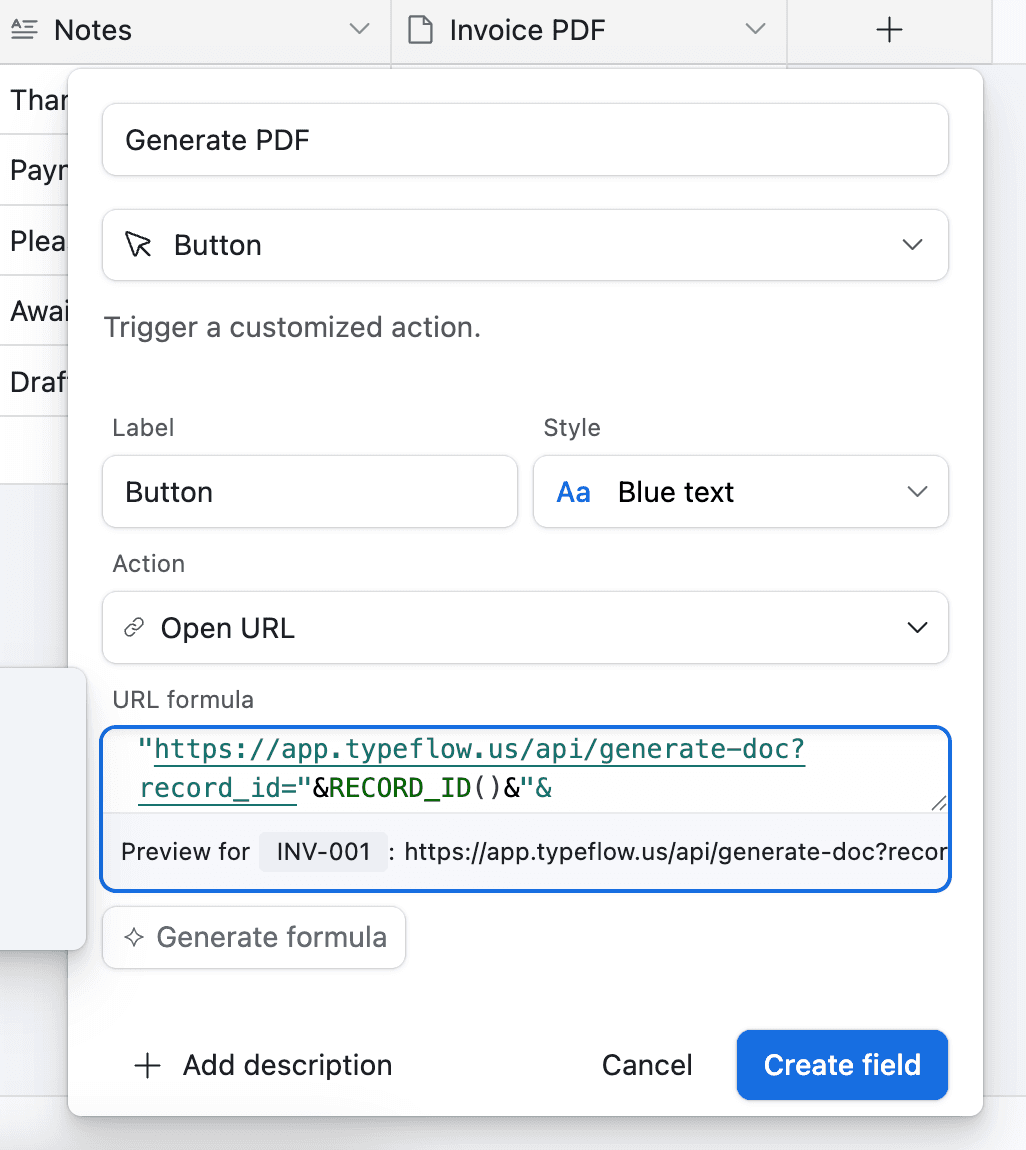
Now whenever you want to generate an invoice, you can click the button in Airtable and it will generate the PDF for you.
Method 2: Generate Documents with Airtable Automation
In this method, we will use the Airtable Automation. For the purpose of this article, we will trigger the PDF generation whenever the field Status, for any invoice, is equal to "Ready".
- Go to Automation in Airtable
- Click on "Add a trigger" and Choose When a Record matches a condition
3. Select the table you want to trigger the automation on (in this case the Invoices table)
4. Select the field you want to trigger the automation on (in this case the Status field)
5. Select the condition you want to trigger the automation on (in this case "is")
6. Select the value you want to trigger the automation on (in this case "Ready")
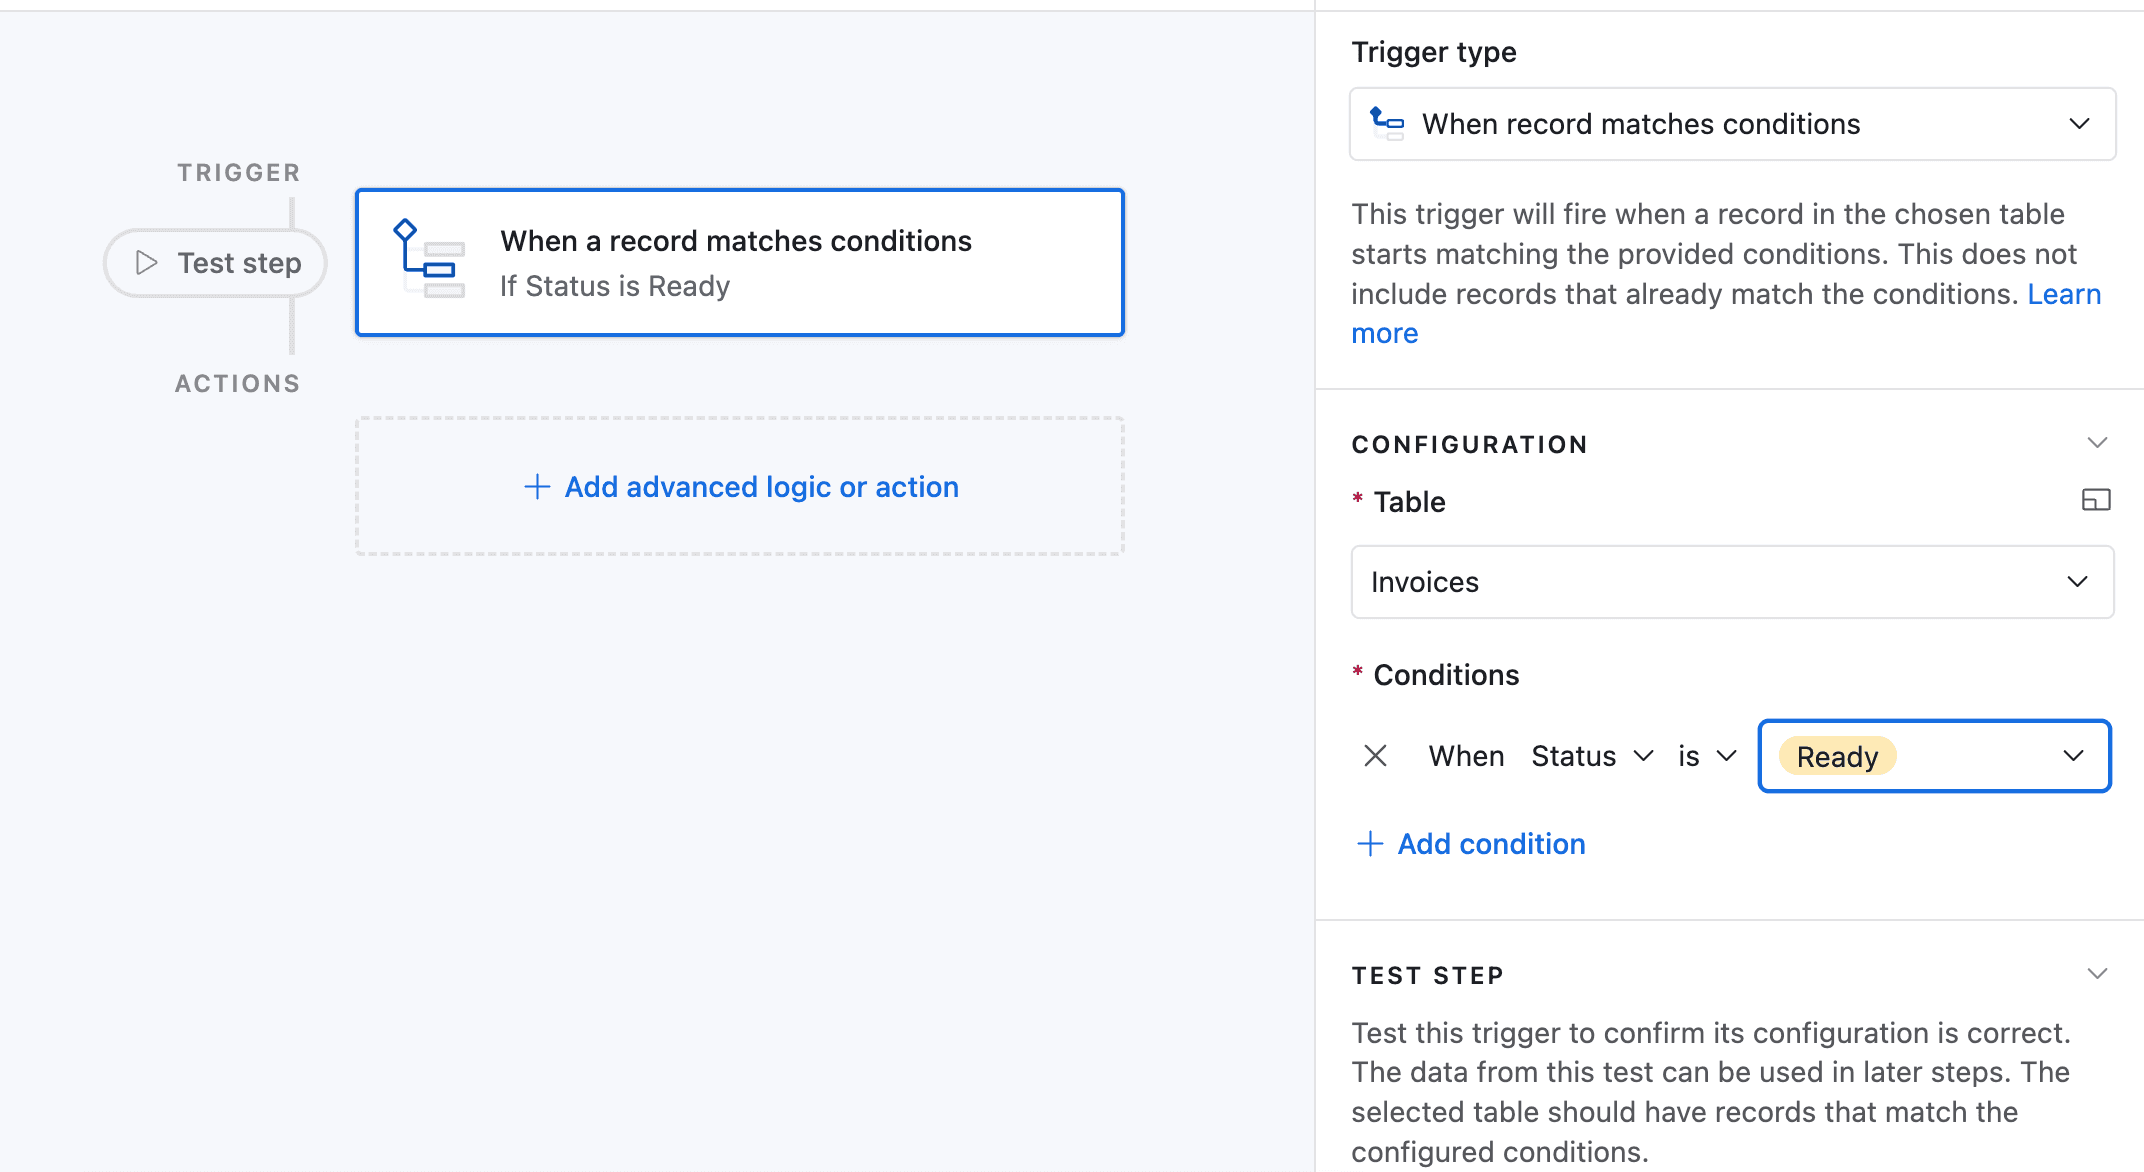
7. Now choose a record that matches the condition
8. Now click on Add an advanced logic or action
9. Pick Run Script. A new popup appears.
10. Go back to TypeFlow and select Automation in Airtable. Copy the script.
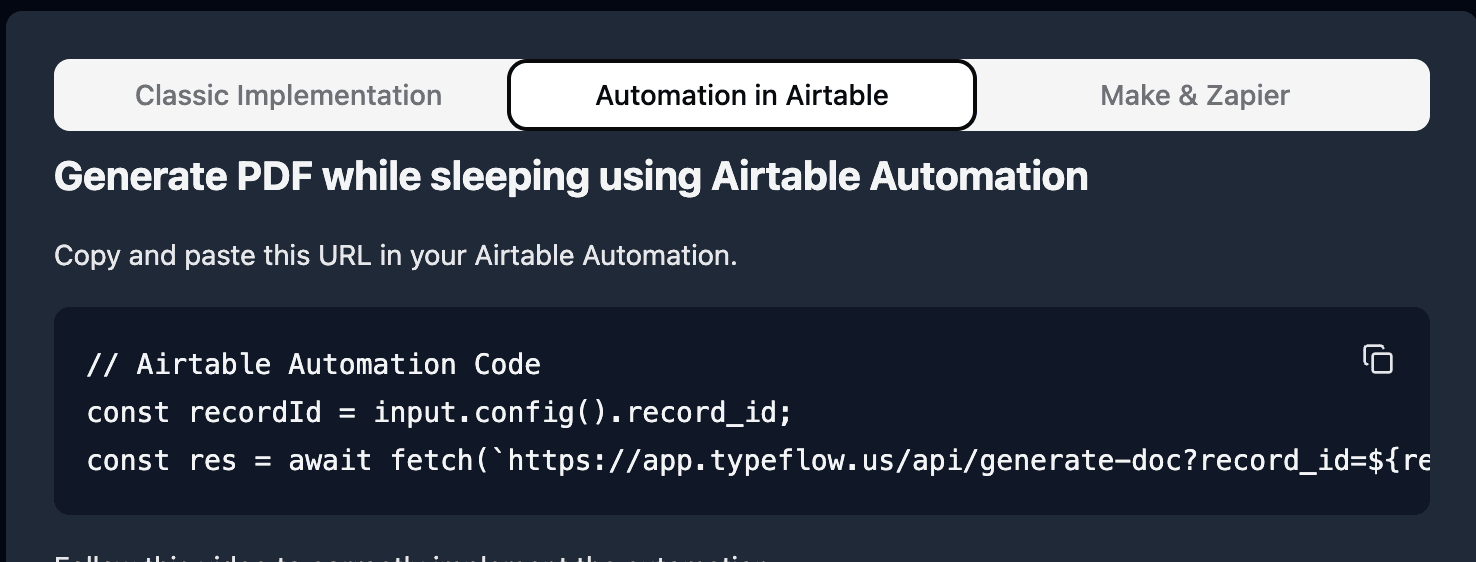
11. Paste the script in the popup.
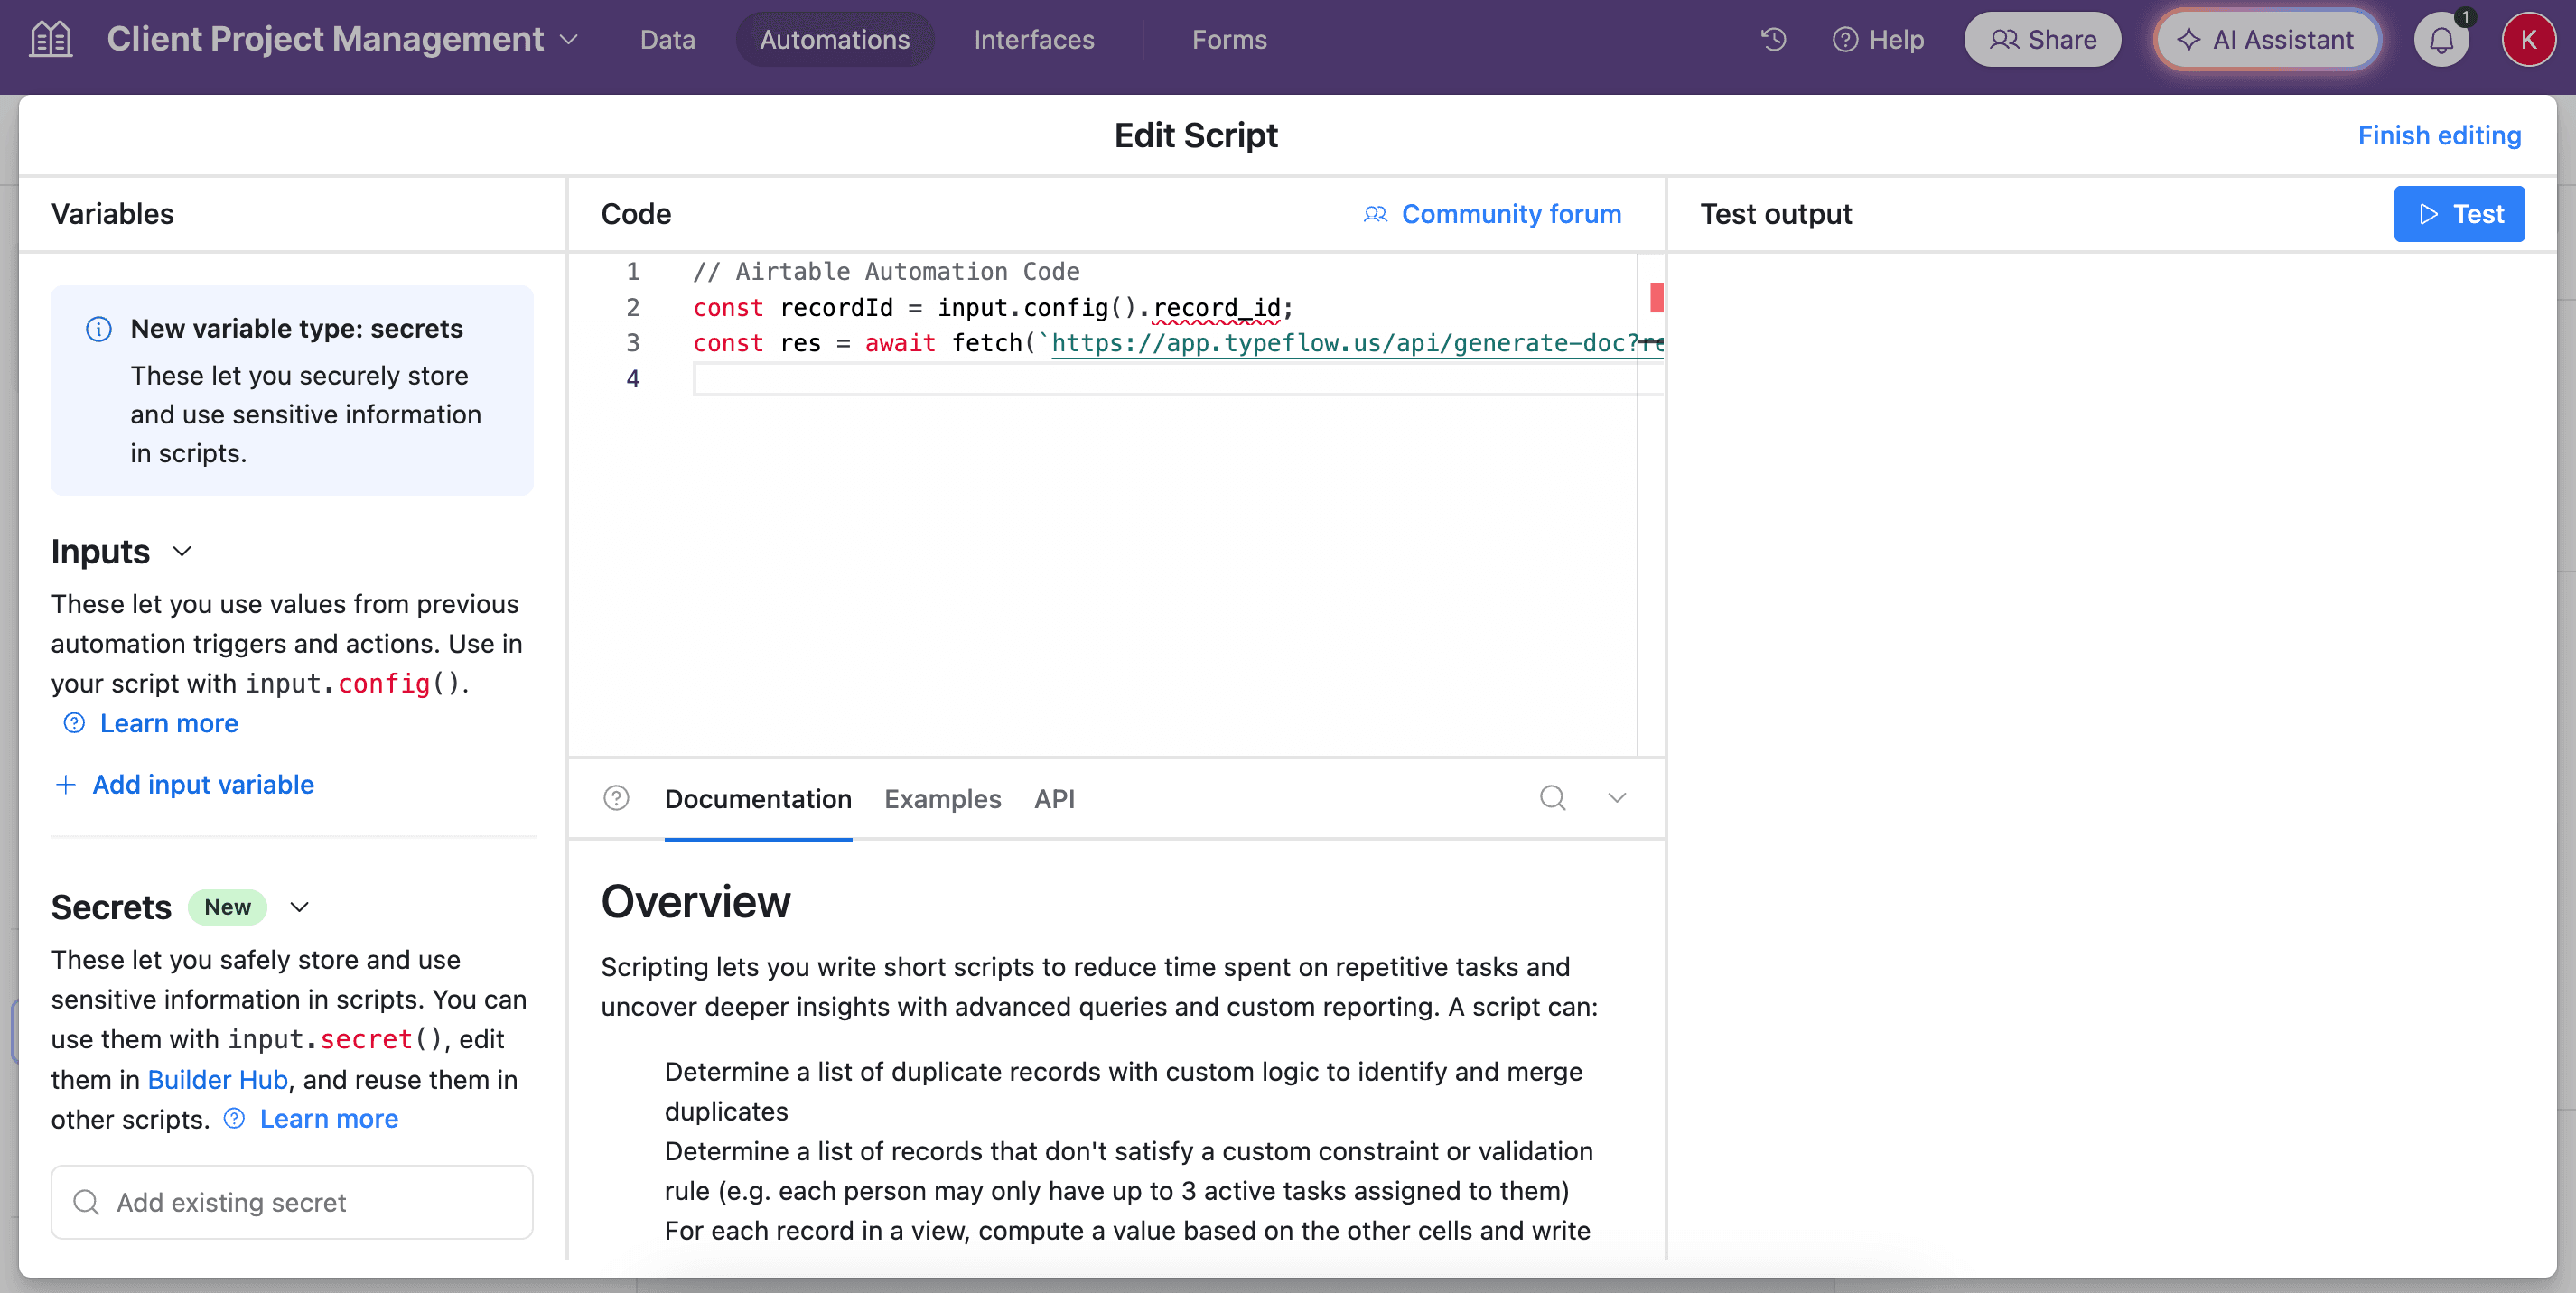
12. In the left-side of the popup, do not forget to configure the variable input, record_id. You need to select Airtable Record ID from the dropdown. See the image.
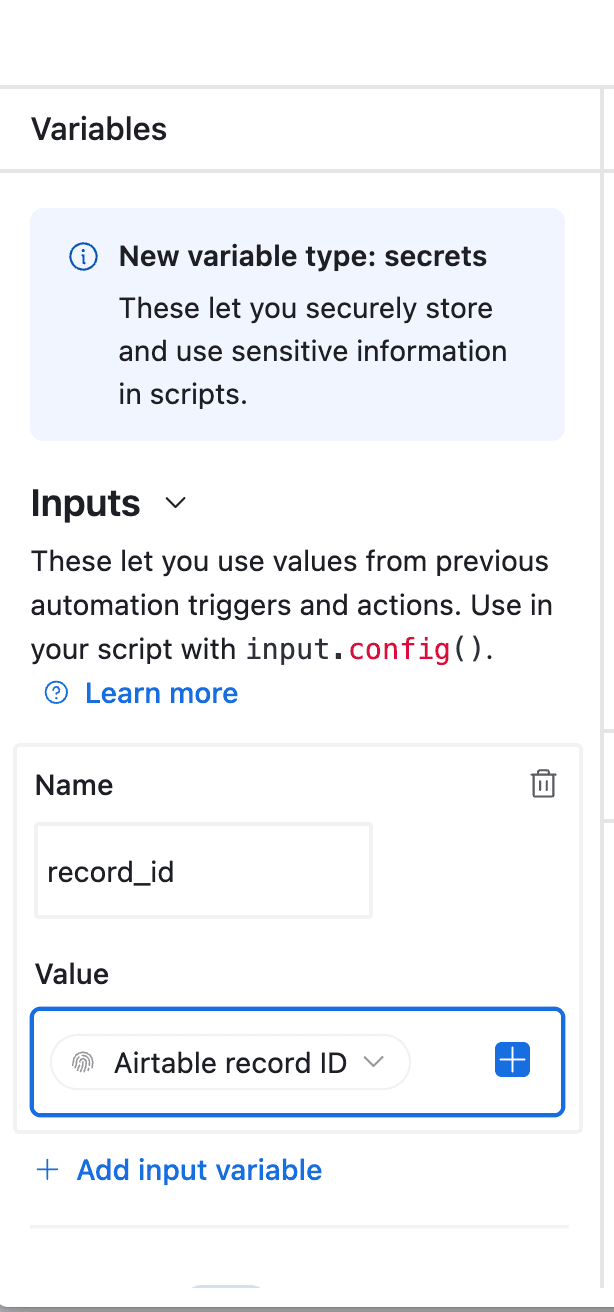
13. Test your script, and see if it works. Adjust if needed (most of the time the error comes from the record_id variable - see step 12).
14. Now name your automation and save it.
Now your flow is ready. Test it carefully to see if it works well.
Pro Tip
There are an infinite ways to trigger the document automation with Airtable Automation. Always try to find the best trigger for your use case.
Here are the most common trigger configurations with Airtable Automation:
- Scheduled triggers: Generate reports every Monday morning or monthly on the first day. Useful for recurring reports that summarize data from a time period.
- Event-based triggers: Create an invoice automatically when a deal moves to "Closed Won" or when a checkbox is marked. The document generates within seconds of the change.
- Form submission triggers: When someone submits an Airtable form, generate a confirmation document or certificate immediately.
- Conditional triggers: Only generate documents for records matching specific criteria. For example, only create invoices for amounts over €500.
You can combine triggers with email actions to send documents directly to recipients. When a new client is added to your base, automatically generate a welcome packet and email it to them. No manual steps required. For a step-by-step setup, see our guide on generating and emailing PDFs from Airtable automatically.
Once your automation is running, you can forget about it. Documents generate in the background while you focus on other work. You'll find finished PDFs waiting in your designated folder or attached to your Airtable records.
Method 3: The TypeFlow Airtable Extension
It's possible to generate documents with the Airtable Extension. It's the best way to bulk generate documents.
You can follow this tutorial:
How TypeFlow Airtable Extension works
Method 4: Zapier or Make.com
If your trigger happens outside Airtable, use Zapier or Make to connect Airtable to your document workflow. This is ideal when another tool (not Airtable) is the real "source of truth."
Example triggers:
- Generate a PDF when a deal is marked "Won" in HubSpot
- Create an invoice when an order is paid in Shopify
- Produce a certificate when a form is submitted in Typeform
Setup overview:
- Create a Zap/Scenario with your external app as the trigger
- Add an Airtable action to create or update a record
- Add a TypeFlow action to generate the document
- Optionally add email or storage actions
Adding E-Signatures to Generated Documents
For contracts, agreements, and other documents requiring signatures, you can add e-signature functionality directly in your workflow.
A Forrester study commissioned by DocuSign found that digital signatures save an average of 1.6 hours per transaction compared to manual processes.
TypeFlow's built-in e-signature:
- Add signature placeholders to your template
- Configure signers (name and email from Airtable fields)
- Recipients receive email invitations to sign
- Signed PDF automatically saves back to Airtable
- Legally compliant under ESIGN Act (US) and eIDAS (EU)
Learn more in our e-signature guide, our walkthrough on adding electronic signatures to Airtable documents, or our step-by-step guide to generating documents with e-signatures from Airtable.
Alternative approaches:
- Connect to DocuSign via Airtable or HelloSign via Zapier
- Use dedicated signing platforms after document generation
Set up your first automation in 15 minutes
No coding required. Connect Airtable, pick a template, and start generating documents today.
Start free with 20 documents →Best Practices for Airtable Document Generation
Always test with 2-3 sample records before bulk generation, match template variable names exactly to Airtable field names, and use filtered views to control which records generate documents.
Test before bulk generation:
- Start with 2-3 sample records to validate your template
- Check field mapping accuracy across different record types
- Ensure all dynamic content renders correctly
Name templates and fields consistently:
- Use clear, predictable names for Airtable fields (avoid special characters)
- Match template variable names to field names for easier mapping
- Document your naming conventions for team consistency
Use views for bulk generation:
- Create filtered views for specific document batches (e.g., "Ready to Invoice")
- Use the TypeFlow extension to generate from selected records in a view
- Avoid generating documents for records with incomplete data
Set up error notifications:
- Configure Airtable Automations to alert you when generation fails
- Check attachment fields to confirm documents were created
- Monitor automation run history for issues
Version control your templates:
- Keep templates in a dedicated Google Drive folder
- Use clear file names with dates or version numbers
- Make copies before making significant changes
Common Issues and How to Fix Them
The three most common issues are missing line items (caused by a missing loop variable in the template), images not displaying (wrong variable syntax), and automation failures (unconfigured record_id parameter). Here is how to fix each one:
Problem: Line items don't appear in PDF
- Cause: Missing
{{loop_0}}variable in table - Solution: Ensure first cell of table row contains
{{loop_0}} - See: Step 2.3 for correct implementation
Problem: Images not displaying
- Cause: Attachment field empty or wrong variable syntax
- Solution: Use
{{image_FieldName}}for main doc,{{loop_image_FieldName}}for line items - Verify attachment field contains valid image files
Problem: Automation script fails in Airtable
- Cause: record_id variable not configured (Step 12)
- Solution: In left sidebar, select "Airtable Record ID" from dropdown
- See: Step 12 in Method 2 for detailed instructions
For more complex automation workflows, you can also connect your document generation tool to Zapier or Make to trigger documents based on events from other apps. The Airtable community is also a great resource for troubleshooting specific use cases.
Real Examples: How Teams Use Airtable Document Automation
Here are real-world examples of how teams use Airtable document generation (anonymized from TypeFlow customers):
Manufacturing company - Packing slips: A parts distributor generates 200+ packing slips weekly. Each slip includes itemized products, quantities, and shipping details pulled from their Orders table. What took a warehouse team member 3 hours per day now happens automatically when orders are marked "Ready to Ship." For more on this use case, see our manufacturing document automation guide.
Professional services firm - Client proposals: A consulting agency creates customized proposals from their CRM data in Airtable. Project scope, pricing tiers, and team bios populate automatically. The team generates proposals in seconds instead of copying data into Word documents for 30+ minutes each.
Construction firm - Project documents: Construction teams use Airtable to manage submittals, change orders, and project closeout packages. Automating these documents eliminates manual formatting and ensures every document meets compliance standards. See our construction document automation guide for a detailed setup.
Real estate agency - Listing and transaction documents: Real estate professionals generate offer letters, listing agreements, and disclosure packets directly from their Airtable CRM. Each document pulls property details, agent info, and client data automatically. Learn more in our real estate document automation guide.
Training organization - Course certificates: An online education company issues certificates to students who complete courses. When an instructor marks a student as "Passed," the certificate generates with their name, course title, and completion date - then emails automatically to the student.
Start Generating Documents from Airtable Today
You now understand how to generate documents from Airtable automatically. The next step is setting up your own workflow and seeing the time savings for yourself.
TypeFlow offers a straightforward way to connect your Airtable data to Google Docs templates. You can create invoices, certificates, contracts, reports, and any other document type your business needs. The setup takes minutes, and you'll have professional documents generating automatically. Rated by Airtable users on G2.
Start for Free and build your first document automation today. The free tier lets you test the full workflow before committing. If you get stuck, the documentation covers common questions and setup scenarios.
Your team's time is valuable. As McKinsey research highlights, 60-70% of employee time in language-heavy workflows like reporting and documentation can be automated. The thirty minutes you spend setting this up will save you hours every month.
About This Data
The setup times, processing speeds, and time-saving estimates in this guide are based on real-world data from 2000+ TypeFlow customer implementations (2024-2025). All customer examples are anonymized to protect confidentiality. External research citations (Zapier Automation Report 2024, Dr. Raymond Panko's data entry error research, Behavior Research Methods 2019) provide independent verification of industry-wide productivity and accuracy challenges that document automation addresses.
Automate your document generation
Start with 20 free documents. Built for businesses using Airtable.
Frequently Asked Questions
Find answers to the most common questions about this feature.
Popular Questions
All Questions
Need more help?
Our team is here to help you solve all your problems and answer your questions.
Contact Us
Kevin from TypeFlow
•AuthorKevin Rabesaotra is a growth engineer and automation specialist with 8+ years of experience building no-code solutions. As Founder & CEO of TypeFlow, he has helped hundreds of businesses automate document generation and streamline workflows with Airtable integrations. Previously, Kevin was a Product Lead specializing in growth engineering, running experiments to drive revenue, retention, and lead generation.
More articles
How to Print Labels from Airtable with Quantity Control (Step by Step)
Print multiple labels per Airtable record based on a quantity field. Step-by-step guide for linked records mode and quantity repeat mode with barcodes and Avery sheets.
Read articleHow to Print Avery Mailing Labels from Airtable
Print Avery mailing labels (5160, 5161, 5162) from Airtable without Word mail merge. Step-by-step guide with print label mode, automation, and bulk generation.
Read articleHow to Create Inventory Labels with Barcodes in Airtable
Create inventory labels with Code 128, EAN-13, or QR barcodes from Airtable. Step-by-step guide for warehouse, retail, and asset tracking with thermal and Avery printers.
Read article