How to Automate Certificate Generation in Airtable
You can automate certificate generation directly from your Airtable recipient data. Connect TypeFlow, create a Google Docs or HTML/CSS template with placeholders for name, course, and date, and generate branded certificates in bulk or one at a time - with optional e-signature for instructor approval.
It's a common challenge for online course platforms and training organizations. Here's how the main approaches compare:
- Design tools (e.g., Canva): Great for layouts, but still manual to personalize and send.
- Credential platforms (e.g., Accredible, Certifier): Full systems, but more than many teams need.
- This guide: A simpler setup that generates and delivers PDF certificates from your Airtable data.
When you automate certificate generation with Airtable, you:
- Reduce manual work from hours to seconds
- Eliminate copy-paste errors
- Maintain consistent branding across all certificates
- Free up time to focus on your programs and events
TL;DR
- Airtable stores certificate data, but it doesn't create or send PDF certificates by itself.
- TypeFlow connects Airtable to a Google Docs template to generate PDF certificates.
- Setup takes about 15 minutes and requires no code.
- Trigger generation with a button, an Airtable automation, or bulk generation.
- Your first 20 documents are free to test end-to-end.
Why Airtable Can't Generate Certificates on Its Own
Airtable is great for storing recipient data, completion dates, and course details. But it's missing key pieces for certificates.
Manual Exporting Is Slow and Error-Prone
Page Designer works for one-off PDFs, but exporting certificates one by one doesn't scale. With dozens or hundreds of recipients, it becomes a bottleneck.
No Built-in Verification or Credibility Features
There's no native system for verification URLs, QR codes, or unique certificate IDs. If a recipient needs to prove their credential is legitimate, Airtable can't help.
Certificate Distribution Is Entirely Manual
Airtable won't automatically generate a PDF and email it as an attachment to each recipient. You'd need to export, attach, and send each one yourself.
What TypeFlow Adds to Your Airtable Certificate Workflow
TypeFlow fills the gaps between your Airtable records and a finished certificate your recipients can download.
- Automated PDF generation: Turn each Airtable record into a polished certificate in seconds.
- Branded templates: Design in Google Docs with your logo, fonts, and layout.
- Automatic email delivery: Send the PDF to the recipient as soon as they're marked complete.
- Verification-ready: Add unique IDs and QR codes so credentials are easy to confirm.
What You'll Build: An Automated Certificate System
You'll build a workflow that takes recipient data from Airtable and turns it into a finished PDF certificate automatically.
The full setup takes about 15 minutes, and there's no coding required.
Here's an example of a certificate generated from Airtable data using TypeFlow's Template Builder. Click the preview to open the full PDF, or duplicate the demo Airtable base to try it yourself:

Ready-to-use template
Course Completion Certificate
Duplicate the Airtable base, paste the template in Typeflow, then generate your first PDF in minutes.
Free tier available • No credit card required
What You Need Before Starting
Before you begin, make sure you have these four items ready. I recommend starting with 5-10 test records so you can perfect your setup before generating certificates for a large group.
- Airtable account: The free version works perfectly for this.
- TypeFlow account: This connects your Airtable data to generate the PDFs.
- Recipient data: An Airtable table with a list of people who will receive certificates.
- Certificate template: A basic design in Google Docs.
Step 1: Set Up Your Airtable Base
The schema below matches the demo base you can duplicate in one click. It uses two linked tables: Courses (shared course info) and Certificates (one record per recipient per course). Each record in Certificates generates one PDF.
Courses Table
Holds shared information that appears on every certificate for a given course. Create this table first.
| Field Name | Field Type | Purpose |
|---|---|---|
| Course Name | Single line text | Primary field |
| Program Name | Single line text | e.g. "Data Science Professional Track" |
| Instructor Name | Single line text | Lead instructor |
| Director Name | Single line text | Program director (co-signs the certificate) |
| Total Hours | Number | Total instruction hours |
| Course Description | Long text (rich text ON) | Brief summary shown on the certificate |
| Accreditation | Single line text | e.g. "CPE Accredited - 12 CEUs" |
| Organization Name | Single line text | Issuing organization |
| Verification URL | URL | Where the certificate can be verified online |
Certificates Table (main)
One record per recipient per course. This is where generation is triggered.
| Field Name | Field Type | Purpose |
|---|---|---|
| Certificate Title | Single line text | Primary field (e.g. "Sarah Martinez - Advanced Data Analytics") |
| Recipient Name | Single line text | Full name on the certificate |
| Recipient Email | For automated delivery | |
| Course | Link to Courses | Link to the Courses table |
| Completion Date | Date | Date of completion |
| Grade | Single line text | e.g. "Distinction", "Pass with Merit" |
| Certificate ID | Single line text | Unique identifier (e.g. "AIT-2026-DS-0847") |
After creating the Course link field, add lookup fields for: Course Name, Program Name, Instructor Name, Director Name, Total Hours, Course Description, Accreditation, Organization Name, Verification URL. These pull data from the linked Course record so you never duplicate course info across certificates.
In your template, you reference fields by name: {{Recipient Name}}, {{Course Name}}, {{Instructor Name}}, {{Completion Date}}, etc. TypeFlow resolves the lookup fields automatically.
Step 2: Design Your Certificate Template in Google Docs
You can duplicate our certificate template. Then change the design the way you want. Add placeholders for Airtable data. The placeholders work like fill-in-the-blank spaces that get replaced with actual information. Add your logos, adjust the borders, etc.
Add placeholders for the data you want to pull from Airtable. These act as fill-in-the-blank fields.
Placeholder Naming: Use double curly braces, like {{Recipient Name}}. For easy mapping, name placeholders the same as your Airtable fields.
For example, If your field is called "Full Name" in Airtable, your template variable name should be {{Full Name}} (or {{full name}} or {{full_name}}) but not {{Recipient Name}}.
To ensure your final PDF looks professional, follow these design tips:
- Keep text at least 12pt for readability.
- Leave a margin of at least 0.5 inches on all sides.
- Test your design with the longest name in your dataset to check for text overflow.
Step 3: Connect TypeFlow to Your Airtable Base
Connecting TypeFlow to Airtable takes about two minutes. You'll connect to Airtable securely. You can visit this link to connect your Airtable account to TypeFlow.
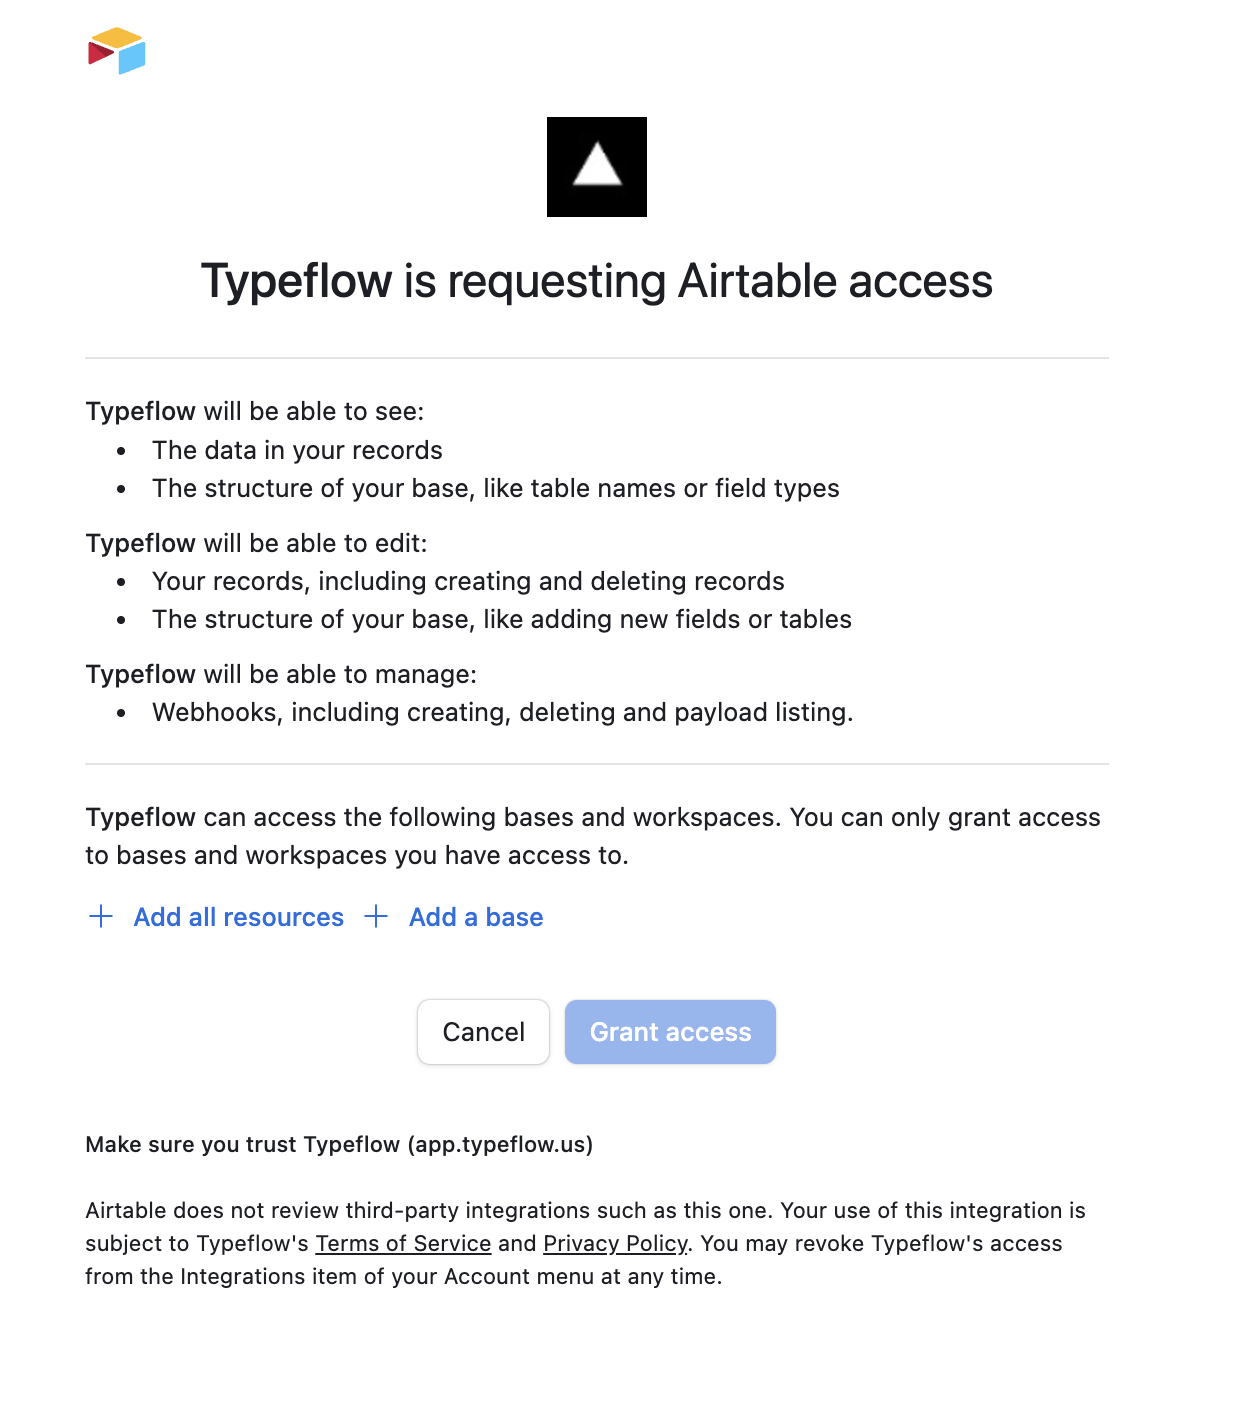
Now when creating a new flow, TypeFlow shows you all the selected bases in your Airtable account. Select the one with your certificate data, and TypeFlow reads your table structure and field names.
Step 4: Map Airtable Fields to Template Variables
This step connects your Airtable data to the placeholders in your template. You're telling TypeFlow which data goes where.
TypeFlow shows your template variables on the left and your Airtable fields on the right. Match each variable to its corresponding field by clicking or dragging. If your Airtable Field has the same name as the placeholders, you can use the Auto-map feature. The mapping will be done automatically.
{{Recipient Name}}connects to your Recipient Name field.{{Course Name}}connects to your Course Name field.{{Completion Date}}connects to your Completion Date field.
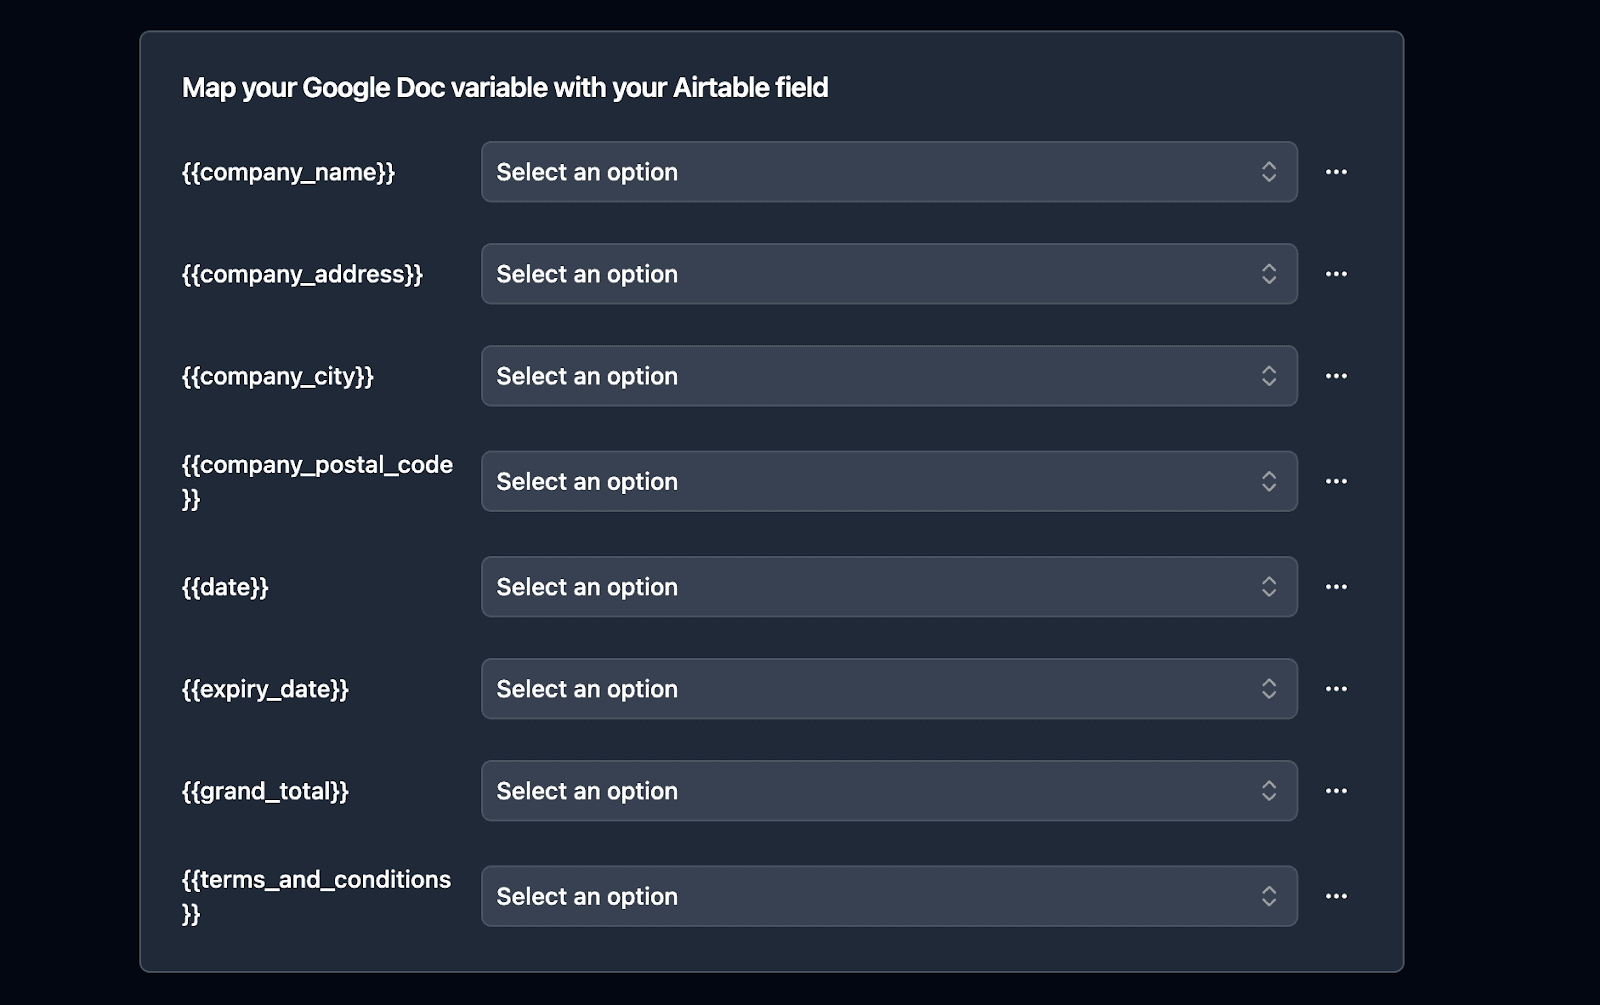
Pro Tip: If your Airtable field names match your template placeholders, use the 'Auto-map' feature to complete this step instantly.
Step 5: Generate Your First Test Certificate
Before automating the entire process, generate a single test certificate. This allows you to catch any formatting or mapping errors early.
In TypeFlow, click 'Generate PDF for test' and select one record from your Airtable base. Once the PDF is created, check it for the following:
- Correct data in all placeholder fields.
- Proper text alignment and formatting.
- No blurry text or images that are cut off.
If anything looks wrong, adjust your Google Docs template and generate another test. Repeat this until the certificate looks perfect.
Step 6: Automate Certificate Generation
Once your test certificate looks right, choose how you want certificates to generate going forward.
| Method | Best For | How It Works |
|---|---|---|
| Button Field | Quick, manual generation for single records. | Click a button in an Airtable row to generate one PDF. |
| Airtable Automation | Trigger-based, fully automated generation. | A record change (e.g., status update) runs a script. |
| Airtable Extension | Generating many certificates at once (bulk). | Select multiple records and run the extension. |
Method 1: Button Field (Quick Manual Generation)
To make certificate generation easy, you can add a button directly in your Airtable base:
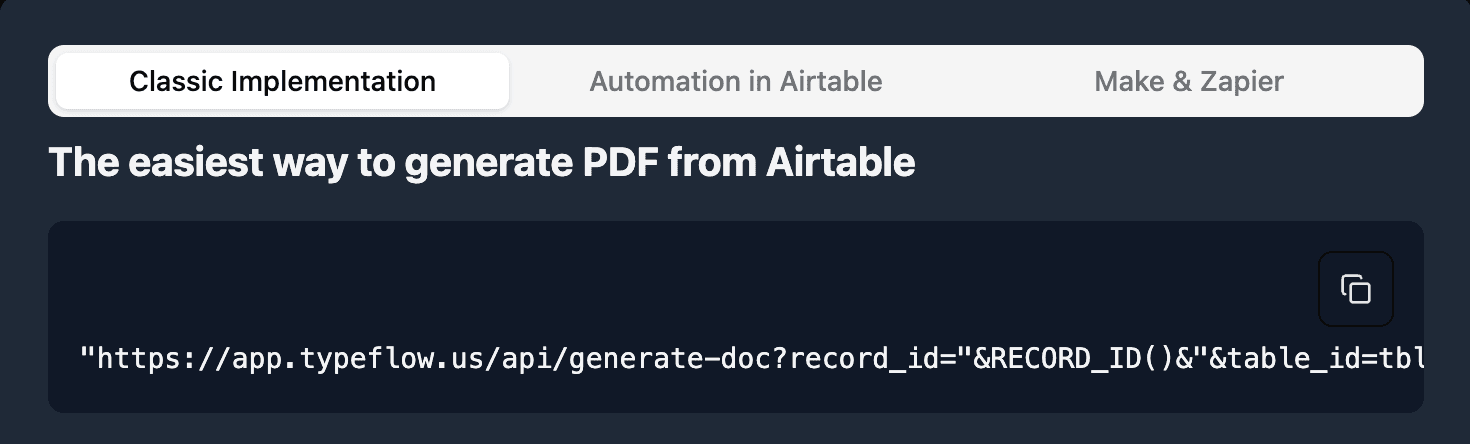
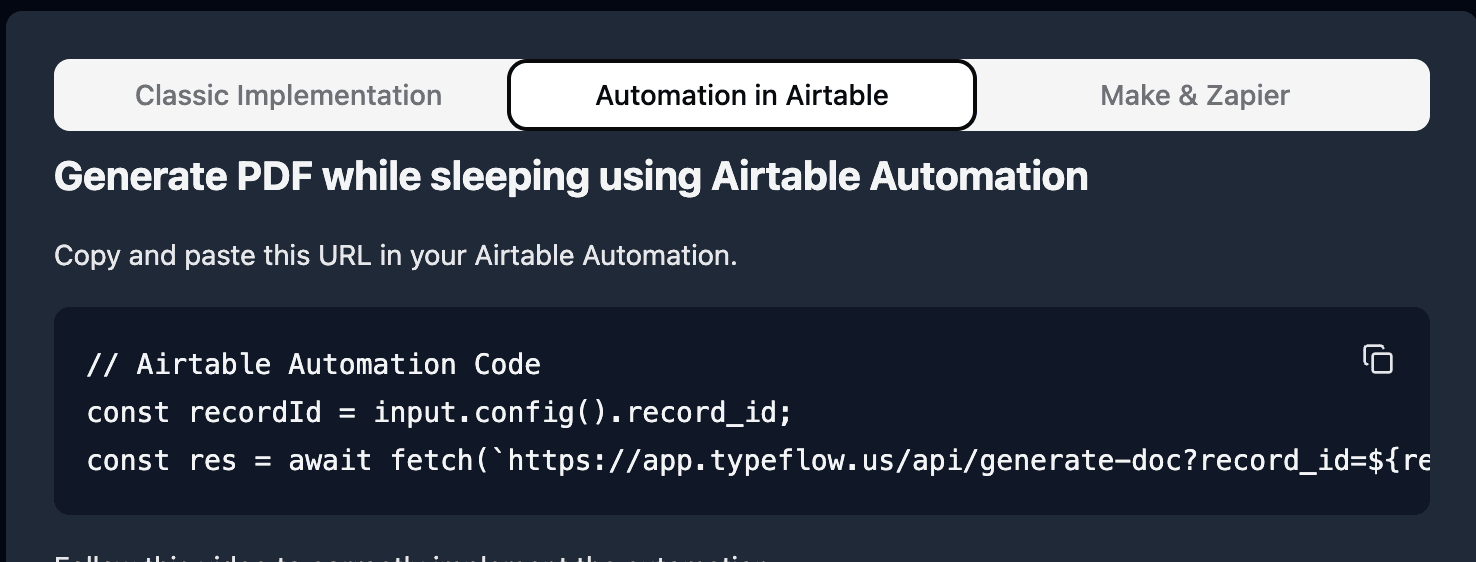
- In TypeFlow, scroll to the bottom of the page and click on "Classic Implementation."
- Copy the URL; it should look like this:
"https://app.typeflow.us/api/generate-doc?record_id="&RECORD_ID()&"&table_id=xxx&flow_id=xxx"
- Go to your Airtable table and add a new button field

- Paste the URL from TypeFlow to the URL Formula
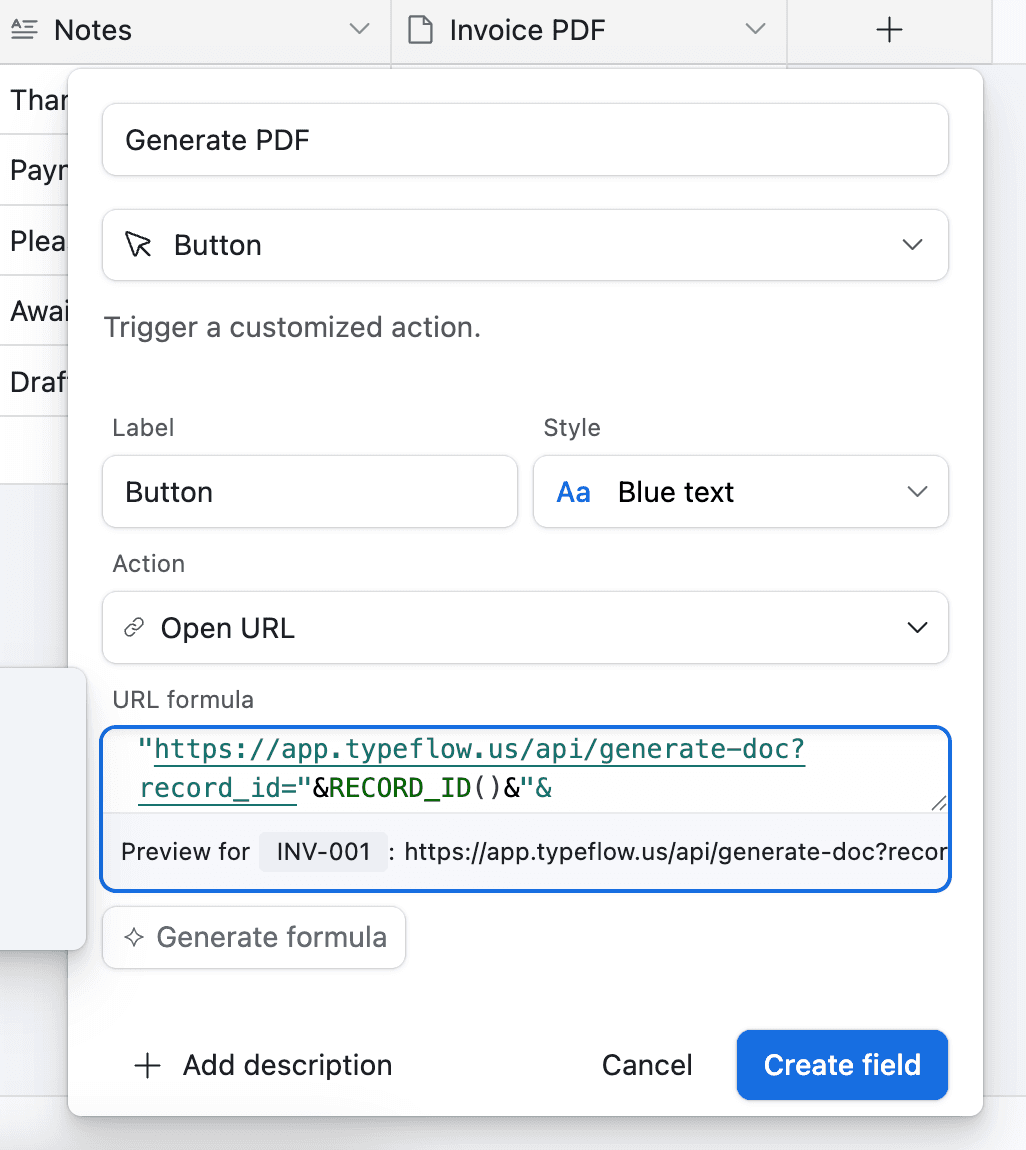
Now whenever you want to generate a certificate, you can click the button in Airtable and it will generate the PDF for you.
Method 2: Airtable Automation (Trigger-Based)
With this method, we will use the Airtable Automation.
Open your Airtable base and click "Automations" in the top toolbar. Create a new automation and pick your trigger condition.
Common triggers include:
- When a record enters a view: Create a filtered view called "Ready for Certificate" and certificates generate when records appear there.
- When a field matches a condition: Generate when Status changes to "Completed."
- When a form is submitted: Works well for event registrations or course completions.
In this example, we'll generate a certificate whenever the Status field equals Ready.
- Go to Automation in Airtable
- Click on "Add a trigger" and Choose When a Record matches a condition
- Select the table you want to trigger the automation on (in this case the Certificates Recipients table)
- Select the field you want to trigger the automation on (in this case the Status field)
- Select the condition you want to trigger the automation on (in this case "is")
- Select the value you want to trigger the automation on (in this case "Ready")
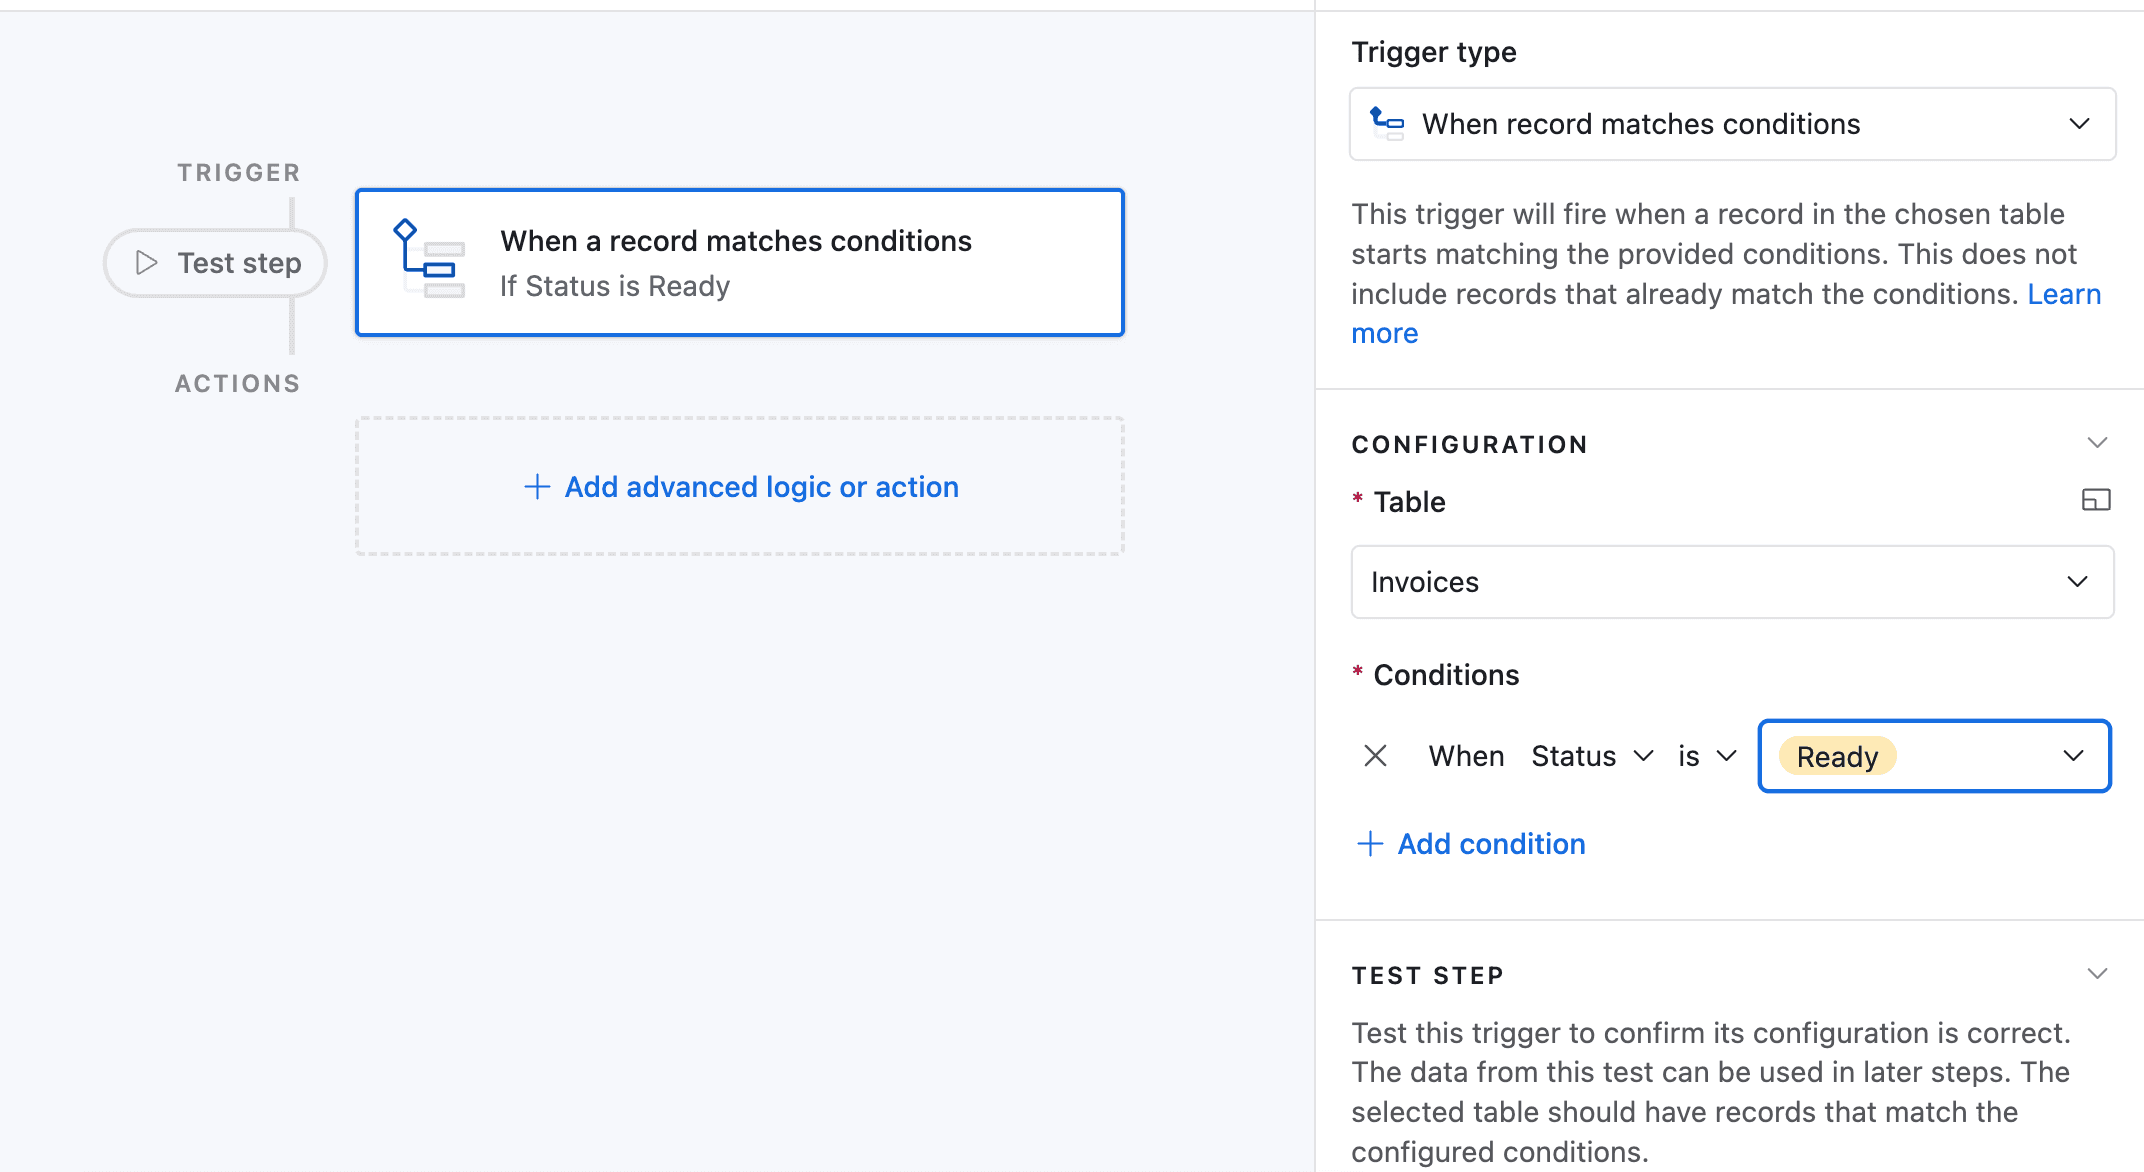
- Now choose a record that matches the condition
- Now click on Add an advanced logic or action
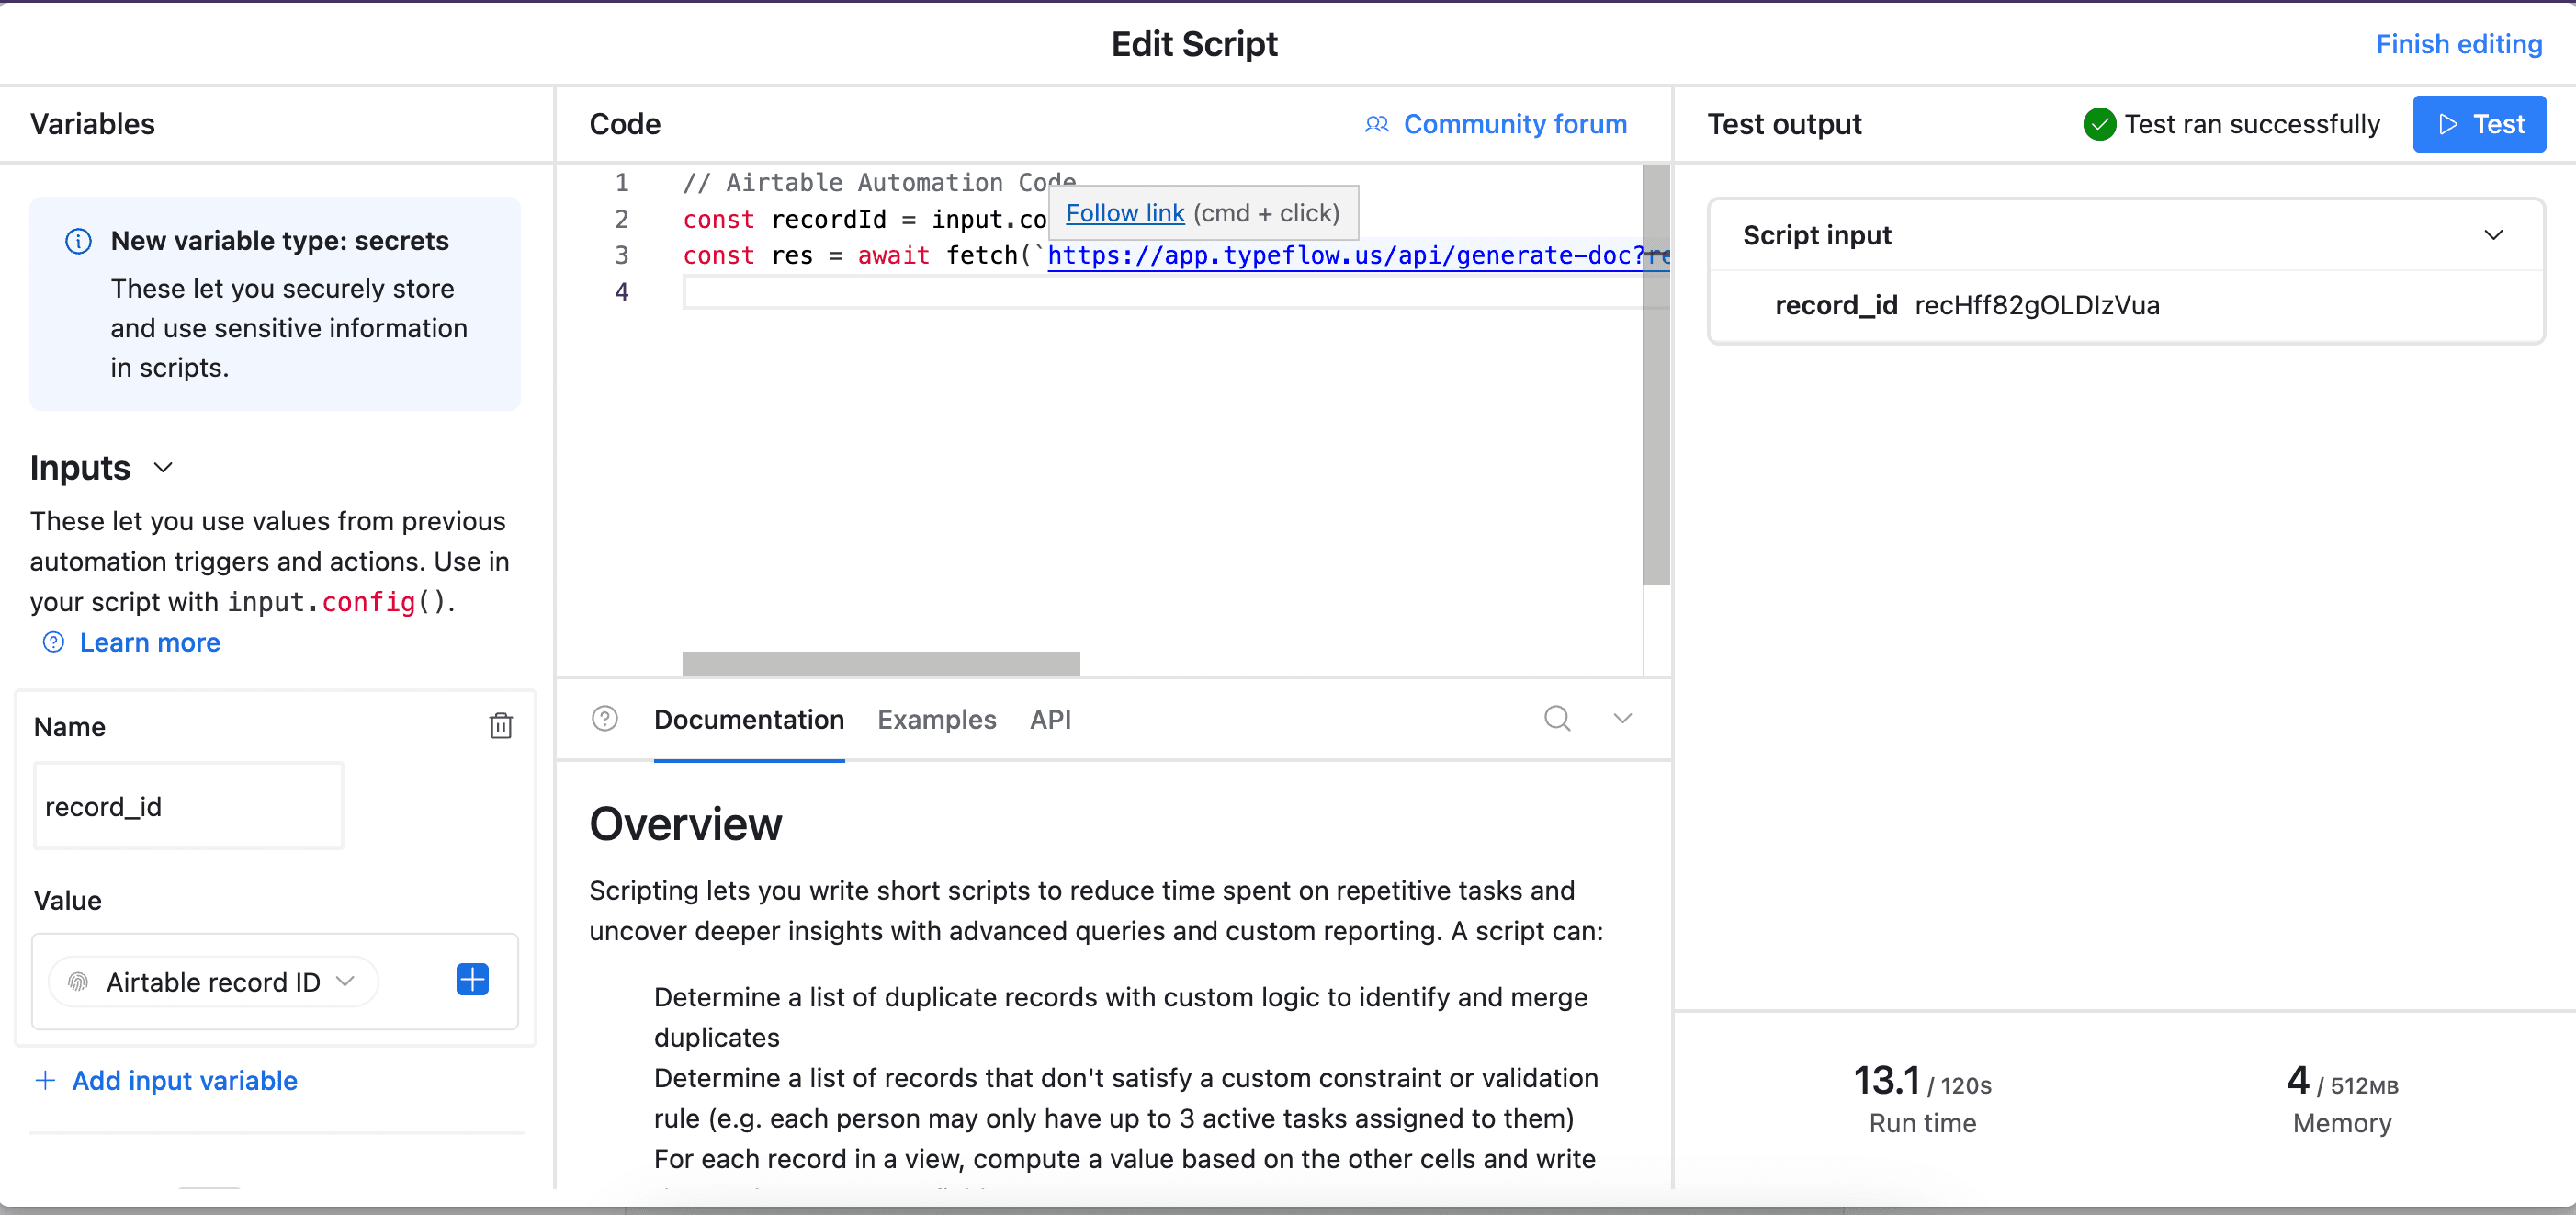
- Pick Run Script. A new popup appears.
- Go back to TypeFlow and select Automation in Airtable. Copy the script.
- Paste the script in the popup.
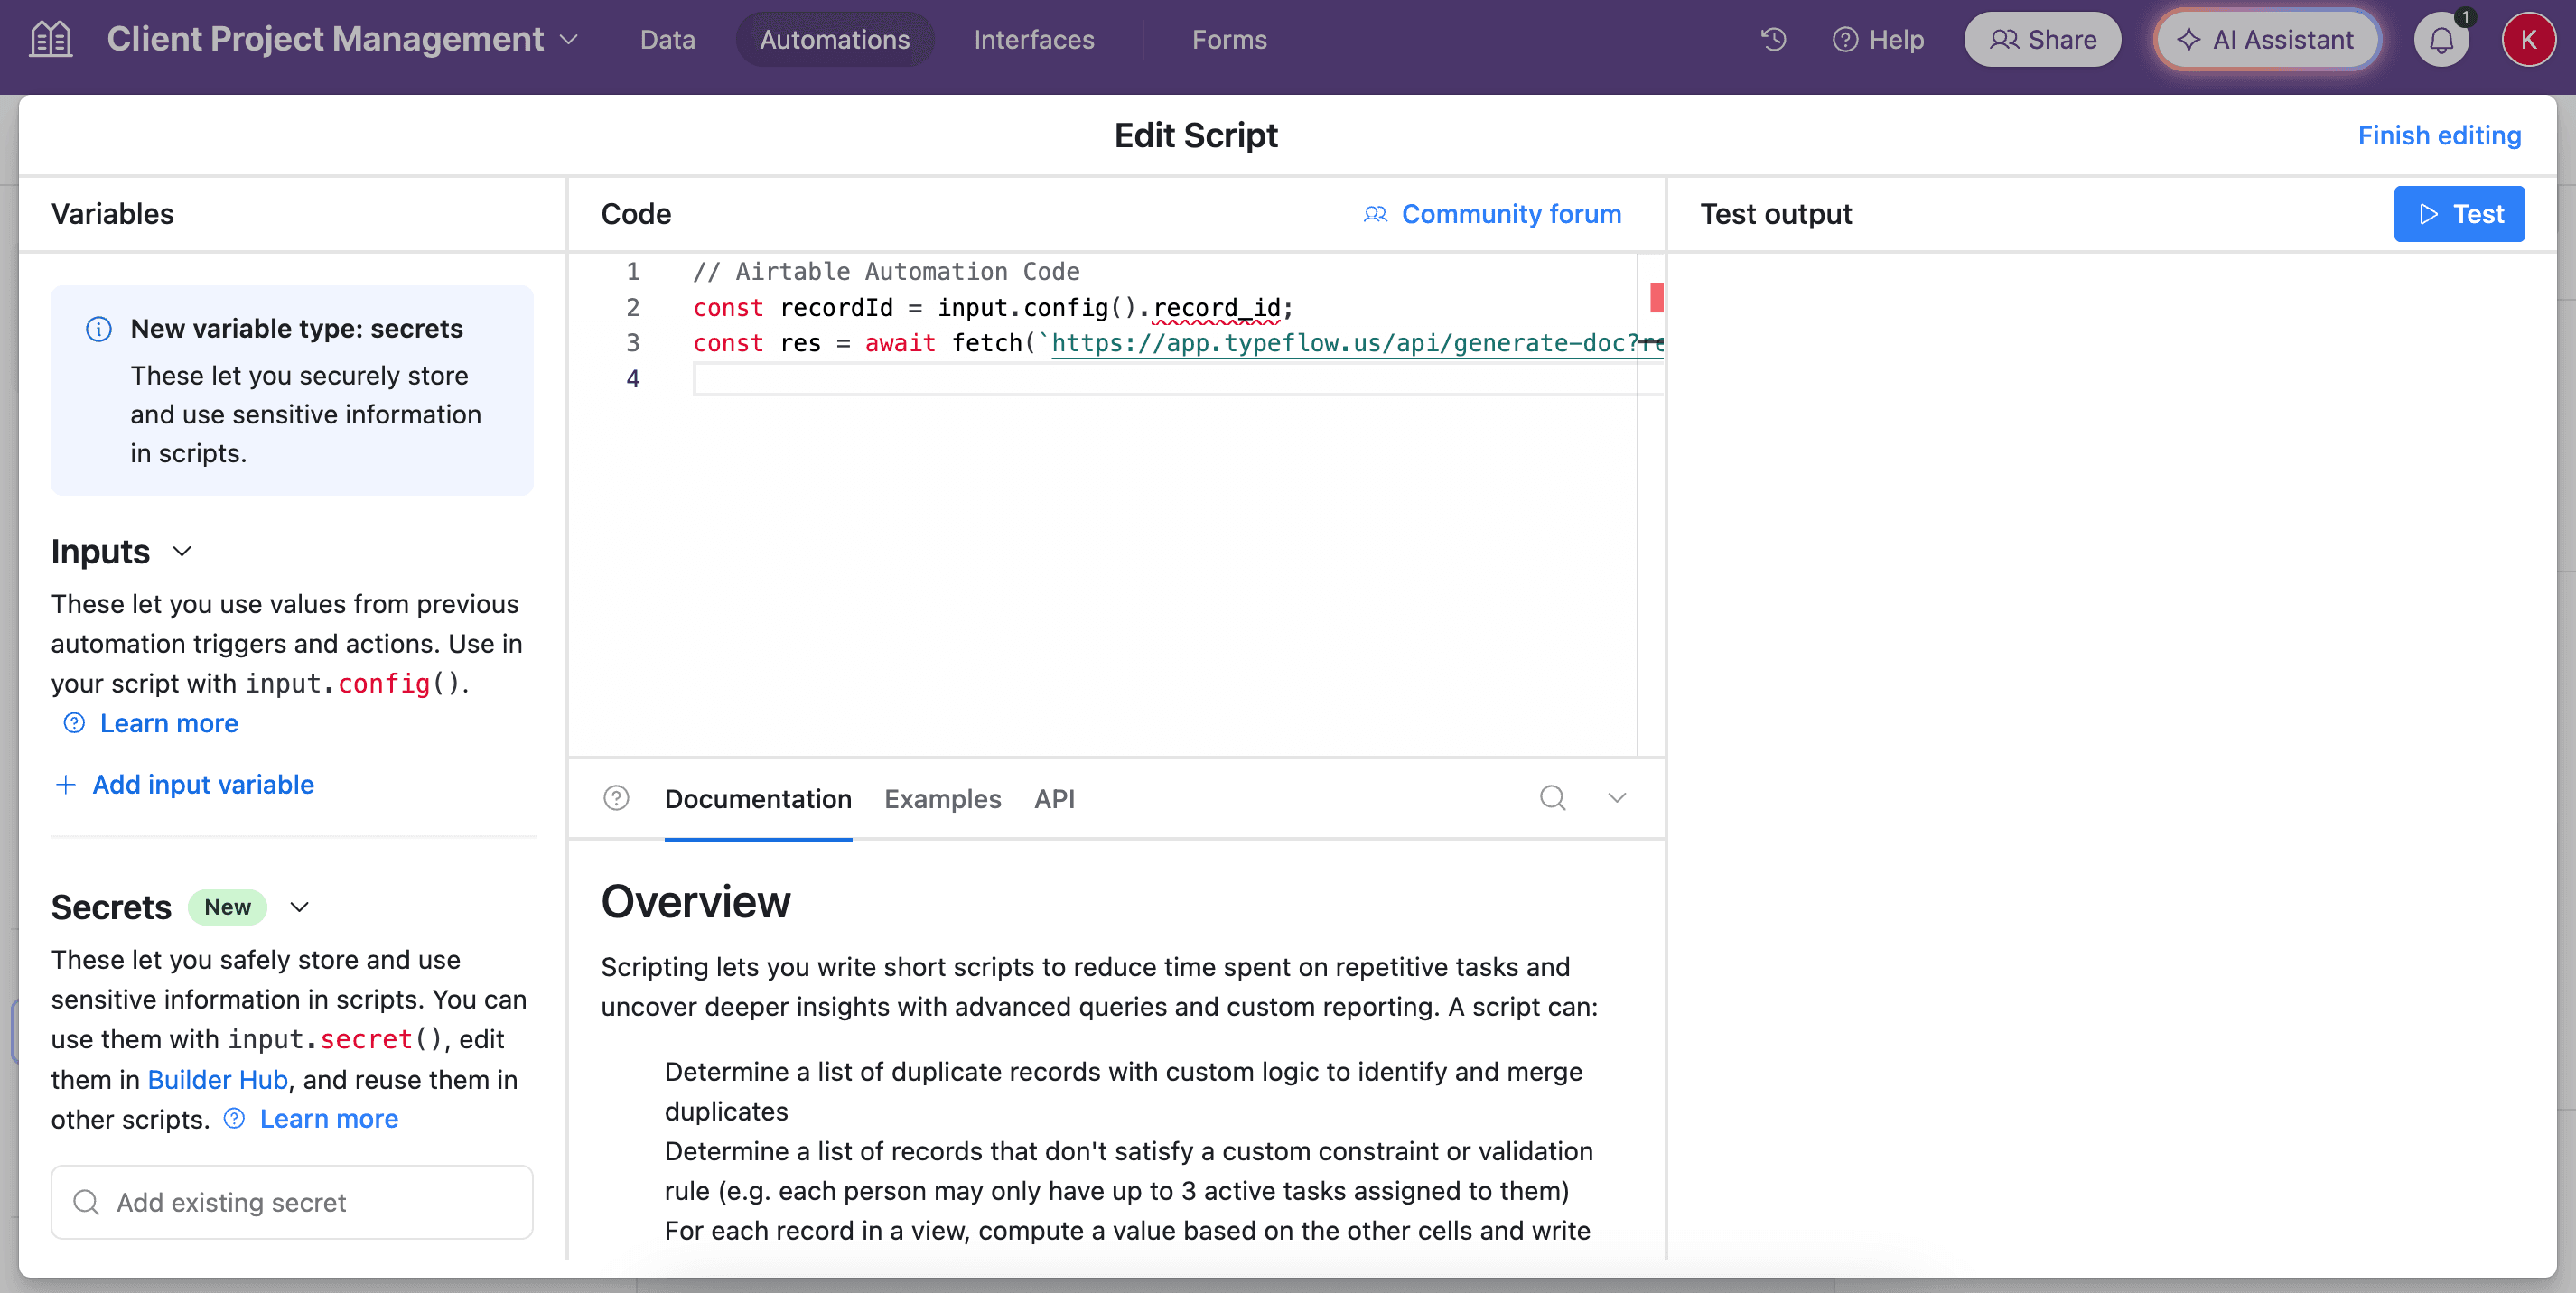
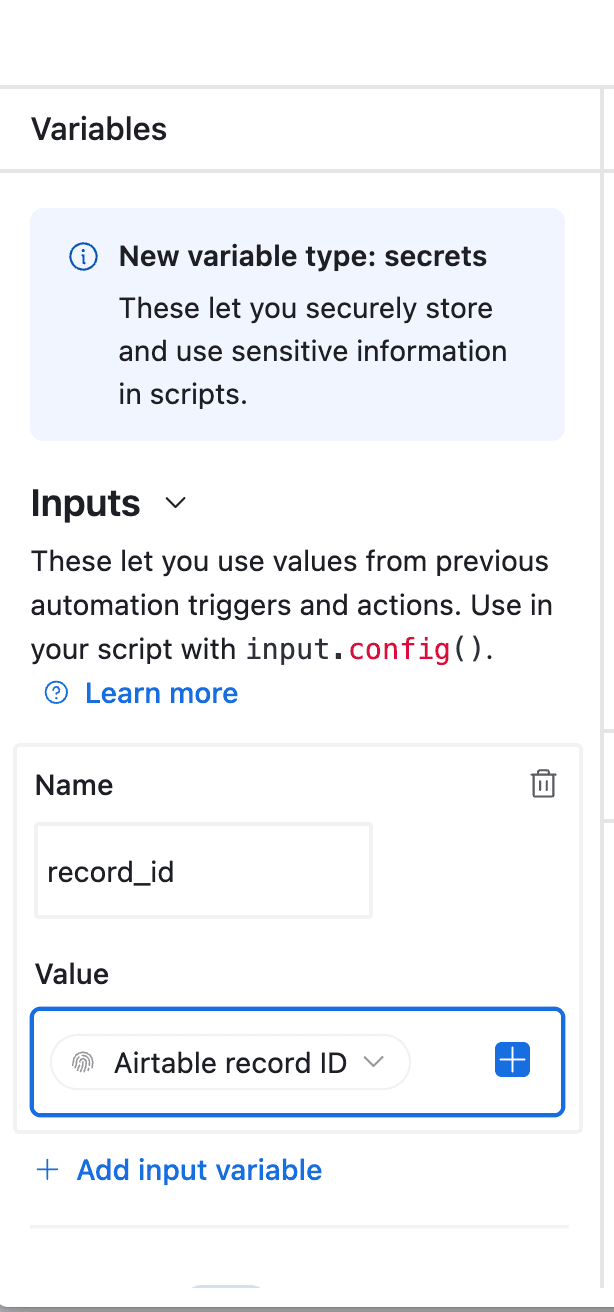
- In the left-side of the popup, do not forget to configure the variable input, record_id. You need to select Airtable Record ID from the dropdown. See the image.
- Test your script, and see if it works. Adjust if needed (most of the time the error comes from the record_id variable - see step 12).
- Now name your automation and save it.
Now your flow is ready. Test it carefully to see if it works well.
TypeFlow receives the ID, pulls the data from Airtable, fills your template, and generates the PDF. The process takes a few seconds per certificate (based on 2000+ TypeFlow customer implementations, 2024-2025).
Test by creating a record that meets your trigger condition. Check the automation run history in Airtable to confirm it executed without errors.
Method 3: Airtable Extension (Bulk Generation)
It's possible to generate documents with the Airtable Extension. It's the best way to bulk generate documents.
You can follow this tutorial:
Automatically Email Certificates
Generating certificates is useful, but delivering them automatically saves even more time.
For that you can run a new Airtable automation (or you can run a Make or Zapier workflow). Whenever you have the status Ready and the attachment field with a PDF then an email can be sent.
The email sends right after the PDF generates. You can track delivery status in TypeFlow's dashboard.
Best Practices for Bulk Certificate Generation
When generating dozens or hundreds of certificates, these practices help you avoid errors and keep the process smooth.
- Use Airtable Views: Create a view named 'Ready to Generate' that filters for records with all required fields filled in. This keeps your workflow organized.
- Test with a Small Batch: Before processing your full list, generate 5-10 certificates first. This helps you catch formatting issues before they affect everyone.
- Track Generation Status: Add a 'Certificate Generated' checkbox field in Airtable. Your automation can check this box after generation to prevent duplicates.
- Process in Groups: For very large batches (100+), generate them in smaller groups. This makes it easier to manage and troubleshoot if an issue arises.
Set Up Expiry and Renewal Dates
If your certificates expire, add an expiration date field in Airtable (often a formula based on completion date). Include it in your Google Docs template as a variable like {{Expiration Date}}. You can then use Airtable automations to send renewal reminders when the expiration date approaches.
| Task | Approach | Why It Helps |
|---|---|---|
| Data validation | Filter view for complete records | Catches missing information early |
| Template updates | Test with sample data first | Prevents errors in live certificates |
| Large batches | Generate in groups of 50-100* | Easier to spot issues |
| Status tracking | Use checkbox field | Avoids duplicate certificates |
*Based on 2000+ TypeFlow customer implementations, 2024-2025
Troubleshoot Common Issues
Even with a solid setup, you might hit an occasional snag. Here's how to fix the most common problems.
- Variables Not Filling In: Check that your placeholder names in Google Docs exactly match the field names in Airtable. While case doesn't matter, spaces and underscores do.
- PDF Formatting Looks Wrong: Complex layouts with multiple columns can sometimes cause issues. Try simplifying your template design for more reliable results.
- Automation Not Triggering: Double-check your trigger conditions in Airtable's automation settings. Ensure your test record clearly meets the criteria.
- Missing Data in Certificates: Make sure all required fields in your Airtable records contain data. Empty fields will result in blank spots on your certificate.
Need more help? You can reach out to me directly - I typically respond within a few hours.
Do You Still Need Zapier or Make?
If your only goal is to generate certificates from Airtable data, no. TypeFlow connects to Airtable natively - there's no middleware to set up or maintain.
Zapier or Make only becomes useful if you want to connect additional tools into the same workflow, like pushing certificate data to an LMS, updating a CRM, or logging completions in a separate system. For the certificate generation itself, the native integration is simpler and more reliable.
Beyond Certificates: Other Documents You Can Generate
The same Airtable-to-TypeFlow process works for many other types of documents. You can use it to automatically generate:
- Invoices and Quotes: Pull client data and line items to create professional invoices.
- Contracts and Agreements: Generate service agreements or NDAs with dynamic terms.
- Reports: Create training summaries or progress reports with updated data.
- Event Badges and Tickets: Design event materials, including QR codes for check-in.
You now have a complete, automated certificate system that runs without any manual work. What used to take hours now happens in seconds, freeing you up to focus on your programs.
Start generating certificates with TypeFlow - 20 free documents, no credit card required.
Automate your document generation
Start with 20 free documents. Built for businesses using Airtable.
Frequently Asked Questions
Find answers to the most common questions about this feature.
Popular Questions
All Questions
Need more help?
Our team is here to help you solve all your problems and answer your questions.
Contact Us
Kevin from TypeFlow
•AuthorKevin Rabesaotra is a growth engineer and automation specialist with 8+ years of experience building no-code solutions. As Founder & CEO of TypeFlow, he has helped hundreds of businesses automate document generation and streamline workflows with Airtable integrations. Previously, Kevin was a Product Lead specializing in growth engineering, running experiments to drive revenue, retention, and lead generation.
More articles
How to Print Labels from Airtable with Quantity Control (Step by Step)
Print multiple labels per Airtable record based on a quantity field. Step-by-step guide for linked records mode and quantity repeat mode with barcodes and Avery sheets.
Read articleHow to Print Avery Mailing Labels from Airtable
Print Avery mailing labels (5160, 5161, 5162) from Airtable without Word mail merge. Step-by-step guide with print label mode, automation, and bulk generation.
Read articleHow to Create Inventory Labels with Barcodes in Airtable
Create inventory labels with Code 128, EAN-13, or QR barcodes from Airtable. Step-by-step guide for warehouse, retail, and asset tracking with thermal and Avery printers.
Read article