Airtable Electronic Signature: Complete Setup Guide
Airtable doesn't have a built-in signature field. For simple form signatures (waivers, intake forms), use a form builder like Fillout that syncs to Airtable. For signing generated documents (contracts, proposals), use TypeFlow - it handles document generation, e-signature, audit trail, and Certificate of Completion in one workflow. No DocuSign or Zapier needed.
This guide covers both approaches, plus how to connect tools like Dropbox Sign (formerly HelloSign) and automate the full process.
- Form signatures: Add a signature field to a connected form and save it to Airtable
- Document signing: Generate a PDF from Airtable data, then send it for signature
- Automations: Trigger requests, send reminders, and save signed files back to the right record
Note: Alternative document generation tools like Plumsail Documents and DocsAutomator can also support e-signature workflows.
Why Airtable Forms Do Not Support Signature Fields
No - Airtable forms don't include a native signature field. To collect signatures, you'll need a third-party form or e-signature tool that syncs the signature back to Airtable.
- What you can do instead: Use a form builder (like Fillout, Plumsail Forms, or miniExtensions) or an e-signature platform (like DocuSign) connected via Make or Zapier
- Where the signature goes: Typically into an Airtable attachment field as an image or signed PDF
It's an extra setup step upfront, but once connected, everything can run automatically.
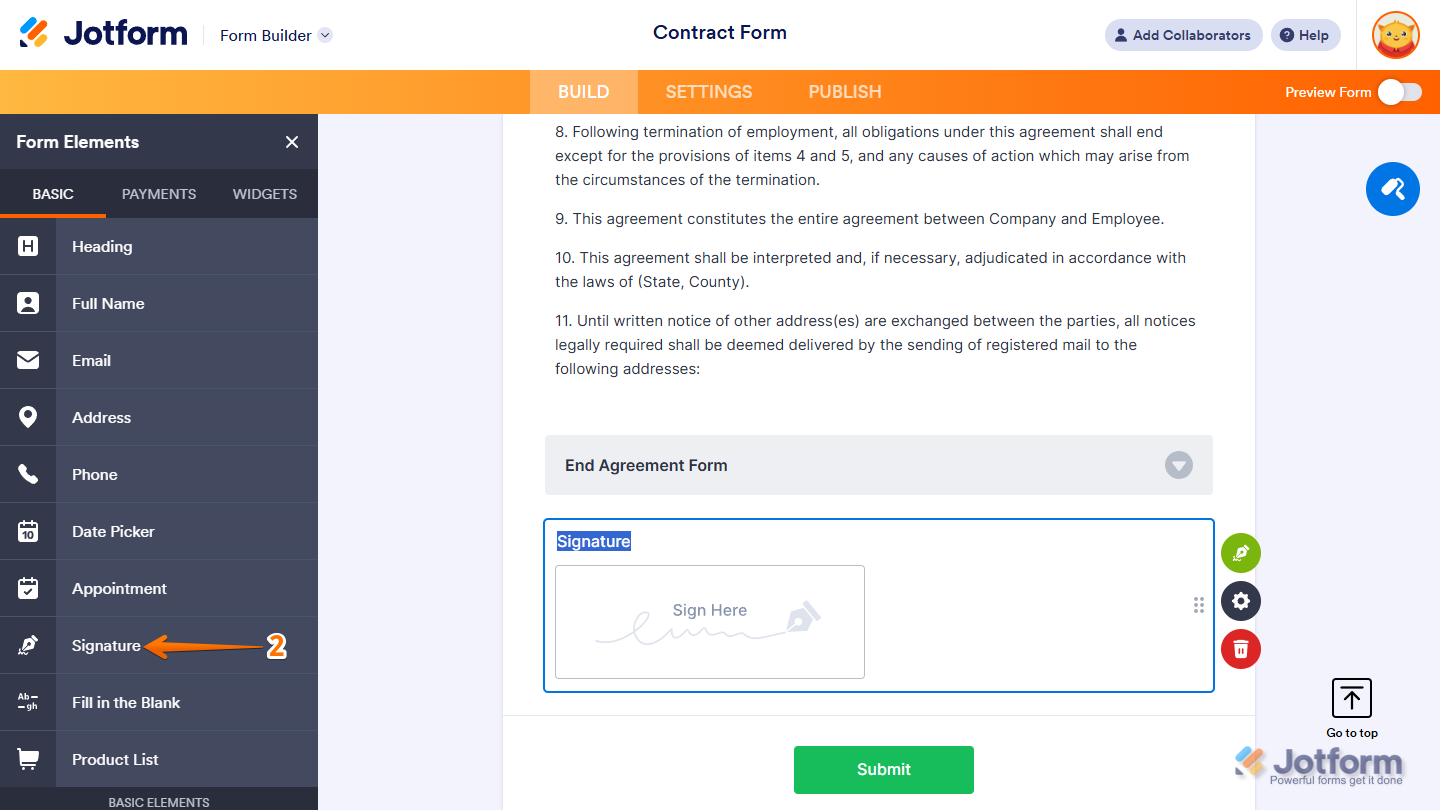
How to Add a Signature Field to Airtable Forms
Several form builders connect to Airtable and include signature fields. When someone signs, the signature syncs back to your base as an attachment.
- Best for: Waivers, permission slips, intake forms, and simple approvals
- What you'll store: Usually a PNG/JPG signature image (or sometimes a PDF)
| Tool | Signature Field | Airtable Sync | Free Plan |
|---|---|---|---|
| Fillout | Yes | Native | Yes |
| Jotform | Yes | Integration | Limited |
| Plumsail Forms | Yes | Native | Yes |
| Formstack | Yes | Integration | No |
| miniExtensions | Yes | Native | Paid |
| TypeFlow | Yes | Yes | Yes |
Fillout
Fillout is a popular option because it connects directly to Airtable without any middleware. You drag a signature field onto your form, and when someone signs, the signature saves as an image in your Airtable attachment field. The free plan includes this feature, which makes it a good starting point if you're testing the workflow.
Jotform
Jotform offers a signature widget that works well for forms with more complex logic. You can connect Jotform to Airtable through its native integration or through Zapier. The setup takes a few more steps than Fillout, but Jotform gives you more control over form design and conditional fields.
Plumsail Forms
Plumsail Forms connects natively to Airtable and includes an Ink Sketch control for signature capture. The free plan supports basic forms with signature fields, making it a viable option if you're already in the Plumsail ecosystem.
Formstack
Formstack provides signature capture along with advanced form logic and approval workflows. It's a paid tool, so it makes more sense for teams that already use Formstack for other purposes or have specific compliance requirements.
miniExtensions
miniExtensions is a popular Airtable extension that includes a signature field among other form enhancements. It's a paid tool with native Airtable integration, frequently recommended in the Airtable community.
TypeFlow
TypeFlow includes a form builder with signature capture that syncs directly to Airtable. When submitted, it generates a PDF with the signature and saves it to your attachment field. Free plan available.
Document generation + e-signature in one tool
No DocuSign, no Zapier, no per-signature fees. Generate and sign documents directly from Airtable.
Start free with 20 documents →How to Generate Documents for Signature in Airtable
Collecting a signature on a form is straightforward. Document signing is different because the PDF usually needs to be personalized with Airtable data.
- Create a template in Google Docs
- Map fields from Airtable to placeholders
- Generate a PDF from the record
- Send it for signature and store the signed copy
Step 1: Create your document template in Google Docs
Start by building a template in Google Docs. Add placeholder variables where you want Airtable data to appear. These placeholders look like {{client_name}}, {{contract_date}}, or {{project_scope}}. When the document generates, real data from your Airtable record replaces each placeholder.
You can design the template with your branding, formatting, and any standard language that appears in every document. The placeholders are the only parts that change from one document to the next.
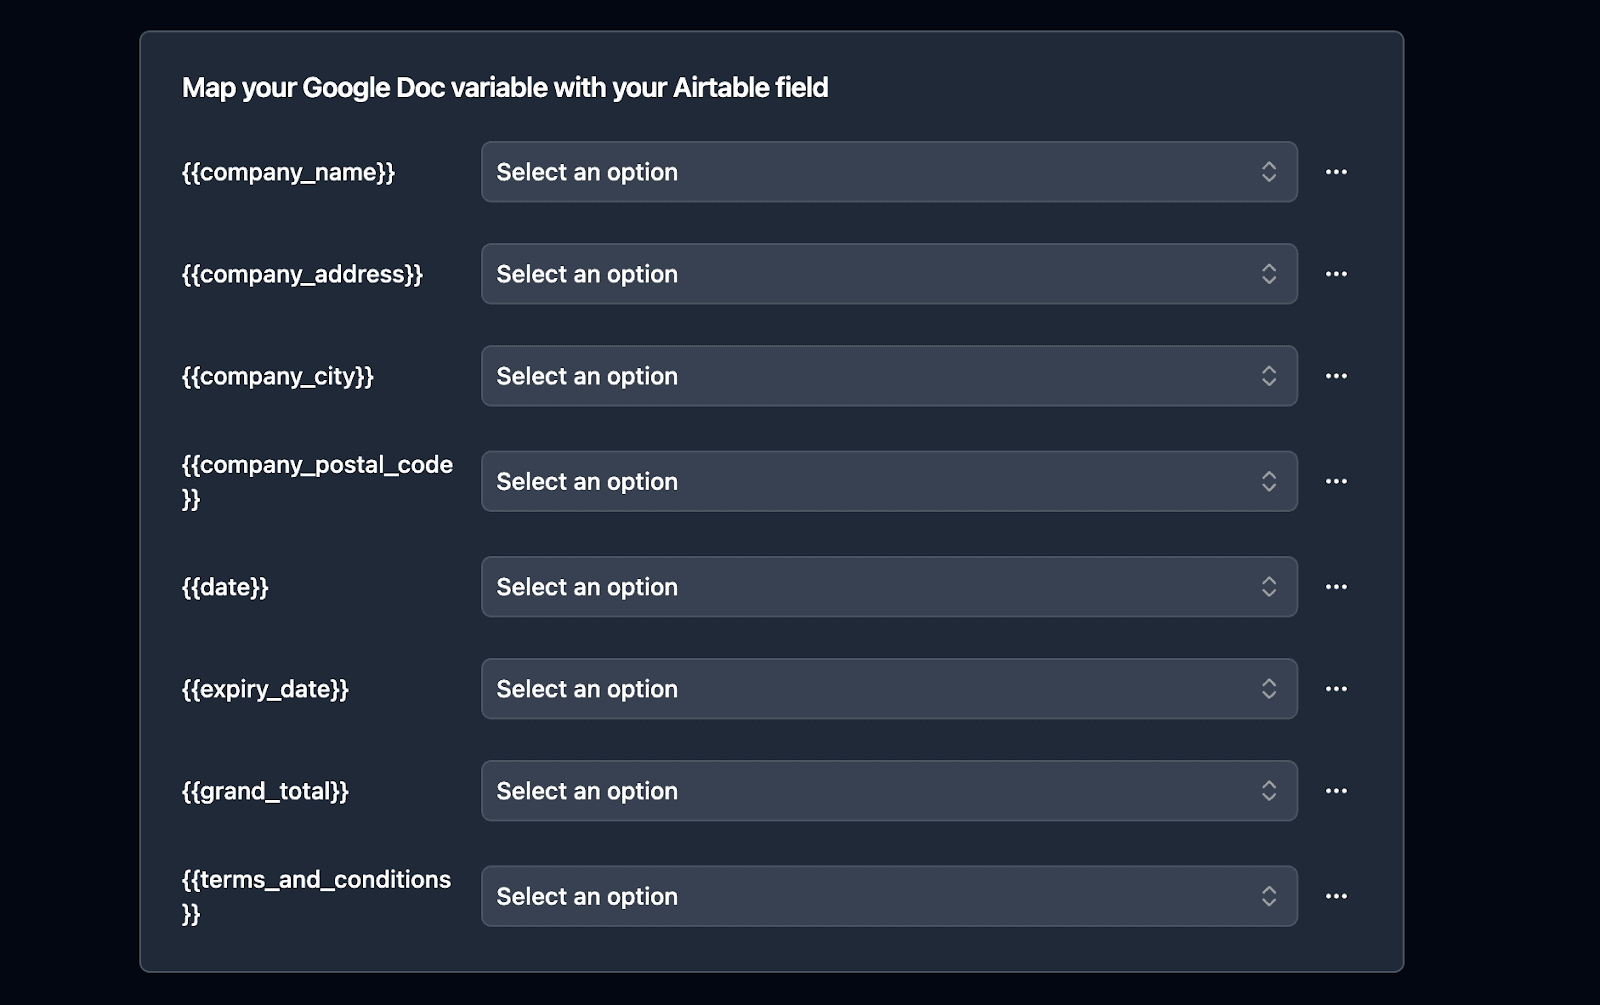
Step 2: Map Airtable fields to template variables
Field mapping is the process of connecting your Airtable fields to the placeholders in your template. For example, you link the "Client Name" field in Airtable to the {{client_name}} variable in your document. This connection ensures the right information appears in the right place.
With TypeFlow, this mapping happens in a visual interface. You select your Airtable base, choose your template, and match fields to variables. No code involved.
Step 3: Generate the PDF from Airtable data
Once your mapping is complete, the document populates with data from your Airtable record and converts into a PDF. This can happen manually when you click a button, or it can run automatically through an Airtable automation whenever a record meets certain conditions.
The generated PDF looks exactly like your template, but with all the placeholders replaced by actual data from your base.
Step 4: Send the document for electronic signature
Once your PDF is ready, send it to an e-signature tool like DocuSign, Dropbox Sign (formerly HelloSign), or PandaDoc. The recipient opens the document, reviews it, and signs electronically. Most e-signature platforms send you a notification when the signing is complete.
Tip: If you're generating contracts or invoices from Airtable, TypeFlow handles steps 1-3 for you. You can start for free and connect your first template in minutes.
This workflow works well, but it means managing two separate tools: one for document generation and another for signatures.
Native Electronic Signature with TypeFlow
What if you could skip the separate signature tool entirely?
TypeFlow now handles both document generation (steps 1-3 above) AND electronic signature collection in a single platform. No exporting PDFs to external tools, no additional subscriptions, no complex integrations.
Step-by-step tutorial: For a detailed walkthrough with screenshots, see our guide on how to generate documents with e-signature from Airtable.
.png)
How TypeFlow Combines Document Generation and E-Signature
The traditional workflow requires three separate systems: a document generator, an automation platform to connect them, and a signature tool. TypeFlow consolidates this into a single flow.
You build your template in Google Docs and add placeholders for both Airtable data and signature fields. These look like {{e-signature.signature_1}} for a signature, {{e-signature.text_1}} for a text input, or {{e-signature.date_1}} for a date picker. When the document is generated, TypeFlow detects these placeholders, creates a signing session, and automatically sends invitations to your signers.
Everything happens within your existing Airtable automation. One trigger, one action, one platform.
Setup in 5 Minutes
Enable e-signature in your flow. Toggle on the e-signature option in your TypeFlow settings. A dedicated e-signature tab will appear.
Add signature placeholders to your template. In your Google Doc, place placeholders where you want signers to complete fields:
Client Signature: {{e-signature.signature_1}}
Client Name: {{e-signature.text_1}}
Date Signed: {{e-signature.date_1}}
Configure your signers. Add each person who needs to sign. Enter a static email address (for signers who stay the same) or pull the email from an Airtable field (for signers who vary per record). Optionally store their signing URL back to Airtable.
Choose your signing mode. Decide whether signers should all receive invitations at once (parallel) or one after another (sequential).
Generate a document. Run your automation. The document generates, invitations send automatically, and each signer receives a unique link.
Sequential vs Parallel Signing Modes
Parallel signing sends invitations to all signers simultaneously. Everyone can sign in any order. This works well for rental applications, event waivers, or partnership agreements where signing order doesn't matter.
Sequential signing enforces a specific order. The first signer must complete their signature before TypeFlow invites the second signer. Use this for employment contracts (employee then manager then HR) or contractor agreements where approval flows matter.
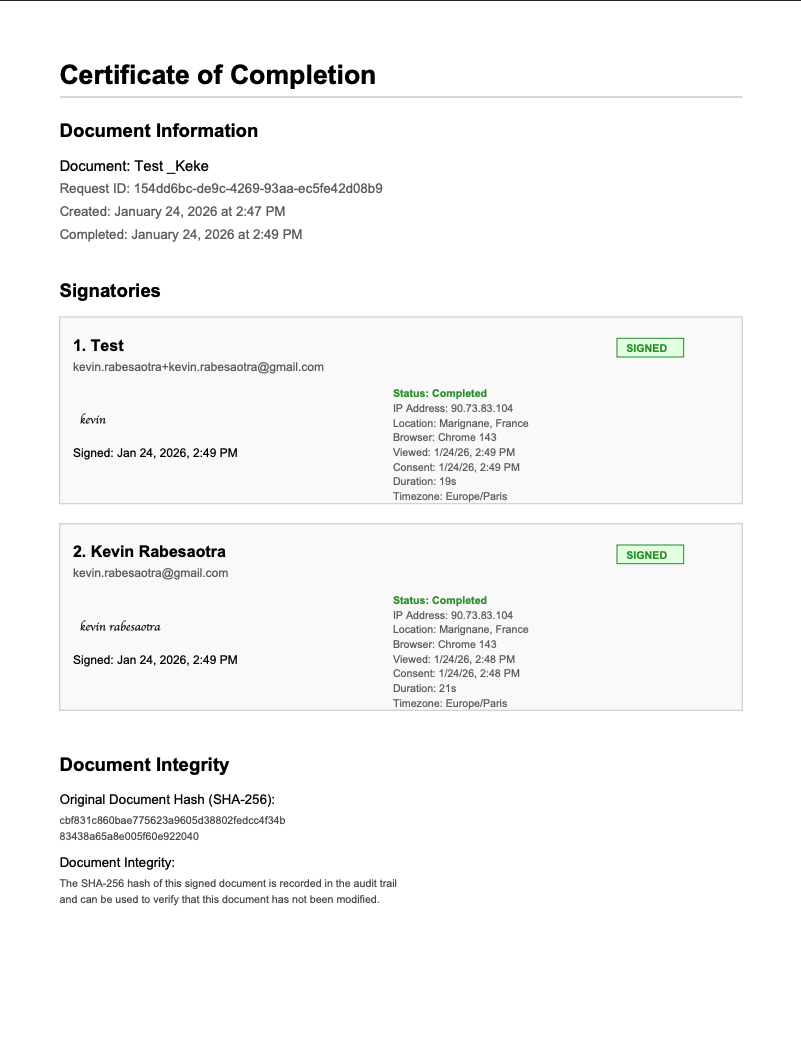
Certificate of Completion and Legal Compliance
When the final signer completes their fields, TypeFlow generates a signed PDF with an embedded Certificate of Completion. The certificate includes detailed information for each signer: their signature image, email, signing timestamp, IP address, geographic location, browser used, and time spent reviewing the document.
TypeFlow calculates a SHA-256 hash of both the original and final documents. These cryptographic hashes serve as fingerprints. Any change to the PDF would produce a different hash. The certificate displays both, letting anyone verify the document hasn't been altered after signing.
The signing process complies with the US ESIGN Act, UETA, and EU eIDAS Regulation for simple electronic signatures. TypeFlow handles consent collection, audit trails, and signer intent automatically.
Set up e-signatures in 5 minutes
Legally binding signatures with full audit trail. No external tools required.
Start free with 20 documents →DocuSign Airtable Integration: Step-by-Step Setup
DocuSign is a widely used e-signature platform, but it doesn't connect to Airtable directly. To integrate the two, you'll use Make or Zapier to pass records and documents between them. For more details, see our DocuSign Airtable integration guide.
- Goal: Trigger a DocuSign request from Airtable, then save the signed PDF back to the same record.
Step 1: Connect DocuSign to Make or Zapier
In your automation platform, add DocuSign as a connected app. You'll sign in with your DocuSign credentials to authorize access. This step only happens once, and then the connection stays active for future automations.
Step 2: Set up your Airtable trigger
A trigger is the event that starts your automation. Common triggers include:
- New record created: The automation runs whenever someone adds a new record to your table.
- Record enters a view: The automation runs when a record matches the filter conditions of a specific view.
- Field value changes: The automation runs when a particular field, like a checkbox or status field, updates to a certain value.
Choose the trigger that matches when you want signature requests to go out.
Step 3: Configure the signature request
Map the document you want signed and the recipient's email address from your Airtable record to the DocuSign action. If you generated the document with TypeFlow, you can use the PDF URL or attachment stored in your Airtable record.
DocuSign also lets you specify where on the document the signature box appears, so the recipient knows exactly where to sign.
Step 4: Save signed documents back to Airtable
Set up a final action that takes the completed, signed PDF from DocuSign and attaches it back to the original record in Airtable. This keeps everything in one place. When you open a record, you see both the original document and the signed version without switching between apps.
Native vs External Signature Solutions for Airtable
If you're generating documents from Airtable and need signatures, you have two approaches: TypeFlow's built-in signature capability or an external tool like DocuSign connected through automation. Each works well for different scenarios.
TypeFlow Native Signature
TypeFlow's native signature makes sense when you want simplicity and you're already using TypeFlow to generate documents. The signature workflow adds about five minutes to your initial setup, and everything stays within one platform.
This approach works well for:
- Standard business documents: Contracts, proposals, NDAs, service agreements, employment contracts
- Any volume: TypeFlow handles 3000+ documents per month without issue
- Simple Electronic Signatures (SES): Legally binding for most business transactions under ESIGN Act (US), UETA (US), and eIDAS SES (EU)
- Cost-conscious teams: No additional subscription beyond your TypeFlow plan
- Fast implementation: You need signatures working today, not next week
The built-in audit trail (IP address, location, timestamps, browser, document hash) and Certificate of Completion satisfy legal requirements for standard business contracts in the US and EU.
DocuSign Integration
DocuSign integration makes sense when you need qualified electronic signatures or when you're already paying for DocuSign enterprise licenses and want to connect them to your Airtable workflows.
This approach works better for:
- Qualified Electronic Signatures (QES): Required for specific legal situations in the EU where simple signatures aren't sufficient (certain notarized documents, some real estate transactions, specific government contracts)
- Advanced identity verification: SMS/phone authentication, government ID verification, knowledge-based authentication
- Specialized workflows: In-person signing, remote notarization (US), witnessing features
- Enterprise organizations: Already have DocuSign licenses and want centralized signature management across all departments
Important distinction: Most business contracts (B2B agreements, NDAs, employment contracts, service agreements, proposals) accept Simple Electronic Signatures under both US and EU law. Qualified Electronic Signatures are only required in specific situations, typically defined by national law in EU member states.
The tradeoff is complexity. Connecting DocuSign to Airtable requires an automation platform like Zapier or Make, which means managing three separate tools instead of one.
Decision Matrix
| Factor | TypeFlow Native | DocuSign Integration |
|---|---|---|
| Setup time | 5 minutes | 1-2 hours |
| Tools required | 1 (TypeFlow) | 3 (TypeFlow + DocuSign + Zapier/Make) |
| Monthly cost | Included in TypeFlow | DocuSign ($25-$65+) + automation ($20+) |
| Signature type | Simple Electronic Signature (SES) | SES, AES, or QES (depending on DocuSign plan) |
| Legal compliance | ESIGN, UETA, eIDAS SES | ESIGN, UETA, eIDAS SES/AES/QES |
| Audit trail | IP, location, timestamps, hash | IP, location, timestamps, hash + advanced options |
| Identity verification | Email-based | Email + SMS + ID verification + KBA |
| In-person signing | No | Yes |
| Notarization | No | Yes (US remote notarization) |
| Best for | Standard business contracts | Documents requiring QES or advanced verification |
When you actually need QES (rare): Check your jurisdiction's specific requirements. In the EU, most business-to-business contracts accept SES. QES is typically required for documents with particularly high legal consequences (notarized acts, certain financial instruments, specific public sector contracts). In the US, QES doesn't exist. The ESIGN Act treats all electronic signatures equally if proper consent and audit trails exist.
For the vast majority of Airtable users generating business documents, TypeFlow's native signature provides legally binding signatures without the overhead of external integrations. If your legal team confirms you need Qualified Electronic Signatures for specific document types, or if you require advanced identity verification, DocuSign's additional capabilities justify the complexity.
How to Store Electronic Signatures in Airtable
There are a few different ways to save signature data in Airtable, and the right choice depends on your workflow.
- Attachment fields: Best for storing signature images captured through forms.
- URL fields: Useful for linking to signed documents hosted in cloud storage or on the e-signature platform.
- Linked records: Helpful for tracking signature status across related tables when you have multiple documents or signers.
Attachment Fields for Signature Images
Form builders like Fillout save a drawn signature as a PNG or JPG image file directly into an Airtable attachment field. This approach is the simplest for basic signature collection, like getting a client's signature on a form submission.
The image file stays in your Airtable base, so you can view it anytime without leaving Airtable.
URL Fields for Signed Document Links
Sometimes you want to store a link to the signed document rather than the file itself. The document might live in Google Drive, Dropbox, or on the e-signature platform's servers. A URL field keeps your Airtable base lightweight while still giving you one-click access to the document.
This approach works well when documents are large or when you want the e-signature platform to remain the source of truth for the signed file.
Linked Records for Signature Tracking
For detailed audit trails, consider creating a separate "Signatures" table. Link this table to your contracts or clients tables to track signature status, dates, and signers for each document.
This structure works well when you have:
- Multiple documents per client
- Multiple signers per document
- A need to report on signature completion rates or turnaround times
How to Automate Signature Workflows in Airtable
Automation removes the manual steps from your signature process. You can use Airtable's built-in automations for simpler workflows, or connect to Make or Zapier when you want more complex logic or connections to external apps.
Trigger Signature Requests on Record Creation
Set up an automation that sends a document for signature whenever a new record is created or moves into a specific view. For example, when a deal moves to a "Ready for Contract" view, the automation generates the contract and sends it to DocuSign. Similarly, you can automate invoice generation when orders are confirmed. No one has to remember to do it manually.
Send Reminders for Unsigned Documents
Create a workflow that triggers when a document's status remains "Pending" for a set number of days. The automation sends a follow-up email to the signer. This saves you from tracking unsigned documents in a spreadsheet or calendar.
Update Record Status After Signing
When a document is signed, the e-signature platform can notify your automation platform. The automation then updates a status field in your Airtable record, changing it from "Pending" to "Signed." Your records stay current without any manual updates, and you can filter views to see only signed or unsigned documents.
Digital Signature vs Electronic Signature
These two terms come up often, and people use them interchangeably. But they refer to different things.
- Electronic signature: A broad legal concept that covers any electronic indication of intent to agree. This includes a typed name, a drawn signature on a touchscreen, or clicking an "I agree" checkbox.
- Digital signature: A specific type of electronic signature that uses cryptographic methods to verify the signer's identity and confirm the document hasn't been altered after signing. Digital signatures provide a higher level of security and a detailed audit trail.
For most business documents like contracts, invoices, and proposals, an electronic signature is sufficient and legally binding under laws like the ESIGN Act in the US and eIDAS in the EU.
Build a Complete Signature Workflow in Airtable
A complete signature workflow connects all the pieces: collect data in Airtable, generate a professional document from a template, send it for signature, and store the signed document back in Airtable. If you manage contracts end-to-end, see our contract lifecycle management guide. For a workflow that connects quotes to invoices with signatures at each step, see our quote-to-invoice workflow guide. You can find more tips and workflow examples in the Airtable community and r/Airtable on Reddit.
TypeFlow handles both the document generation step and electronic signature collection in one platform. Create polished PDFs from your Airtable data using Google Docs templates, then send them for signature without leaving TypeFlow.
Automate your document generation
Start with 20 free documents. Built for businesses using Airtable.
FAQs About Airtable Electronic Signatures
Find answers to the most common questions about this feature.
Popular Questions
All Questions
Need more help?
Our team is here to help you solve all your problems and answer your questions.
Contact Us
Kevin from TypeFlow
•AuthorKevin Rabesaotra is a growth engineer and automation specialist with 8+ years of experience building no-code solutions. As Founder & CEO of TypeFlow, he has helped hundreds of businesses automate document generation and streamline workflows with Airtable integrations. Previously, Kevin was a Product Lead specializing in growth engineering, running experiments to drive revenue, retention, and lead generation.
More articles
How to Print Labels from Airtable with Quantity Control (Step by Step)
Print multiple labels per Airtable record based on a quantity field. Step-by-step guide for linked records mode and quantity repeat mode with barcodes and Avery sheets.
Read articleHow to Print Avery Mailing Labels from Airtable
Print Avery mailing labels (5160, 5161, 5162) from Airtable without Word mail merge. Step-by-step guide with print label mode, automation, and bulk generation.
Read articleHow to Create Inventory Labels with Barcodes in Airtable
Create inventory labels with Code 128, EAN-13, or QR barcodes from Airtable. Step-by-step guide for warehouse, retail, and asset tracking with thermal and Avery printers.
Read article