How to Generate Contracts from Airtable Data (Step-by-Step)
The fastest way to generate contracts from Airtable is to connect a template tool like TypeFlow and map your client and deal fields to a Google Docs template. Trigger contract creation with one click or an Airtable automation, and add e-signatures, conditional clauses, and line items directly from your data.
Other tools like Plumsail Documents, Documint, and DocsAutomator also connect Airtable to document templates. This guide walks you through setting up automated contract generation, structuring your data, and choosing the right approach.
Key Takeaways
- TypeFlow generates contracts directly from Airtable records using Google Docs templates - no coding or middleware like Zapier required.
- Setup takes about 15 minutes: connect Airtable, create a template with
{{field_name}}placeholders, map fields, and start generating contracts. - Built-in e-signatures let you send contracts for signing directly from Airtable - no DocuSign fees or additional integrations needed. If you do need DocuSign, see our DocuSign Airtable integration guide.
- One master template handles multiple contract variations using conditional sections that show/hide clauses based on Airtable data.
Who is this for?
This guide is for you if you:
- Use Airtable for your business data
- Need to generate a lot of contracts for your clients or collaborators
- Want to automate contract generation
What You Need Before Starting
Generating contracts from Airtable involves connecting your Airtable base to a tool like TypeFlow, creating a contract template in Google Docs with placeholder variables, and then mapping your Airtable fields to those variables. This process, similar to a mail merge, automatically populates your template with data to create a finished PDF contract.
To make it work, you need:
- An Airtable account with a base: This is where your contract data lives
- A Google account: You'll use Google Docs to design your contract template.
- A basic idea of your contract layout: Know which fields from Airtable will appear in your contract and roughly where they belong.
- A TypeFlow account: to automate your contract generation
The whole setup takes about 15 minutes once you have these three pieces in place (based on 2000+ TypeFlow customer implementations, 2024-2025).
Ready to generate contracts from Airtable?
Connect your base, pick a Google Docs template, and generate your first contract in minutes.
Start free with 20 documents →How Long Does Contract Automation Setup Take?
Most people get their first automated contract working in about 15 minutes. Here's the typical timeline:
- 5 minutes: Connect TypeFlow to Airtable and authenticate Google Docs
- 5-8 minutes: Create your contract template with placeholder variables
- 2-3 minutes: Map Airtable fields to template variables
- 1 minute: Generate your first test contract
Complex templates with conditional sections or multiple contract types might take 30-45 minutes initially, but you'll save hours every week once automation is running.
How to Set Up Your Airtable Base for Contracts
For our example, we will generate contracts for new collaborators.
Your Airtable base is where all your contract data lives. The way you organize this data determines how smooth everything runs later.
Required fields for contract data
Every contract pulls from specific data points in your base. You'll want to create fields that match the information your contracts actually need.
For most contracts, you'll need these core fields in your Airtable base:
- Collaborator Name: The full legal name of the person or company.
- Contract Date: The date the agreement takes effect.
- Terms and Conditions: The specific legal clauses for the agreement. You can use Linked Records to select different terms based on the role.
- Salary: The compensation offered to the collaborator.
- Contract Type: The employment status, such as Full-Time, Part-Time, or Contractor.
- Role: The collaborator's job title or position.
Organizing records for contract workflows
Airtable views let you filter which records are ready for contract generation. I create a view called "Ready to Generate" that only shows records where a status field equals "Approved."
This approach prevents you from generating contracts for incomplete or unapproved deals. You can also add a checkbox field called "Contract Generated" to track which records already have documents. When you check that box, the record disappears from your "Ready to Generate" view.
How to Create Your Contract Template in Google Docs
Your Google Doc acts as the master template where Airtable data gets inserted. The design you create here becomes the final look of every contract you generate.
Adding placeholder variables to your template
Placeholder variables tell the system where to insert data from Airtable. You write these using double curly braces with the field name inside, like this: {{field_name}}.
The text between the braces corresponds to your Airtable field names:
{{client_name}}pulls the client's name from your base.{{contract_date}}inserts the date from the corresponding field.{{total_amount}}adds pricing information to the document.
Keep variable names simple and match them to your Airtable field names as close as possible. If your Airtable field is called "Client Email," use {{client_email}} instead of something vague like {{email}}. This makes the mapping step easier later.
Formatting your contract for PDF output
The formatting in your Google Doc carries over to the final PDF. Use standard fonts like Arial or Times New Roman because they render the same way across different systems.
Set your margins to at least 1 inch on all sides. This prevents text from getting cut off when the document converts to PDF. Use page breaks to control where new sections start, which matters for multi-page contracts.
Bold your important headings and use tables for pricing breakdowns or itemized lists. The cleaner your template looks in Google Docs, the more professional your final contracts appear.
Conditional sections for your contract
Conditional sections let you create one master template that adapts based on Airtable data. Show or hide entire clauses based on field values - no need to maintain separate templates for each contract type.
Syntax: Wrap content with {{section_name}} and {{/section_name}} tags:
{{section_fulltime_benefits}}
This agreement includes health benefits, 401k matching, and 15 days PTO.
{{/section_fulltime_benefits}}

{{section_contractor_terms}}
This agreement is for independent contractor services. No employment benefits are included.
{{/section_contractor_terms}}
In TypeFlow, configure when each section appears:
section_fulltime_benefits→ Show when "Contract Type" equals "Full-Time"section_contractor_terms→ Show when "Contract Type" equals "Contractor"
Conditions are configured in the TypeFlow UI, not in the template itself.
How to Connect TypeFlow to Airtable
Step 1: Connect Airtable to TypeFlow
Connecting TypeFlow to your Airtable base takes just a few minutes. The process links your data source to your document template so contracts can be generated with one click. For that, you just need to connect Airtable with TypeFlow here.
Step 2: Authenticate your Google account
When you open TypeFlow for the first time, it asks you to connect your Google account. Click "Connect Google Account" and follow the authorization steps.
This allows TypeFlow to access the Google Docs templates in your Drive. The authorization is standard OAuth, which means TypeFlow can only access files you explicitly select.
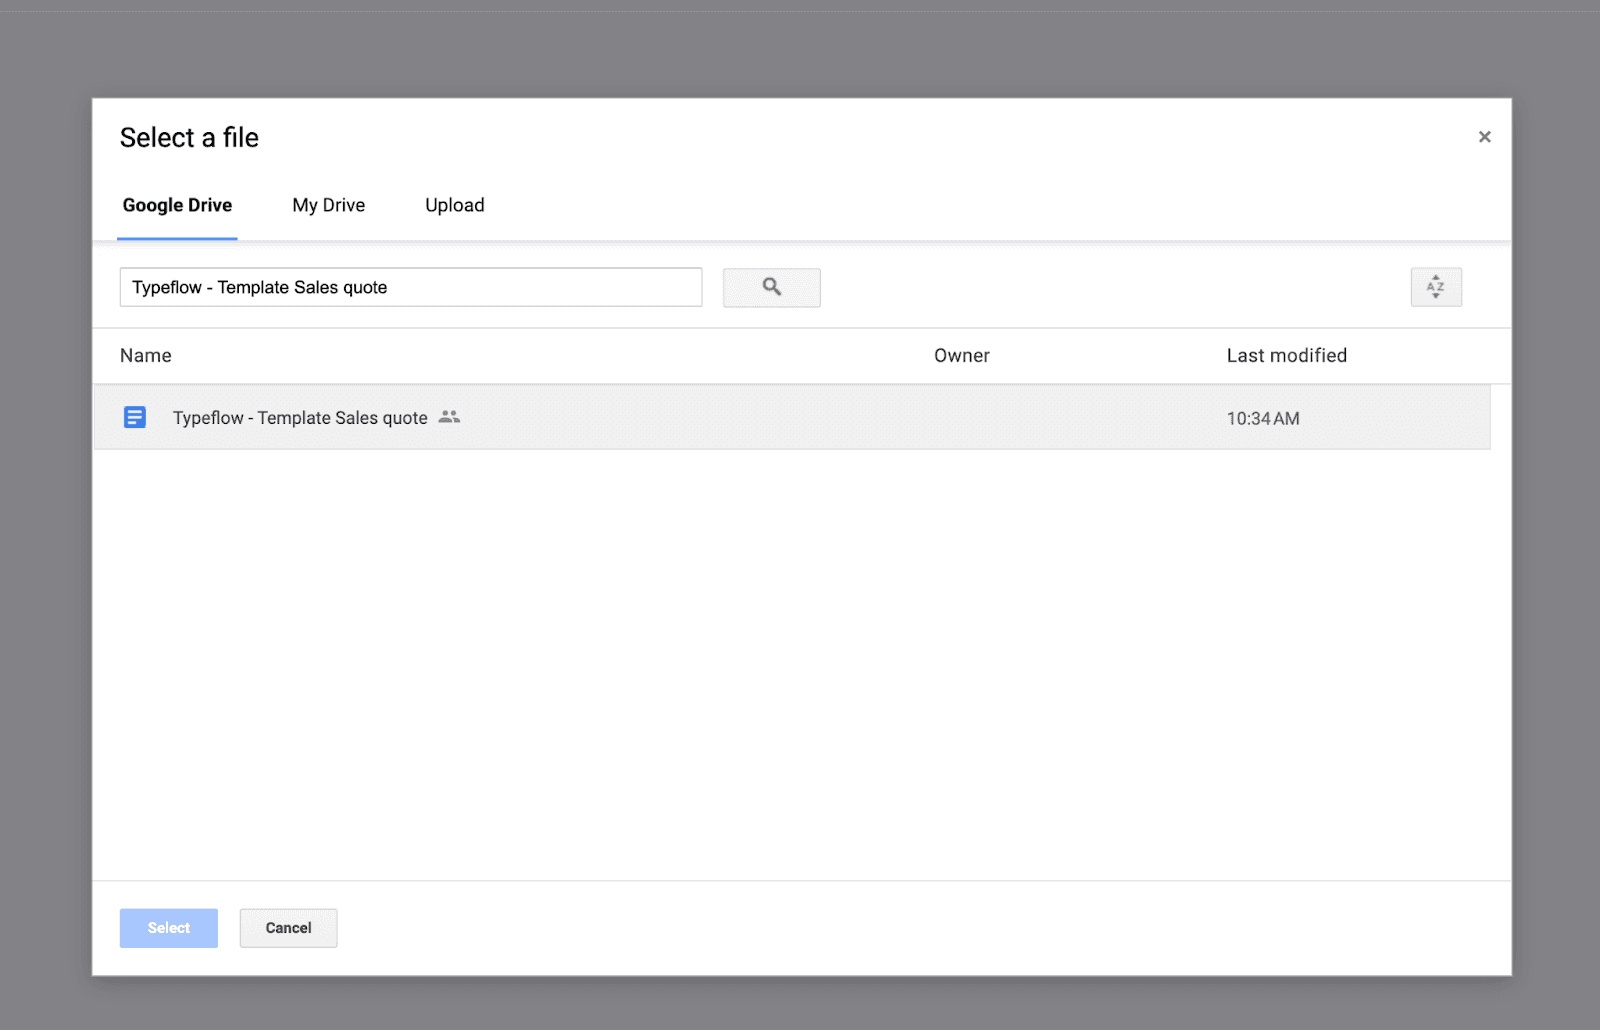
Step 3: Select your contract template
After authentication, TypeFlow displays your Google Drive files. Navigate to the folder where you saved your contract template and select it. The template now links to your Airtable base and is ready for field mapping.
How to Map Airtable Fields to Your Contract Template
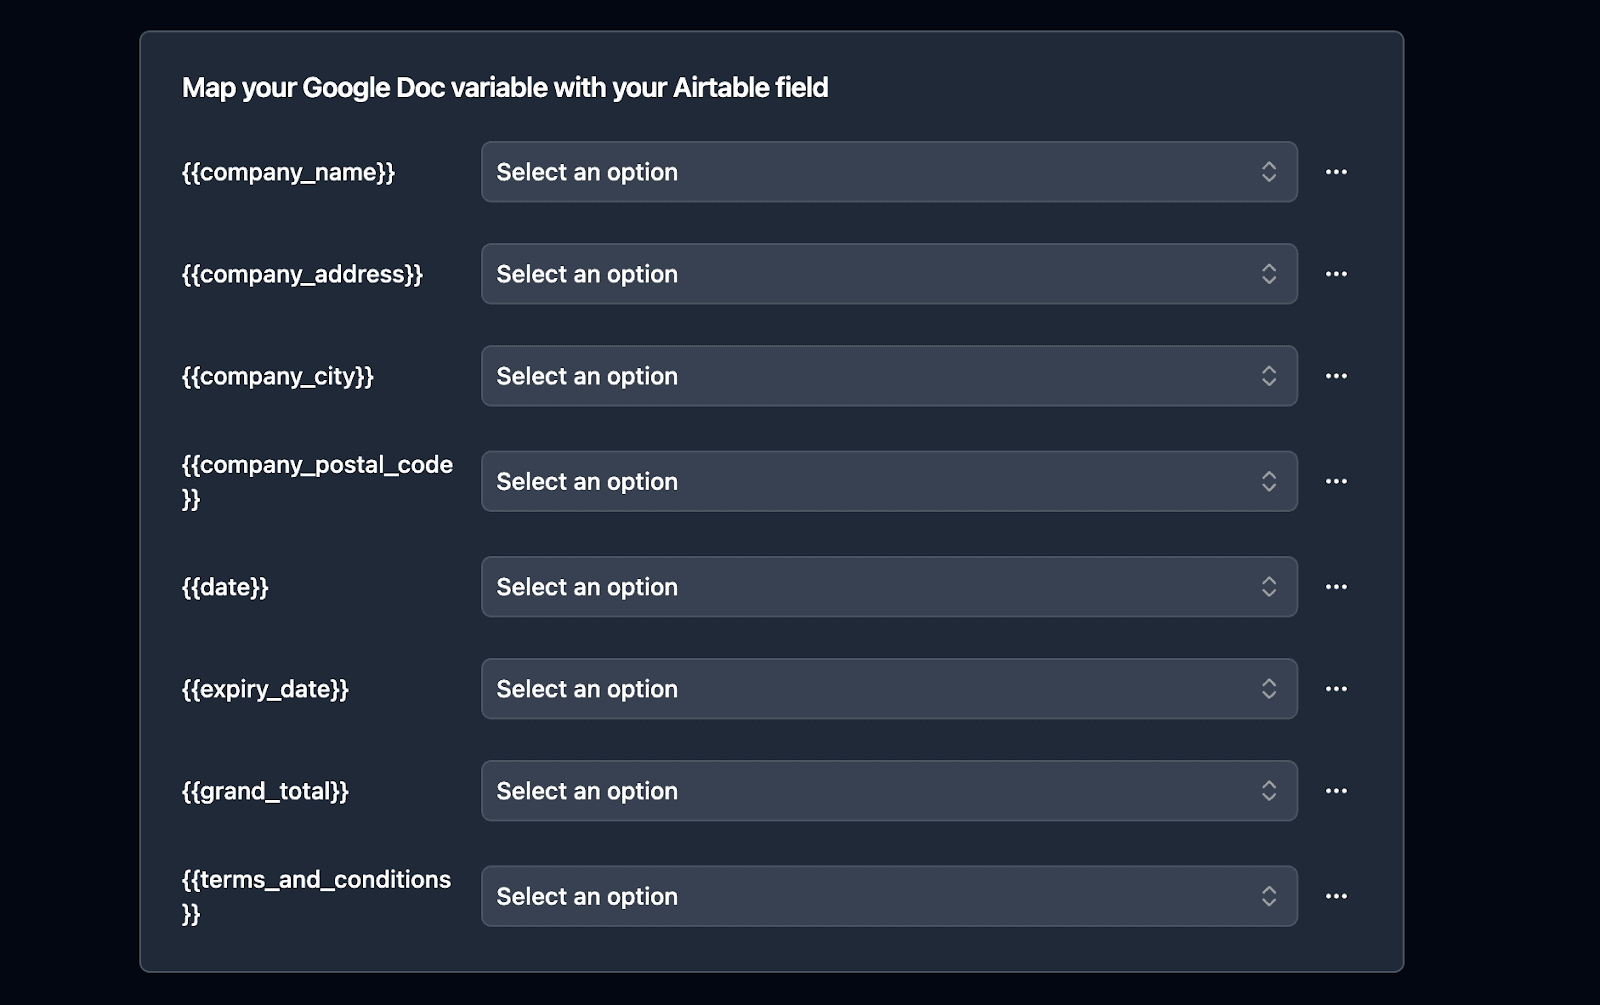
Mapping connects each Airtable field to its corresponding placeholder variable in your template. TypeFlow shows your available fields on the left and detected template variables on the right.
Click on an Airtable field, then click the matching template variable to create the connection:
- Airtable field "Company Name" → Template variable
{{company_name}} - Airtable field "Start Date" → Template variable
{{contract_start}} - Airtable field "Total Price" → Template variable
{{total_amount}}
Once done, you can import TypeFlow to Airtable.
Common Contract Types You Can Generate from Airtable
TypeFlow works for any contract type you need. Here are the most common documents our customers generate from their Airtable bases.
- Employment contracts: Full-time, part-time, contractor, intern agreements with salary, benefits, and terms
- Service agreements: Client contracts, SOWs, retainer agreements with pricing and deliverables
- Vendor contracts: Purchase orders, supplier agreements, NDAs with payment terms
- Sales contracts: Order forms, terms of sale, product agreements with line items
Each type uses the same setup process but with different template fields and conditional logic. For a complete guide on organizing contracts in Airtable, see Airtable Contract Management. To manage the full contract lifecycle from creation to renewal, see our contract lifecycle management guide. If you are evaluating whether Airtable is enough or you need dedicated CLM software, see our Airtable contract management vs CLM comparison.
Which Industries Use Contract Automation Most?
Based on our customer data, these industries see the biggest impact from automated contract generation:
- Professional services: Law firms, consulting agencies, marketing firms generating client agreements
- HR and recruitment: Companies hiring contractors, freelancers, or full-time employees
- Real estate: Property managers, agents, and developers creating lease agreements and purchase contracts
- Education: Schools and training organizations issuing certificates and enrollment contracts
- SaaS companies: Businesses with custom enterprise contracts or partnership agreements
Any business that creates more than 5-10 contracts per month typically sees significant time savings from automation. 36% of businesses have contracts with missing signatures, and 28% of work time is spent on document admin - automating contract generation eliminates most of this overhead.
How to Automate Contract Generation in Airtable
You have three ways to generate contracts from Airtable. Pick the method that fits your workflow: manual control with buttons, automatic generation with Airtable automations, or signature-triggered regeneration with forms. Most teams start with buttons, then add automation once they've tested their templates.
Method 1: The Classic Implementation
The classic method gives you full control over when to generate a contract. Indeed, you need to click on a button to trigger the contract generation.
you can add a button directly in your Airtable base:
-
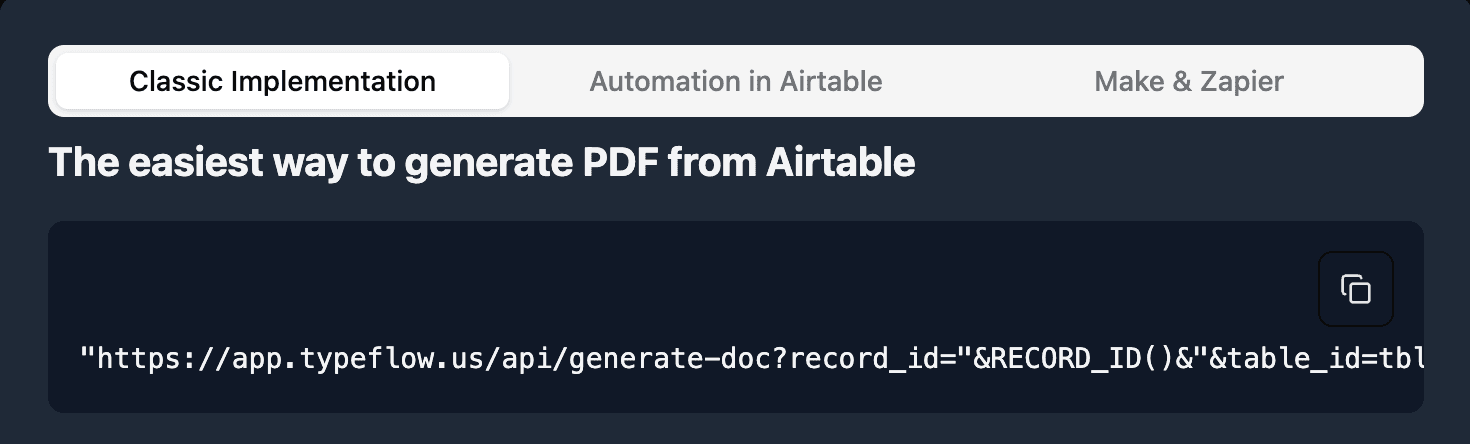
In TypeFlow scroll to the bottom of the page and click on " Classic Implementation"
-
Copy the URL, it should look like this:
"https://app.TypeFlow.us/api/generate-doc?record_id="&RECORD_ID()&"&table_id=xxx&flow_id=xxx"
- Go to your Airtable table and add a new button field

- Paste the URL from TypeFlow to the URL Formula
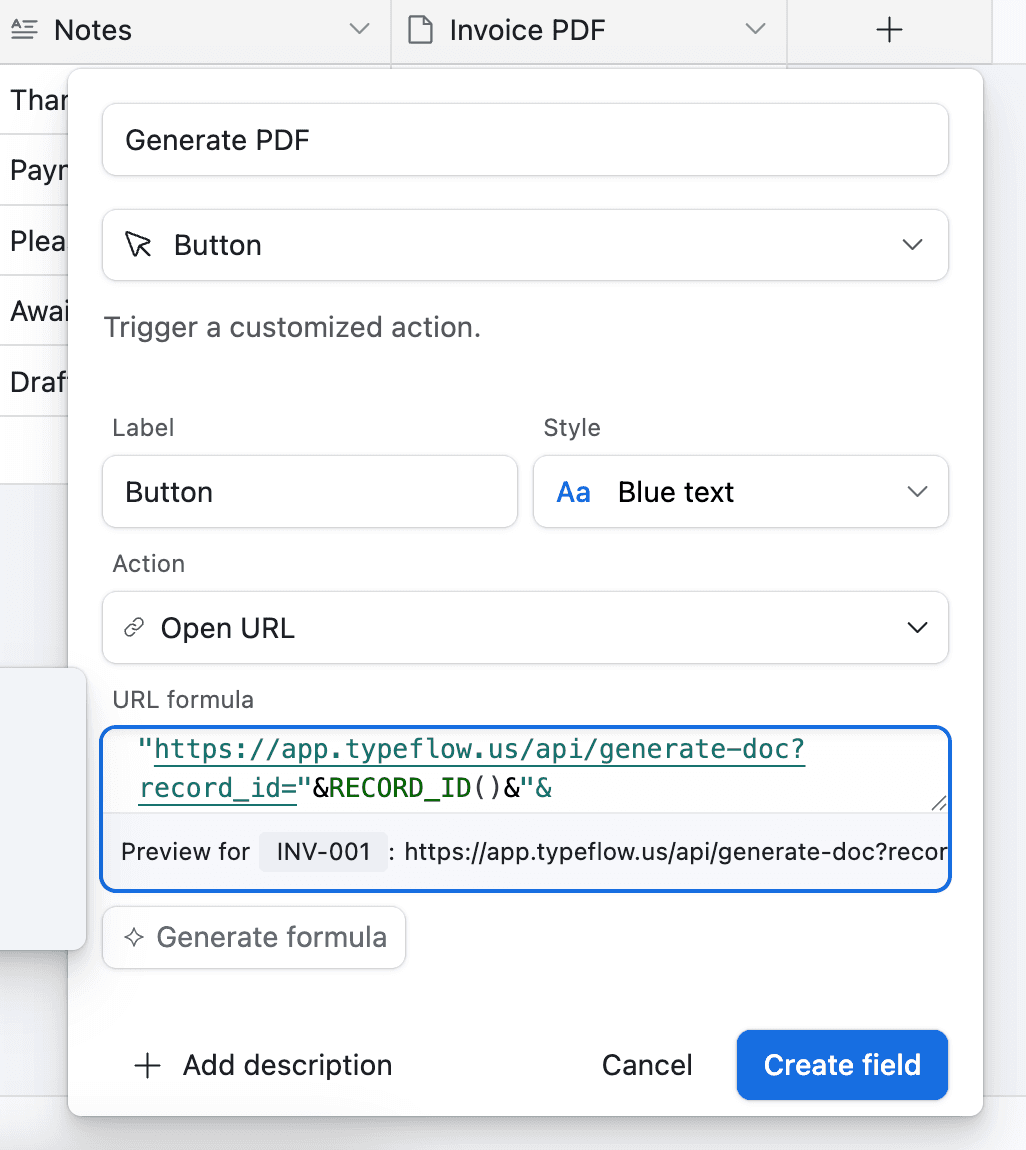
Now whenever you want to generate a contract, you can click the button in Airtable and it will generate the PDF for you.
Method 2: The Airtable Automation
You can use the Airtable Automation to automate your contract generation. You can also use Zapier or Make for more complex workflows. Automations run based on specific events in your base. You can choose from several trigger options depending on your workflow.
Here are the most common triggers:
- When a record is created: Generate a contract as soon as someone adds a new client to your base.
- When a field changes: Generate a contract when a status field updates to "Approved."
- On a schedule: Generate a batch of contracts every Friday afternoon or on the first of each month.
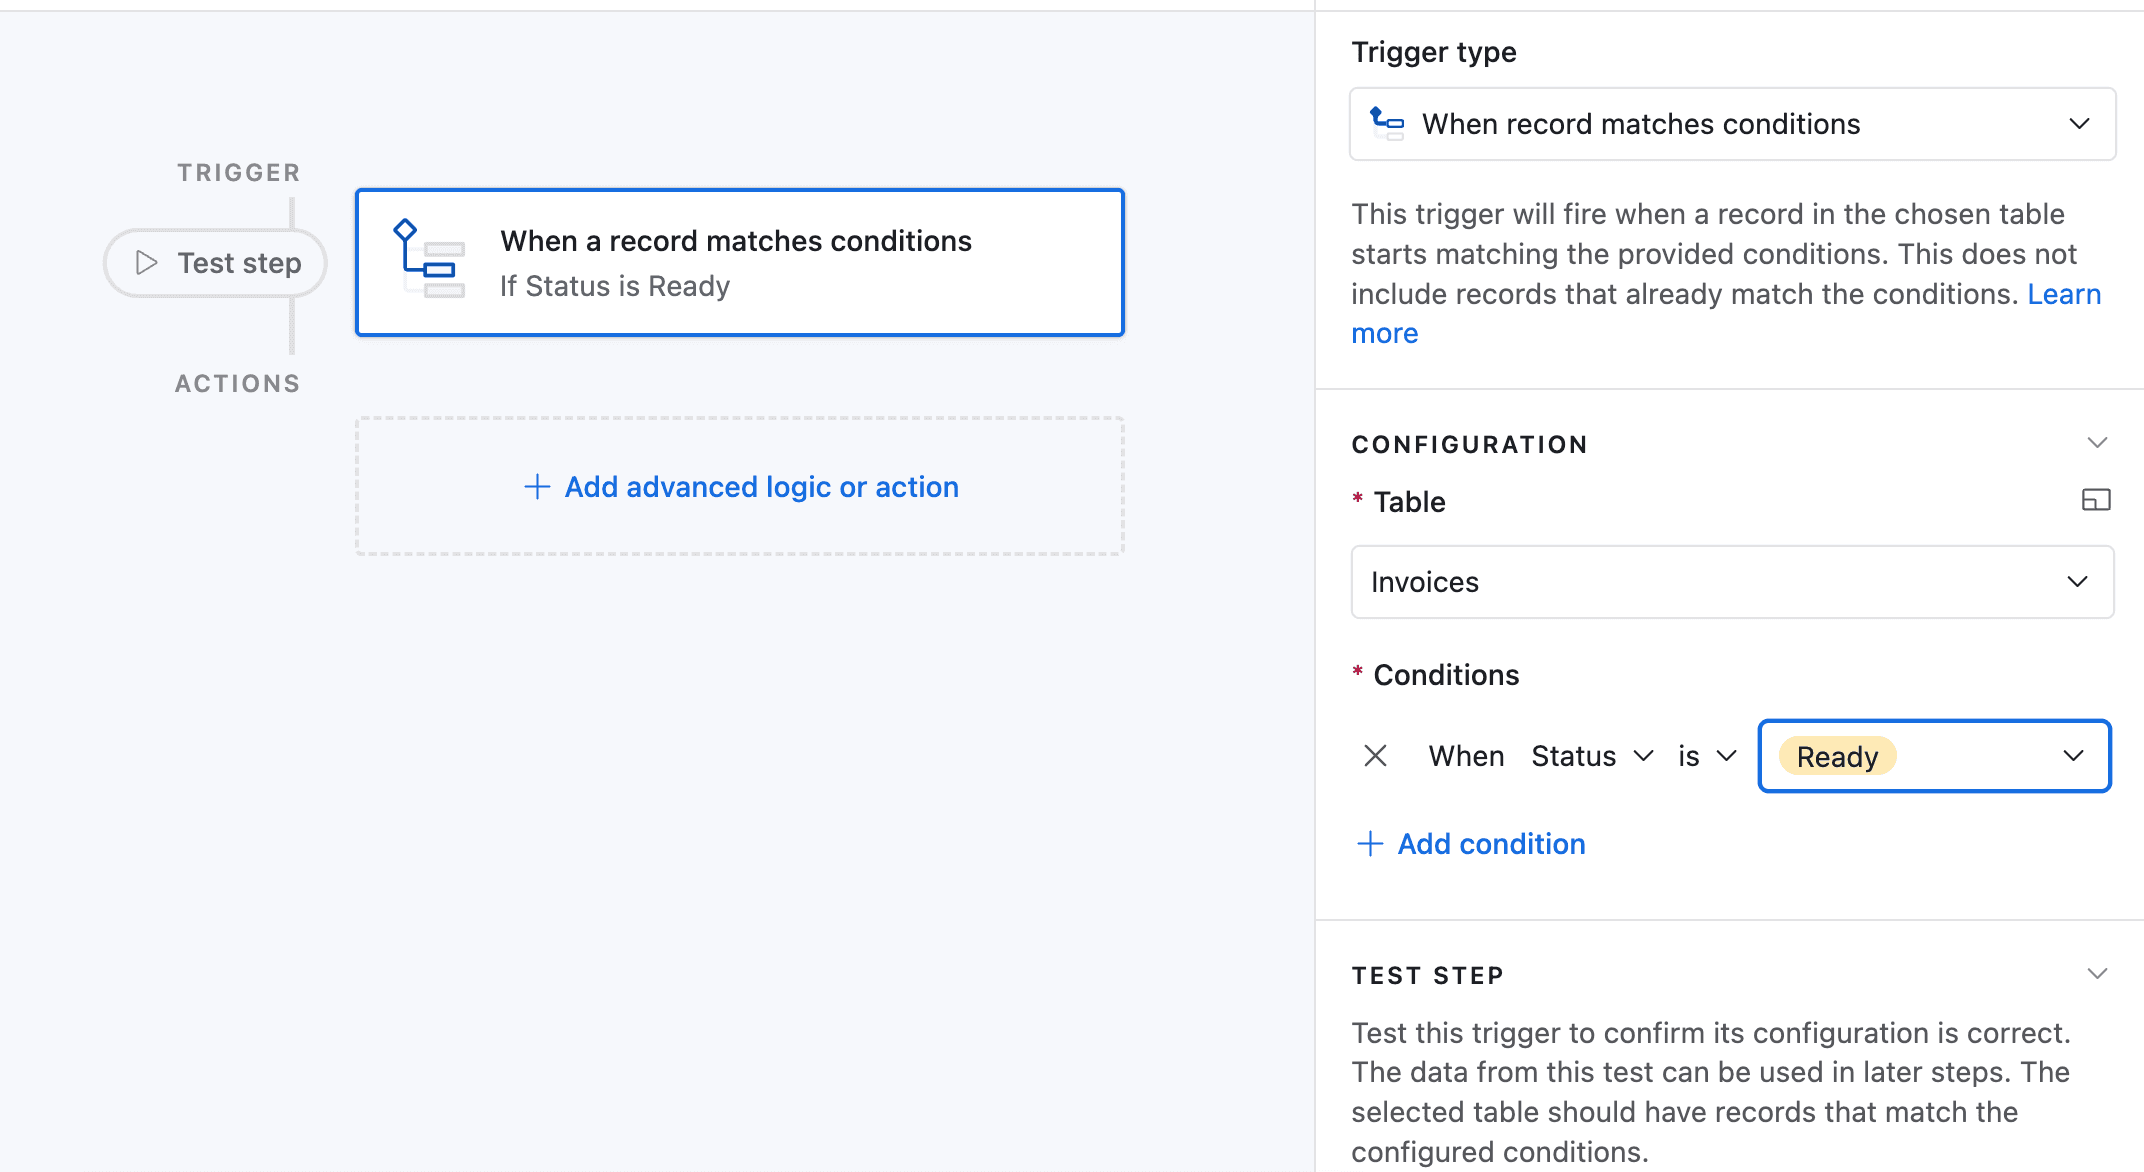
To set this up, click the Automations tab in your base, then "Create automation." Choose your trigger type and configure the conditions that activate the automation. For the purpose of this article, we will trigger the PDF genration whenever the field Status, for any invoice, is equal to "Ready".
Go to Automation in Airtable
-
Click on "Add a trigger" and Choose When a Record matches a condition
-
Select the table you want to trigger the automation on (in this case the Invoices table)
-
Select the field you want to trigger the automation on (in this case the Status field)
-
Select the condition you want to trigger the automation on (in this case "is")
-
Select the value you want to trigger the automation on (in this case "Ready")
-
Now choose a record that matches the condition
-
Now click on Add an advanced logic or action
-
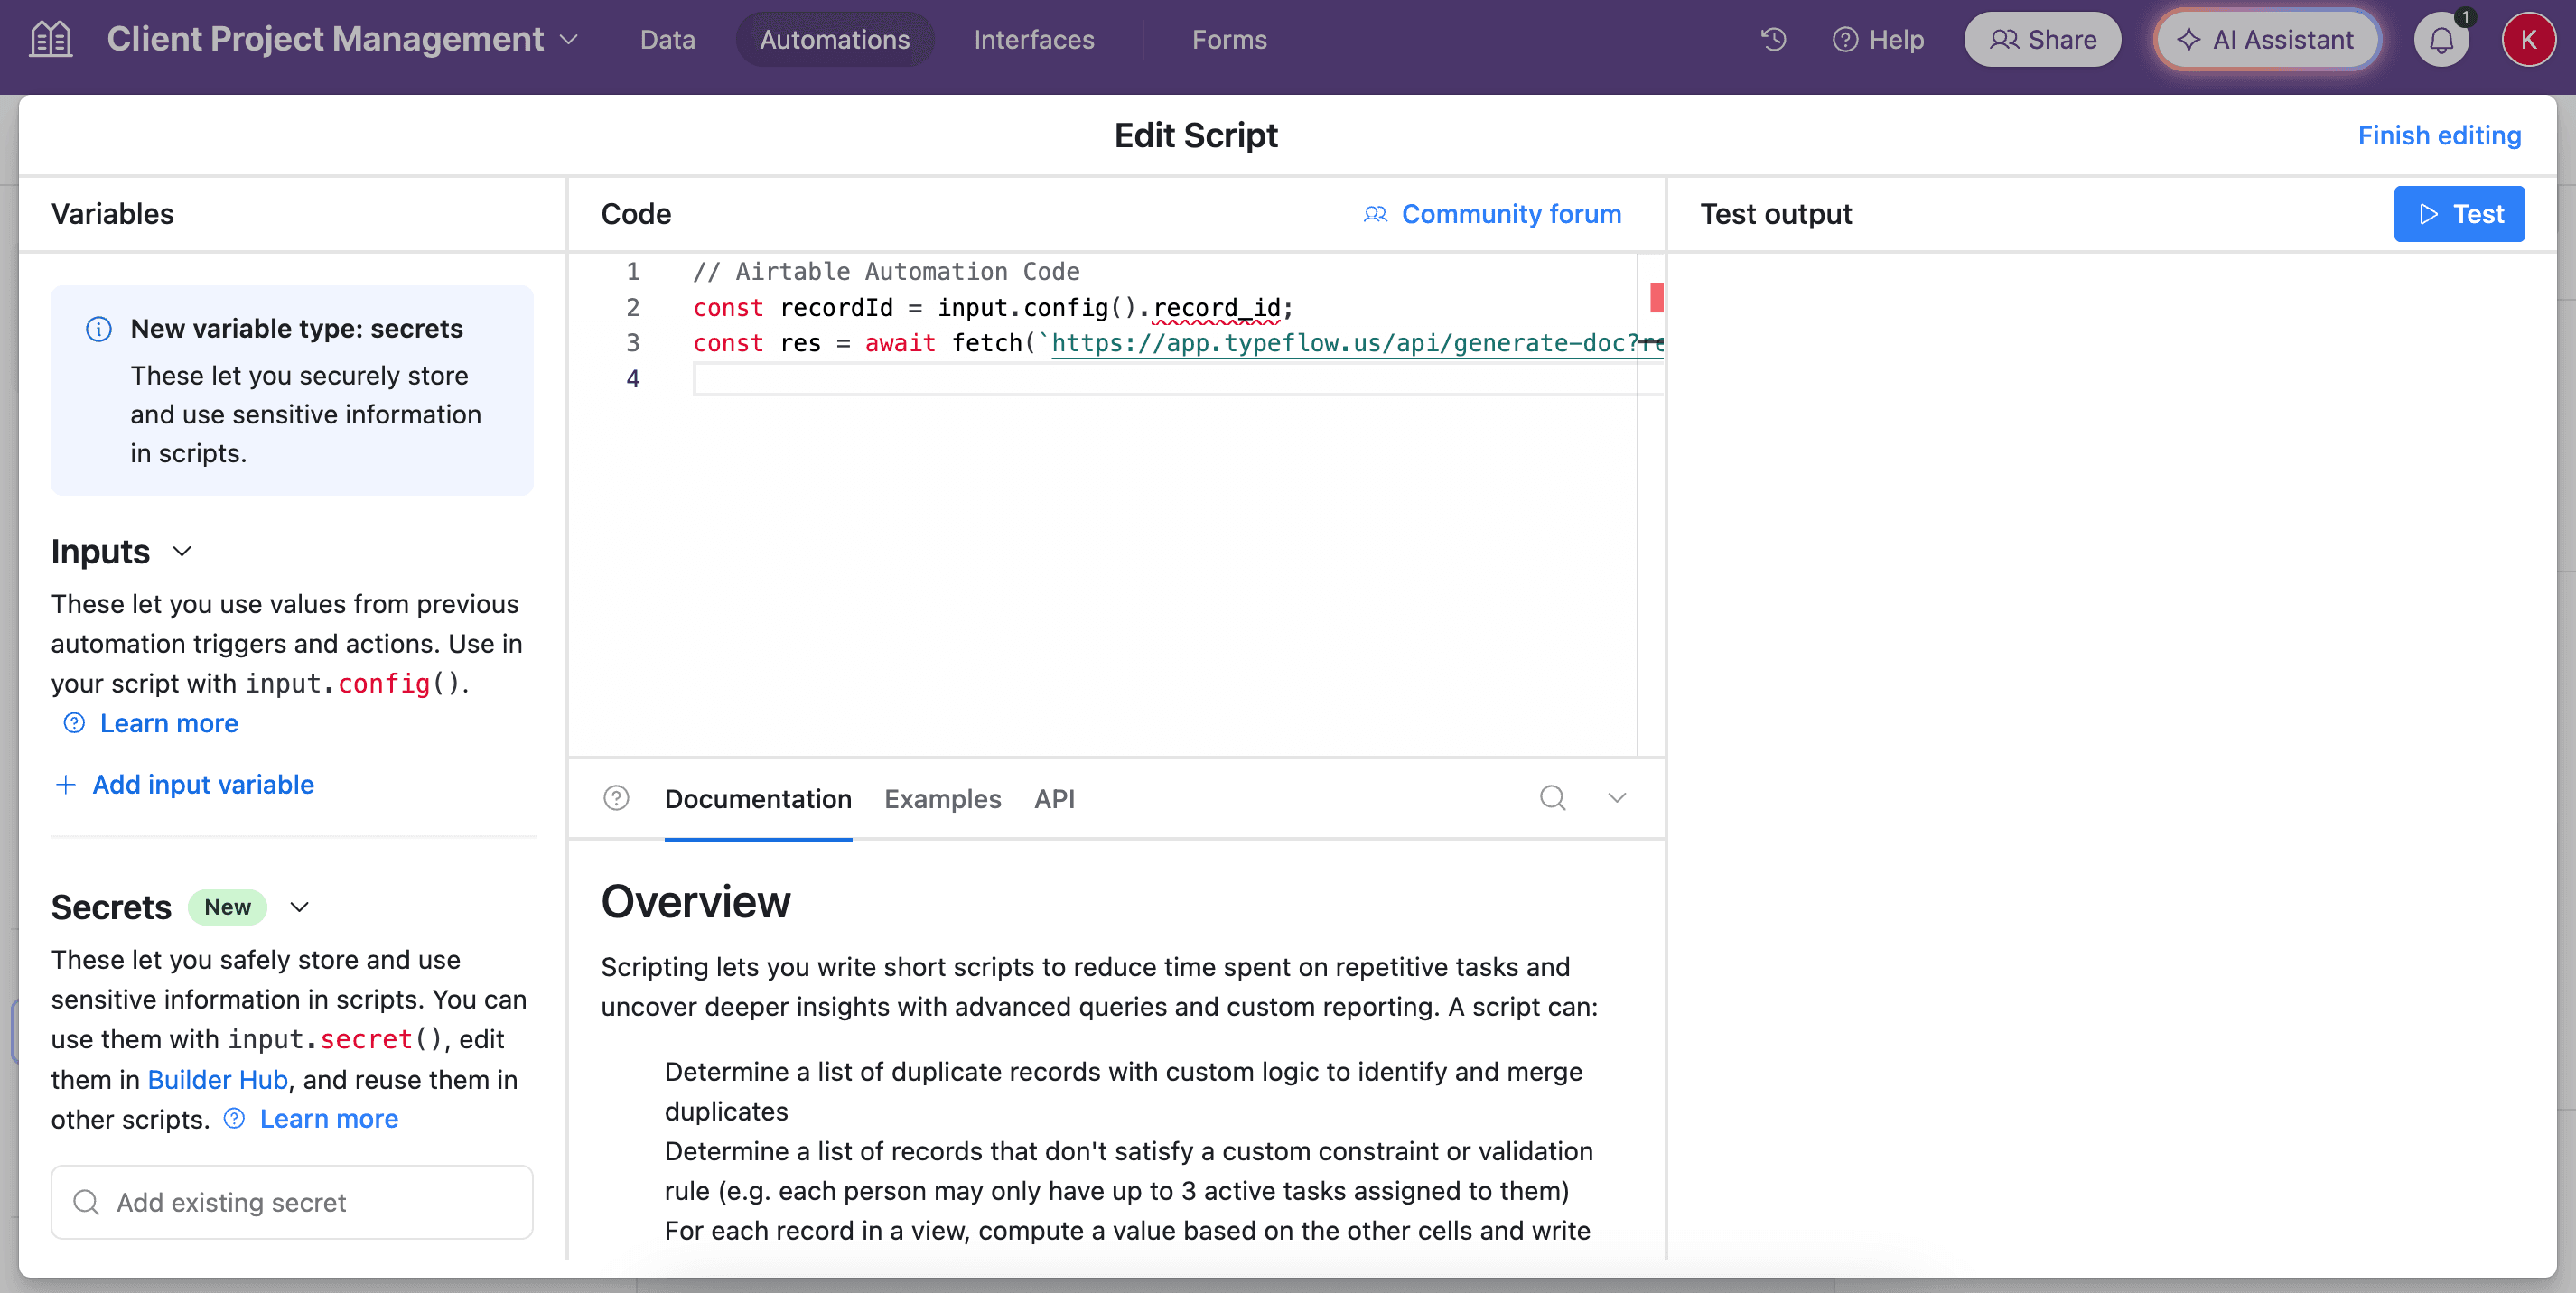
Pick Run Script. A new popup appears.
-
Go back to TypeFlow and select Automation in Airtable. Copy the script.
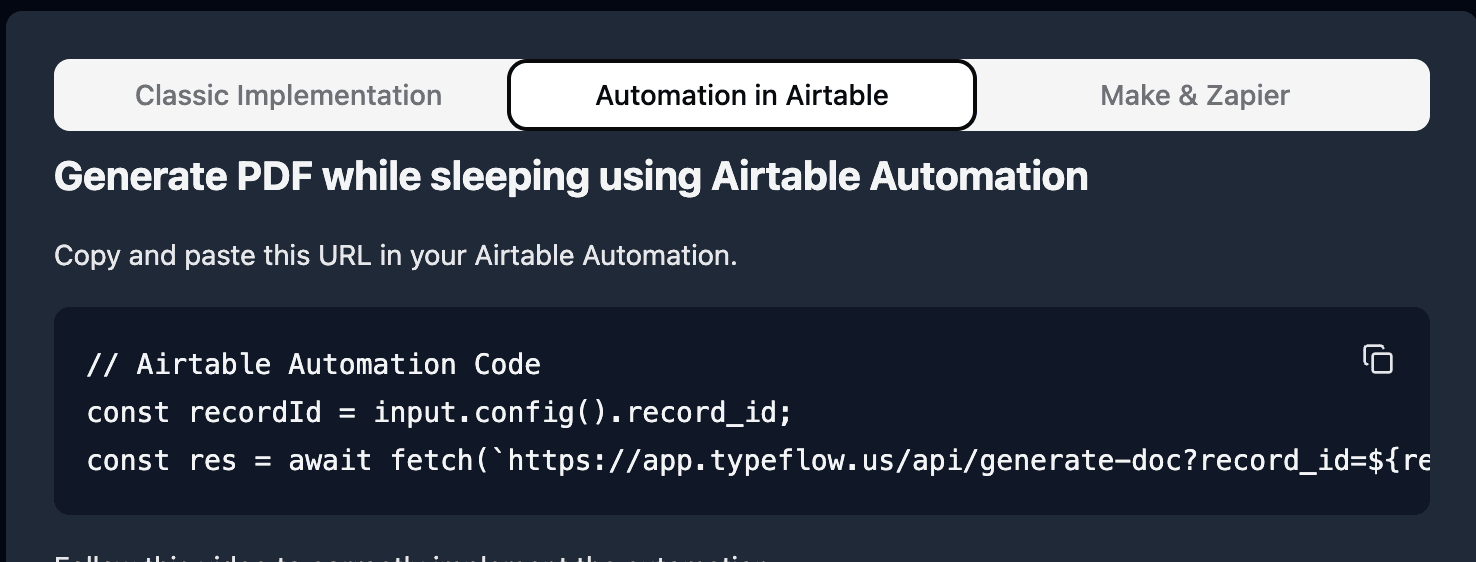
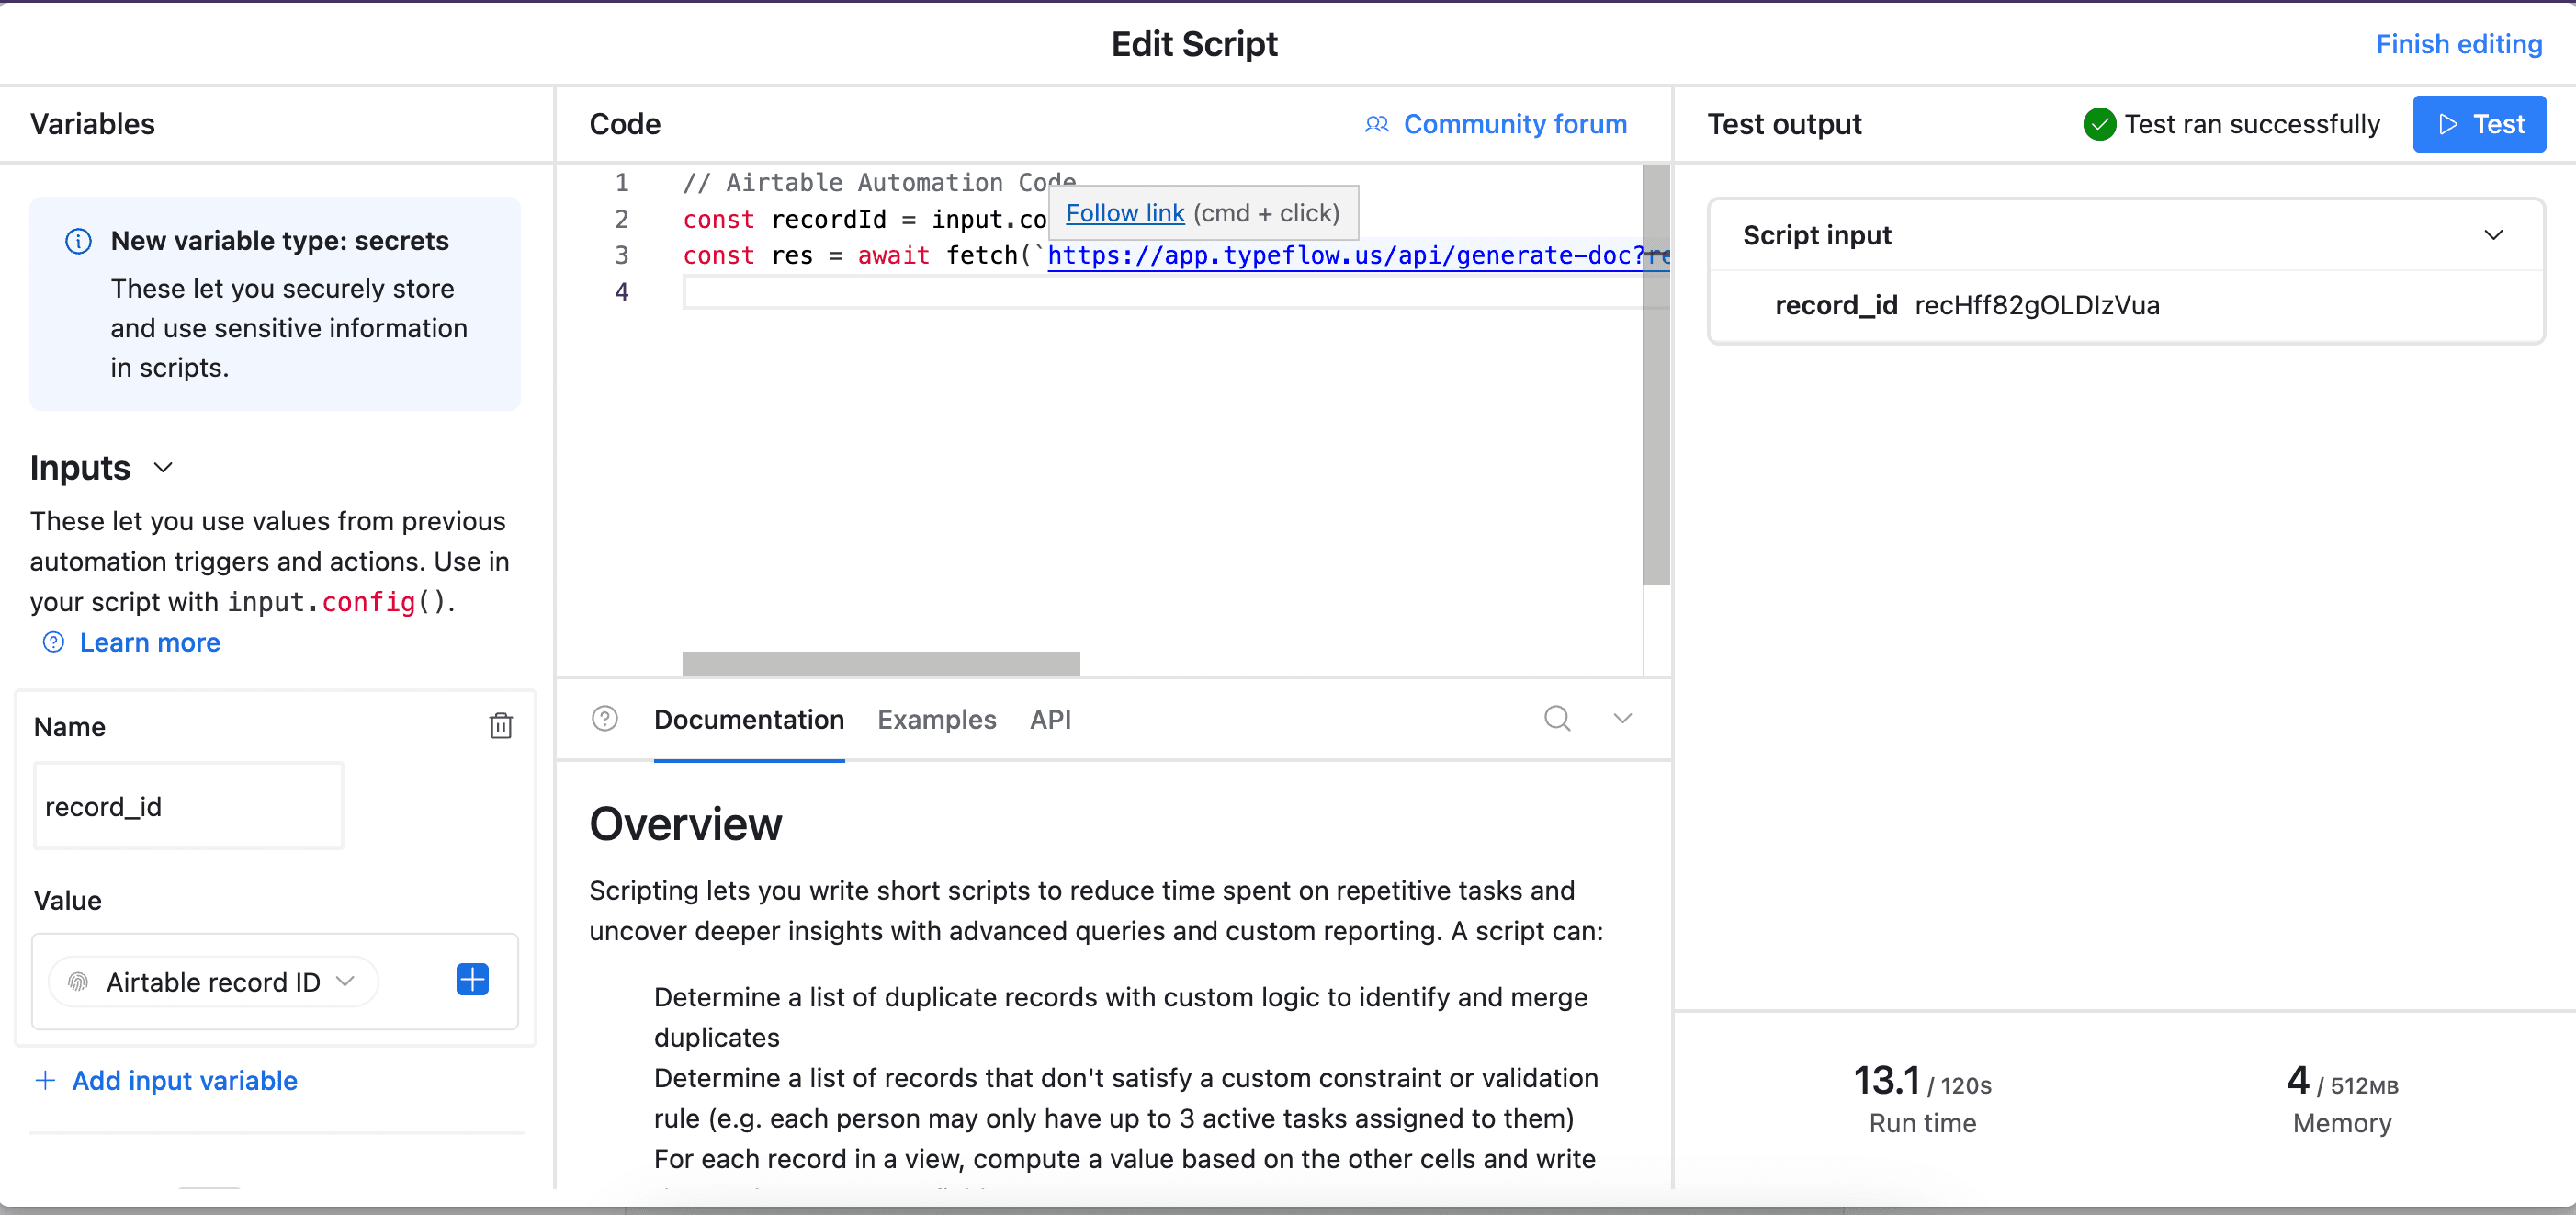
- Paste the script in the popup.
- In the left-side of the popup, do not forget to configure the variable input, record_id. You need to select Airtable Record ID from the dropdown. See the image.
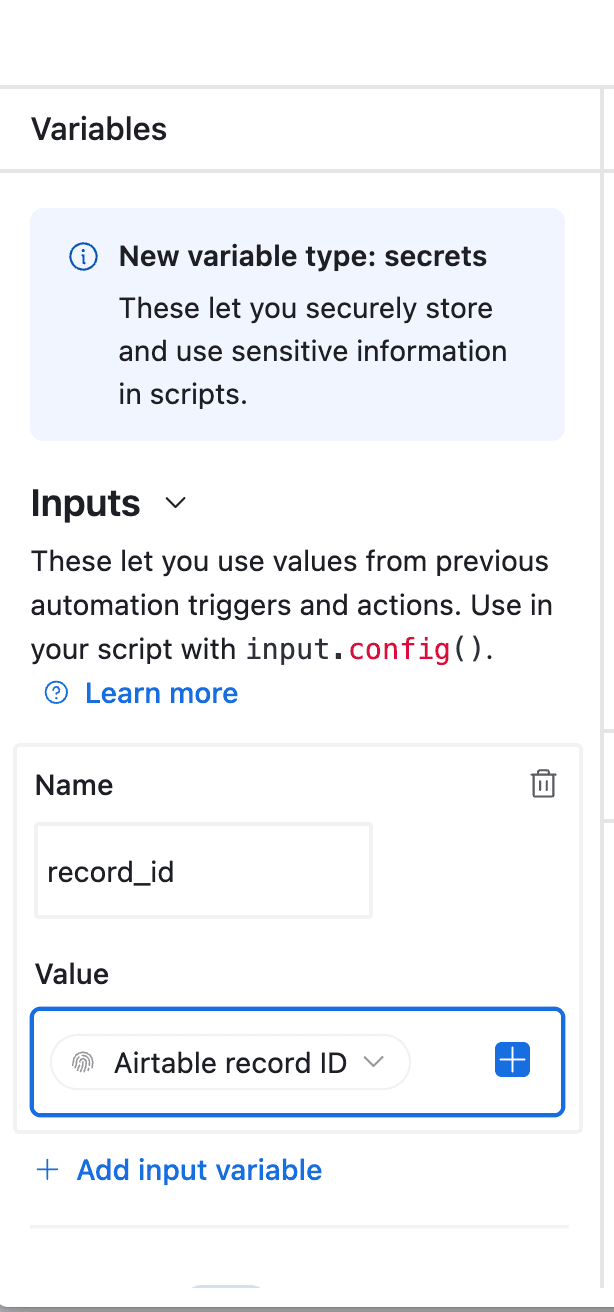
- Test your script, and see if it works. Adjust if needed (most of the time the error comes from the record_id variable - see step 12).
- Now name your automation and save it.
Method 3: Built-in E-Signatures
TypeFlow includes native e-signatures - no DocuSign or Zapier required. For enterprise needs, you can also integrate with HelloSign (now Dropbox Sign) or PandaDoc. Here's how it works:
- Add signature placeholders to your Google Doc template:
{{e-signature.signature_1}},{{e-signature.signature_2}}, etc. - Configure signers in TypeFlow - use a static email or pull from an Airtable field like
{{client_email}} - Generate the contract - TypeFlow automatically emails each signer a unique signing link
- Signer completes signature on an interactive signing page (works on any device)
- Signed PDF returns to Airtable with a Certificate of Completion containing full audit trail (IP address, timestamps, geolocation, consent capture)
Multi-signer support lets you define sequential signing (signer 2 waits for signer 1) or parallel signing (everyone signs simultaneously).
For a complete e-signature setup guide, see How to Add E-Signatures to Airtable Documents.
Try it yourself in 15 minutes
Set up contract generation with e-signatures included. No Zapier, no DocuSign fees.
Start free with 20 documents →Best Practices for Airtable Contract Automation
Following a few simple practices prevents common problems and keeps your automation running smoothly. Addressing them upfront saves troubleshooting time later.
Use clear naming conventions
Match your Airtable field names to your template variables (e.g., Airtable field "Client Email" becomes template variable {{client_email}}). This makes mapping intuitive and simplifies future updates.
Test your template before going live
Always generate a test contract with sample data before using the automation for real clients. This helps you catch mapping errors or formatting issues early.
Store generated contracts in Airtable
Add an attachment field in Airtable to save the final PDF to each record. This creates a complete, centralized audit trail for all your agreements.
Benefits of Automating Contract Generation
Automation transforms contract creation from a tedious manual task into a background process that runs itself. The time savings add up fast, but the benefits go beyond just speed.
Save time on repetitive document tasks
An automated contract generates in seconds, saving hours of manual work each month. This frees you up to focus on growing your business instead of administrative tasks.
Reduce errors and maintain consistency
Automation pulls data directly from your Airtable base, eliminating copy-paste errors. Every contract uses the same approved template, ensuring consistent branding and legal language.
Scale your contract workflow
An automated system handles 100 contracts as easily as it generates 10. This allows your business to grow without the administrative burden growing at the same rate.
What's the ROI of Automating Contracts?
Most businesses see a return on their automation investment within the first month. Here's the typical math:
Manual contract creation costs:
- 20 minutes per contract (find template, copy data, format, review)
- $30/hour labor cost = $10 per contract
- 50 contracts/month = $500 in labor costs
Automated contract generation:
- 30 seconds per contract (click button, download PDF)
- TypeFlow cost: $29/month
- Time savings: 16+ hours per month
- Cost savings: $470+ per month
The automation pays for itself with just 3 contracts per month, and most customers generate 20-50 contracts monthly.
Is Automated Contract Generation Secure?
Security is critical when dealing with contract data, and automated systems need proper safeguards to protect sensitive information.
Data encryption and storage
TypeFlow encrypts all data in transit using TLS 1.3 and at rest using AES-256 encryption. Contract templates and generated PDFs are stored securely on Google's infrastructure, which meets SOC 2 Type II and ISO 27001 standards.
Your data never leaves the Google/Airtable ecosystem - TypeFlow acts as a bridge between these trusted platforms rather than storing contract information on separate servers.
Access controls and permissions
Authorization follows the principle of least privilege. TypeFlow can only access:
- Google Docs templates you explicitly select
- Airtable bases you choose to connect
- Specific fields you map during setup
You can revoke access instantly from either Google or Airtable admin panels. Team members only see contracts for records they already have permission to view in Airtable.
Compliance and audit trails
Built-in e-signatures include complete audit trails with timestamps, IP addresses, and geolocation data. Each signature creates a tamper-evident Certificate of Completion that meets most legal requirements for electronic signatures.
For businesses requiring additional compliance (HIPAA, SOX, etc.), consider enterprise solutions like Ironclad or Juro that offer dedicated compliance features.
Common Issues and Solutions
Even well-configured automations can hit snags. Here are the most common problems and how to quickly fix them.
Variables not populating
If a variable like {{client_name}} appears in the final document, check for typos in your Google Doc template. Also, confirm the field is correctly mapped in TypeFlow.
PDF formatting problems
If your PDF layout looks broken, simplify your Google Doc template. Stick to standard fonts and simple table structures to ensure a clean conversion.
Automation not triggering
First, double-check that your trigger conditions in Airtable are being met exactly (e.g., status is "Approved" not "Approve"). Second, ensure your tool's authorization to access Airtable and Google hasn't expired.
How TypeFlow Compares to Other Airtable Contract Tools
Several tools can generate contracts from Airtable, but they differ in approach and complexity. Here's how TypeFlow stacks up against common alternatives:
| Feature | TypeFlow | Documint | Plumsail | PandaDoc | ActiveMerge |
|---|---|---|---|---|---|
| Google Docs templates | Yes | No (built-in editor) | Yes | No | No (built-in editor) |
| Native Airtable extension | Yes | Yes | Yes | Via Zapier | Yes |
| Built-in e-signatures | Yes (no extra fees) | No | No | Yes ($) | No |
| PDF generation | Yes | Yes | Yes | Yes | Yes |
| Multi-page contracts | Yes | Yes | Yes | Yes | Yes |
| Conditional sections | Yes | Yes | Yes | Yes | Limited |
| No-code setup | Yes | Yes | Yes | Yes | Yes |
| Free documents | 20 | Limited | Limited | No | Limited |
Why "No Zapier" matters: Plumsail requires a Zapier subscription ($20-50/month) on top of their document service. TypeFlow connects directly to Airtable via native extension - no middleware, no extra cost, no sync delays.
Why built-in e-signatures matter: TypeFlow includes e-signatures at no extra cost with full audit trail and Certificate of Completion. Competitors require DocuSign ($10-60/envelope) plus Zapier middleware.
Why Google Docs matters: TypeFlow uses templates you already know how to create. No proprietary syntax or new editors to learn - if you can format a Google Doc, you can create a contract template.
Contract Automation Pricing Breakdown
Understanding total cost helps you pick the right solution for your volume:
- TypeFlow: $29/month for unlimited contracts, includes e-signatures
- Documint: $19/month for 100 documents, e-signatures via third party
- Plumsail: $25/month + Zapier $20-50/month = $45-75/month total
- PandaDoc: $35-65/month, contracts count toward document limit
- ActiveMerge: $15/month for 500 documents
Hidden costs to watch for: Zapier subscriptions, per-signature fees, document limits, and setup/training time for proprietary editors.
Generate Professional Contracts from Airtable in Minutes
You now have a complete roadmap for automating contract generation from Airtable. The setup takes less than an hour, and once it's running, you'll save hours every week on document creation. For more workflow tips, check the Airtable community.
TypeFlow connects the tools you already use - Airtable for data management and Google Docs for document design. This familiar foundation means less learning curve and faster implementation.
Getting Support for Your Contract Automation
Most setup questions get resolved quickly with the right resources:
- TypeFlow support: Email support with same-day response, plus live chat for urgent issues
- Video tutorials: Step-by-step setup guides available in your TypeFlow dashboard
- Template library: Pre-built contract templates for common use cases
- Airtable community: Connect with other users for workflow tips and troubleshooting
For complex integrations or enterprise deployments, TypeFlow offers one-on-one setup calls to get your automation running smoothly.
About This Data
The setup times, processing speeds, and best practices in this guide are based on real-world data from 2000+ TypeFlow customer implementations (2024-2025). All customer examples are anonymized to protect confidentiality. External research citations (Adobe/IDC, 2024) provide independent verification of productivity challenges that contract automation addresses.
Automate your document generation
Start with 20 free documents. Built for businesses using Airtable.
Frequently Asked Questions About Generating Contracts from Airtable
Find answers to the most common questions about this feature.
Popular Questions
All Questions
Need more help?
Our team is here to help you solve all your problems and answer your questions.
Contact Us
Kevin from TypeFlow
•AuthorKevin Rabesaotra is a growth engineer and automation specialist with 8+ years of experience building no-code solutions. As Founder & CEO of TypeFlow, he has helped hundreds of businesses automate document generation and streamline workflows with Airtable integrations. Previously, Kevin was a Product Lead specializing in growth engineering, running experiments to drive revenue, retention, and lead generation.
More articles
How to Print Labels from Airtable with Quantity Control (Step by Step)
Print multiple labels per Airtable record based on a quantity field. Step-by-step guide for linked records mode and quantity repeat mode with barcodes and Avery sheets.
Read articleHow to Print Avery Mailing Labels from Airtable
Print Avery mailing labels (5160, 5161, 5162) from Airtable without Word mail merge. Step-by-step guide with print label mode, automation, and bulk generation.
Read articleHow to Create Inventory Labels with Barcodes in Airtable
Create inventory labels with Code 128, EAN-13, or QR barcodes from Airtable. Step-by-step guide for warehouse, retail, and asset tracking with thermal and Avery printers.
Read article