DocuSign Airtable Integration: When You Need It (and When You Don't)
There's no native DocuSign Airtable integration. To connect them, you typically use middleware like Zapier or Make. An alternative is TypeFlow, which handles document generation and e-signature natively from Airtable - no middleware, no per-signature fees.
This guide covers both approaches: the DocuSign + Zapier/Make setup, and the native TypeFlow alternative.
- Goal: Send a DocuSign envelope from an Airtable record and save the signed PDF back to the same record
- What you'll need: Airtable + DocuSign + an automation tool (Zapier/Make)
Key Takeaways
- DocuSign doesn't integrate natively with Airtable -you need Zapier or Make as middleware, plus DocuSign's per-envelope fees ($10-60 depending on plan).
- For standard business documents (contracts, proposals, NDAs), TypeFlow's built-in e-signatures are simpler: no middleware, no per-signature fees, full audit trail included.
- Use DocuSign when you need: qualified electronic signatures (QES), advanced identity verification, notarization, or enterprise compliance requirements your legal team specifies.
- If you're already using TypeFlow for document generation, adding e-signatures is one toggle -no additional Zapier setup required.
Do You Actually Need DocuSign?
Before diving into the integration setup, consider whether DocuSign is the right tool for your use case.
When DocuSign Is the Right Choice
Regulatory requirements:
- Your legal team specifically requires DocuSign
- EU transactions needing eIDAS Advanced or Qualified signatures
- Industries with specific e-signature vendor requirements (some financial services, healthcare)
Advanced features:
- Identity verification (government ID check, knowledge-based authentication)
- In-person signing with witness
- Notarization
- Payment collection during signing
- Complex routing with conditional logic based on document content
Enterprise considerations:
- Existing DocuSign enterprise license you're required to use
- Integration with other enterprise systems (Salesforce, SAP) that use DocuSign
- Brand recognition matters for high-stakes external signers
When Native E-Signatures Are Enough
Standard business documents:
- Contracts, proposals, and SOWs
- NDAs and confidentiality agreements
- Employment offers and onboarding paperwork
- Client agreements and service contracts
- Purchase orders and invoices
- Internal approvals and sign-offs
Why native works for these:
- ESIGN Act (US), UETA, and eIDAS provide full legal validity
- Audit trail captures all required evidence (intent, consent, attribution)
- Certificate of completion provides legal documentation
- No court has invalidated a properly-executed simple electronic signature for standard business documents
TypeFlow vs DocuSign: Quick Comparison
| Feature | TypeFlow Native | DocuSign (via Zapier) |
|---|---|---|
| Airtable connection | Native integration | Requires Zapier/Make |
| Setup time | 5-10 minutes | 30-60 minutes |
| Per-signature cost | Included in plan | $10-60/envelope |
| Middleware cost | $0 | $20-50/month (Zapier) |
| Multi-signer | Yes (sequential/parallel) | Yes |
| Audit trail | Yes (IP, timestamp, location) | Yes |
| Certificate of completion | Yes | Yes |
| Legal compliance | ESIGN, UETA, eIDAS | ESIGN, UETA, eIDAS + QES |
| Identity verification | No | Yes (premium) |
| Notarization | No | Yes (premium) |
| Best for | High-volume document workflows | Regulated industries, enterprise compliance |
Cost comparison for 50 documents/month:
- DocuSign Business: ~$25/envelope = $1,250/month + Zapier ($50) = $1,300/month
- TypeFlow with e-signatures: $49/month (all-inclusive)
If you've determined you need DocuSign's advanced features, continue with this tutorial. If native e-signatures would work for your use case, skip to The Simpler Alternative section.
Who is this for?
This guide is for you if you:
- Use Airtable to manage your business data
- Need to send documents for electronic signature regularly
- Want to automate the signature collection process
- Want signed documents to automatically update back in Airtable
What You Need Before Starting
Before you start, make sure you have the basics below. If you're setting up DocuSign + Zapier/Make for the first time, plan for ~30-60 minutes including testing.
| Requirement | Why it matters |
|---|---|
| Airtable base | Holds recipient info, status, and the signed PDF attachment |
| DocuSign account (sandbox recommended) | Lets you send envelopes and test safely before going live |
| Zapier or Make | Acts as the bridge between Airtable and DocuSign |
| A document source | Either static PDFs or a generated PDF from Airtable data |
Does DocuSign Have a Sandbox?
Yes. DocuSign offers a free developer sandbox at developers.docusign.com so you can test your automation without sending real signature requests.
What is the Airtable DocuSign Integration
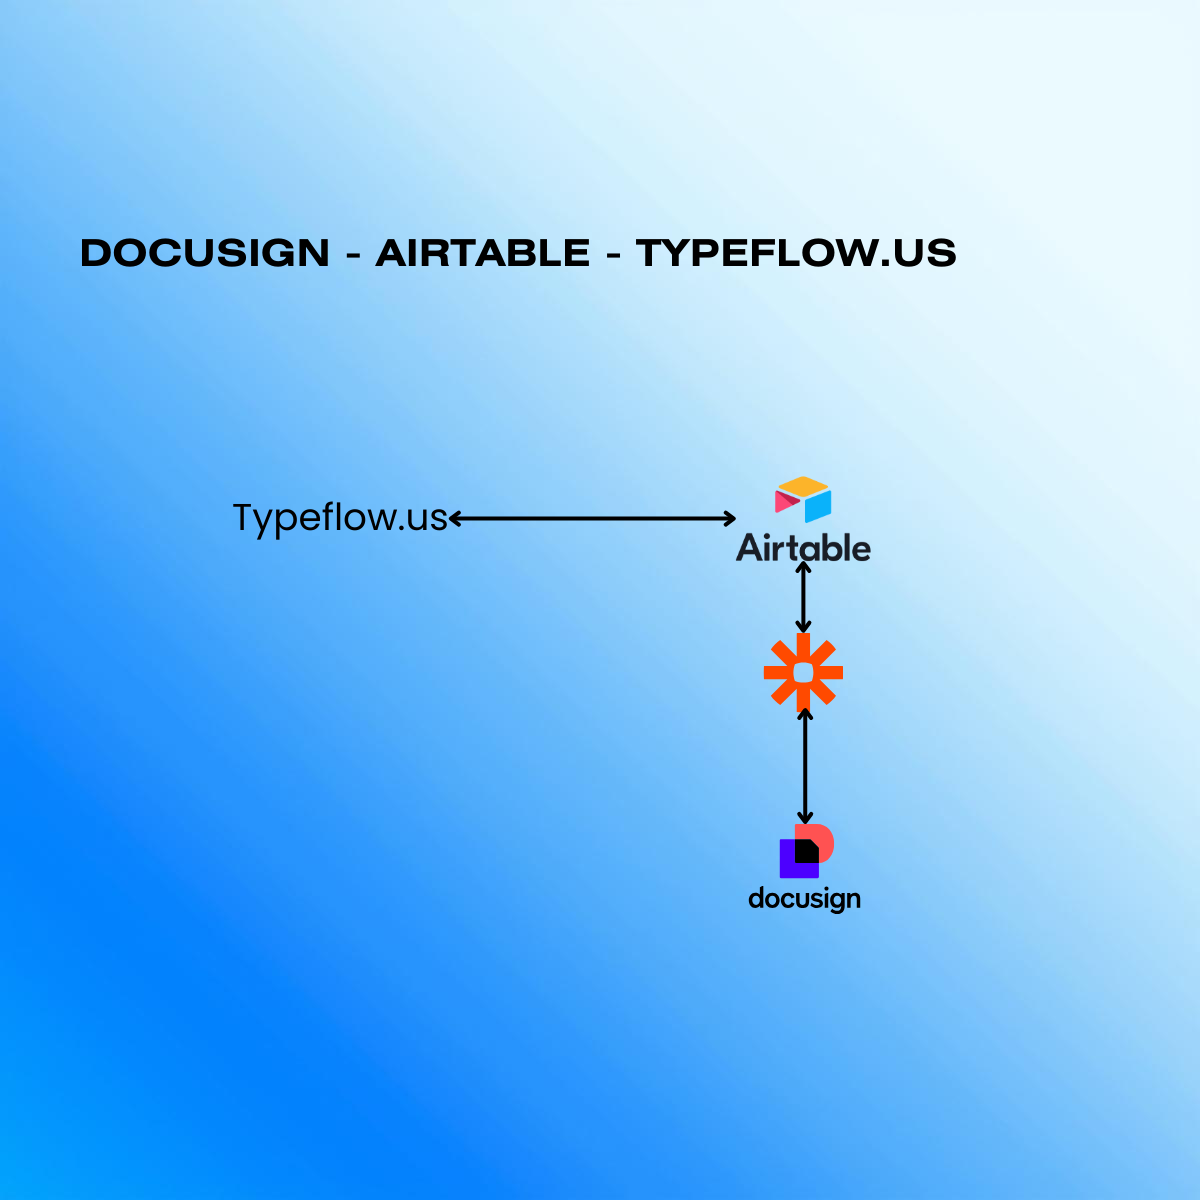
DocuSign and Airtable don't connect natively. To automate the workflow, you'll use Zapier or Make as middleware.
- What this enables: Airtable updates can trigger DocuSign to send an envelope, and DocuSign events can update Airtable
- What this adds: Another tool to configure, monitor, and pay for
At a high level, Airtable provides the data, the middleware watches for changes, and DocuSign sends the signature request.
Let me describe a few terms that will help you navigate through the tutorial:
- Trigger: The event that starts your automation - for example "a new record appears in my Clients table"
- Action: What happens after the trigger fires. For example, "send an envelope in DocuSign."
- Middleware: The automation platform connecting your two apps. Zapier and Make (formerly Integromat) are the most common ones.
How to Set Up Your Airtable Base for DocuSign
Your Airtable base is where all your contract data lives. The way you organize this data determines how smooth everything runs later.
Required fields for document data
Every document you send through DocuSign pulls from specific data points in your base. You'll want to create fields that match the information your documents actually need.
Most document workflows use these core fields:
- Recipient name: The full legal name of the person signing the agreement.
- Recipient email: The email address where DocuSign will send the document.
- Document type: Whether it's a contract, NDA, proposal, or other agreement type.
- Status: Track whether each record is "Draft," "Ready to Send," "Sent," "Signed," or "Declined."
- Document attachment: An attachment field to store the final signed PDF.
Organizing records for signature workflows
Airtable views let you filter which records are ready for document sending. I create a view called "Ready to Send" that only shows records where a status field equals "Approved."
This approach prevents you from sending documents for incomplete or unapproved records. You can also add a checkbox field called "Document Sent" to track which records already have documents in flight. When you check that box, the record disappears from your "Ready to Send" view.
How to Connect Airtable and DocuSign
Let's walk through the actual setup. The process takes about 15-20 minutes once you have your accounts ready.
Step 1: Set up your automation platform account
Visit Zapier and create an account if you don't have one. From the Dashboard click "Create a Zap" to start a new automation.
Zapier will ask you to choose a trigger app first.
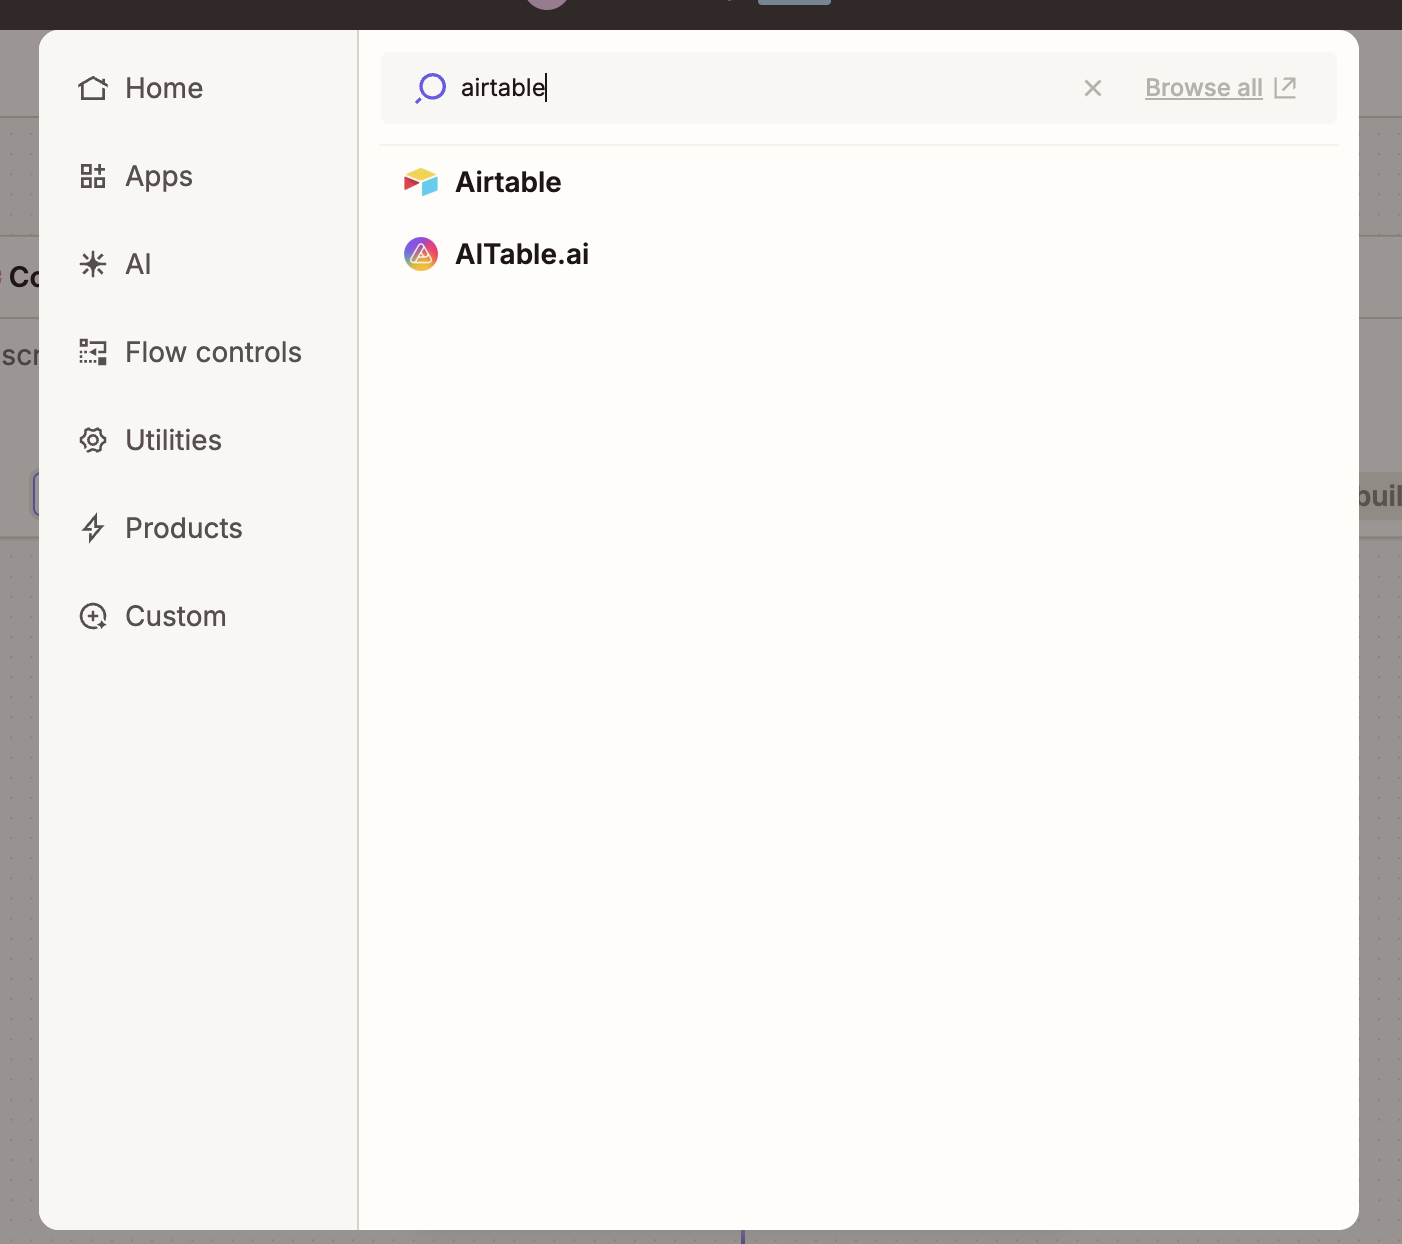
Step 2: Connect your Airtable base
Search for Airtable in the app list and select it. Zapier will prompt you to sign into your Airtable account and grant permission to access your bases.
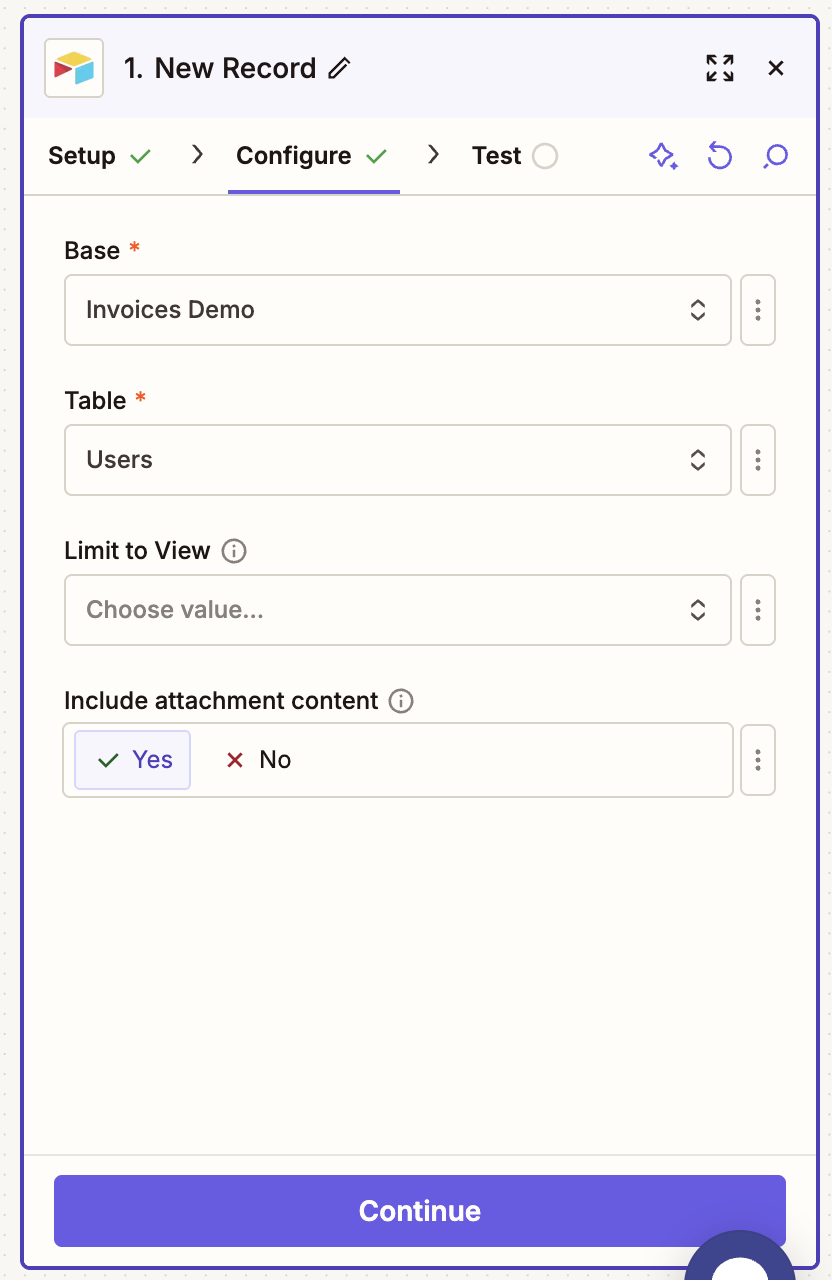
After authorizing, you'll choose which base and table to use. Pick the table containing the records you want to trigger document signing. For a sales workflow, this might be your Deals or Contracts table.
Step 3: Select your trigger
Now you decide what event in Airtable kicks off the automation. Zapier offers several options:
- New Record: Fires every time you add a row to your table.
- Updated Record: Fires when any field in a record changes.
- New Record in View: Fires when a record enters a specific view you've created.

The "New Record in View" option is my favorite. You can create a view in Airtable filtered to show only records where Status equals "Ready to Send." Then the automation only fires for records that meet your criteria, not every single new entry.
Step 4: Connect your DocuSign account
Add DocuSign as your action app. Sign into your DocuSign account when prompted.
Zapier will ask for permission to send envelopes on your behalf. Grant this access to continue.
Step 5: Configure your DocuSign action
Select "Send Envelope" as your DocuSign action. This is where you map your Airtable fields to the DocuSign envelope.
You'll connect:
- The recipient's email address from your Airtable contact field.
- The recipient's name for the signature block.
- The document you want to send can be either uploaded to DocuSign or attached from a URL field in Airtable.
- A subject line and optional message.
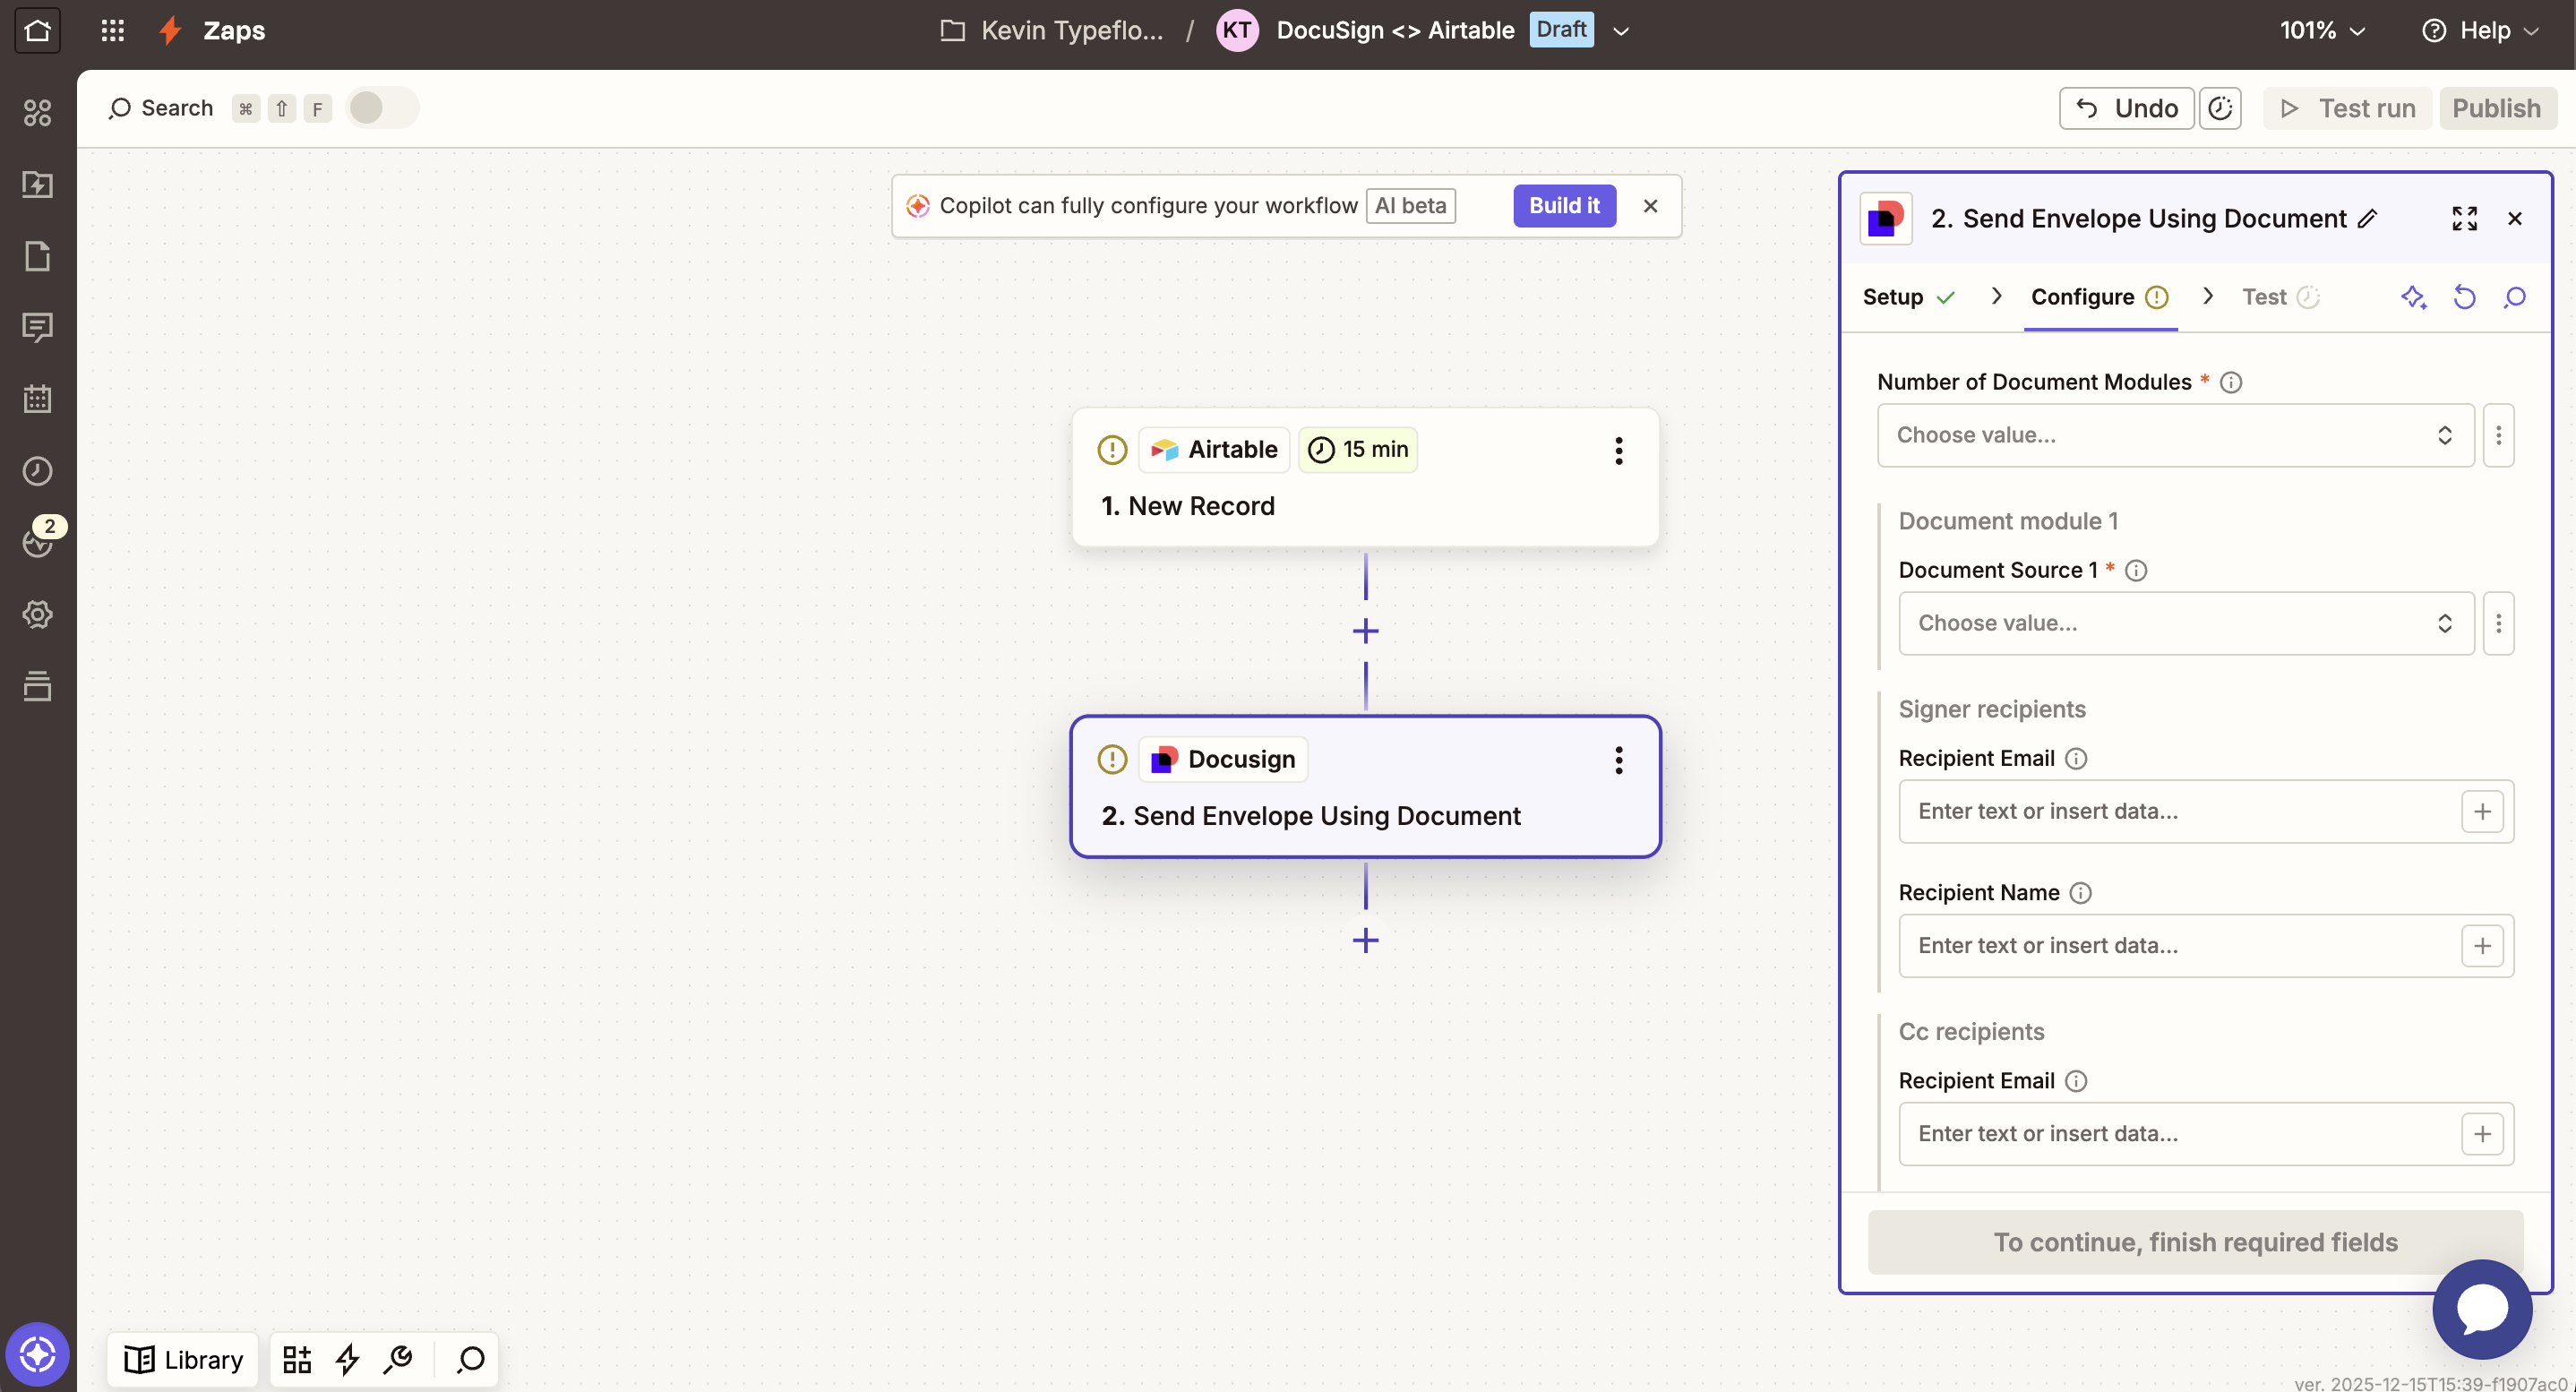
Here are some guidelines:
- Number of Document Modules: This is the number of documents you want to include. For the demo, it will be 1.
- Document Source 1: Where the document comes from. You can have the document come from DocuSign or from an external source. For the demo, the document will come from DocuSign.
Take your time with the field mapping. Mistakes here mean documents go to the wrong people or show up with blank fields.
Step 6: Test and activate your integration
Zapier lets you test the automation before turning it on. Click "Test" and watch what happens. Check your DocuSign account to confirm the envelope arrived with the correct recipient and document.
If something looks wrong, go back and adjust your field mappings. Once the test passes, turn on your Zap.
Tip: Run your first few tests with your own email address as the recipient. This way you can see exactly what your clients will receive.
How to Generate Documents from Airtable Before Sending to DocuSign
But there is a gap in the basic integration: DocuSign sends documents for signature, but doesn't create them. You either upload a pre-made document in DocuSign or point to a file URL. With pre-made documents, it means you need as many pre-made documents as use cases.
If you want to generate a custom contract (you can show or hide some part of the contract based on Airtable data with TypeFlow) using Airtable data, you need an extra step.
This is where document generation tools come in. TypeFlow, for example, creates PDFs from your Airtable data using Google Docs templates.
You design your contract template once, with placeholders for client name, project details, pricing, and so on. Then TypeFlow fills in the blanks from your Airtable record and produces a finished PDF.
The complete workflow looks like this:
- A record in Airtable triggers the automation.
- TypeFlow generates a PDF using your template and the record's data.
- The PDF goes to DocuSign for signature.
- The signed document saves back to Airtable.
This approach gives you full control over document design while keeping everything automated from start to finish.
Get started with TypeFlow in 5 minutes
No coding required. Connect your Airtable, pick a Google Docs template, and generate your first PDF today.
Start free with 20 documents →Step 1: Build your template with Google Docs
You can build your template with Google Docs. Let's say you want to build contracts. Add all the necessary information. When you want to add data from Airtable, you can add placeholders like this:
{{variables}}- here is some documentation.
You can also implement conditional sections to show/hide sections based on Airtable field values. For example, it can be relevant to show some part of the contract for a Full-Time contract. And for a Contractor, it will be relevant to show other parts.
Step 2: Build your Flow with TypeFlow
Now that you have your template, we are going to connect your template with your Airtable data.
First, select the base you want to work with.
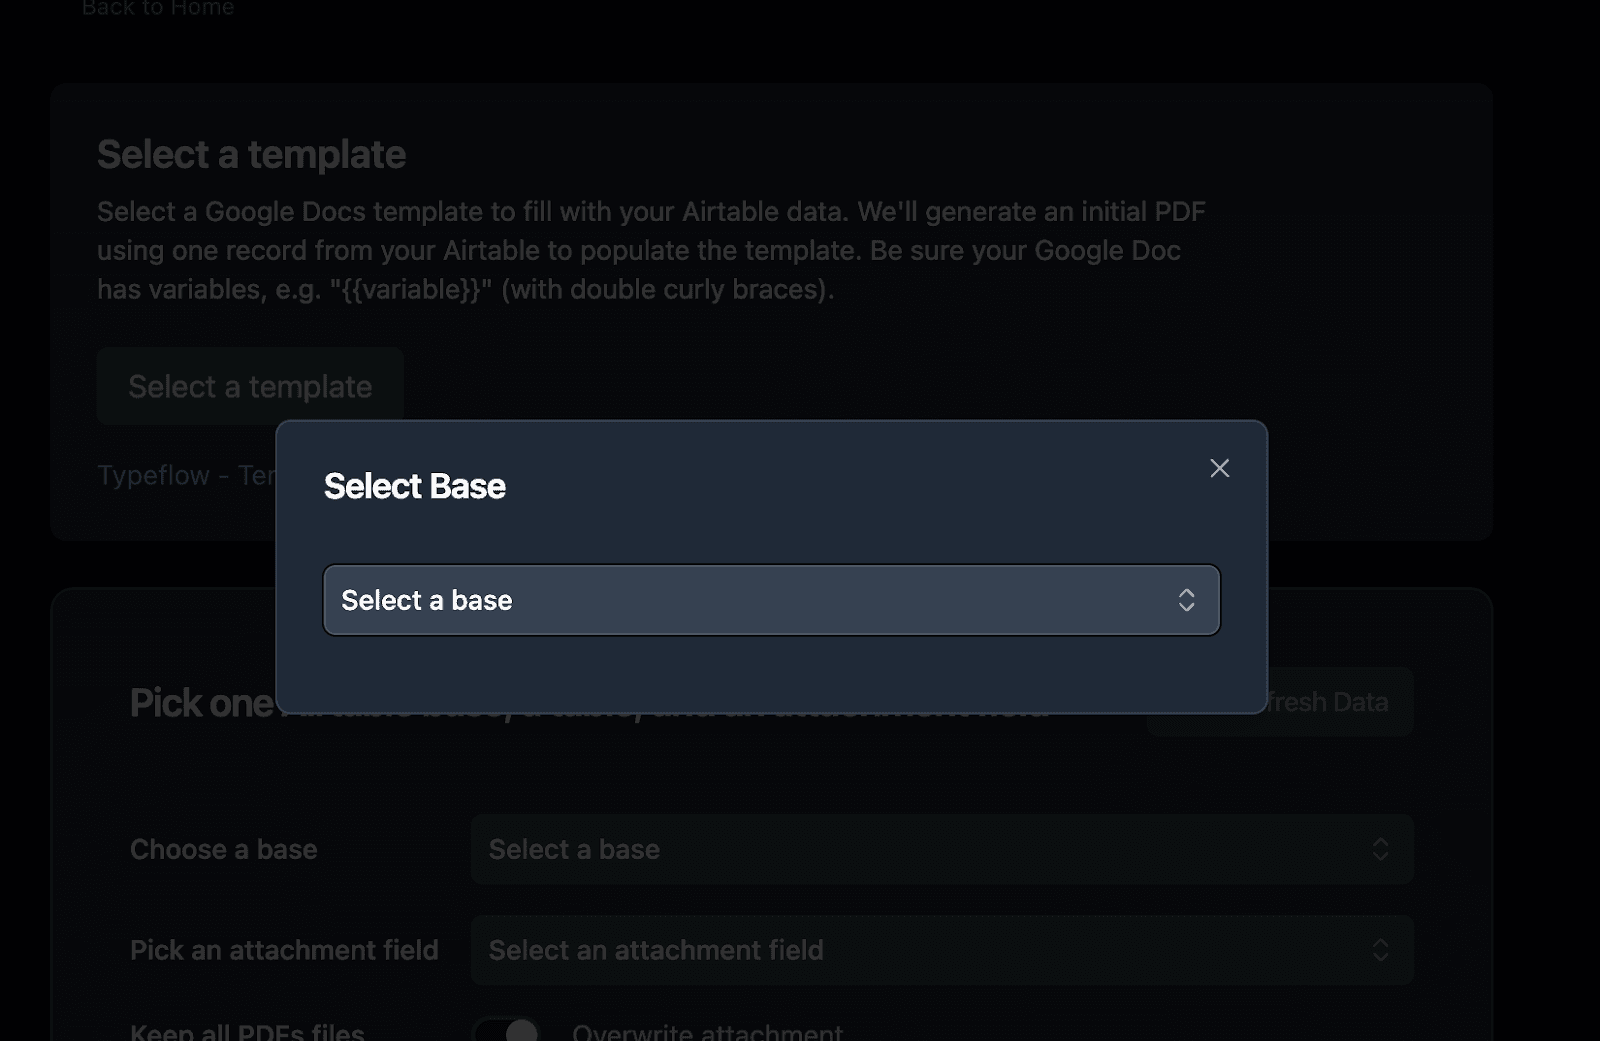
Then the table.
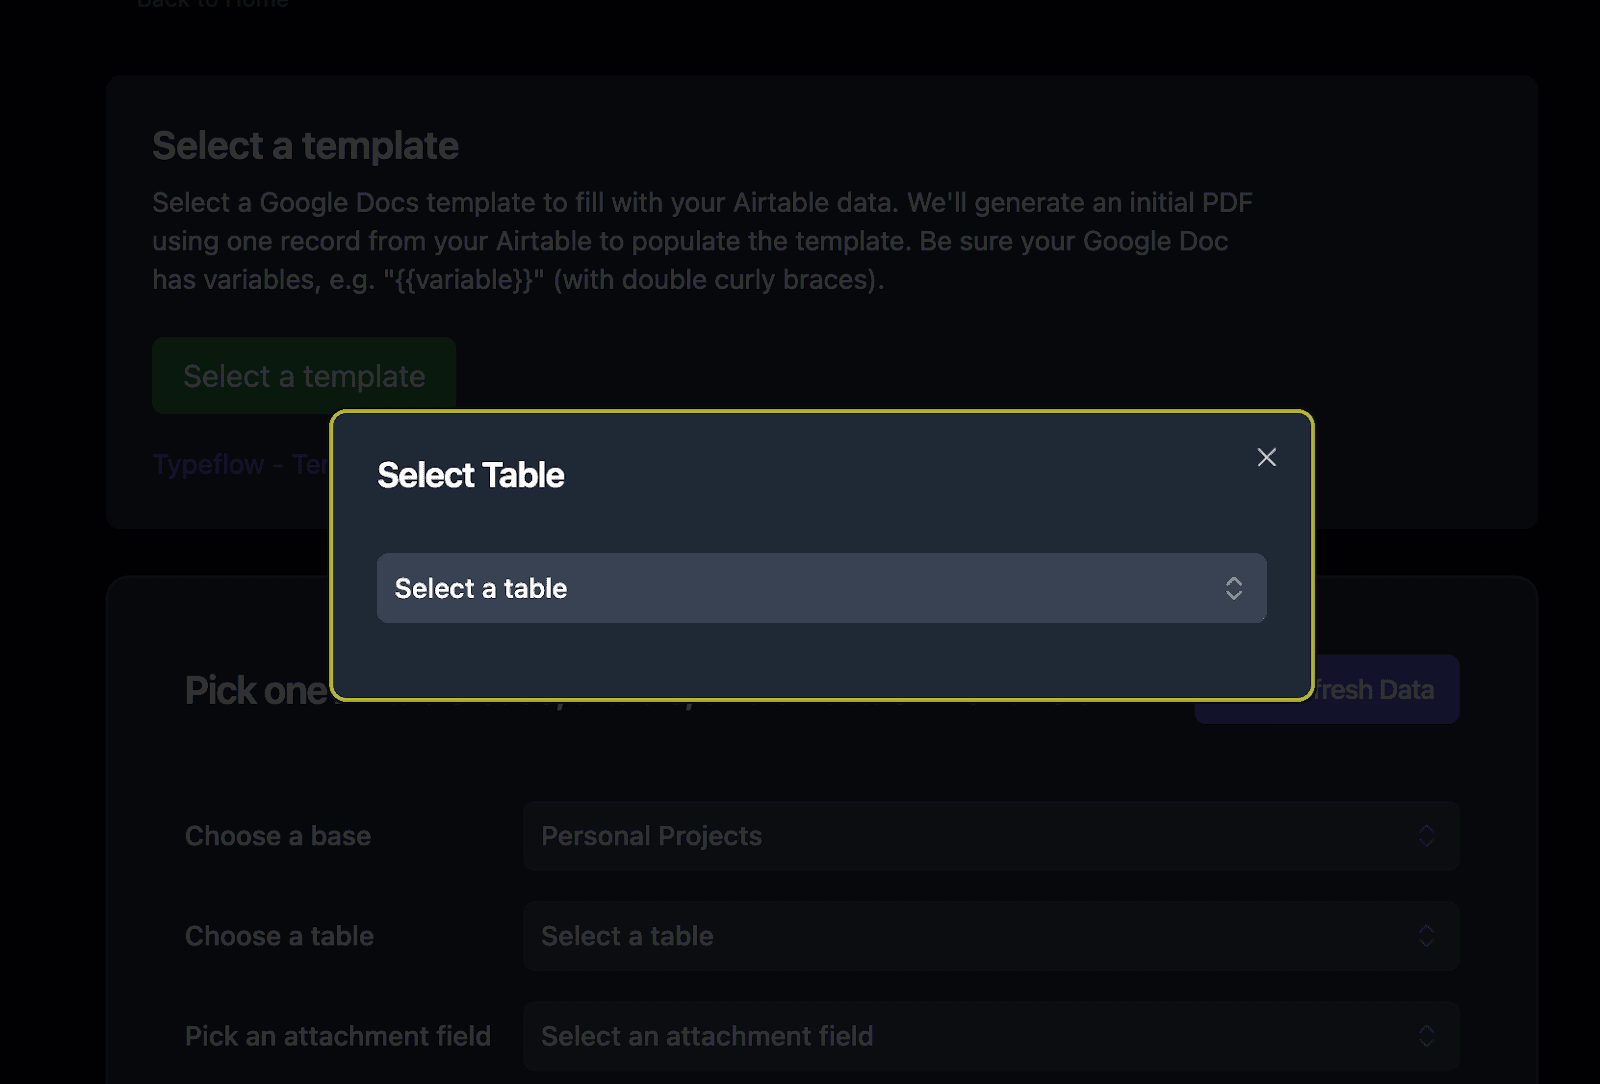
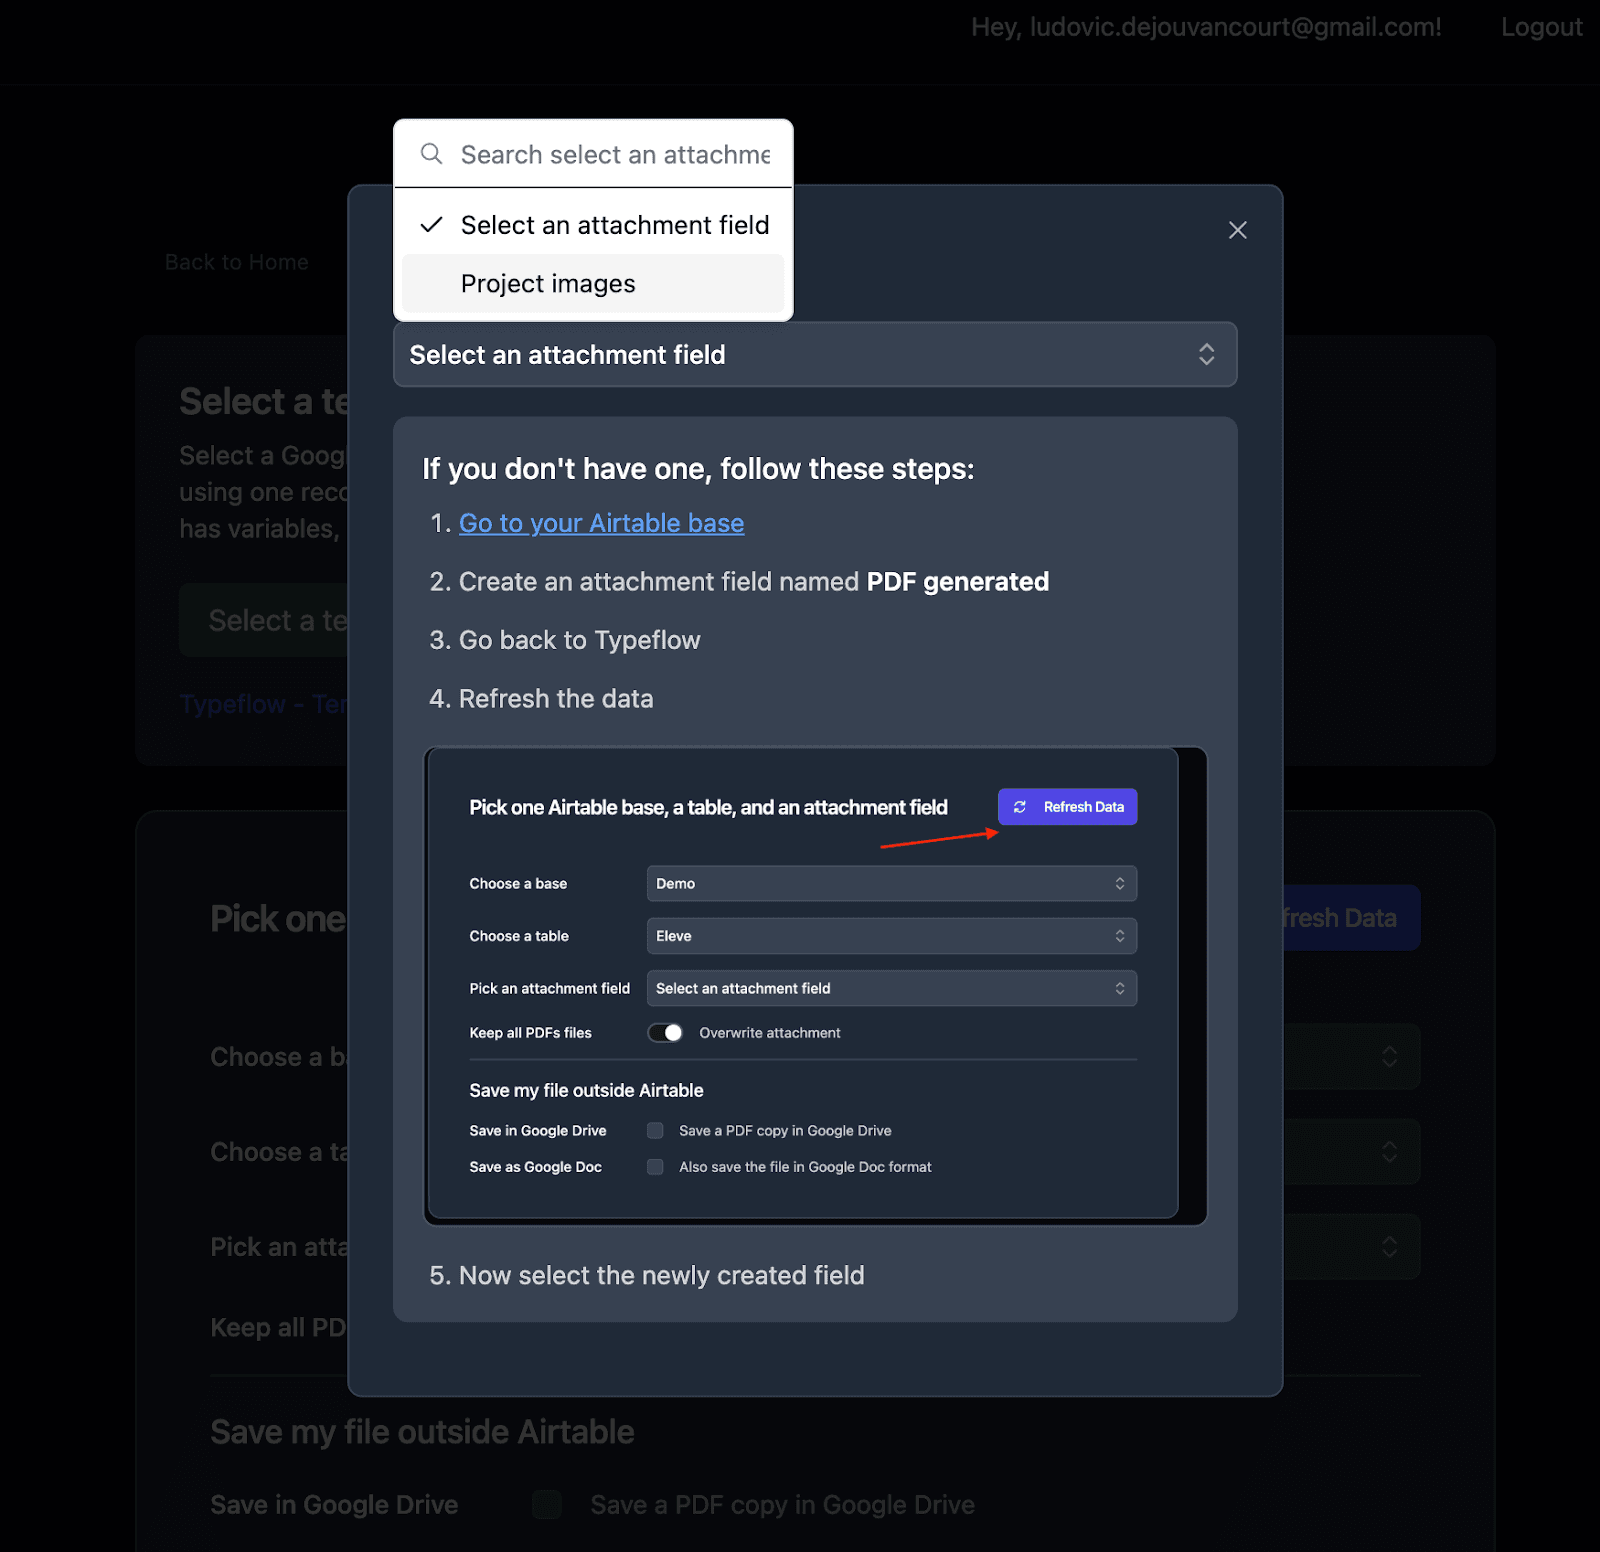
And finally, pick an attachment field where you want to save the generated document.
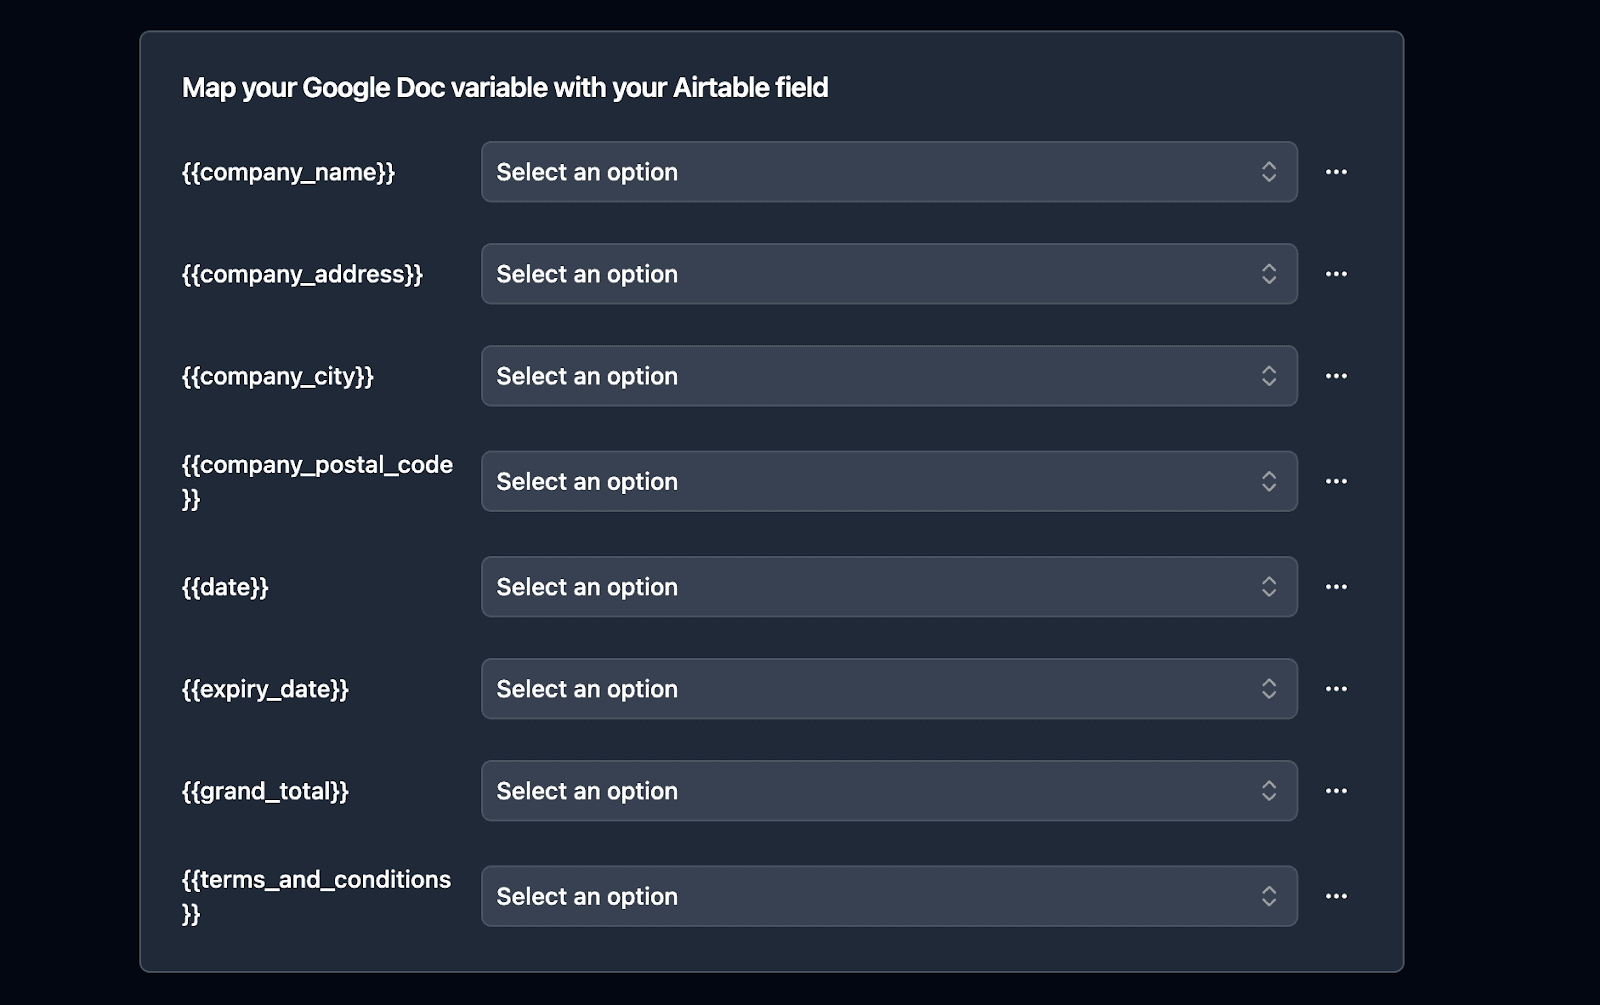
After that, you can map the data between Airtable fields and Google Docs variables.
And you can configure the conditional section, if you set it up.

Step 3: Import TypeFlow to Airtable and Connect to DocuSign
Now you can import TypeFlow to Airtable and set up the complete workflow.
Method 1: The Classic Implementation
You can add a button directly in your Airtable base:
-
In TypeFlow scroll to the bottom of the page and click on "Classic Implementation"
-
Copy the URL, it should look like this:
"https://app.typeflow.us/api/generate-doc?record_id="&RECORD_ID()&"&table_id=xxx&flow_id=xxx"
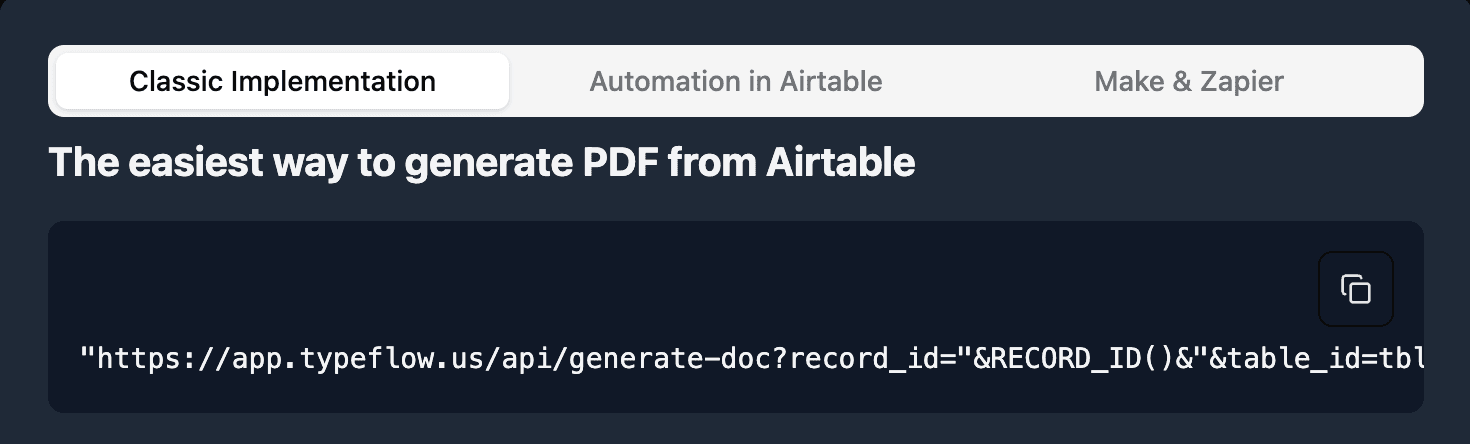
- Go to your Airtable table and add a new button field

- Paste the URL from TypeFlow to the URL Formula
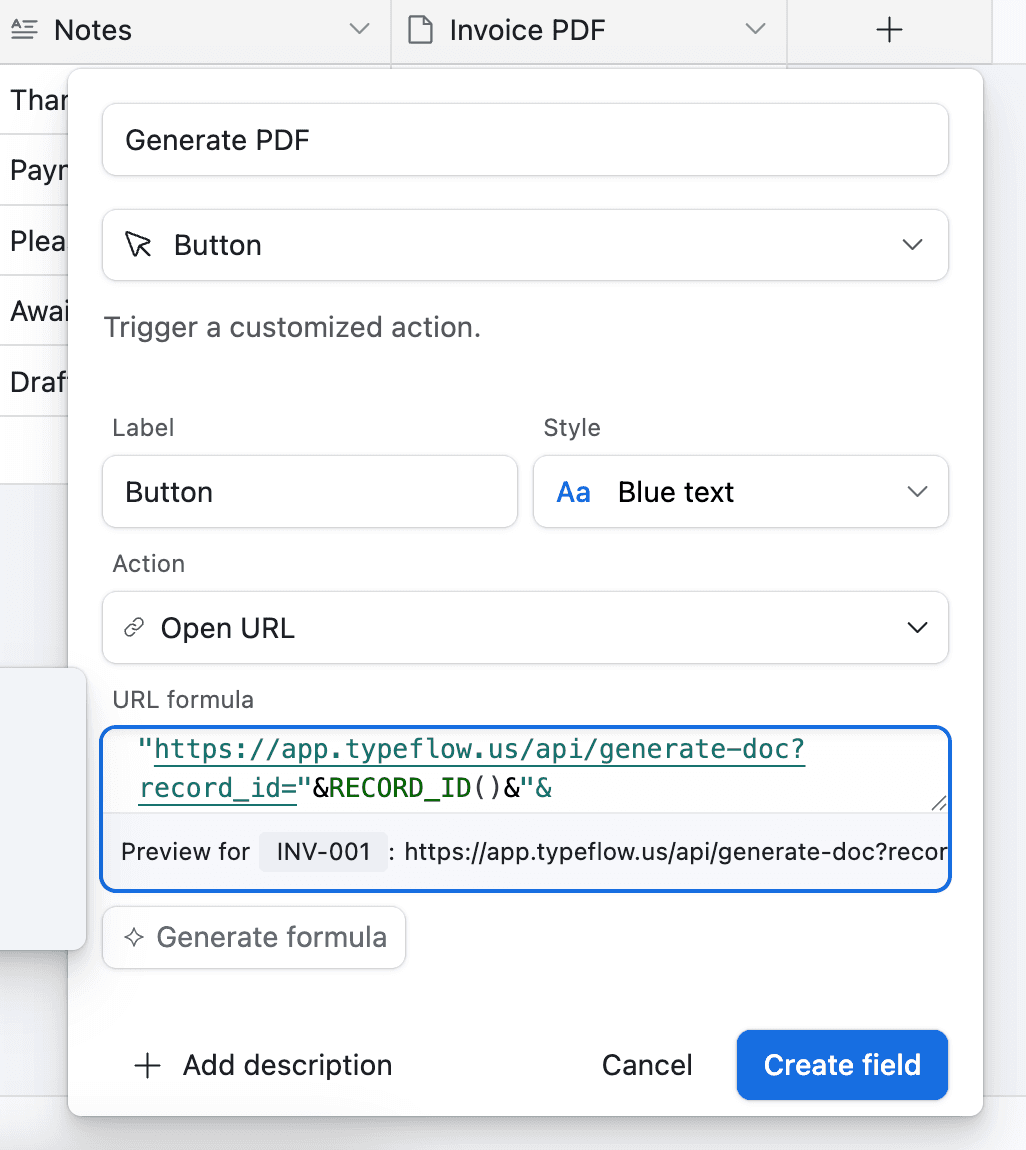
Now whenever you want to generate a contract, you can click the button in Airtable and it will generate the PDF for you.
But now you will need to use the Airtable Automation. You can directly go to Method 2 at step 7 to continue the DocuSign integration.
Method 2: The Automated Implementation
For this approach, you'll use Airtable Automation to automatically generate the PDF and send it to DocuSign.
Creating PDFs Automatically
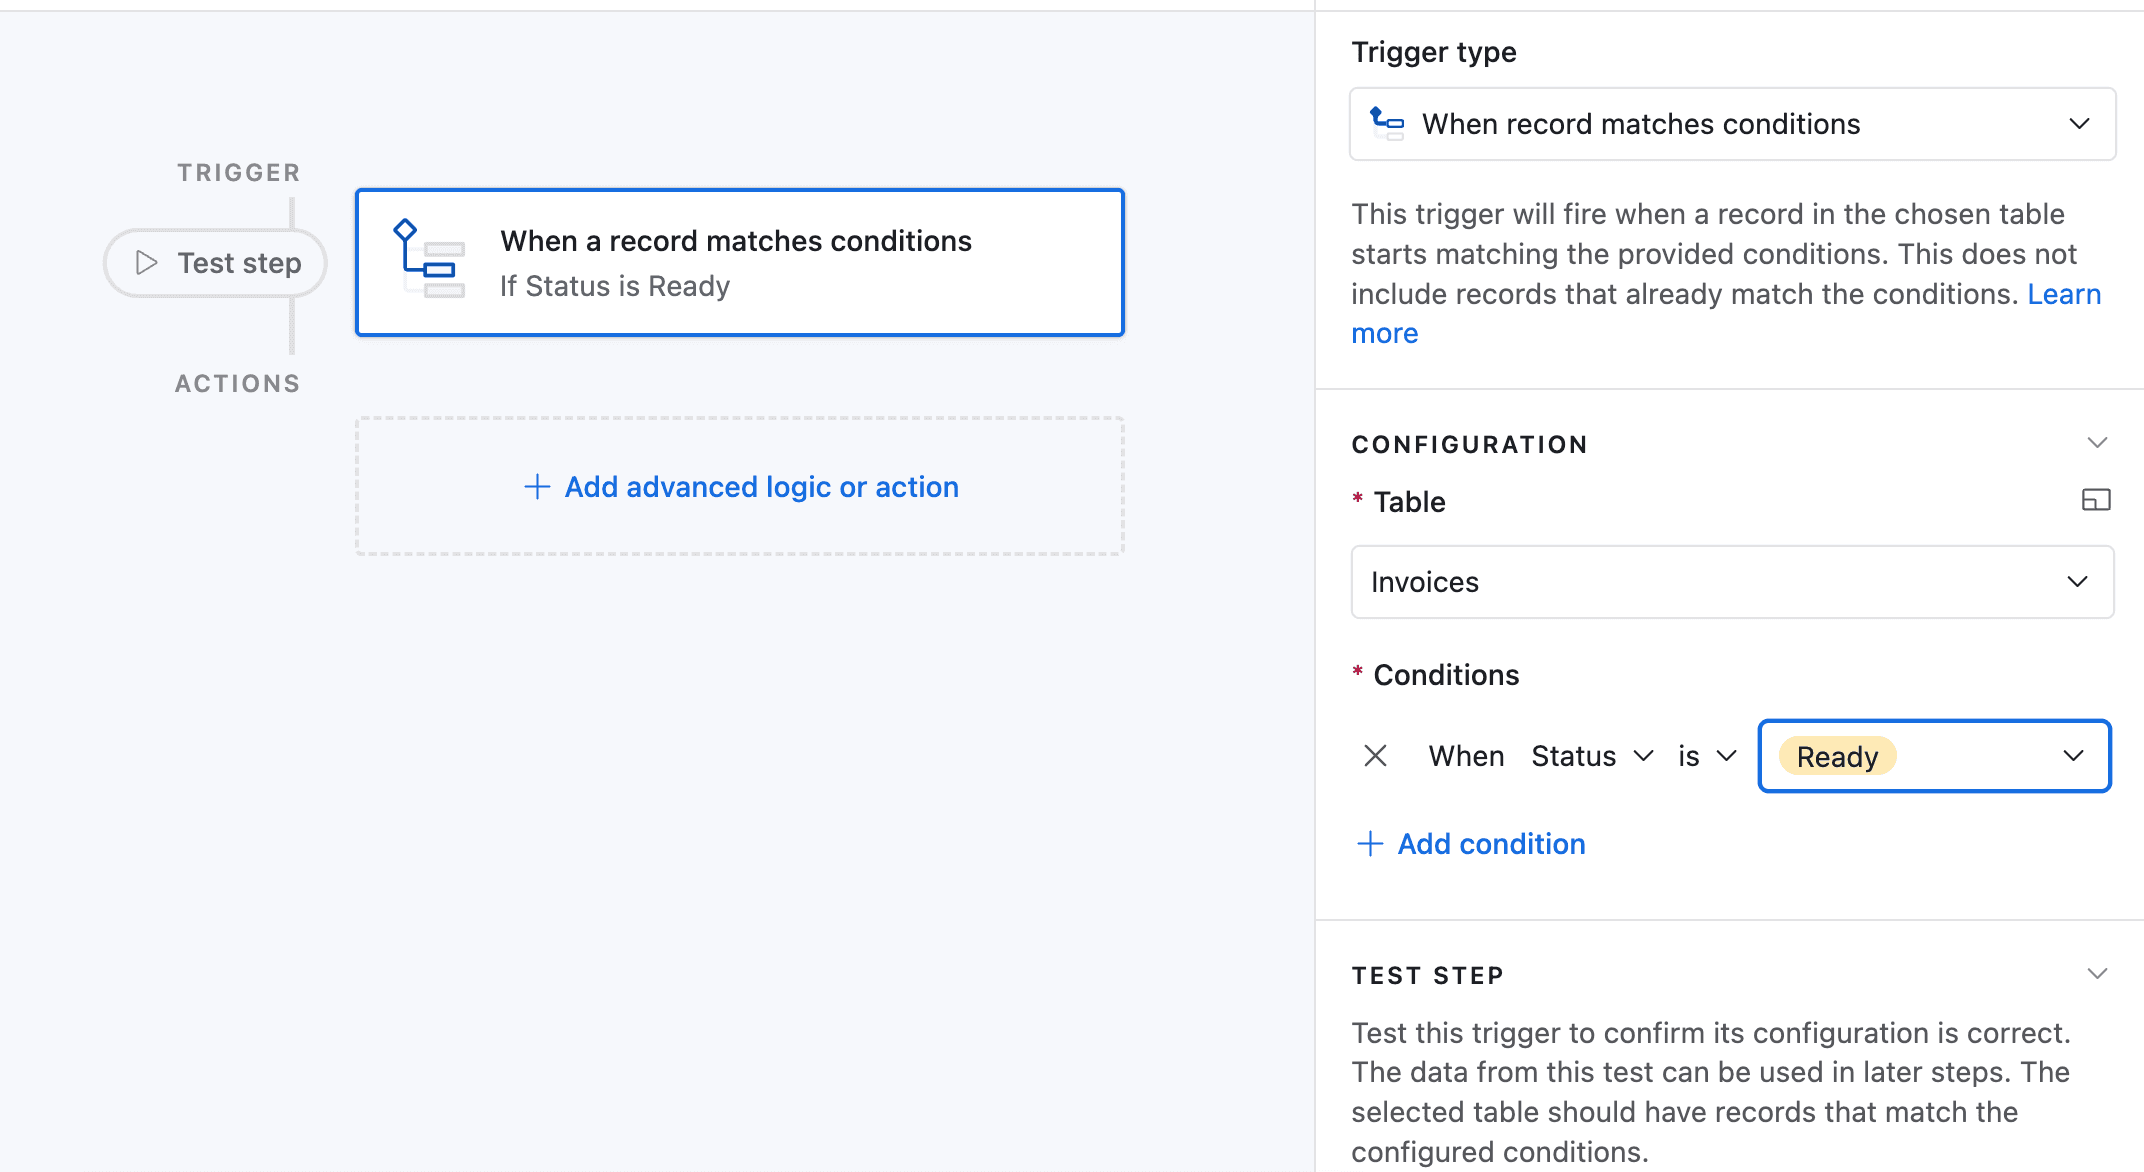
In this example, we will use the Airtable Automation. For the purpose of this article, we will trigger the PDF generation whenever the field Status, for any record, is equal to "Ready to Send".
-
Go to Automation in Airtable
-
Click on "Add a trigger" and Choose "When a Record matches a condition"
-
Select the table you want to trigger the automation on
-
Select the field you want to trigger the automation on (in this case the "Status" field)
-
Select the condition you want to trigger the automation on (in this case "is")
-
Select the value you want to trigger the automation on (in this case "Ready to Send")
-
Now choose a record that matches the condition
-
Now click on "Add an advanced logic or action"
-
Pick "Run Script". A new popup appears.
-
Go back to TypeFlow and select "Automation in Airtable". Copy the script.
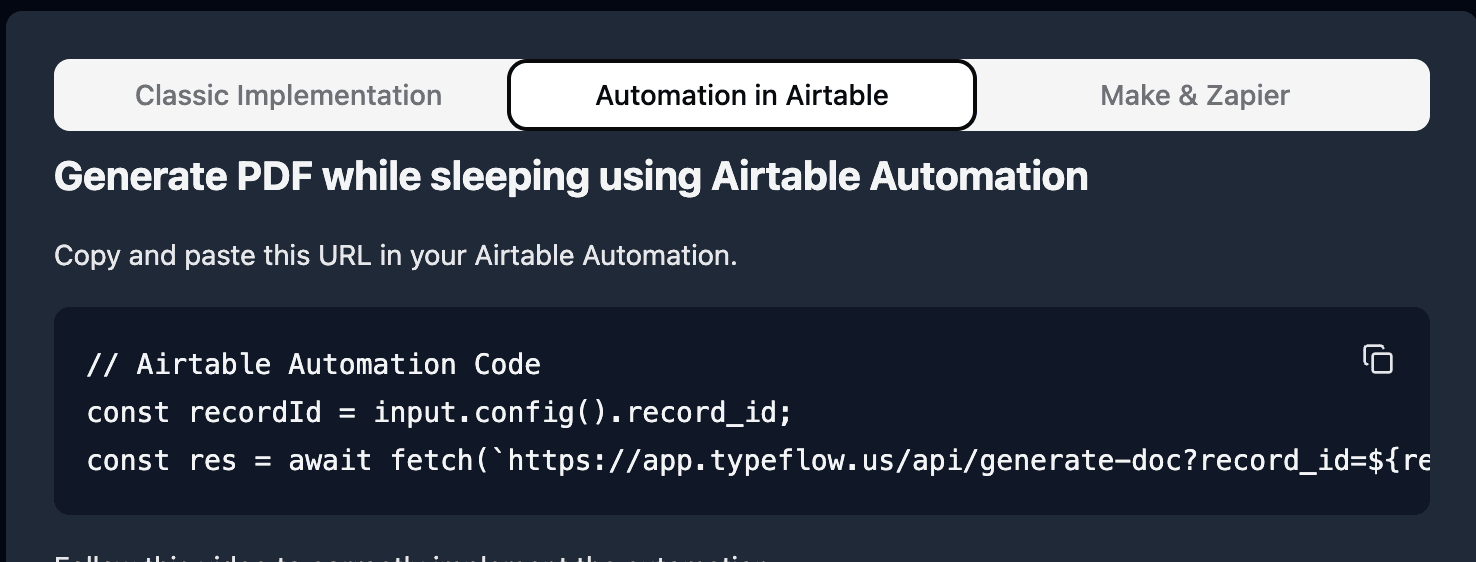
- Paste the script in the popup.
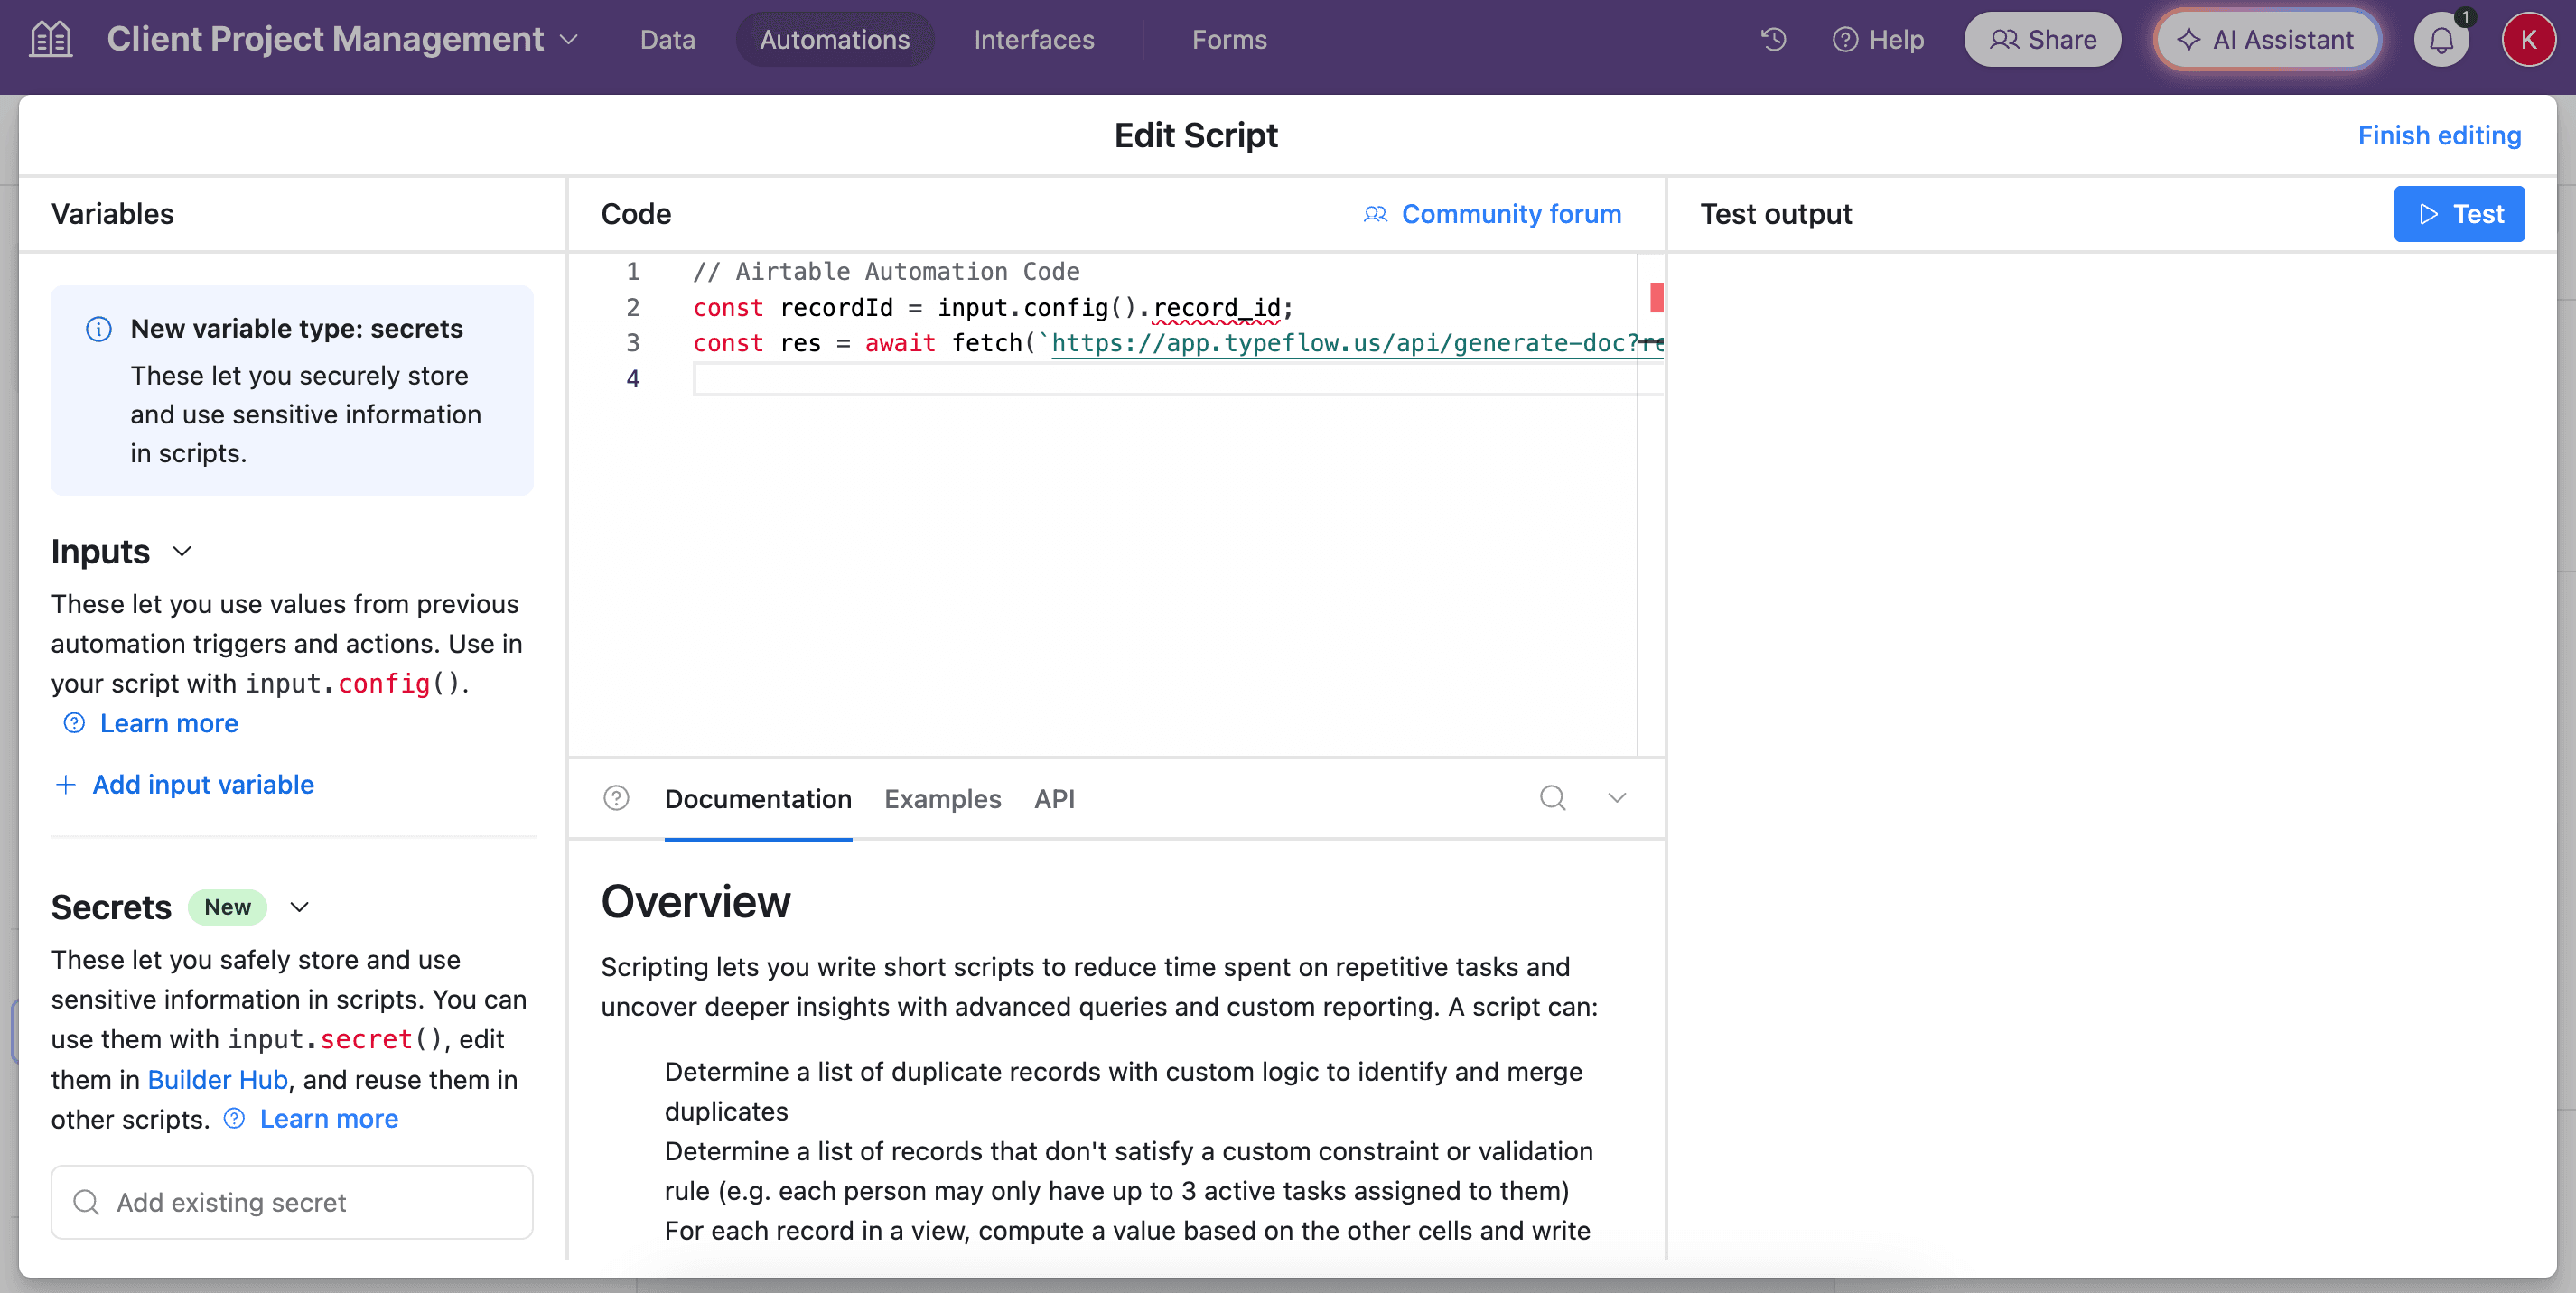
- In the left-side of the popup, do not forget to configure the variable input, record_id. You need to select Airtable Record ID from the dropdown. See the image.
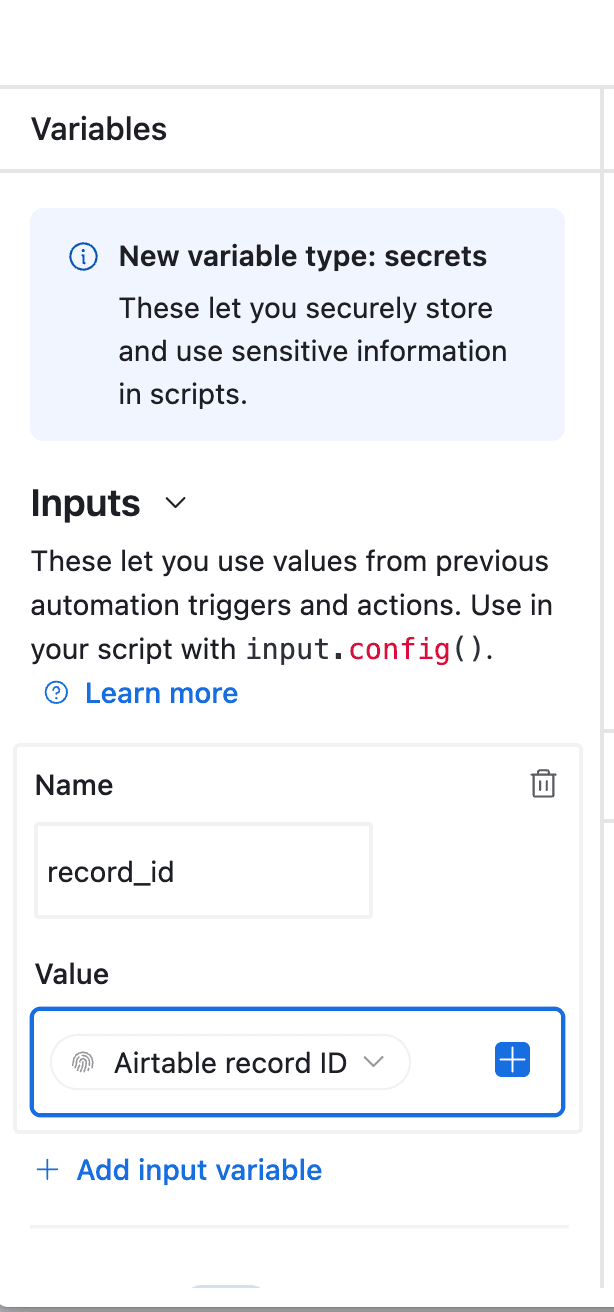
- Test your script, and see if it works. Adjust if needed (most of the time the error comes from the record_id variable - see step 12).
Sending the Generated Documents to DocuSign
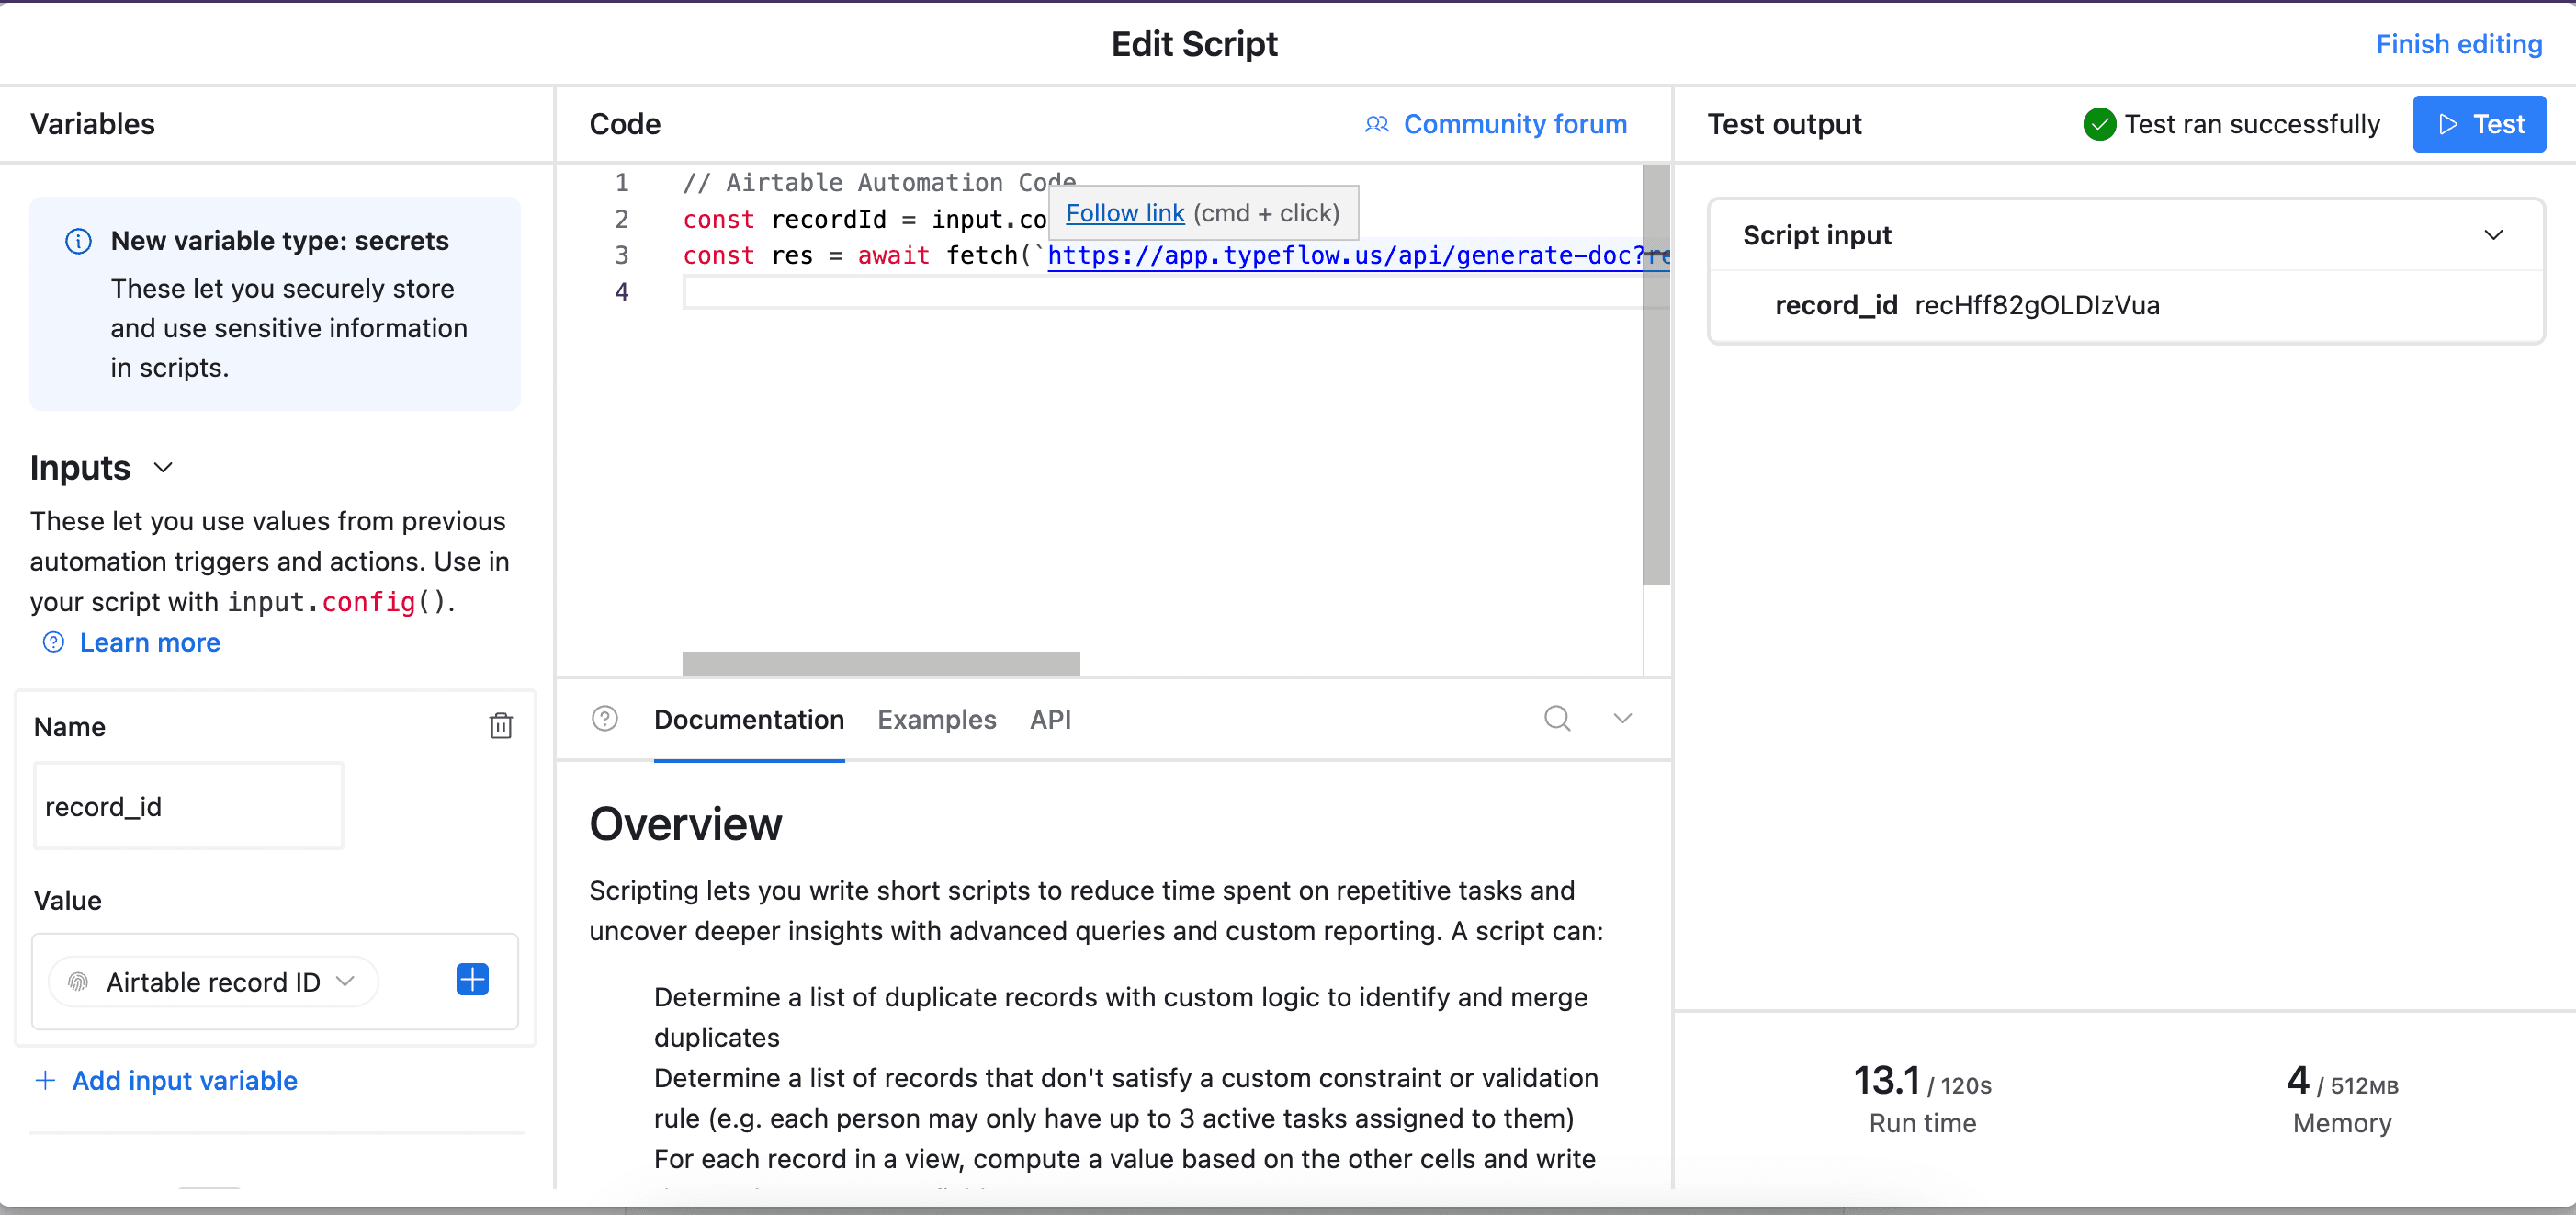
- Add another action to send the PDF generated to Zapier through a webhook. You can do that by running another script.
let inputConfig = input.config();

let recordId = inputConfig.recordId;
let pdf = inputConfig.pdf;
let email = inputConfig.email;
let name = inputConfig.name;
let data = {
    pdf,
    recordId,
    email,
    name
};

// Fetch to Zapier webhook
let response = await fetch('https://hooks.zapier.com/hooks/catch/xxx/xxx/', {
    method: 'POST',
    headers: {
        'Content-Type': 'application/json'
    },
    body: JSON.stringify(data)
});

let result = await response.json();
console.log(result);

output.set('response', result);
In this case, I send email, recordId, name and pdf. Those are the minimum information to send. But you can send more. Do not forget to configure variables on the left.
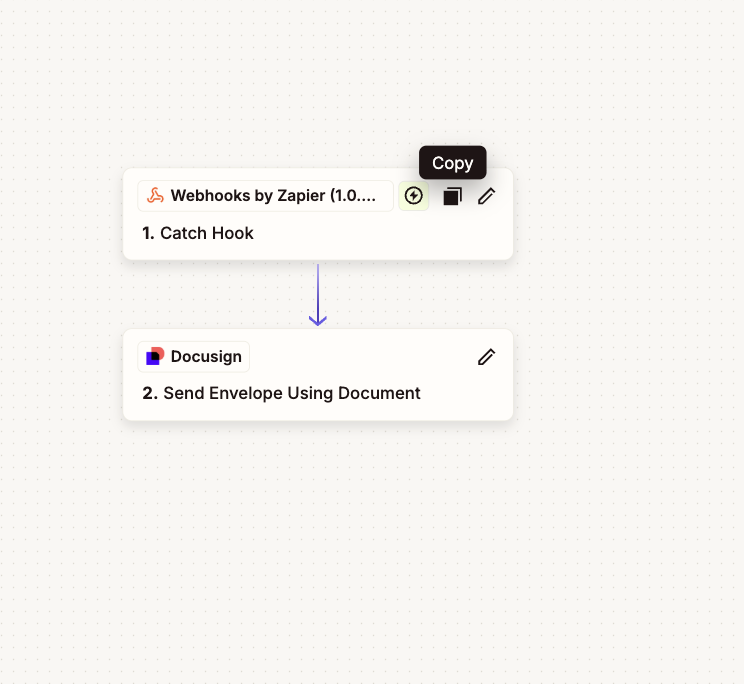
-
Create a new Zap in Zapier. As a trigger, use a catch hook. It will share a URL, use it in your script. It must replace the URL in the script shared above.
-
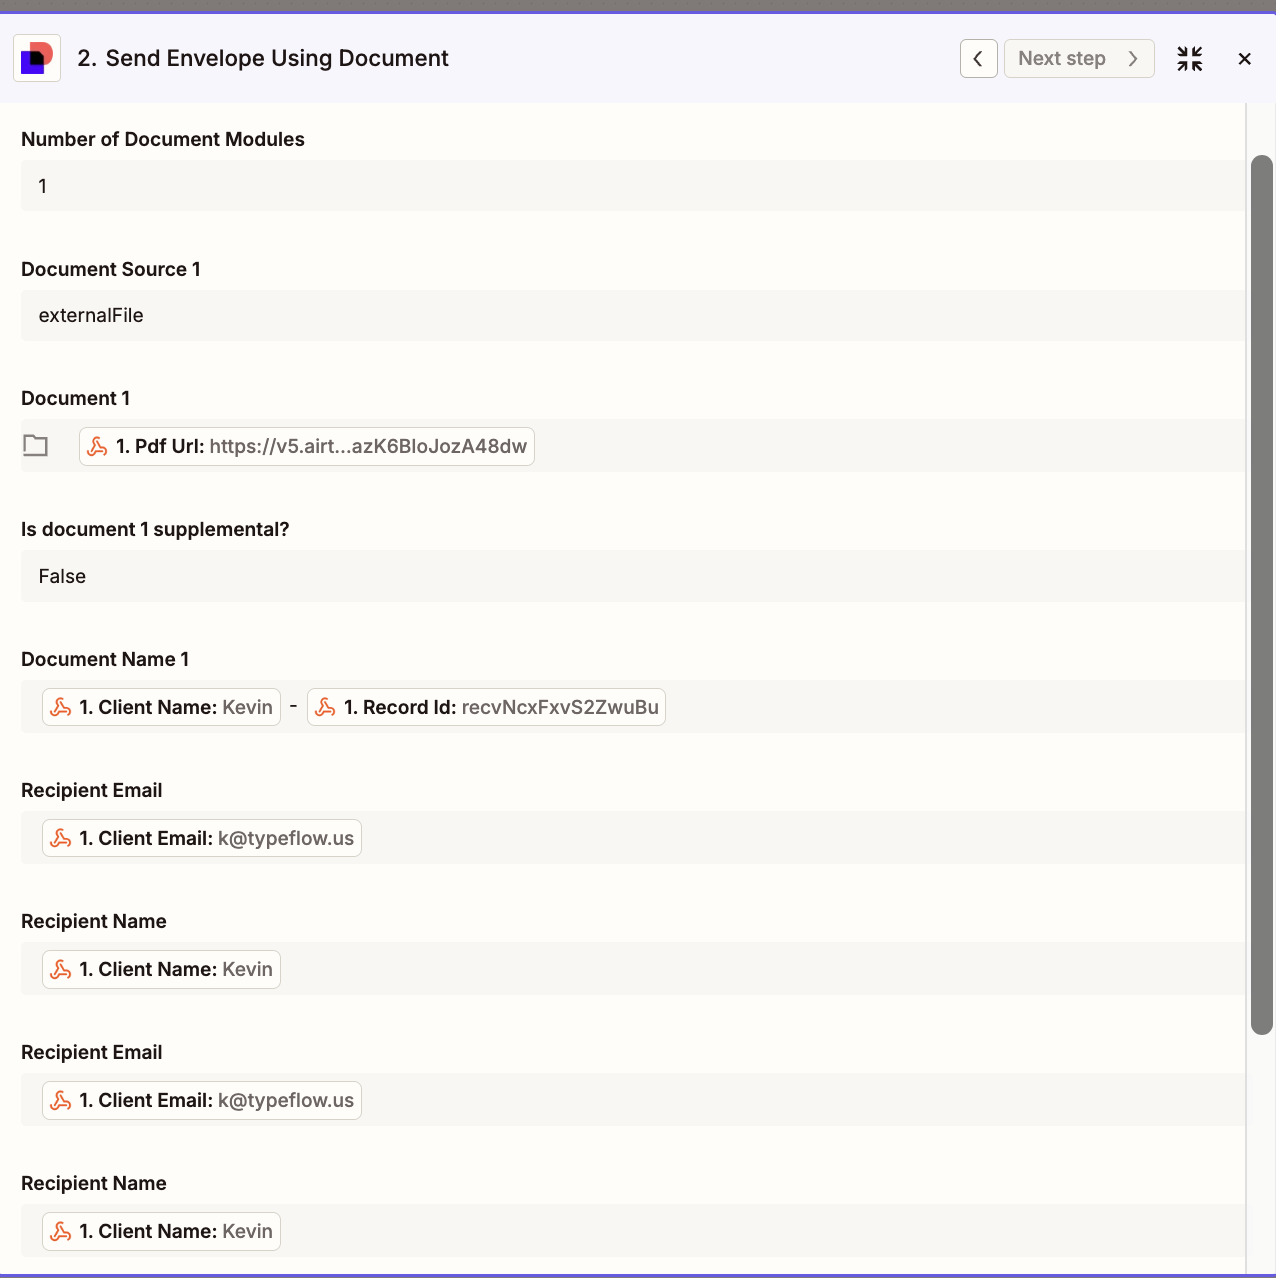
Create an action. Choose "Send Envelope using Document". This time use "externalFile" and the document will be the pdf you sent from Airtable. Keep mapping the other fields. I put the recordId in the Document Name.
Now, whenever a new document is generated, it is automatically sent to DocuSign. Then DocuSign will send the document to the recipient to sign.
Sending the Signed Document from DocuSign back to Airtable
Now, let's implement a new automation in Zapier.
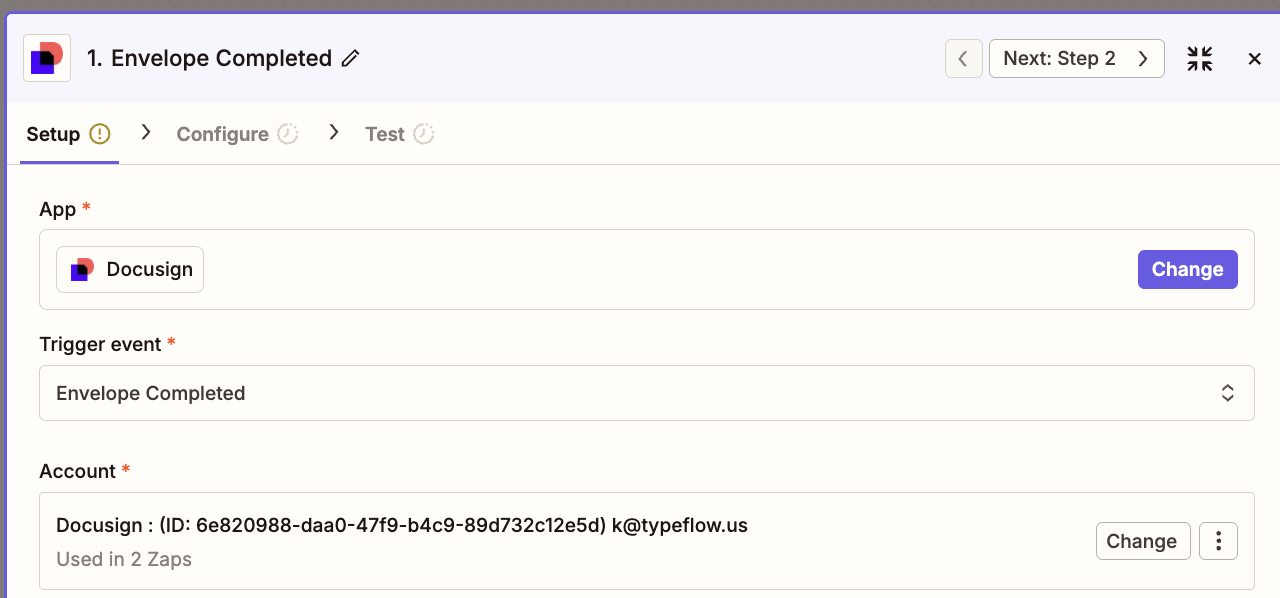
- Create a new automation in Zapier. This time, select the trigger "Envelope Completed" from DocuSign.
- Implement a filter in your Zap. The goal is to make sure we only handle Envelopes that have been signed.
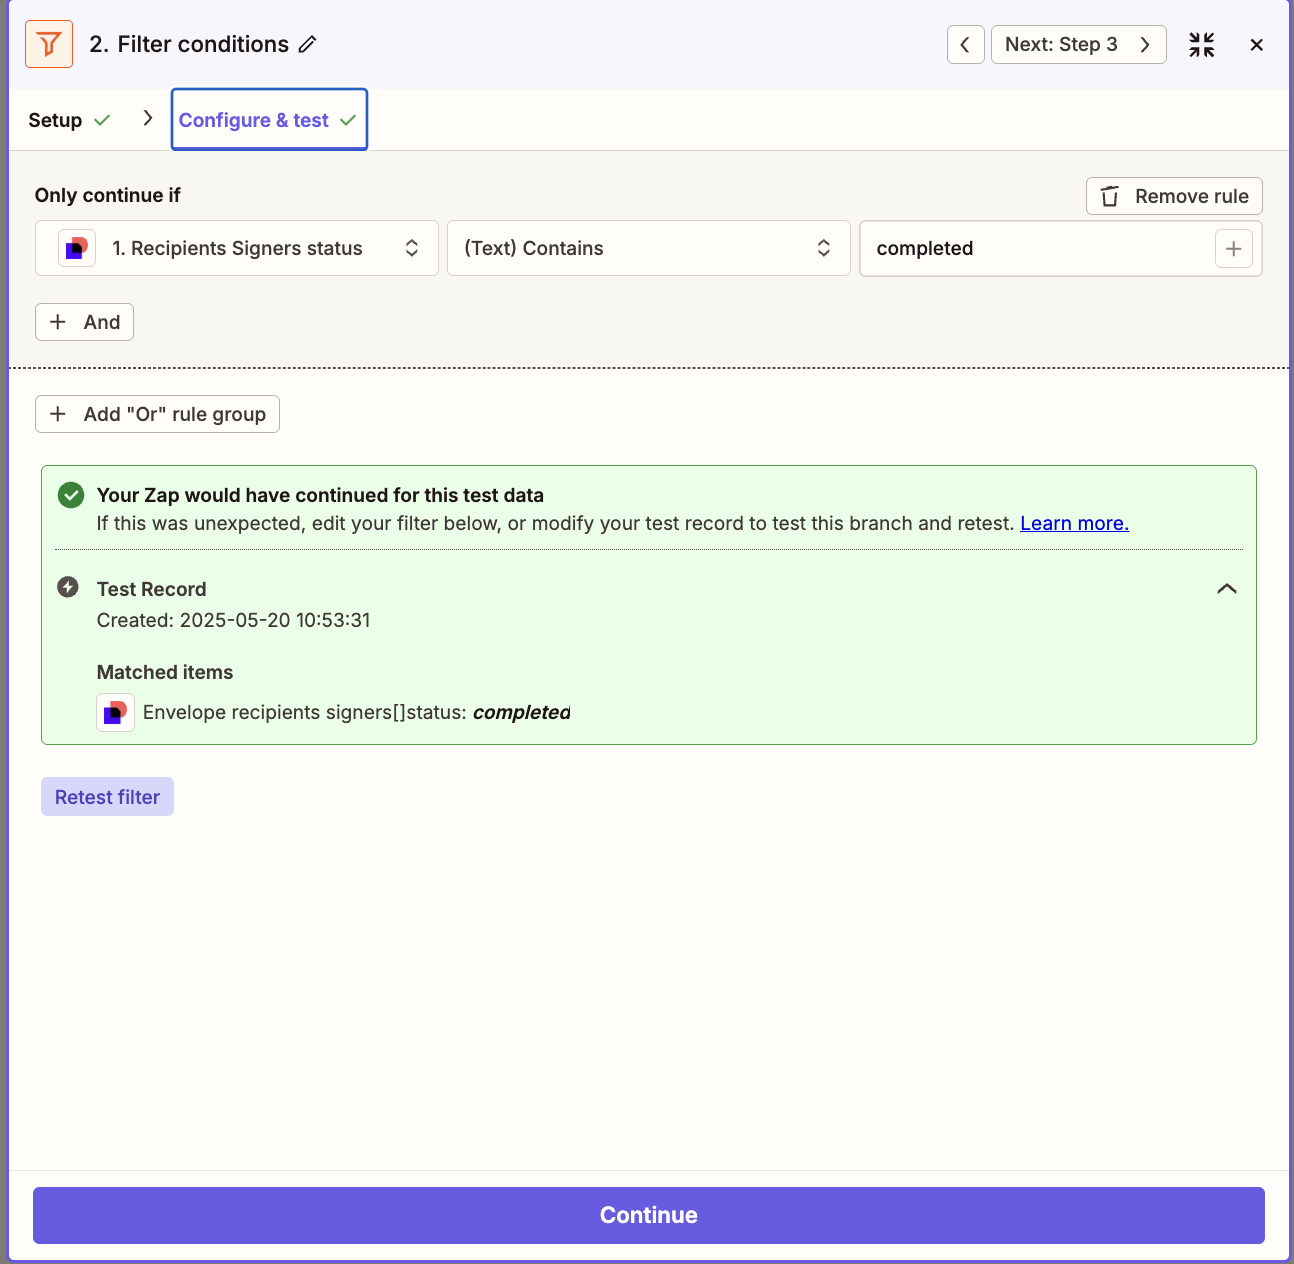
- As a next step, use the Formatter by Zapier. In the document name, we are going to extract the recordId we put in the Document Name. The recordId will be used to send the document back to Airtable! Without it, it will be harder!
Use this pattern:
.* - (rec\w+)

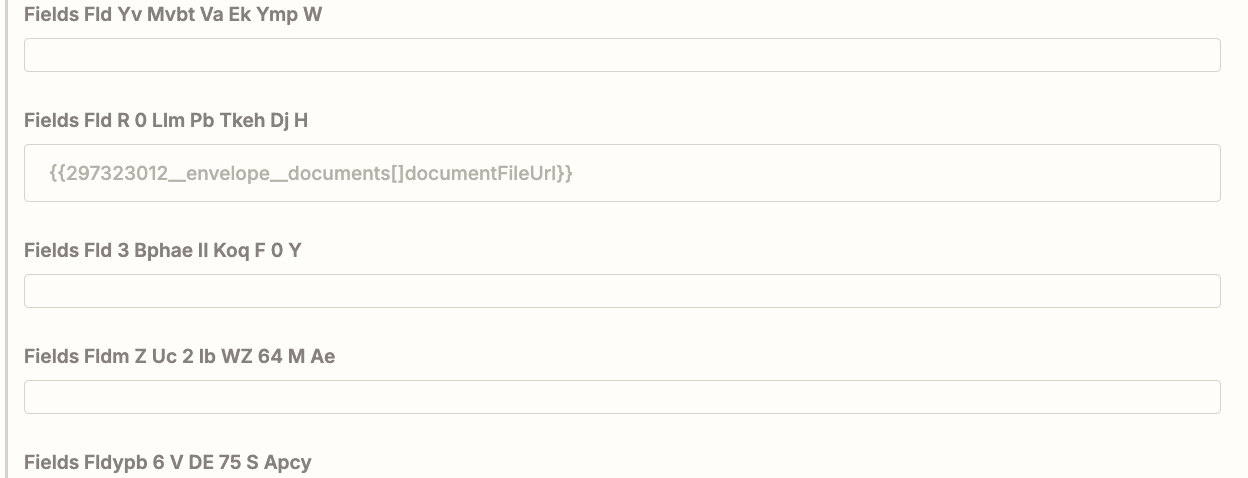
- Now update a record in Airtable. You must use the recordId you retrieved in the previous step. Also, from DocuSign step, when a document has been signed, you will use the Document File URL. And use this URL in the Airtable Fields of your choice (in an attachment field ideally).

Now your flow is implemented. You can generate a personalized document from Airtable, send it to DocuSign. Once the document is signed, it is sent back to the correct Airtable record.
.png)
The Simpler Alternative: TypeFlow Native E-Signatures
Skip the DocuSign complexity
TypeFlow includes unlimited e-signatures on every plan. No Zapier, no per-signature fees, no setup headaches.
Try e-signatures free →If you don't need DocuSign's advanced features (QES, identity verification, notarization), TypeFlow offers a simpler workflow with no middleware required.
How It Works
- Add signature placeholders to your Google Doc template:
{{e-signature.signature_1}},{{e-signature.signature_2}}, etc. - Configure signers in TypeFlow -use a static email or pull from an Airtable field like
{{client_email}} - Generate the document -TypeFlow automatically emails each signer a unique signing link
- Signer completes signature on an interactive signing page (works on any device)
- Signed PDF returns to Airtable with a Certificate of Completion containing full audit trail
No Zapier Required
The entire workflow happens through TypeFlow's native Airtable extension:
- Direct Airtable connection (no middleware)
- No per-signature fees (included in your plan)
- No sync delays or webhook complexity
- Setup in 5-10 minutes vs 30-60 minutes for DocuSign + Zapier
When to Use Each
| Use Case | Recommendation |
|---|---|
| Standard contracts, NDAs, proposals | TypeFlow native |
| Client onboarding documents | TypeFlow native |
| Internal approvals and sign-offs | TypeFlow native |
| EU QES requirements | DocuSign |
| Identity verification needed | DocuSign |
| Notarization required | DocuSign |
| Legal team mandates DocuSign | DocuSign |
For a complete e-signature setup guide, see How to Add E-Signatures to Airtable Documents.
Use Cases for Airtable and DocuSign Automation
Sales contracts and proposals
When a deal in your Airtable CRM moves to "Closed Won," the automation sends the contract to your client. The document pulls in the client's name, company, deal value, and terms from the record. Your sales team doesn't touch a thing. For a broader look at organizing contracts in Airtable, see our contract management guide.
HR onboarding and offer letters
Add a new hire to your recruiting base, and the offer letter goes out for signature. The candidate signs electronically, and the completed document attaches to their record. HR can track who has signed and who hasn't from a single Airtable view.
Client agreements and service contracts
Agencies and consultants often have standardized service agreements. When a new client record is created, the agreement generates and sends. This works well when your contracts follow a consistent format with variable details like scope, timeline, and pricing.
Real estate leases and property documents
Property managers tracking units in Airtable can automate lease renewals. When a lease approaches its end date, the new agreement goes to the tenant. Signed leases attach to the property record for easy reference. See our guide on generating lease agreements from Airtable for a full walkthrough.
Best Practices for Your Airtable DocuSign Workflow
Following a few simple practices prevents common problems and keeps your automation running smoothly.
Create a dedicated view for triggers
Filter to show only records ready for document signing. This prevents the automation from firing on incomplete entries. A view called "Ready to Send" that filters for Status = "Approved" keeps your automation focused on the right records.
Add a status field
Track whether each record is "Draft," "Ready to Send," "Sent," "Signed," or "Declined." Update this field with a second automation when DocuSign events occur. This gives you complete visibility into where each document stands in the signing process.
Test in sandbox first
Use DocuSign's developer environment and test email addresses until you're confident the workflow is correct. This prevents accidentally sending test documents to real clients. Run through the entire flow at least three times before going live.
Name automations clearly
When you have multiple Zaps running, names like "Send Contract on Deal Close" are easier to troubleshoot than "Zap 1." Clear naming helps you and your team understand what each automation does without opening it.
Set up failure notifications
Configure your automation platform to email you when something breaks. Catching errors early prevents missed signatures. Most automation platforms can send you alerts when a Zap fails or encounters an error.
Store signed documents in Airtable
Add an attachment field to your Airtable base to save the final signed PDF directly to each record. This keeps all client-related documents organized in one central location instead of scattered across email or Google Drive.
Common Issues and How to Fix Them
Even well-configured automations sometimes hit snags. Here are the most common problems and how to fix them.
Connection and authentication errors
If your automation stops working, the connection between your apps may have expired. Go into your automation platform and re-authorize both Airtable and DocuSign. Also check that your DocuSign account still has API access enabled in the admin settings.
Missing or incorrect data in documents
When documents arrive with blank fields or wrong information, the problem is usually in your field mapping. Double-check that each DocuSign field points to the correct Airtable field. Also verify that the Airtable record you're testing has data in all the mapped fields.
Automation fails to trigger
If nothing happens when you expect it to, start by confirming the automation is turned on. Then check that your test record meets the trigger conditions. If you're using "New Record in View," make sure the record actually appears in that view. Review the automation logs for specific error messages.
Documents sent to wrong recipients
Make sure you map a single email field (not a multi-email field) and test with your own address first.
Webhook timeouts and API rate limits
If you send high volume, you may hit DocuSign API limits or timeouts in Zapier/Make. Add delays for bulk sends, use retries where possible, and watch your task history for failures.
DocuSign Alternatives for Airtable Users
If DocuSign feels heavy (or expensive) for your workflow, you do have options. The main tradeoff for Airtable users is that most alternatives still require middleware like Zapier or Make.
-
Adobe Sign: Strong enterprise feature set and compliance; still needs middleware for Airtable
-
Dropbox Sign (HelloSign): Simple signing experience; still needs middleware for Airtable
-
PandaDoc: Great for proposals + content; still needs middleware for Airtable
-
SignNow: Popular for e-signatures; still needs middleware for Airtable
-
If you need enterprise compliance: DocuSign / Adobe Sign
-
If you want the simplest Airtable workflow: A native option like TypeFlow (no middleware)
Automate your document generation
Start with 20 free documents. Built for businesses using Airtable.
Frequently Asked Questions
Find answers to the most common questions about this feature.
Popular Questions
All Questions
Need more help?
Our team is here to help you solve all your problems and answer your questions.
Contact Us
Kevin from TypeFlow
•AuthorKevin Rabesaotra is a growth engineer and automation specialist with 8+ years of experience building no-code solutions. As Founder & CEO of TypeFlow, he has helped hundreds of businesses automate document generation and streamline workflows with Airtable integrations. Previously, Kevin was a Product Lead specializing in growth engineering, running experiments to drive revenue, retention, and lead generation.
More articles
How to Print Labels from Airtable with Quantity Control (Step by Step)
Print multiple labels per Airtable record based on a quantity field. Step-by-step guide for linked records mode and quantity repeat mode with barcodes and Avery sheets.
Read articleHow to Print Avery Mailing Labels from Airtable
Print Avery mailing labels (5160, 5161, 5162) from Airtable without Word mail merge. Step-by-step guide with print label mode, automation, and bulk generation.
Read articleHow to Create Inventory Labels with Barcodes in Airtable
Create inventory labels with Code 128, EAN-13, or QR barcodes from Airtable. Step-by-step guide for warehouse, retail, and asset tracking with thermal and Avery printers.
Read article