How to Generate Documents with E-Signature from Airtable
If you want to generate documents with e-signature from Airtable, this guide shows you how. Airtable doesn't support native signatures, so you'll need a workflow that generates documents and sends them for signing.
We'll walk through the TypeFlow setup step-by-step, and we'll also cover common alternatives (like DocuSign + Zapier/Make) so you can choose the right approach.
- Generate PDFs from Airtable: Turn records into contracts, offers, and agreements
- Send for signature automatically: Email invites or save signing links back to Airtable
- Save the signed PDF: Store the final signed file and audit trail on the record
Why Airtable Forms Don't Support Signature Fields
Airtable doesn't support native e-signatures because it's a database tool, not a document signing platform. To sign documents "from Airtable," you typically need a third-party tool to generate a document, collect signatures, and store the signed file back on the record.
- No signature field type: Airtable forms can't capture a legally-auditable signature by default
- No document signing workflow: There's no built-in invitation, signer tracking, or completion state
- No audit trail engine: Compliance typically requires timestamps, consent, and proof of integrity
The good news is you can solve this cleanly with a workflow that combines document generation and e-signature.
Why Combine Document Generation and E-Signature
Most Airtable signature workflows are fragmented: generate a doc, upload it to a signing tool, then save the signed PDF back to Airtable. It works, but it's slow and easy to mess up.
- Fewer tools: One template and one workflow instead of three platforms
- Fewer manual steps: No exporting, uploading, or file chasing
- Cleaner tracking: Signing status and the signed PDF live on the record
With TypeFlow, document generation and e-signature run in one flow. Generate from Airtable, send for signature automatically, and save the final signed PDF back to the record.
Common examples: contracts, proposals, NDAs, service agreements, and employment documents.
Adding Signature Fields to Airtable Forms
If your goal is to collect a simple signature during form submission, Airtable's native forms won't do that by themselves. In that case, you'll want a form builder that supports signature fields and can sync submissions into Airtable.
- Fillout: Signature field + Airtable sync (signature usually saved as an attachment/image)
- Jotform: Signature widget; often connected to Airtable via Zapier or Make
- Formstack: More enterprise-focused, with stronger compliance options
If you need signatures on a generated document (like a contract populated from Airtable data), use a document generation + e-signature workflow instead. For a full comparison of form builders with signature fields, see our Airtable Electronic Signature guide.
Document generation + e-signature in one tool
No Zapier, no DocuSign, no per-signature fees. TypeFlow handles both natively from your Airtable data.
Start free with 20 documents →What You Need Before Starting
Before you add e-signature, make sure your document generation flow is already working. Then you'll only be adding signature fields and signer settings.
- Airtable base: The records and fields you want to merge into documents
- TypeFlow account: Connected to your Airtable base (connect here)
- Template: Google Docs (recommended) or TypeFlow's Template Builder
- Signer emails: Stored in Airtable fields or entered as static emails
If you haven't set up basic document generation yet, start with our Airtable document generation guide first.
How to Generate Documents with E-Signature from Airtable
The setup takes about 5 minutes if you already have document generation working. You'll enable e-signature, add placeholders to your template, configure signers, and generate.
Step 1: Enable E-Signature in Your Flow
Open your existing flow in TypeFlow (or create a new one). In the flow settings, toggle on E-Signature. This unlocks the e-signature configuration tab.
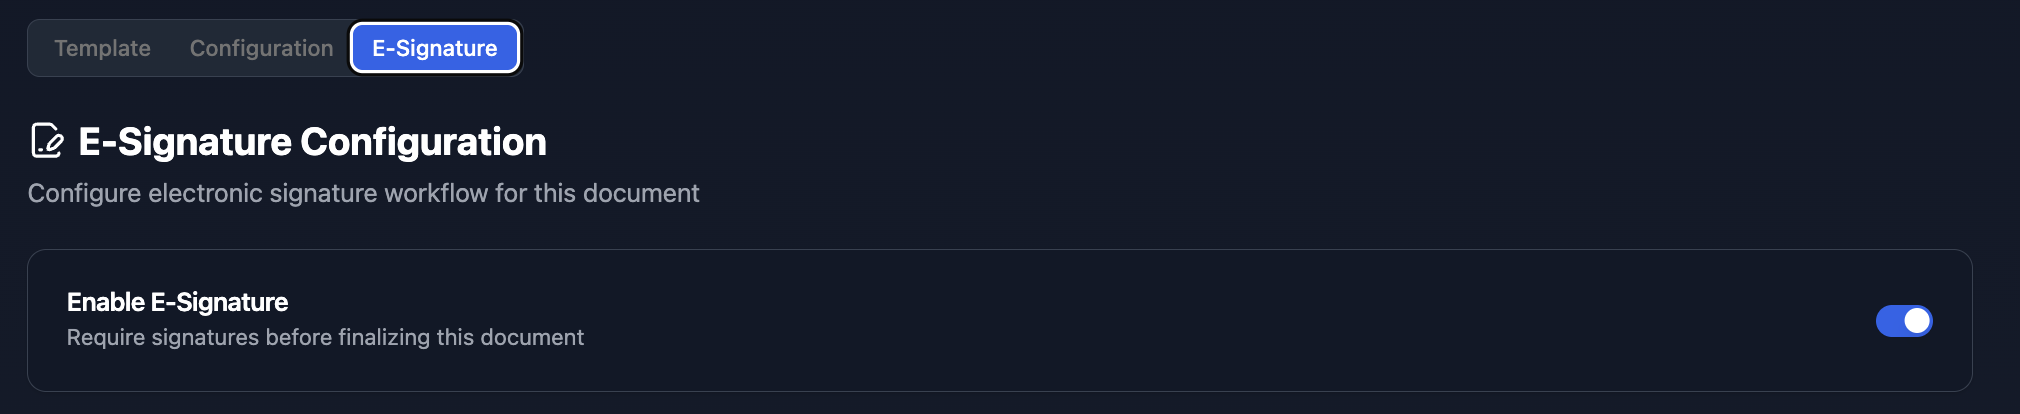
When e-signature is enabled, your flow changes behavior:
- Generate + send: Each generated document can be sent for signature automatically
- Unique signing links: Each signer gets their own secure link
- Save the final PDF: The signed PDF (with certificate) saves after all signers complete
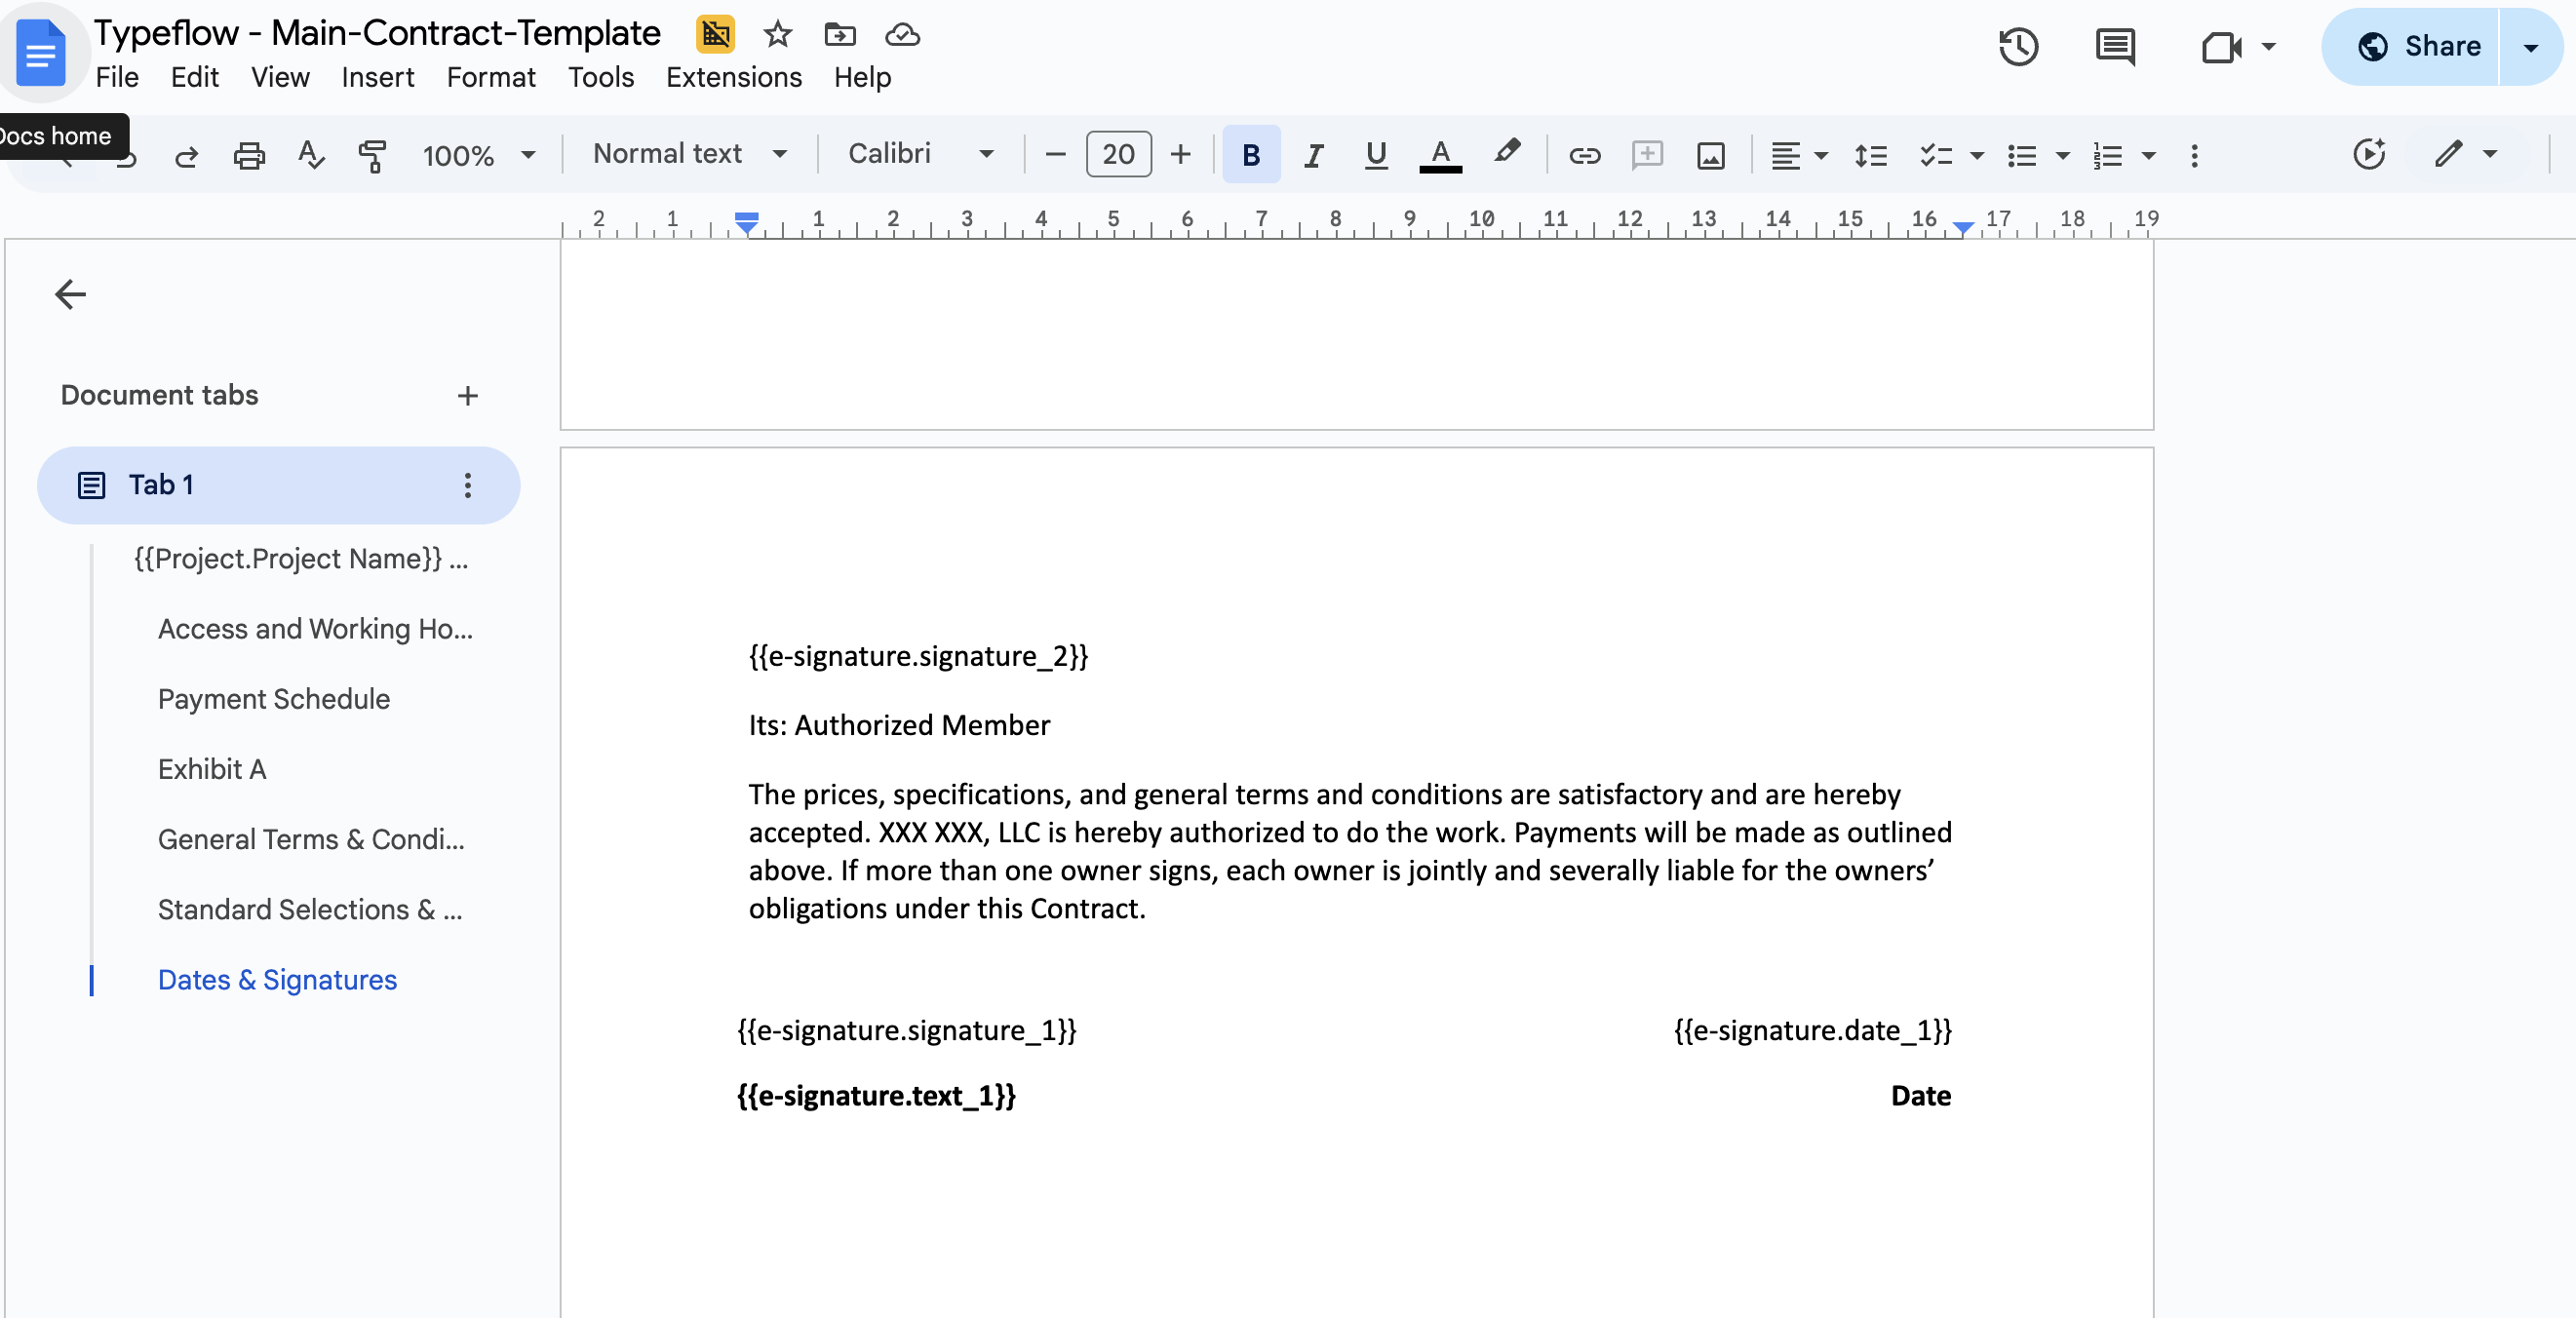
Step 2: Add Signature Placeholders to Your Template
Open your template. Add e-signature placeholders where you want signers to complete fields. These use a specific syntax:
Signature fields:
{{e-signature.signature_1}}
{{e-signature.signature_2}}
Text input fields (for typed name, title, etc.):
{{e-signature.text_1}}
{{e-signature.text_1}}
{{e-signature.text_2}}
Date fields (auto-fills when signer signs):
{{e-signature.date_1}}
{{e-signature.date_2}}
The number in each placeholder (1, 2, 3) corresponds to the signer number you'll configure in the next step. Signer 1 completes all _1 fields, Signer 2 completes all _2 fields, and so on.
Example contract signature block:
CLIENT SIGNATURE

Signature: {{e-signature.signature_1}}
Name: {{e-signature.text_1}}
Title: {{e-signature.text_1}}
Date: {{e-signature.date_1}}


COMPANY SIGNATURE

Signature: {{e-signature.signature_2}}
Name: {{e-signature.text_2}}
Title: {{e-signature.text_2}}
Date: {{e-signature.date_2}}
You can mix regular Airtable data placeholders with e-signature placeholders in the same template. The Airtable data fills in when the document generates; the signature fields remain for signers to complete.
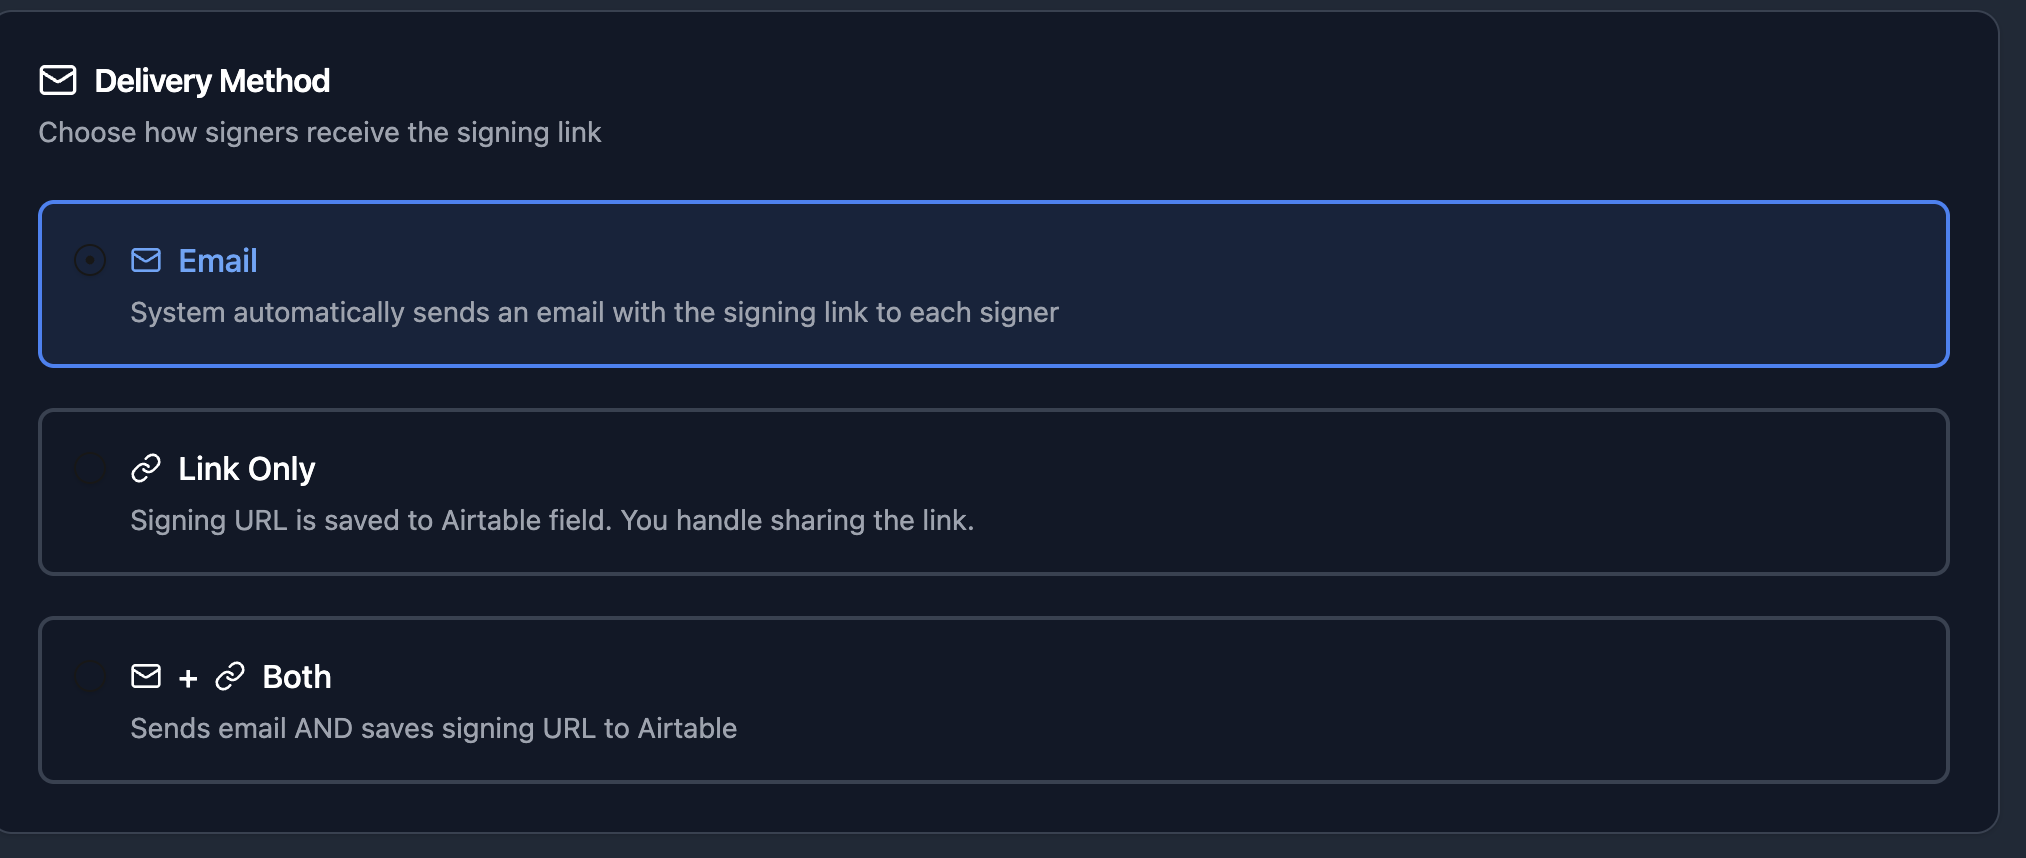
Step 3: Choose Delivery Method
In the Delivery Method section, you can choose three ways to send the document to sign:
- Email: Send the document directly to the signer via email
- Link Only: Save the link to sign to an Airtable field, so it will be you who share the link to the signer
- Both: Send the document via email and save the link to an Airtable field
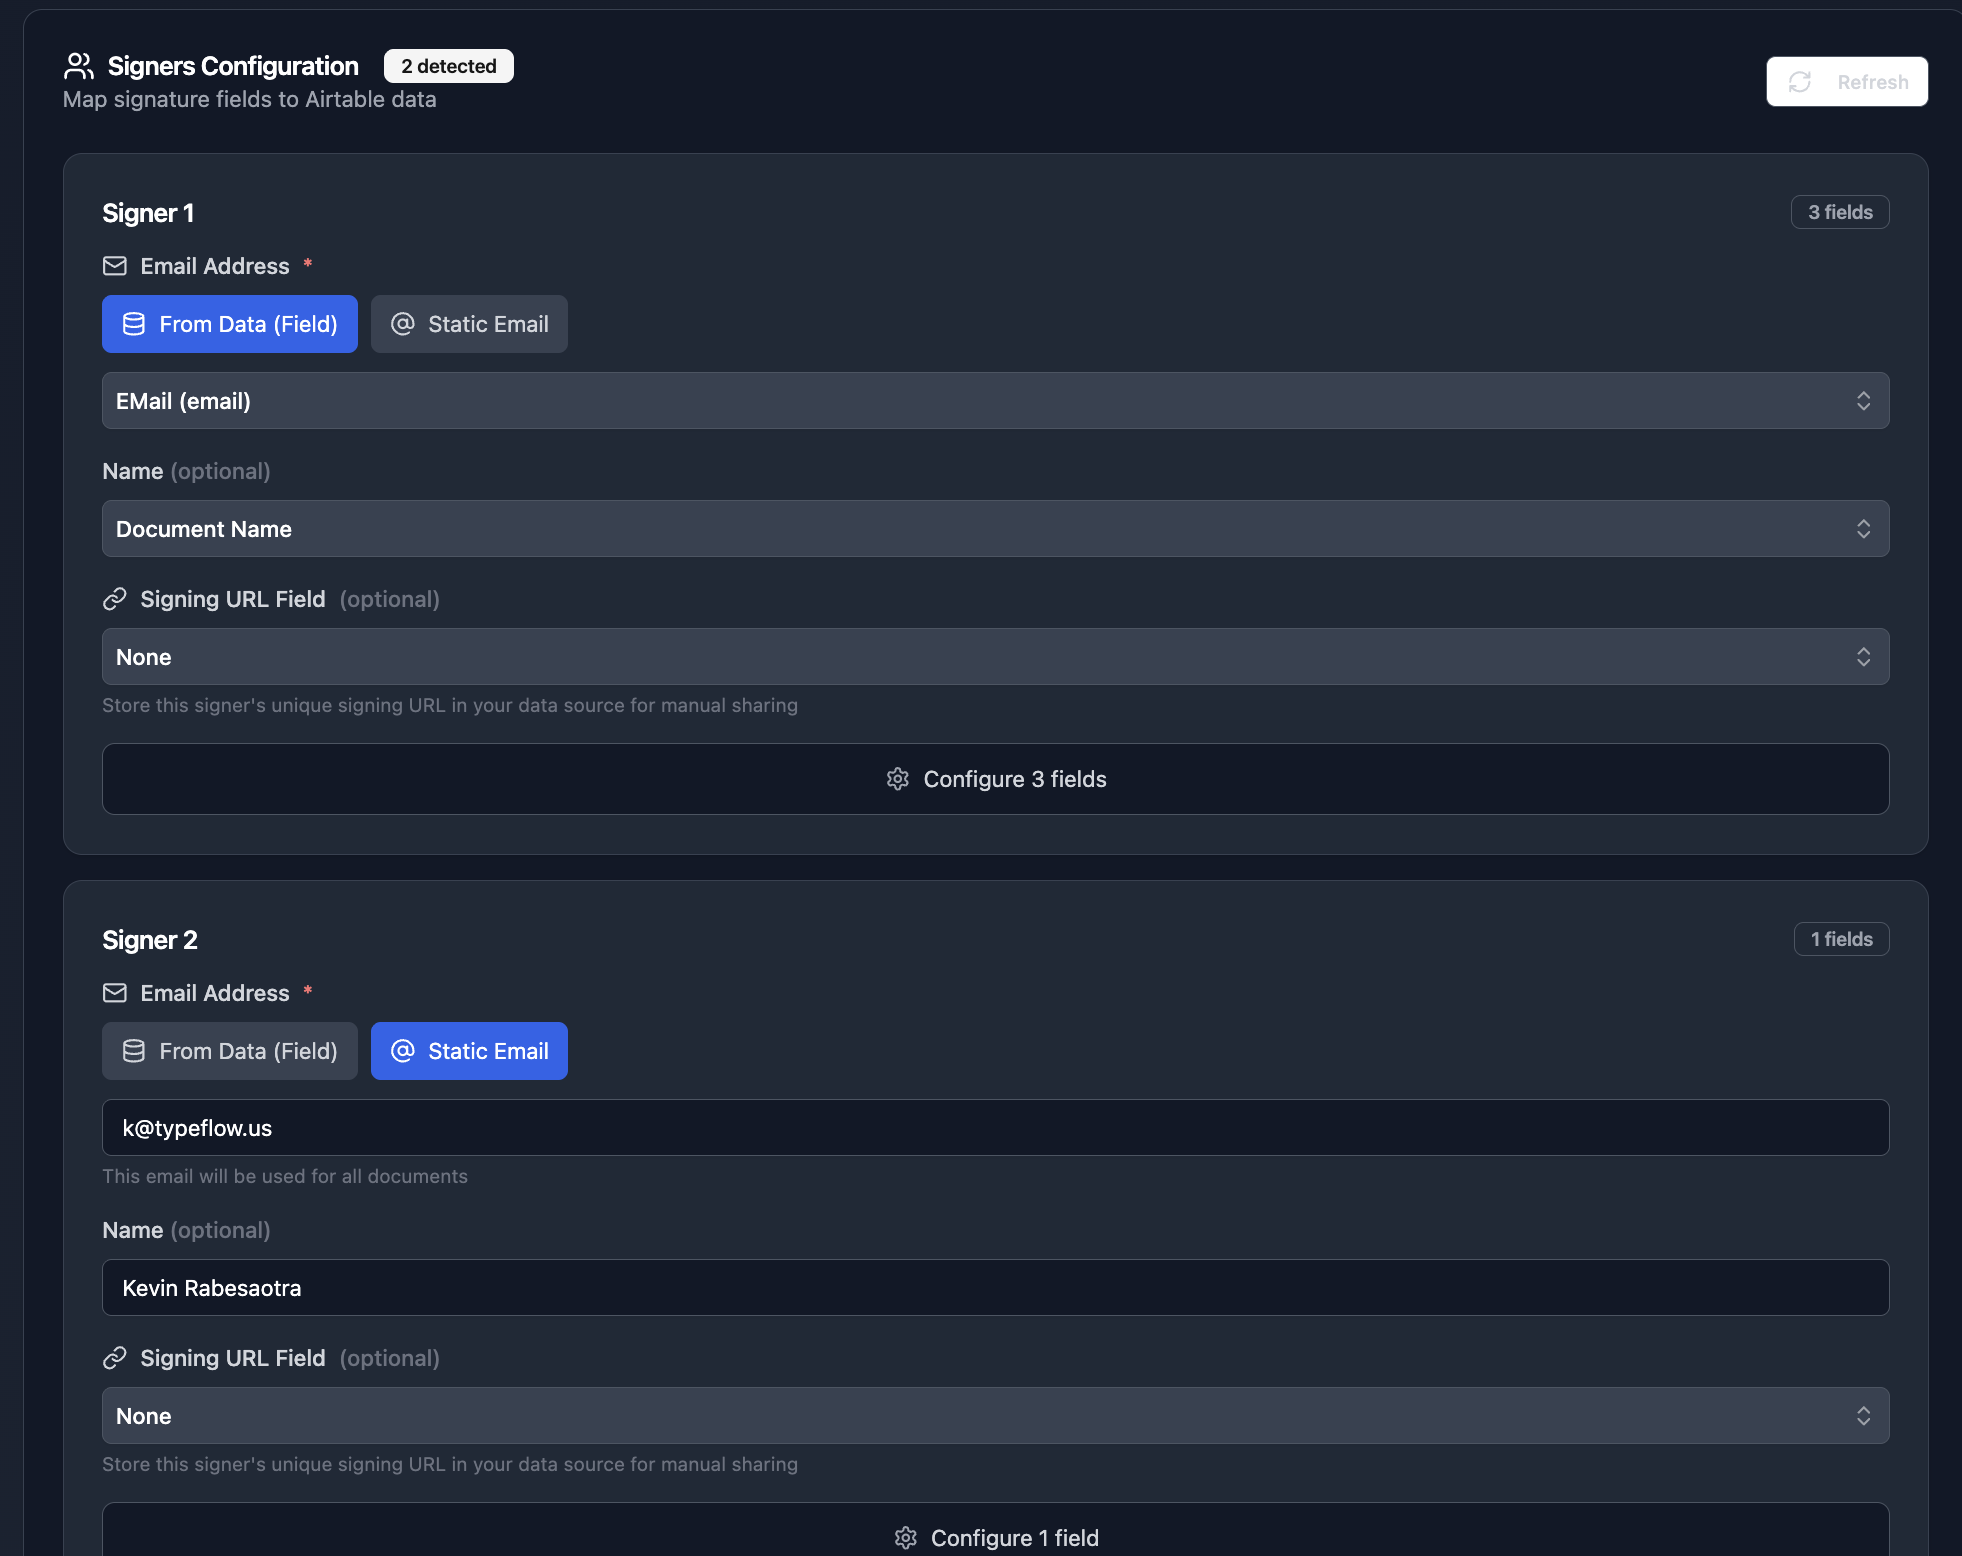
Step 4: Configure Your Signers
Back in TypeFlow, go to the E-Signature tab. Refresh your Signer configuration it will detect the number of signer you defined in your template.
For each signer, configure:
Email source:
- Static data: Enter a fixed email address. Use this when the same person always signs (e.g., your company's authorized signatory).
- From Airtable field: Select an email field from your table. Use this when the signer varies per record (e.g., client email, employee email).
Signing link storage (optional): Select an Airtable field to store each signer's unique signing URL. Useful if you want to share the link through other channels or track who hasn't signed.
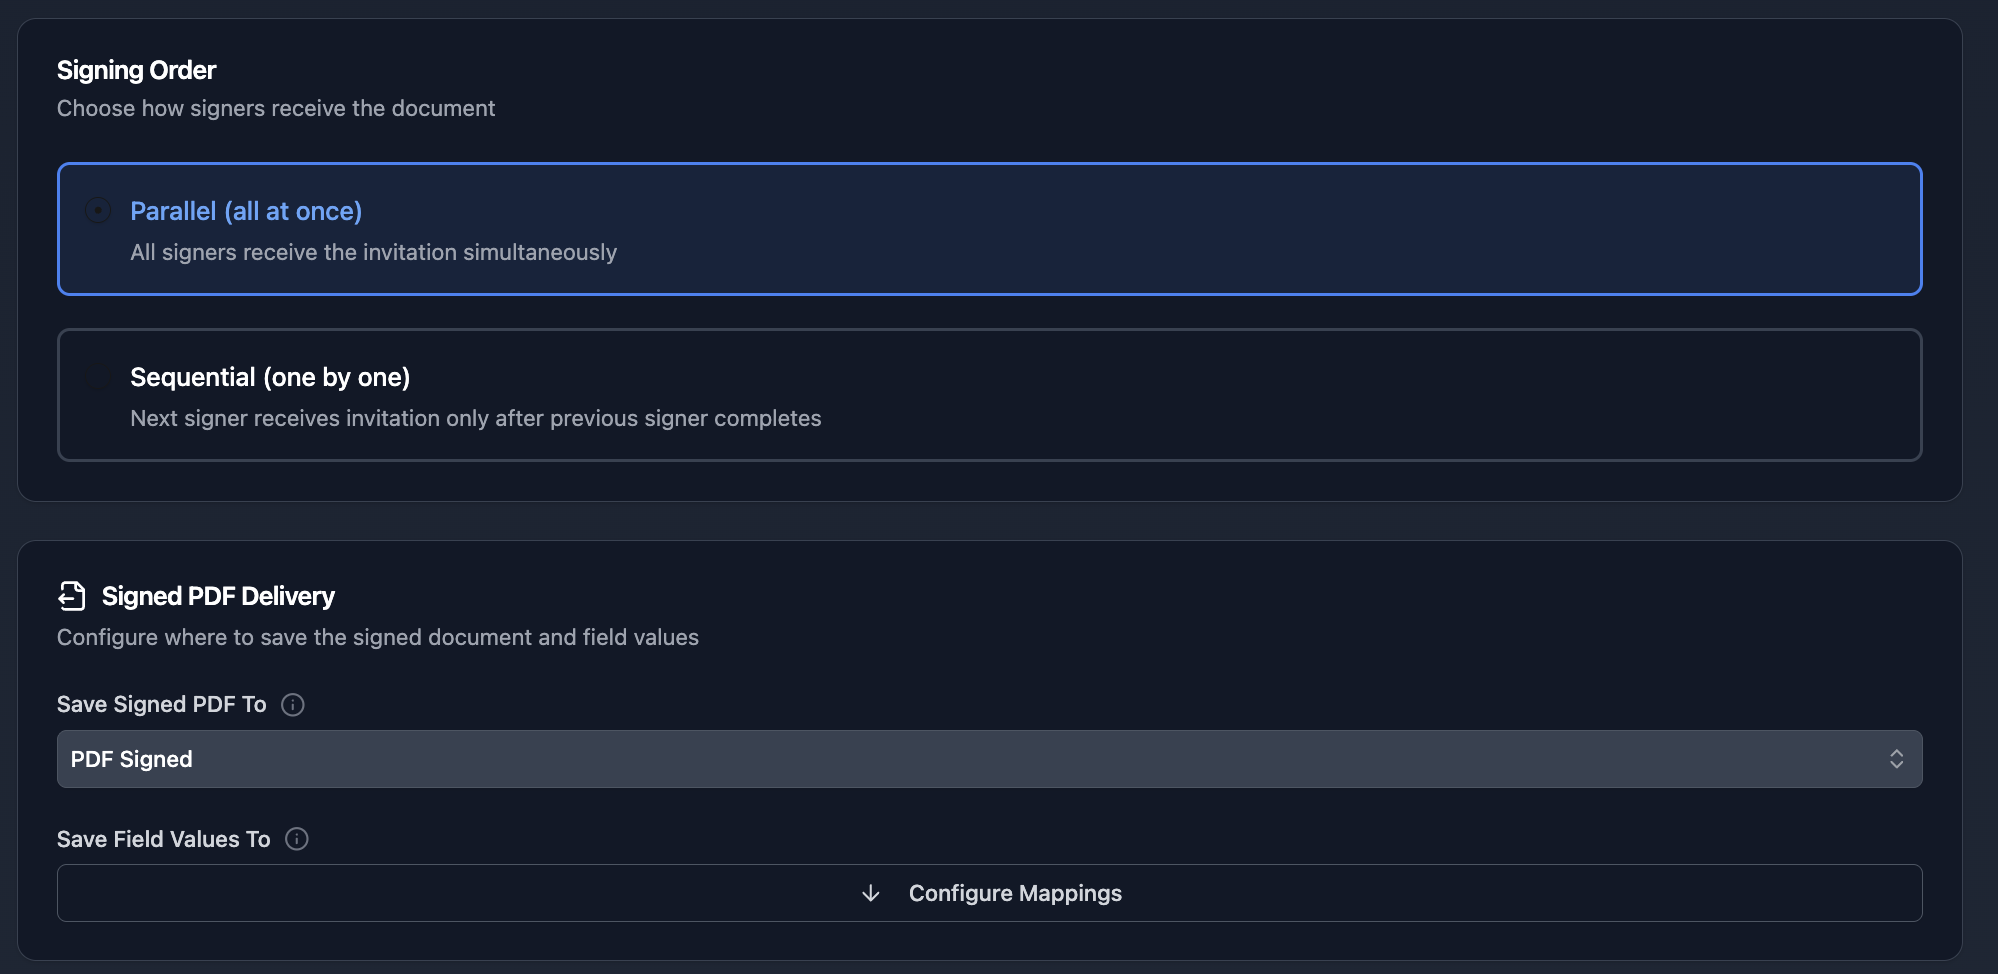
Choose signing mode:
- Parallel: All signers receive invitations simultaneously. Anyone can sign in any order. Best for documents where signing sequence doesn't matter.
- Sequential: Signer 1 must complete before Signer 2 receives their invitation. Best for approval workflows where the first signature authorizes the next.
Signed document storage: Select an Airtable attachment field where the final signed PDF will be saved.
Step 5: Generate and Send for Signature
With your template and signers configured, you're ready to generate.
Manual generation: Click the generate button in TypeFlow or use the button field in Airtable.
Automated generation: Set up an Airtable automation that triggers when a record meets certain conditions (status changes, checkbox ticked, enters a view). See our document automation guide for setup steps.
When generation runs:
- TypeFlow pulls data from your Airtable record
- The template populates with your data
- E-signature placeholders become signable fields
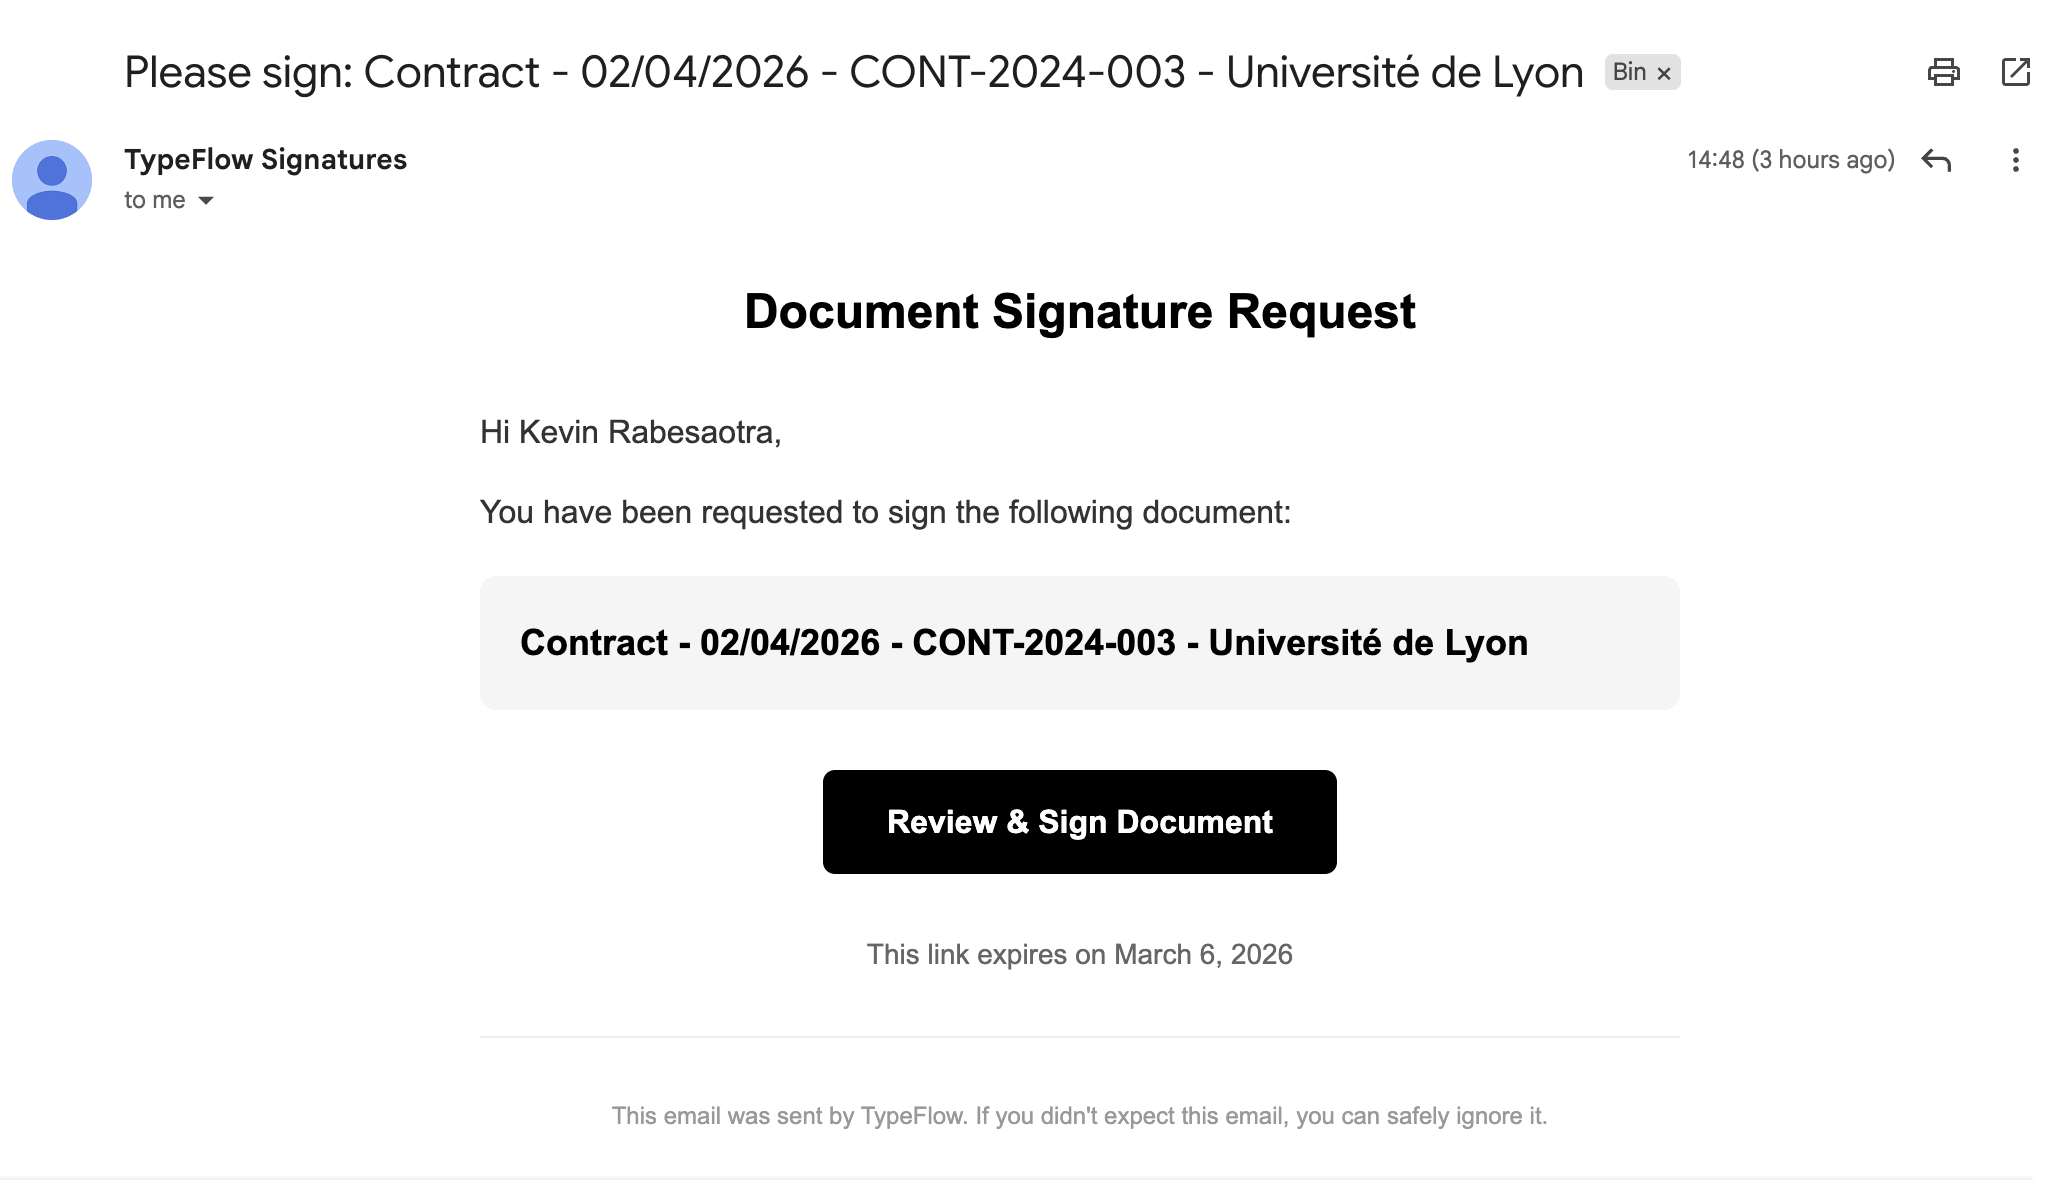
- Each signer receives an email with their unique signing link
- Signers review the document and complete their fields
- After all signatures, the final PDF saves to your Airtable attachment field
What Signers See
When a signer clicks their unique link, they land on a signing page that shows:
- Document preview: The full document with their signature fields highlighted
- Consent checkbox: Required before signing (legally necessary for audit trail)
- Signature pad: Draw signature with mouse, trackpad, or finger on mobile
- Text/date fields: Any additional fields assigned to them
- Complete button: Submits their signature
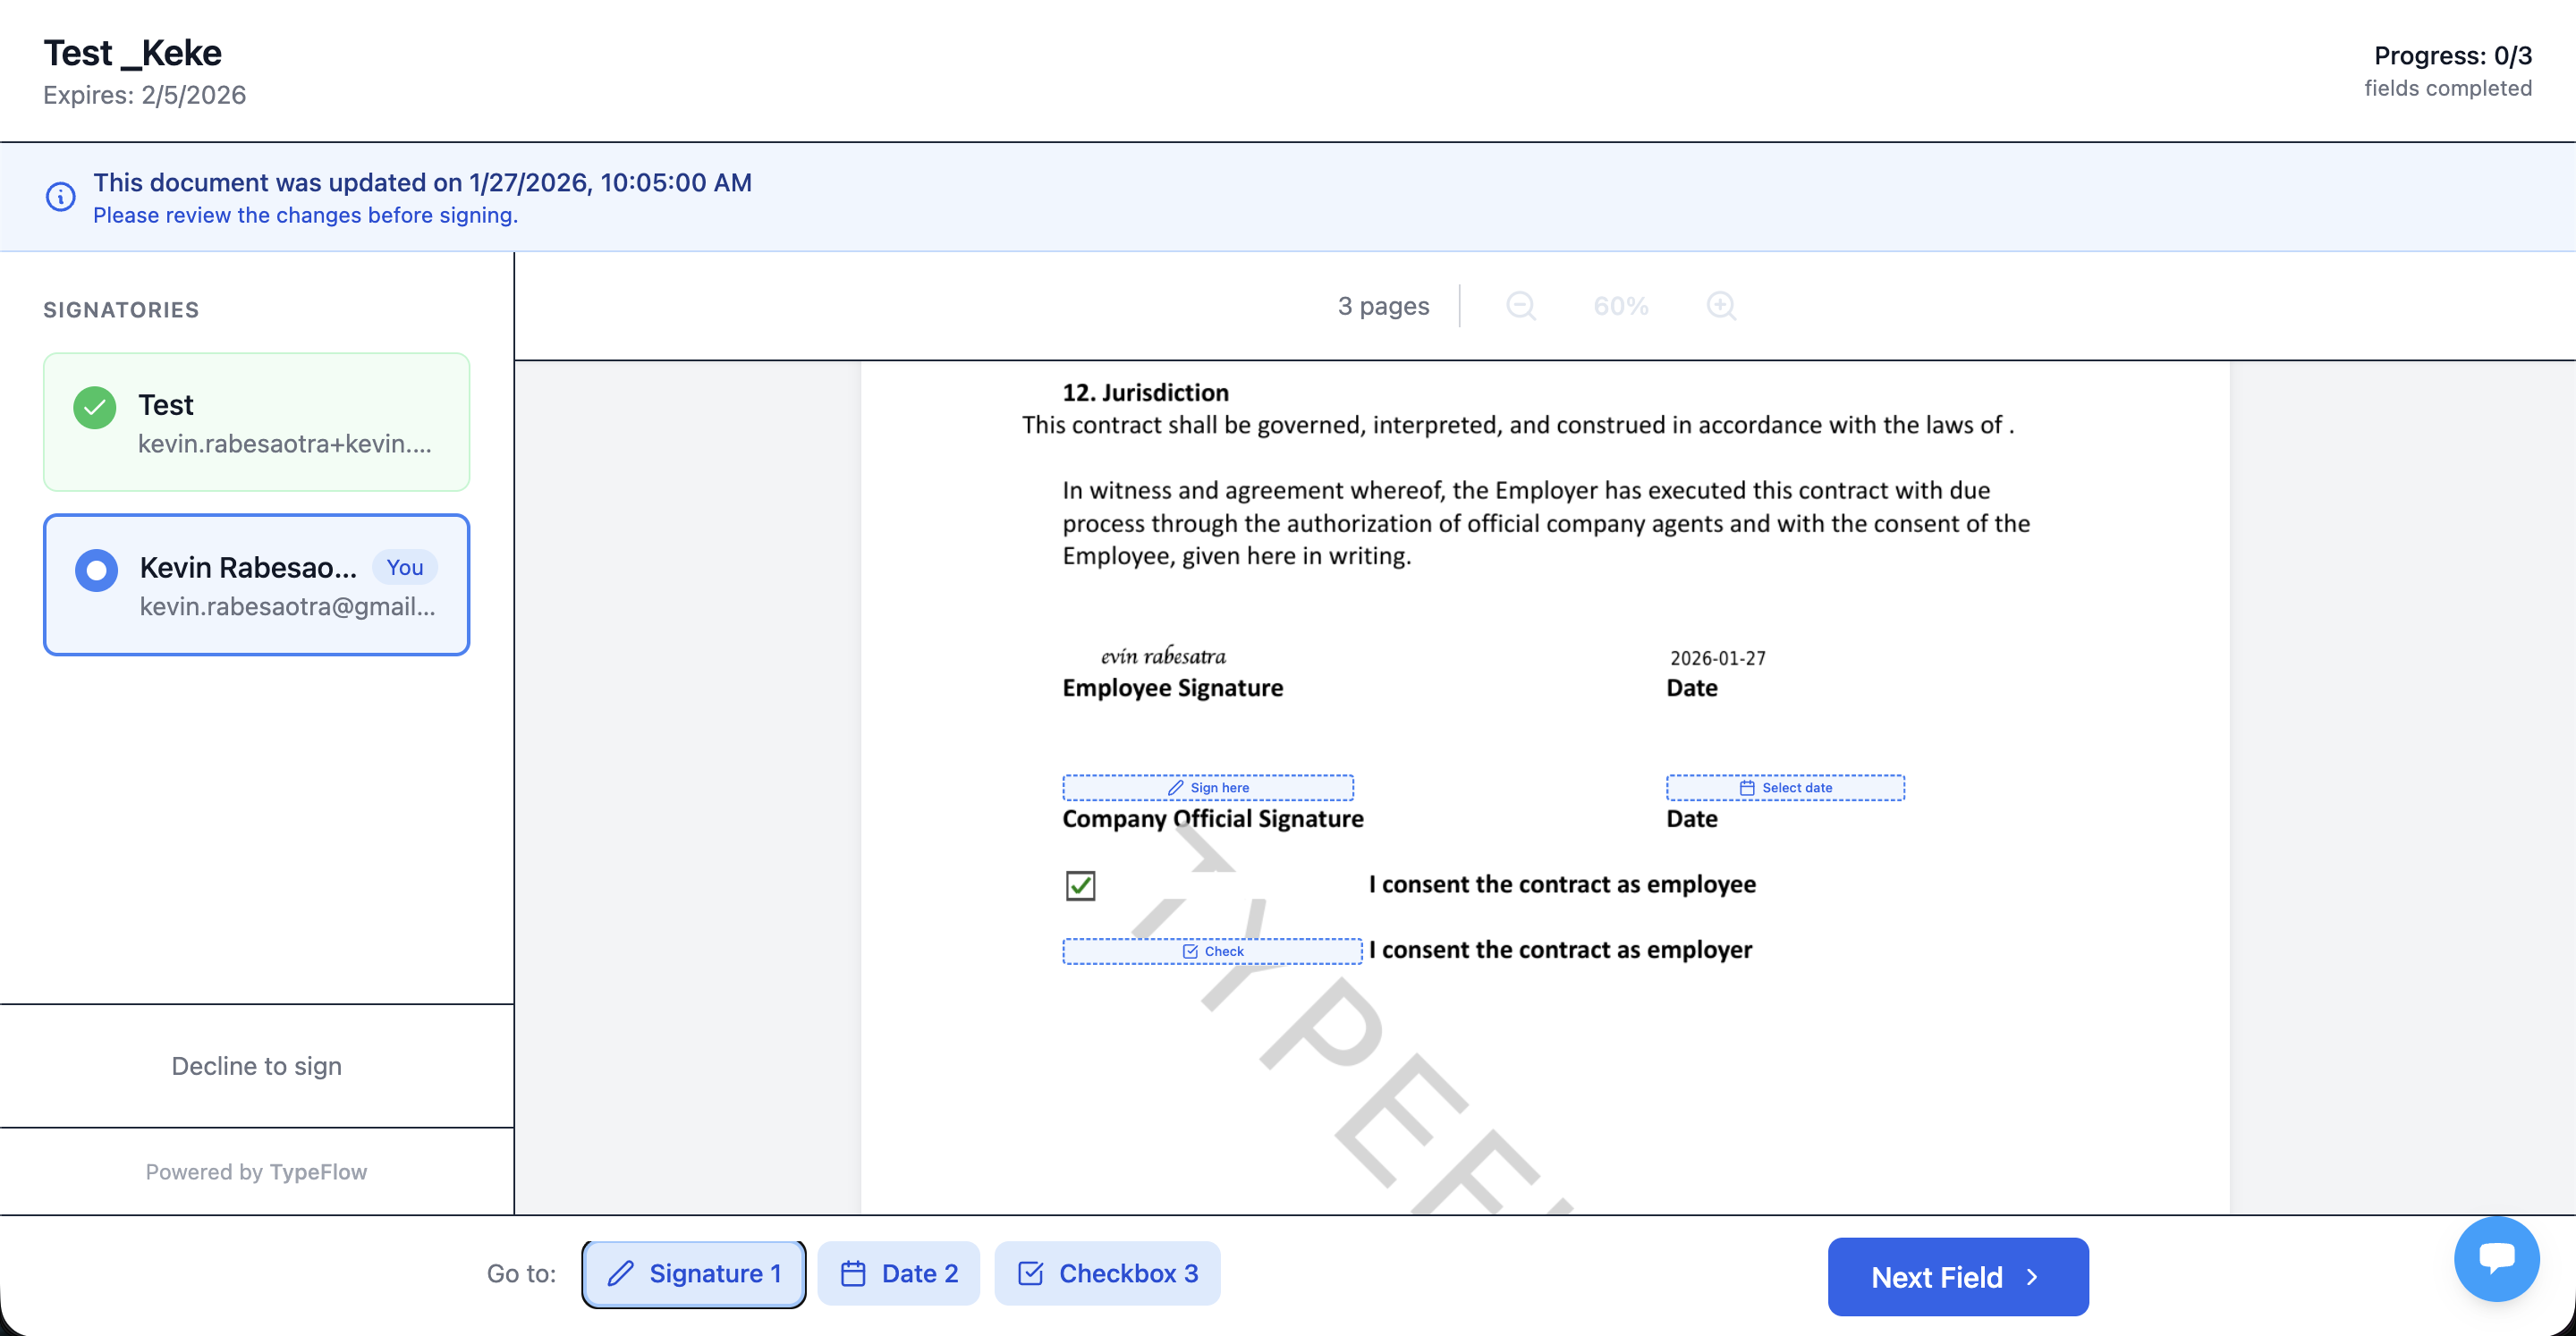
The page works on desktop and mobile. Signers don't need a TypeFlow account -they just click, review, sign, and submit.
After signing, they see a confirmation and can download a copy of the signed document.
Certificate of Completion and Legal Compliance
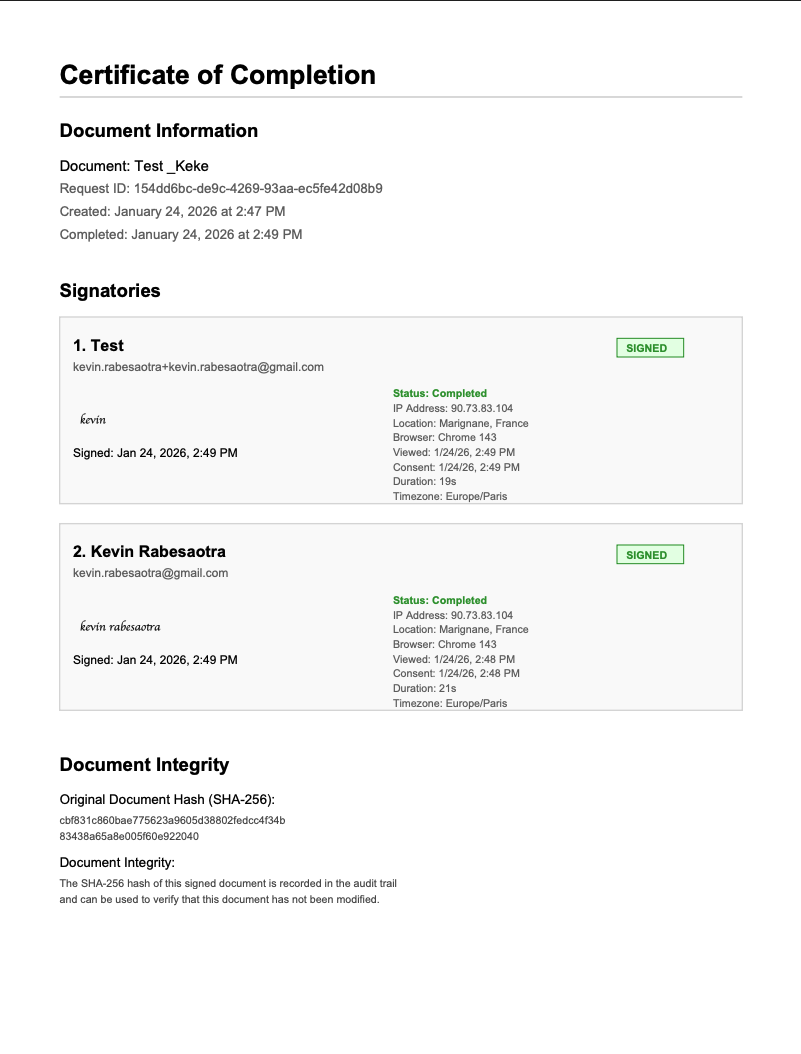
After the final signer completes, TypeFlow embeds a Certificate of Completion in the signed PDF. This certificate is your audit trail for proving who signed, when they signed, and what was signed.
- Document details: Filename and timestamps
- Signer details: Email, name (if provided), signature image
- Audit trail: View/consent/sign timestamps, IP address, location, browser/device
- Integrity proof: SHA-256 hash of the document
This supports legal enforceability under the US ESIGN Act, UETA, and EU eIDAS for most standard business agreements. In most cases, a Simple Electronic Signature (SES) plus a strong audit trail is enough.
Audit Trail: Sync Signature Events to Airtable
For teams that need full visibility without leaving Airtable, TypeFlow can sync every signature event directly to a dedicated Airtable table. One record per signer per document, updated in real-time.
Every event is tracked: when the document was sent, when the signer viewed it, when they signed (or declined), along with IP address, location, and browser details. The audit trail table links back to the original source record so you can see everything in context.
This is especially useful if you use Softr or another portal on top of Airtable - signature status is visible without opening TypeFlow.

Available on Unlimited plans. Learn more about E-Signature Audit Trail →
How to Integrate DocuSign with Airtable (Alternative)
Yes, you can use DocuSign with Airtable, but it usually requires middleware. In most setups, Zapier or Make connects Airtable to DocuSign and moves files back and forth.
The DocuSign + Airtable Workflow:
- Trigger: Airtable record updates (e.g., "Ready to Sign")
- Generate: A separate tool creates the PDF from Airtable data
- Send: DocuSign emails signing invitations and tracks completion
- Return: The signed PDF is pushed back to Airtable via automation
Tradeoff: More tools means more cost and more points of failure. For the full setup guide, see our DocuSign Airtable integration article.
Choosing Between Native and External E-Signature Solutions
The best choice depends on your compliance needs and how many tools you want to maintain. For most teams, an all-in-one workflow is faster to set up and easier to keep running.
- Choose TypeFlow: Standard business contracts, quick setup, fewer subscriptions
- Choose DocuSign: Enterprise mandates, advanced ID verification, or specialized signature requirements
| Factor | TypeFlow Native | DocuSign + Middleware |
|---|---|---|
| Tools | Airtable + TypeFlow | Airtable + Doc Gen + Zapier/Make + DocuSign |
| Setup | Minutes | Hours+ |
| Best for | Most SMB workflows | Enterprise + complex compliance |
For the full decision matrix (10 factors compared), see our Airtable Electronic Signature guide.
Common Use Cases
Client Contracts
Template includes: Project scope, deliverables, timeline, payment terms from Airtable. Signature blocks for client and your company.
Workflow: When deal status changes to "Ready for Contract," automation generates the contract and sends to client. After client signs, your team gets notified to countersign. Signed contract saves to the deal record.
Employment Offers
Template includes: Position, salary, start date, benefits from Airtable. Signature blocks for candidate and HR.
Workflow: HR updates candidate status to "Offer Approved." Automation generates offer letter, sends to candidate. Sequential signing: candidate signs first, HR countersigns. Signed offer saves to candidate record.
Vendor Agreements
Template includes: Vendor name, service terms, pricing from Airtable. Signature blocks for vendor and procurement.
Workflow: Procurement marks vendor as "Approved." Automation generates agreement, sends for signature. Parallel signing since order doesn't matter. Signed agreement saves to vendor record.
Project Sign-Offs
Template includes: Project name, deliverables completed, client feedback from Airtable. Signature block for client approval.
Workflow: Project manager marks project "Ready for Sign-Off." Automation generates completion certificate, sends to client. Single signer flow. Signed document saves to project record.
Troubleshooting Common Issues
Signature placeholders not appearing as signable fields
Check that your placeholder syntax is correct: {{e-signature.signature_1}} with the exact format. Common mistakes include missing the hyphen in e-signature or using wrong brackets.
Signer not receiving email
Verify the email address is correct. Check spam folders. If using an Airtable field, make sure the field contains a valid email format, not a name or other text.
Wrong signer assigned to fields
Match signer numbers in your configuration to placeholder numbers in your template. Signer 1 in settings completes _1 placeholders, Signer 2 completes _2 placeholders.
Document shows signature fields but signing link doesn't work
Check that the signing session hasn't expired. Links expire after 30 days by default. If the link has expired, regenerate the document to create a new signing session.
Signed PDF not saving to Airtable
Check that your flow has an attachment field selected for output. The signed PDF only saves after ALL signers complete. If one signer hasn't finished, the document remains pending.
Best Practices for Airtable E-Signature Workflows
Test with your own email first. Before sending real contracts, generate a test document with your email as the signer. Walk through the signing experience to verify everything works.
Use sequential signing for approvals. When one signature authorizes the next (employee → manager → HR), sequential mode ensures proper order.
Store signing links in Airtable. Even though signers receive email invitations, storing the unique URL lets you resend manually or share through other channels.
Keep templates simple. Complex formatting can shift between Google Docs and PDF. Test your template layout before going live with signatures.
Name your signers clearly. In TypeFlow's signer configuration, use descriptive names like "Client" and "Account Manager" rather than "Signer 1" and "Signer 2."
Build Your Complete E-Signature Workflow
You now have everything you need to generate documents from Airtable and collect signatures without manual exports. Once it's set up, the process runs automatically for every record.
- Generate: Create a document from your Airtable data
- Send: Invite signers by email or share a signing link
- Store: Save the final signed PDF back to Airtable
If you want, you can extend this further with Airtable Automations for approvals, reminders, and status updates. To manage the full contract lifecycle with e-signatures at every stage, see our contract lifecycle management guide. If you need to connect quote acceptance to invoice generation, see our quote-to-invoice workflow guide.
For the complete guide on electronic signatures in Airtable (including form-based signatures, DocuSign integration, and choosing between solutions), see our Airtable Electronic Signature Setup Guide.
Automate your document generation
Start with 20 free documents. Built for businesses using Airtable.
Frequently Asked Questions
Find answers to the most common questions about this feature.
Popular Questions
All Questions
Need more help?
Our team is here to help you solve all your problems and answer your questions.
Contact Us
Kevin from TypeFlow
•AuthorKevin Rabesaotra is a growth engineer and automation specialist with 8+ years of experience building no-code solutions. As Founder & CEO of TypeFlow, he has helped hundreds of businesses automate document generation and streamline workflows with Airtable integrations. Previously, Kevin was a Product Lead specializing in growth engineering, running experiments to drive revenue, retention, and lead generation.
More articles
How to Print Labels from Airtable with Quantity Control (Step by Step)
Print multiple labels per Airtable record based on a quantity field. Step-by-step guide for linked records mode and quantity repeat mode with barcodes and Avery sheets.
Read articleHow to Print Avery Mailing Labels from Airtable
Print Avery mailing labels (5160, 5161, 5162) from Airtable without Word mail merge. Step-by-step guide with print label mode, automation, and bulk generation.
Read articleHow to Create Inventory Labels with Barcodes in Airtable
Create inventory labels with Code 128, EAN-13, or QR barcodes from Airtable. Step-by-step guide for warehouse, retail, and asset tracking with thermal and Avery printers.
Read article