How to Print an Airtable View and Export It to PDF
Key Takeaways:
- Airtable's native "Print View" feature works for quick snapshots but cuts off wide columns and offers no branding.
- Different view types (Grid, Gallery, Kanban, Calendar) print differently - Grid works best for tabular data.
- Page Designer creates custom single-record layouts but requires manual export for each record.
- For automated, multi-record PDF reports from views, use TypeFlow's View Report feature with custom branding, header/footer variables, and e-signature support.
- View Report respects your view's filters, sorts, and column order. The PDF matches what you see in Airtable.
There are three ways to export an Airtable view to PDF: the native Print View (free, basic), Page Designer (single-record layouts), or TypeFlow's View Report feature (multi-record branded PDFs with filters, sorting, and e-signature). The right method depends on whether you need a quick snapshot or a professional, automated report.
This guide covers each method step by step, plus workarounds for the limitations you'll run into along the way.
How to Print a View in Airtable
To print an Airtable view, open the view dropdown next to the view name in the top left corner and select "Print view." In the preview, choose your layout, then click Print or Save as PDF.
- Best for: Quick snapshots of what's currently visible in your view.
- Good to know: Your view's filters, sorts, hidden fields, and column order affect what prints.
Step 1: Open Your Airtable View
Airtable views control what prints because they control what you're looking at. The underlying data stays the same, but you see it differently depending on which view you choose.
- Filters: Only matching records show up in the printout.
- Hidden fields: Hidden columns won't print.
- Sort + field order: Your PDF follows the order you see on screen.
Open the base and table you want to print, then select the view from the left sidebar or the view switcher at the top of the screen.
Step 2: Click the View Menu and Select Print View
Look for the small down arrow icon right next to your view name at the top left. When you click it, a dropdown menu appears with several options. "Print view" sits in this list - click it to open the print preview window.
Step 3: Adjust the Print Preview Settings
Use print preview to catch layout issues before you export or hit the printer. You can tweak a few things here:
- Field width: Resize columns in the view before opening print preview for best results.
- Orientation: Use landscape when your grid is wide.
- Row height: Increase row height if long text is getting cut off.
If the preview looks cramped, go back to the view, adjust column widths, then open Print view again.
| Quick Fix | Use It When |
|---|---|
| Landscape | Right-side columns are missing |
| Hide non-essential fields | You only need a subset for sharing |
| Dedicated "Print" view | You export the same view repeatedly |
Step 4: Send to Printer or Save as PDF
Once the preview looks right, click Print or use the keyboard shortcut - Ctrl+P on Windows or Cmd+P on Mac. Your browser's print dialog pops up with options to select a physical printer or save as PDF.
The PDF option is useful when you want to share the document digitally or keep a copy for your records. Just select "Save as PDF" or "Microsoft Print to PDF" as your printer destination.
How to Print Each Airtable View Type
Not all views print the same way. Grid views come out looking like spreadsheets, while gallery views create card-based layouts. Here's what to expect from each type:
| View Type | Best For Printing | Limitations |
|---|---|---|
| Grid | Spreadsheet-style data | Columns may get cut off |
| Gallery | Visual records with images | Limited formatting control |
| Kanban | Status-based workflows | Not ideal for detailed prints |
| Calendar | Date-based records | Basic output only |
Print a Grid View
Grid view is what most people use for printing tabular data. The output looks like a spreadsheet, which feels familiar if you've ever printed from Excel or Google Sheets.
Before printing, I recommend hiding columns you don't want and adjusting widths so nothing gets cut off at the page edge. Wide grids are the main source of printing frustration in Airtable.
Print a Kanban View
Kanban views organize records into columns based on a status field - like "To Do," "In Progress," and "Done." The print output here is basic and doesn't capture the visual structure well.
If you want a detailed Kanban print, taking a screenshot or using a third-party tool often works better than the native print function.
Print a Gallery View
Gallery view displays records as cards, each showing an image and key fields. This works well for visual catalogs, contact lists, or any data where attachments matter.
The output tends to look cleaner than grid view when you have photos or want a more polished appearance. It's worth trying if your grid view prints look cluttered.
Print a Calendar View
Calendar view shows records on a date-based layout. The print functionality here is limited - you get a basic calendar output without much room for customization.
For professional calendar documents, external tools offer more flexibility. The native option works for quick reference prints but not much else.
How to Print a Single Record or All Records From a View
Sometimes you want just one record printed, not the entire view. Airtable handles both scenarios differently:
- Single record: Open the record by clicking on it, then click the three-dot menu in the top right corner and select Print.
- All records: Use Print View from the view menu to include every visible record.
The filters and sorts you apply to your view determine which records appear in the print output. So if you only want certain records, filter your view first, then print.
How to Use Page Designer for Custom Print Layouts
Page Designer is Airtable's extension for building a formatted, print-ready layout from a single record. It's only available on paid Airtable plans.
To set it up, open Extensions, add Page Designer, then drag fields onto the canvas and print. When your design is ready, you can print a single record or all records in your current view at once.
- Best for: Invoices, labels, certificates, and one-record-at-a-time documents.
- Not ideal for: Exporting an entire view as a clean multi-page table. If you need multi-page PDFs from Airtable records, see our guide on how to create multi-page PDFs without Page Designer.
Keep these limitations in mind:
- No automation: You still have to generate documents manually.
- Multi-page constraints: Long records and long tables can be awkward to lay out.
- Basic styling: It's not as flexible as template-first document tools.
How to Print an Airtable View as a PDF
In the browser print dialog, choose "Save as PDF" (or "Microsoft Print to PDF") instead of a physical printer.
- Tip: The PDF will match the print preview, so fix column widths and hidden fields in the view first.
- Tip: Use filters to export only the records you actually want to share.
This is a common request in the Airtable community - many users need to share data with stakeholders who don't have Airtable access, and PDF is the universal format that works everywhere.
Airtable Print View Limitations and How to Fix Them
Native printing in Airtable works for quick outputs but falls short for professional documents. Understanding where it struggles helps you decide when to use alternatives.
Columns Get Cut Off in the Print Preview
Wide grid views often exceed page boundaries, which means columns on the right side disappear. To fix this:
- Hide columns you don't need before printing.
- Reduce column widths by dragging the borders.
- Switch to landscape orientation for more horizontal space.
- Split your data across multiple views if you have many fields.
Formatting and Branding Stay Basic
Airtable's print output lacks custom fonts, logos, and professional styling. Page Designer helps somewhat, but you still can't match the polish of a dedicated document tool.
For branded documents like reports or contracts, third-party solutions let you use templates with your exact formatting. TypeFlow, for example, uses Google Docs templates where you control every detail of the design.
No Built-In Automation for Printing
Airtable doesn't automatically generate print-ready PDFs when records change. If you print recurring reports, this quickly turns into repetitive manual work.
- Best fix: Use an automation-friendly PDF tool for scheduled or trigger-based exports.
- Quick fix: Create a dedicated "Print" view so your layout is always ready.
Quick Workaround: Screenshot to PDF
If you just need a one-off snapshot, a full-page screenshot tool like GoFullPage can capture the entire view and export it as a PDF. This workaround captures exactly what you see on screen, including formatting that might not translate to the native print function. It's not ideal for recurring reports, but works well for one-off snapshots when native printing doesn't cooperate.
CSV Export Then Print From Sheets
For more control over formatting, export your view as CSV, open it in Google Sheets or Excel, format as needed, then print or save as PDF. This adds steps but gives you full control over column widths, fonts, and page layout.
Third-Party Tools for Airtable View Export
If Airtable's native printing is too limited, a document-generation tool can give you better formatting and automation. According to McKinsey, automating repetitive tasks like report generation frees teams to focus on higher-value work.
Most third-party tools are built for per-record document generation - creating one PDF per Airtable record (invoices, contracts, certificates). They don't export an entire view as a table:
- Documint - Template-based PDFs from individual records.
- DocsAutomator - Generates Google Docs or PDFs per record.
- Make (formerly Integromat) - Automates Airtable-to-document workflows across tools.
- Plumsail Documents - Template-driven documents in multiple formats.
For exporting an entire Airtable view as a formatted PDF table - with branding, headers/footers, and automation - TypeFlow's View Report is purpose-built for that workflow and covered in detail below.
How to Export Your Entire Airtable View as a Professional PDF Report
If you generate recurring reports, manual printing gets old fast. TypeFlow's View Report exports an Airtable view into a branded, consistent PDF table.
Unlike template-based document generation (invoices, contracts), View Report auto-generates the table layout from your view structure. No template design needed.
- Matches your view: Respects filters, sorts, and field order.
- Looks professional: Branding, headers/footers, and versioning.
- Can be automated: Generate on schedule or from a button.
- Optional e-signature: Add approval workflows when needed.
Step 1: Create a View Report Configuration
- Log in to app.typeflow.us.
- Click View Reports in the dashboard.
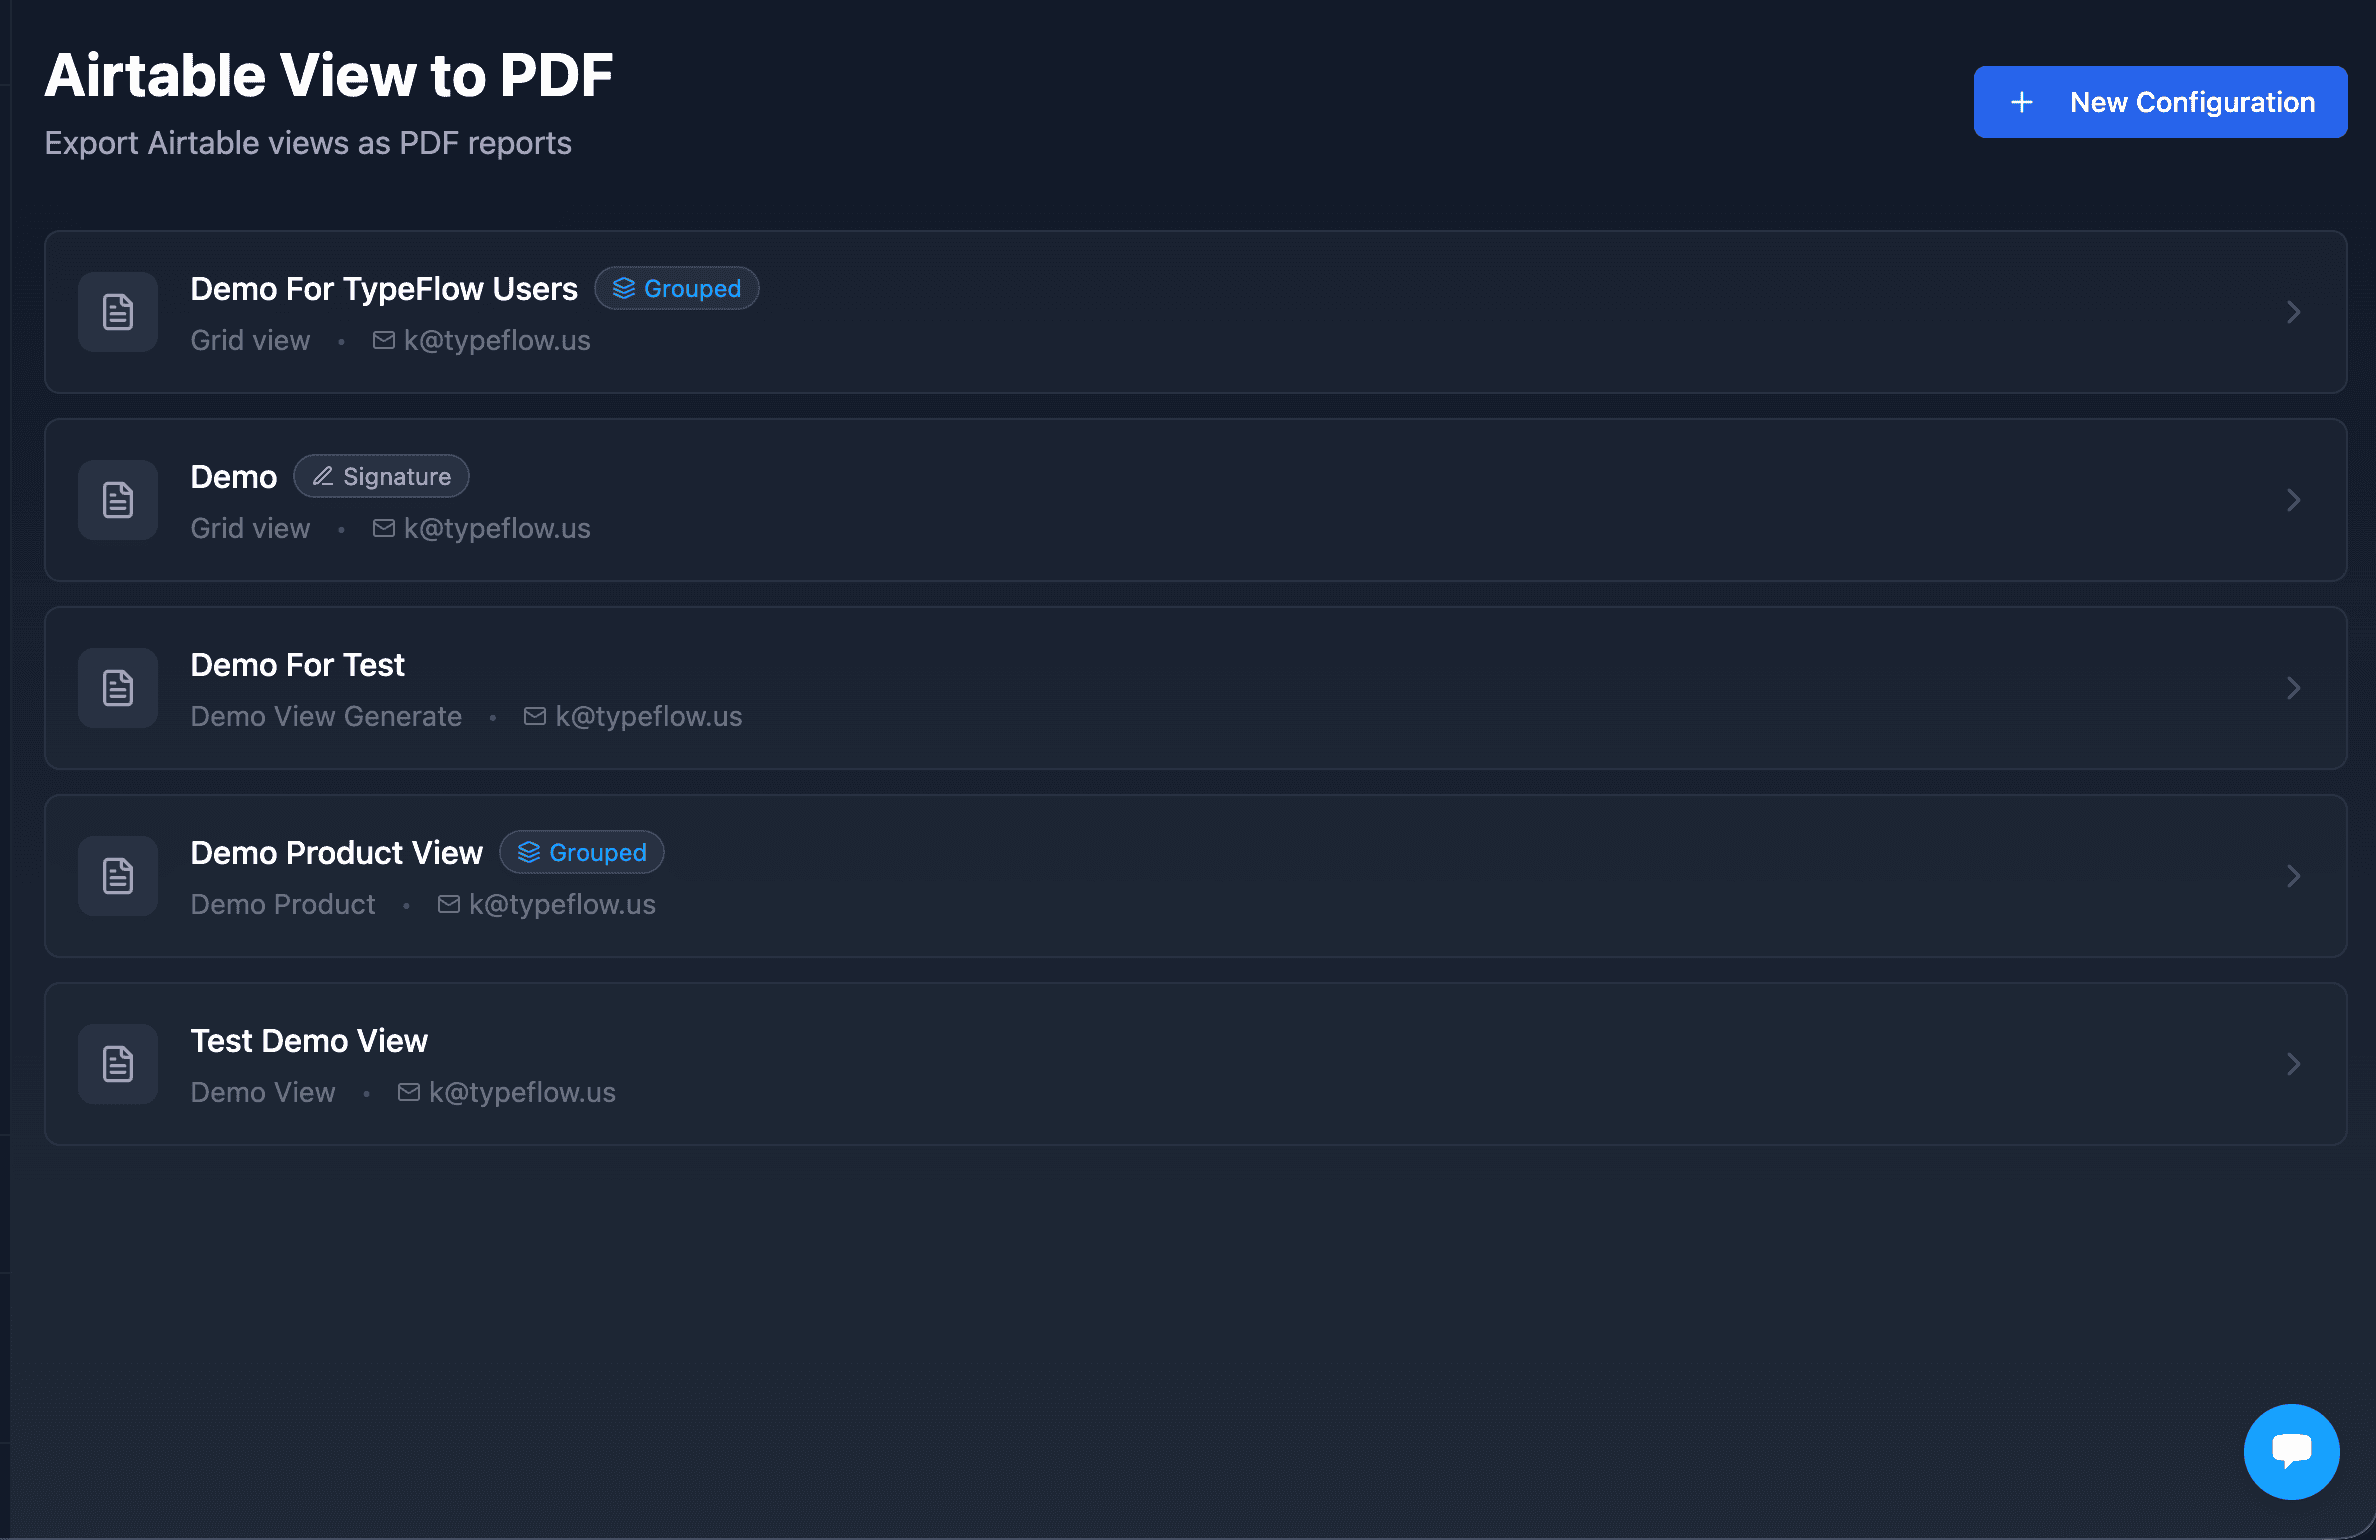
- Click + New Configuration.
- Fill in the form:
- Configuration name: A friendly name (e.g., "Weekly Sales Report").
- Base: Select your Airtable base from the dropdown.
- Table: Select the table containing your data.
- View: Select the view you want to export.
- Default email: Where reports will be sent.
- Grouping (optional): Group records by up to 3 fields.
- Click Save Configuration.
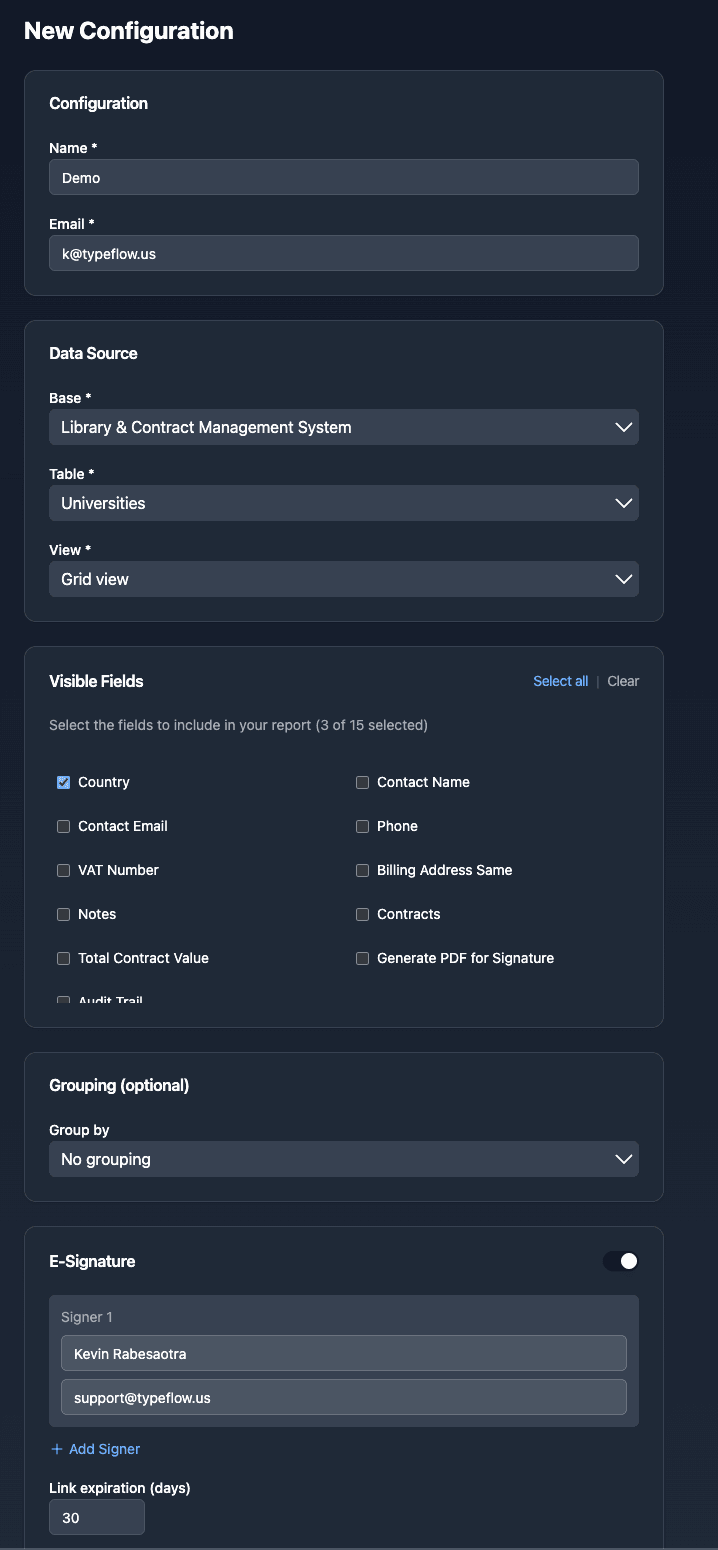
The configuration captures your view's settings. TypeFlow infers visible fields from the records themselves since Airtable's API does not expose view column settings directly.
Step 2: Customize Your PDF Template
After saving, click Customize Template to open the customization page. Here you can brand your reports:
Branding options:
| Option | Description |
|---|---|
| Company Logo | Upload PNG, JPG, or SVG (max 2MB). Appears in the header. |
| Company Name | Your company name for header/footer variables. |
| Document Code | Custom identifier (e.g., RTA-SMQ) for document tracking. |
| Primary Color | Accent color for the header border. |
Date and time formats:
Choose formats that match your region:
- DD/MM/YYYY (European)
- MM/DD/YYYY (US)
- YYYY-MM-DD (ISO)
Header and footer variables:
Use these placeholders in your header and footer text:
| Variable | Description | Example |
|---|---|---|
{{company_name}} | Your company name | ACME Corp |
{{document_code}} | Document identifier | RTA-SMQ |
{{version}} | Auto-incrementing version | 3 |
{{view_name}} | Airtable view name | Equipment List |
{{date}} | Generation date | 03/03/2026 |
{{time}} | Generation time | 14:32 |
{{record_count}} | Number of records | 47 |
{{page}} | Current page number | 1 |
{{total}} | Total pages | 5 |
Example header:
{{company_name}} | {{view_name}} | {{document_code}}-V{{version}}
Result: ACME Corp | Equipment List | RTA-SMQ-V3
Example footer:
Page {{page}}/{{total}} | Generated on {{date}} at {{time}} | {{record_count}} records
Result: Page 1/5 | Generated on 03/03/2026 at 14:32 | 47 records
Click Test PDF to preview your template with sample data. Test PDFs include a watermark and do not increment the version number. Click Save Changes when satisfied.

Step 3: Add E-Signature to Your Report
View Report supports e-signature for documents that require approval or sign-off.
- In your configuration, enable Require Signature.
- Add signers (name and email for each).
- Set link expiration days (default 30).
- Save the configuration.
How it works:
- Report generates with your view data plus a signature page.
- Each signer receives an email invitation.
- Signers sign via web interface (works on mobile, tablet, desktop).
- After all signatures, a Certificate of Completion is added with audit trail.
- The final signed PDF is stored and can be sent to all parties.
The audit trail includes when each signer viewed the document, when they signed, IP address, location, and browser information. This level of traceability meets eIDAS requirements in Europe and ESIGN Act standards in the United States.
Step 4: Trigger the Report From Airtable
The configuration detail page shows two options to trigger PDF generation:

Option A: Interface Button URL
Use this for buttons in Airtable Interfaces:
- Copy the Interface Button URL from the configuration detail page.
- Open your Airtable Interface in edit mode.
- Add a Button element.
- Set action to Go to external URL.
- Paste the URL.
- Save and test.
When clicked, a new tab opens confirming the report is generating. The PDF arrives in the configured email inbox within seconds.
Option B: Automation Script
Use this for scheduled or event-based reports:
- Copy the Automation Script from the configuration detail page.
- In Airtable, go to Automations.
- Create a new automation with your trigger:
- At a scheduled time for recurring reports (weekly, monthly).
- When a button is pressed for manual triggers.
- When record matches conditions for event-based triggers.
- Add action: Run a script.
- Paste the script.
- Test and activate.
Example: Weekly Report Every Monday
| Setting | Value |
|---|---|
| Trigger | At a scheduled time |
| Frequency | Weekly |
| Day | Monday |
| Time | 8:00 AM |
| Action | Run script (View Report API call) |
Once configured, reports arrive in your inbox every Monday at 8am. No clicks, no reminders, no forgotten reports.
Which Airtable PDF Export Method to Use
| Method | Best For | Setup | Professional Output | Automation | Branding |
|---|---|---|---|---|---|
| Browser Print View | Quick snapshots | None | No | No | No |
| Page Designer | Single record layouts | Low | Basic | No | Limited |
| CSV Export + Sheets | Reformatting in Excel | Medium | Limited | No | Manual |
| TypeFlow View Report | Entire views as reports | Medium | Yes | Yes | Full |
Frequency matters most. If it's a one-time export, native methods work fine. If you generate the same report weekly, automation saves hours every month. Deloitte estimates that document automation can reduce processing time by up to 80%.
Formatting requirements vary. Basic table layouts work with browser print. Professional reports with branding, version numbers, and e-signatures require View Report.
How to Batch Print Records From an Airtable View
If you need lots of documents at once, start by filtering your view to only the records you want, then use the "Print all records" option in Page Designer.
- Page Designer: Use "Print all records" for bulk, record-by-record documents.
- TypeFlow: Automate batch generation and delivery (email, save back to Airtable, or both). See our guide on how to generate and email PDFs from Airtable automatically.
For per-record documents like invoices or contracts, template-based generation gives you full layout control. If you're exporting an entire view as a table, View Report is the better fit than record templates.
How to Print From an Airtable Interface
Interfaces are custom pages built with Airtable's Interface Designer. They're great for dashboards and simplified workflows, but they don't print the same way as base views.
To enable printing, open the interface in edit mode and turn on Format for printing. Once enabled, a print icon appears in the top-right corner for viewers.
- Typically supported: List, Timeline, Calendar, Record Details, and Charts.
- Common limitation: Grid and Gallery layouts in interfaces may not support native printing yet.
If you need a consistent PDF every time, add a button that triggers a TypeFlow View Report from the interface.
Best Practices for Clean Airtable Print Output
A few adjustments before printing make a noticeable difference in output quality:
- Hide extra fields: Less clutter makes the printout easier to read.
- Adjust row height: Prevents long text from truncating.
- Filter first: Only print the records you need.
- Try another view type: Gallery can look cleaner for visual records.
- Always preview: Catch cut-off columns before exporting.
- Create a dedicated "Print" view: Save your layout once, then reuse it whenever you export.
Turn Your Airtable Views Into Professional Documents With TypeFlow
Manual printing does not scale. If you generate reports weekly, the cumulative time adds up fast.
TypeFlow's View Report feature handles the repetitive work. You configure once and reports generate on schedule or button click. The PDF includes your branding, respects your view filters and sorts, and supports e-signature for approval workflows.
For teams following ISO 9001 or other quality management standards, the auto-incrementing version numbers and Certificate of Completion provide the document traceability that compliance requires.
Start for Free and set up your first View Report in minutes.
Frequently Asked Questions
Find answers to the most common questions about this feature.
Popular Questions
All Questions
Need more help?
Our team is here to help you solve all your problems and answer your questions.
Contact UsThis guide covers Airtable's native print options and TypeFlow's View Report feature. For official Airtable documentation, see Printing from Page Designer, Page Designer Extension, and Interface Designer.

Kevin from TypeFlow
•AuthorKevin Rabesaotra is a growth engineer and automation specialist with 8+ years of experience building no-code solutions. As Founder & CEO of TypeFlow, he has helped hundreds of businesses automate document generation and streamline workflows with Airtable integrations. Previously, Kevin was a Product Lead specializing in growth engineering, running experiments to drive revenue, retention, and lead generation.
More articles
How to Print Labels from Airtable with Quantity Control (Step by Step)
Print multiple labels per Airtable record based on a quantity field. Step-by-step guide for linked records mode and quantity repeat mode with barcodes and Avery sheets.
Read articleHow to Print Avery Mailing Labels from Airtable
Print Avery mailing labels (5160, 5161, 5162) from Airtable without Word mail merge. Step-by-step guide with print label mode, automation, and bulk generation.
Read articleHow to Create Inventory Labels with Barcodes in Airtable
Create inventory labels with Code 128, EAN-13, or QR barcodes from Airtable. Step-by-step guide for warehouse, retail, and asset tracking with thermal and Avery printers.
Read article