How to Build Quality Control Reports in Airtable
Quality control reports document inspection results, defects, and pass/fail status for products and processes. If your QC data lives in Airtable, you need a reliable way to generate professional, shareable PDF reports for clients, auditors, and internal stakeholders.
This guide shows you how to generate QC report PDFs directly from Airtable using TypeFlow - including linked defect records, inspection photos, and e-signature approvals. For a complete overview of all manufacturing documents you can automate, see our guide to manufacturing document automation in Airtable.
Key Takeaways
- Page Designer limitations: Airtable's built-in tool can't handle multi-page reports, defect tables, or automated generation
- Extensions for dashboards only: Chart and Summary extensions are for internal monitoring, not shareable PDF reports
- Template-first approach: Create a Google Docs template with
{{variables}}that map directly to your Airtable fields - Defect line items: Pull all related defects from linked tables as dynamic rows in your report
- Compliance-ready: Add e-signatures with audit trails for inspector and supervisor sign-off
What Is a QC Report and Why Generate It from Airtable
You can generate shareable QC report PDFs directly from your Airtable inspection data - complete with defect tables, photos, and e-signature approvals - instead of compiling results manually. A QC report typically includes:
- Inspection details - Date, inspector name, product or batch inspected
- Test results - Measurements, observations, pass/fail status
- Defects found - Description, location, severity, photos
- Final disposition - Accept, reject, rework
- Approvals - Inspector sign-off, supervisor approval
QC reports are crucial for maintaining product quality, complying with industry standards, and providing audit trails for customers and regulators. For teams that need branded, audit-ready reports with version control and e-signature, automation is essential. They often accompany other manufacturing documents like certificates of conformity and traceability records.
Generating reports directly from Airtable eliminates manual copy-paste, ensures data accuracy, and creates a single source of truth where the report lives alongside the inspection data.
How to Structure Your Airtable Base for QC Reports
The schema below matches the demo base you can duplicate. It uses three tables: Inspections (main), Checklist (linked via loop), and Defects (linked via loop). Each record in Inspections generates one QC report PDF.
Inspections Table (main)
| Field Name | Field Type | Purpose |
|---|---|---|
| Inspection ID | Single line text | Primary field (e.g. "QC-2026-0142") |
| Company Name | Single line text | Issuing company |
| Product Name | Single line text | Product being inspected |
| SKU | Single line text | Part / model number |
| Batch Number | Single line text | Lot identifier |
| Customer | Single line text | Who the product ships to |
| Inspection Date | Date | When the inspection occurred |
| Overall Status | Single line text | "PASS", "FAIL", or "CONDITIONAL" |
| Items Checked | Number | Total checkpoints inspected |
| Items Passed | Number | Checkpoints that passed |
| Defects Found | Number | Number of defects identified |
| Pass Rate | Single line text | e.g. "87.5%" |
| Inspector Name | Single line text | Who performed the inspection |
| Inspector Title | Single line text | e.g. "Senior QC Inspector" |
| Supervisor Name | Single line text | Who approves the report |
| Supervisor Title | Single line text | e.g. "QA Manager" |
| Notes | Long text (rich text ON) | Inspector observations |
Checklist Table (linked, feeds the inspection results)
| Field Name | Field Type | Purpose |
|---|---|---|
| Check Point | Single line text | What was checked (e.g. "Body pressure test") |
| Specification | Single line text | Required value or range |
| Measured Value | Single line text | Actual measurement |
| Method | Single line text | Test method or standard (e.g. "ISO 5208") |
| Status | Single line text | "Pass" or "Fail" |
| Inspection | Link to Inspections | Links to the inspection |
Defects Table (linked, feeds the defects section)
| Field Name | Field Type | Purpose |
|---|---|---|
| Defect Number | Number | Sequential within the inspection |
| Description | Single line text | What the defect is |
| Location | Single line text | Where on the product |
| Severity | Single select | Critical, Major, Minor, Observation |
| Corrective Action | Single line text | Required action |
| Inspection | Link to Inspections | Links to the inspection |
The checklist and defects tables are rendered dynamically via linked-record loops (loop_0 and loop_1). Add as many rows as needed per inspection. In the template, reference fields by name: {{Inspection ID}}, {{Check Point}}, {{Severity}}, etc. No dot notation needed.
Pro Tip: Use Rollups for Defect Counts
Add a rollup field in your Inspections table to count linked defects by severity. This gives you "Critical Defects: 0, Major: 2, Minor: 3" data that can appear in your QC report summary.
Methods to Generate QC Reports in Airtable
| Method | Best For | Output Format | Multi-Page | Automation |
|---|---|---|---|---|
| Document automation (TypeFlow) | Professional client-facing reports | PDF (automatic) | Yes | Yes |
| Page Designer | Simple internal summaries | Print/PDF (manual) | No | No |
| Extensions (Chart, Summary) | Internal dashboards and metrics | On-screen only | N/A | No |
This guide focuses on document automation - the most reliable approach for shareable, audit-ready QC reports.
Why Page Designer Falls Short for QC Reports
Airtable Page Designer works for simple single-page documents but struggles with QC reporting requirements:
- One record at a time - Manual export for each inspection
- No multi-page support - Can't handle detailed defect lists
- Limited defect tables - Linked records don't display as proper line items
- No automation - Every report requires manual generation
Why Extensions Are for Dashboards, Not Reports
Chart and Summary extensions are excellent for internal monitoring - tracking pass rates, defect trends, and inspection volumes. But they're on-screen only. You can't export them as formatted PDF reports for clients or auditors.
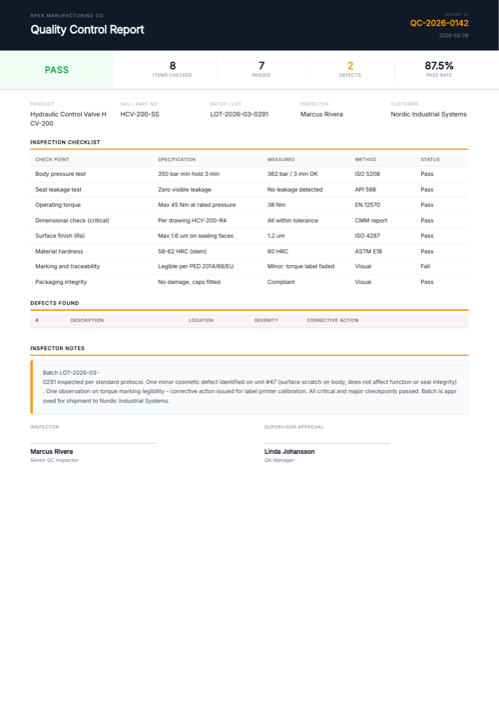
Here's an example QC report generated from Airtable inspection data with TypeFlow, including checklist results and defect tracking. Click to open the full PDF, or duplicate the demo base:
Ready-to-use template
Quality Control Report
Duplicate the Airtable base, paste the template in Typeflow, then generate your first PDF in minutes.
Free tier available • No credit card required
How to Create QC Reports From Airtable With TypeFlow
Step 1: Create a QC Report Template in Google Docs
Create your QC report template in Google Docs using {{variable}} placeholders where Airtable data should appear.
Example QC report template:
QUALITY CONTROL REPORT

Report ID: {{Inspection_ID}}
Date: {{Inspection_Date}}
Inspector: {{Inspector}}

─────────────────────────────────────────

PRODUCT INFORMATION

Product: {{Product.Name}}
SKU: {{Product.SKU}}
Batch/Lot: {{Batch_Number}}
Customer: {{Product.Customer.Name}}

─────────────────────────────────────────

INSPECTION RESULTS

Overall Status: {{Pass_Fail}}

| Test | Specification | Result | Status |
{{loop_0}}
| {{Test_Name}} | {{Specification}} | {{Measured_Value}} | {{Test_Status}} |

─────────────────────────────────────────

DEFECTS FOUND

{{loop_1}}
Defect #{{Defect_ID}}
Description: {{Description}}
Location: {{Location}}
Severity: {{Severity}}
Corrective Action: {{Corrective_Action}}

─────────────────────────────────────────

NOTES

{{Notes}}

─────────────────────────────────────────

APPROVAL

Inspector Signature: ____________________
Date: ____________________

Supervisor Approval: ____________________
Date: ____________________
Variable types:
| Variable Type | Example | Source |
|---|---|---|
| Direct field | {{Inspection_Date}} | Inspections table |
| Linked record | {{Product.Name}} | Products table via link |
| Test results loop | {{loop_0}} | Test Results linked table |
| Defects loop | {{loop_1}} | Defects linked table |
The {{loop_0}} and {{loop_1}} syntax creates repeating rows for each linked record - essential for QC reports with multiple tests and defects.
Step 2: Connect TypeFlow to Your Airtable Base
-
Sign in to your TypeFlow account
-
Click "Start a new automation workflow"
-
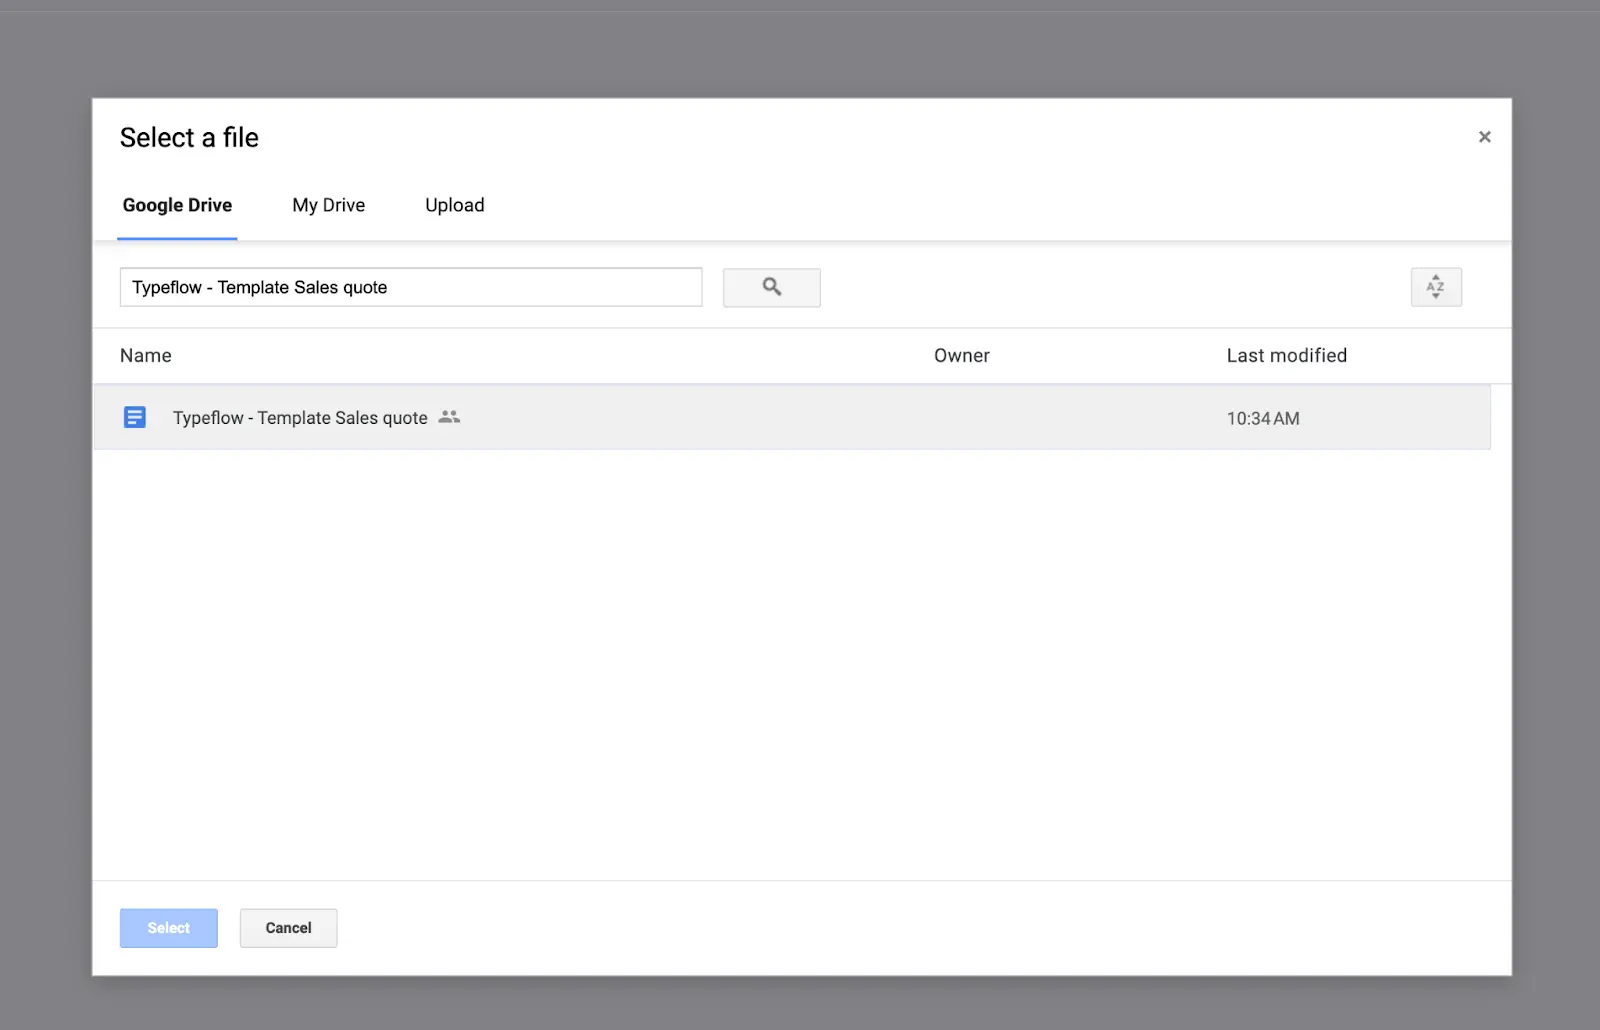
Select "Google Docs" and choose your QC report template
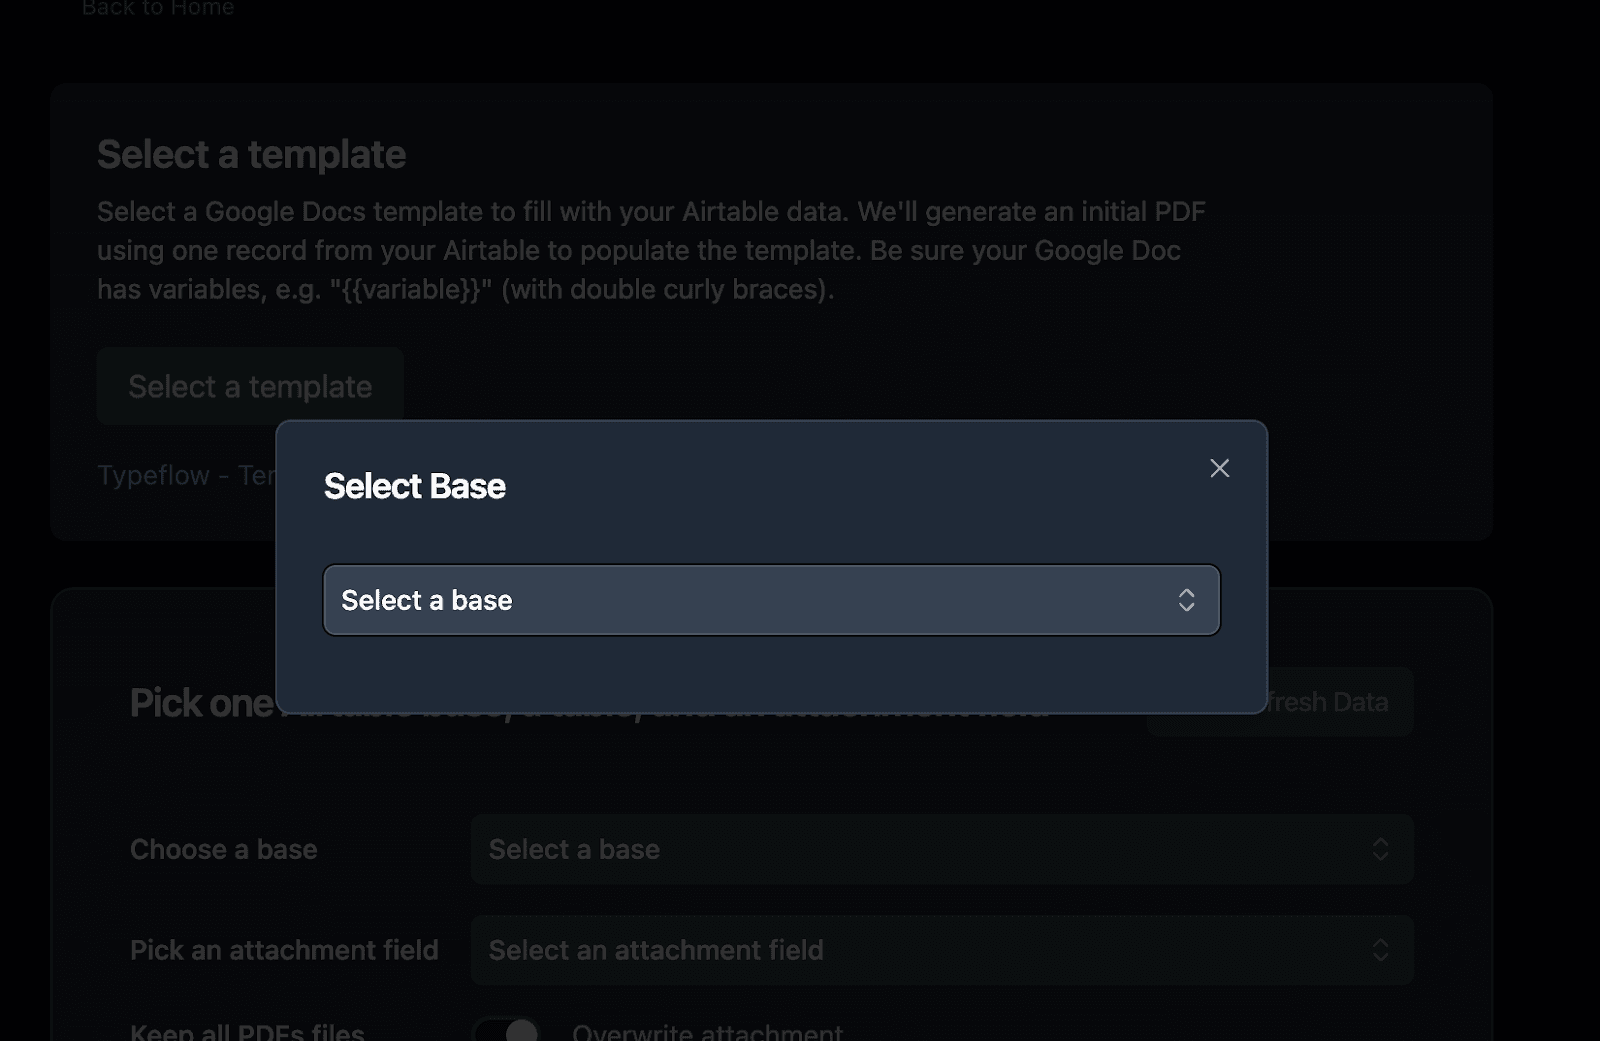
- Connect to Airtable and select your base
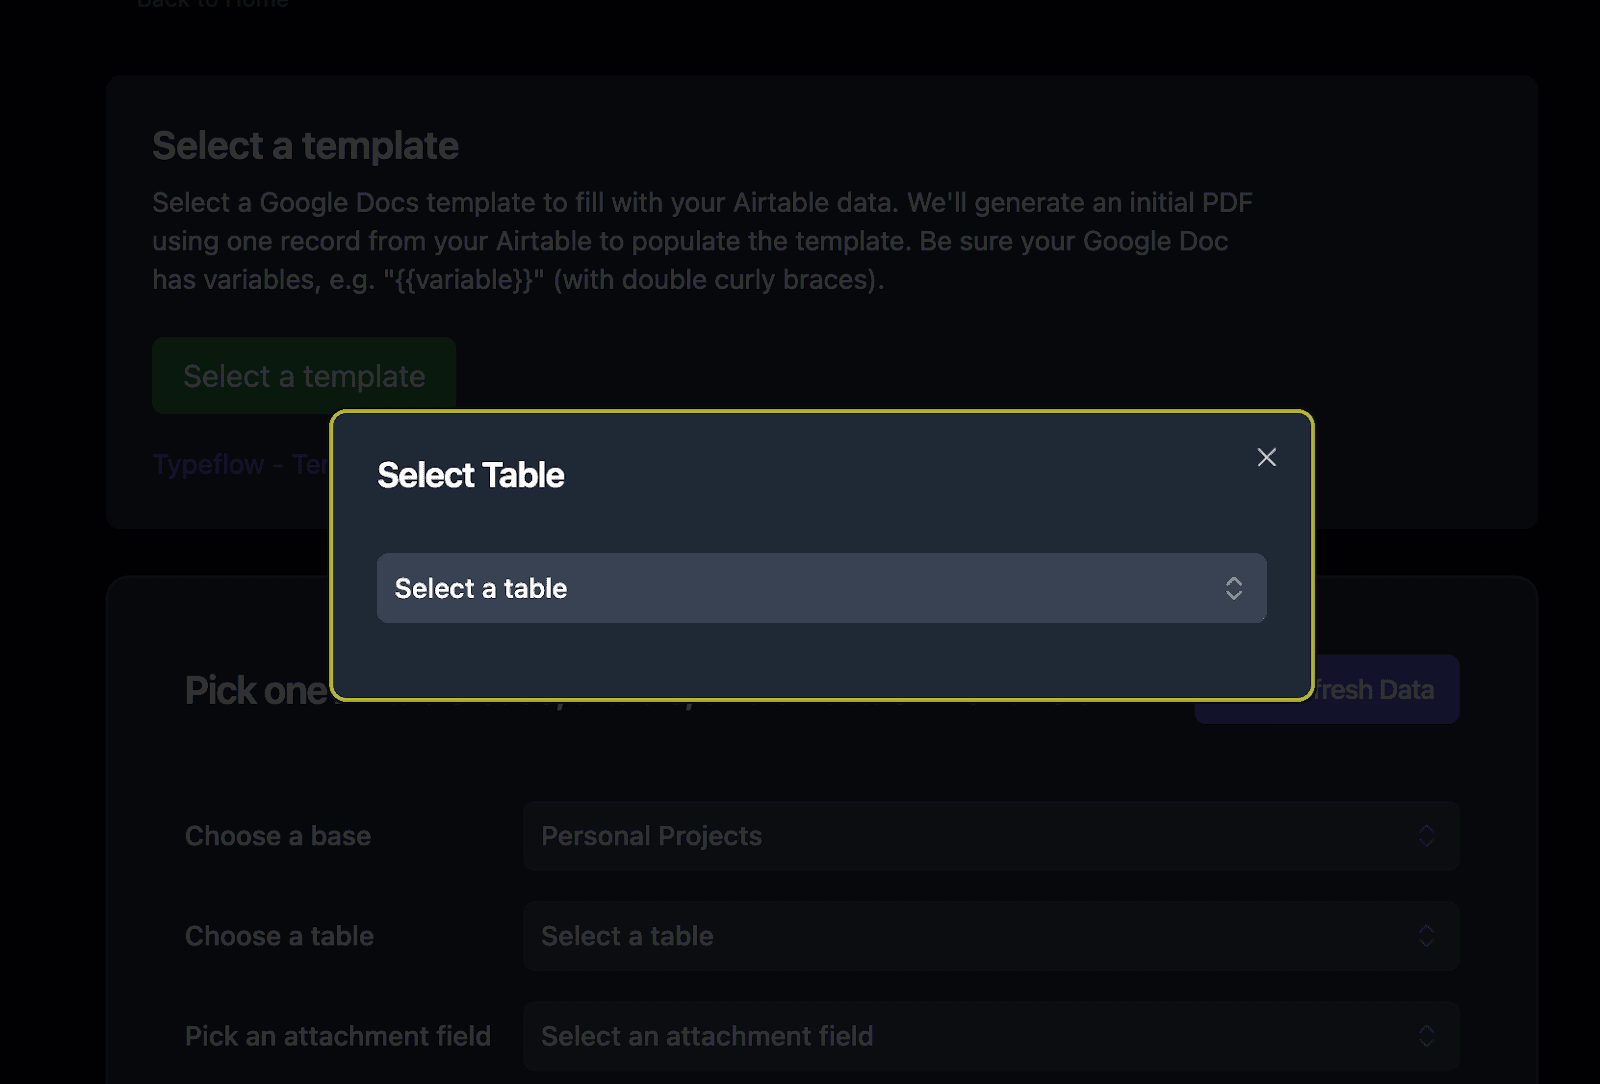
- Select your Inspections table
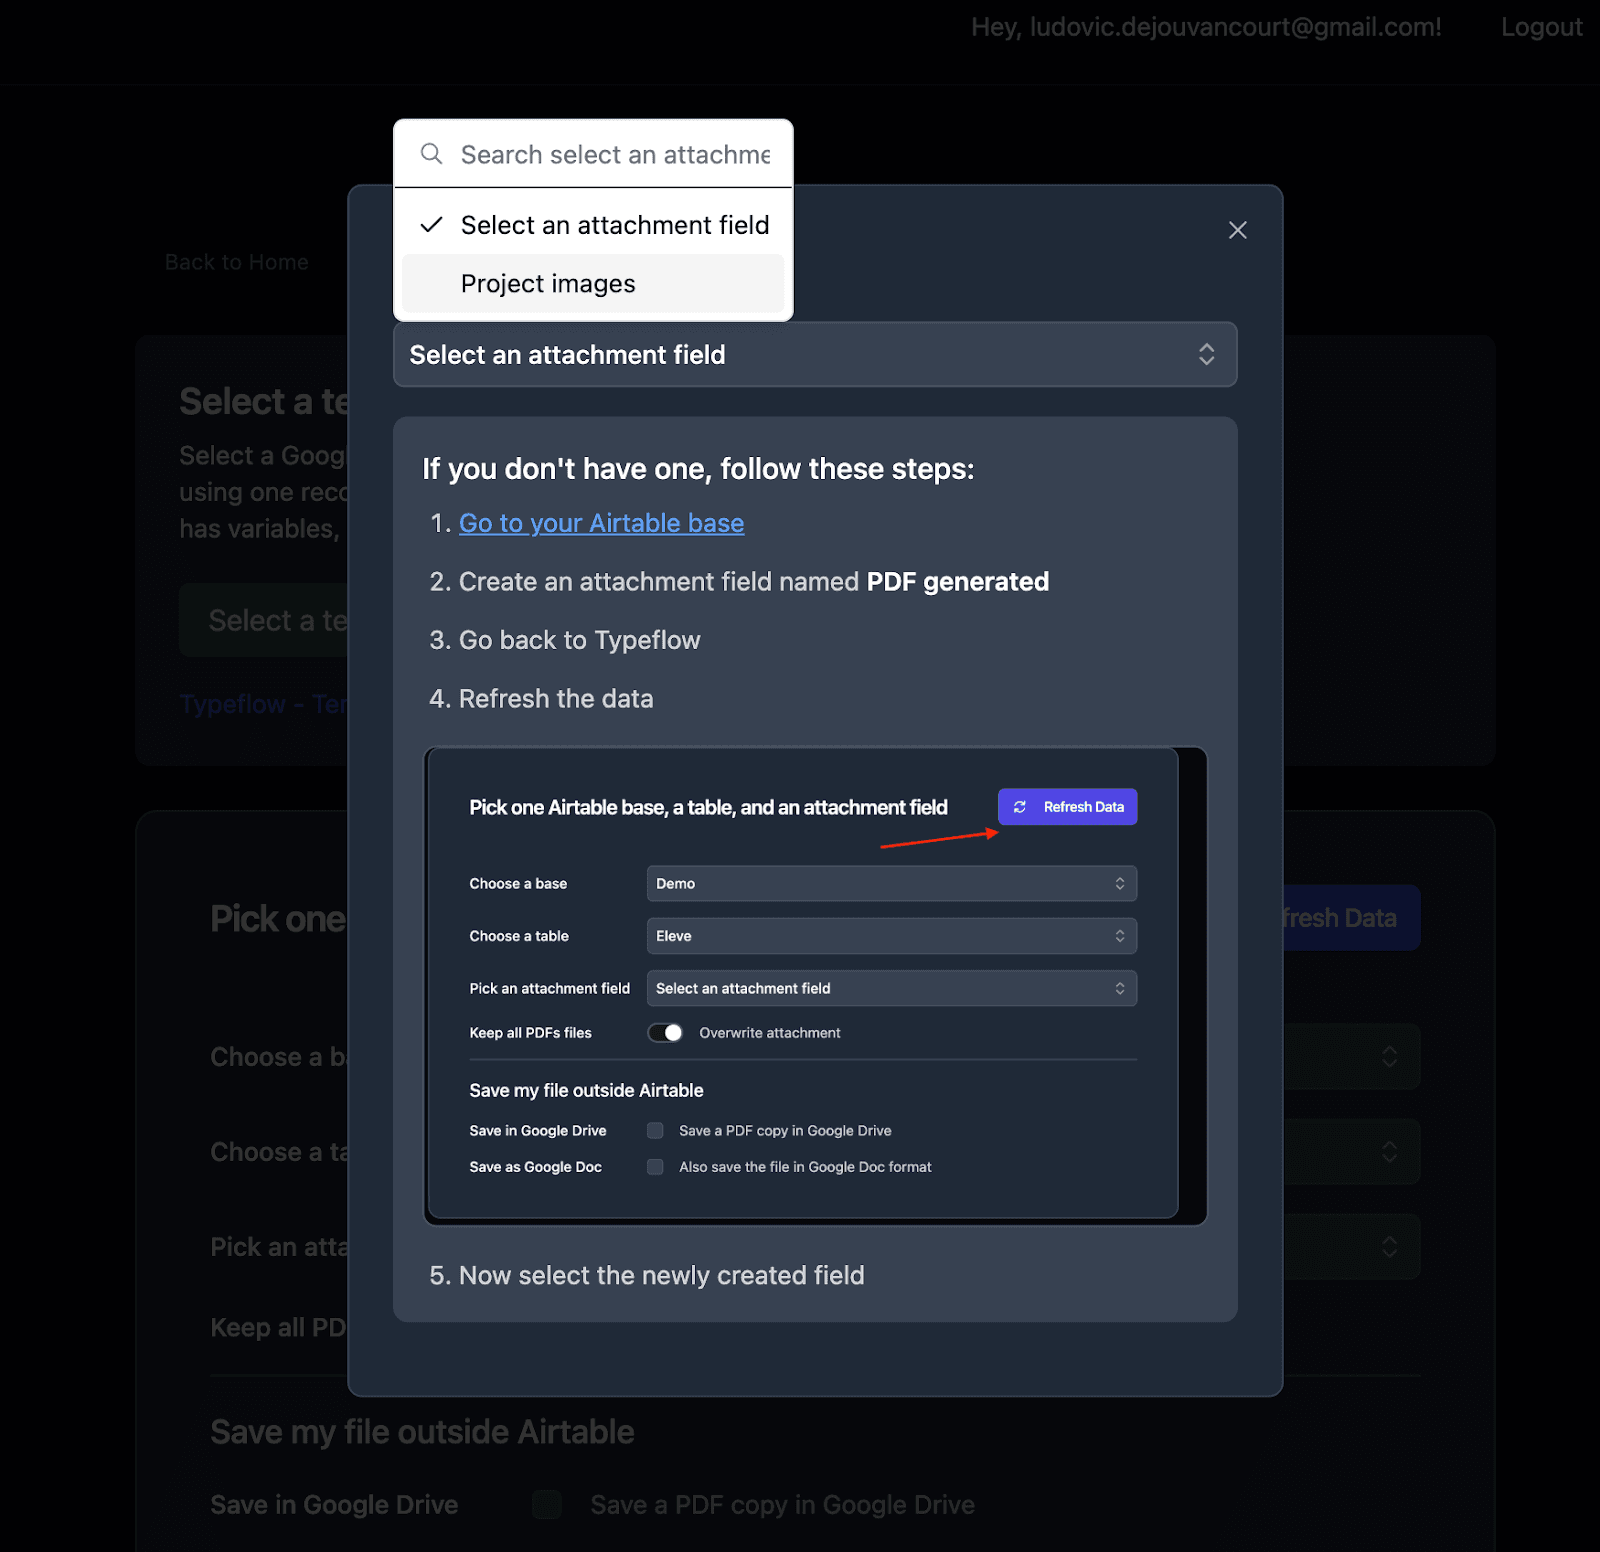
- Set up the attachment field where generated PDFs will be saved
Step 3: Map Airtable Fields to Template Variables
TypeFlow automatically detects all {{variables}} in your template. Connect each one to the corresponding Airtable field.
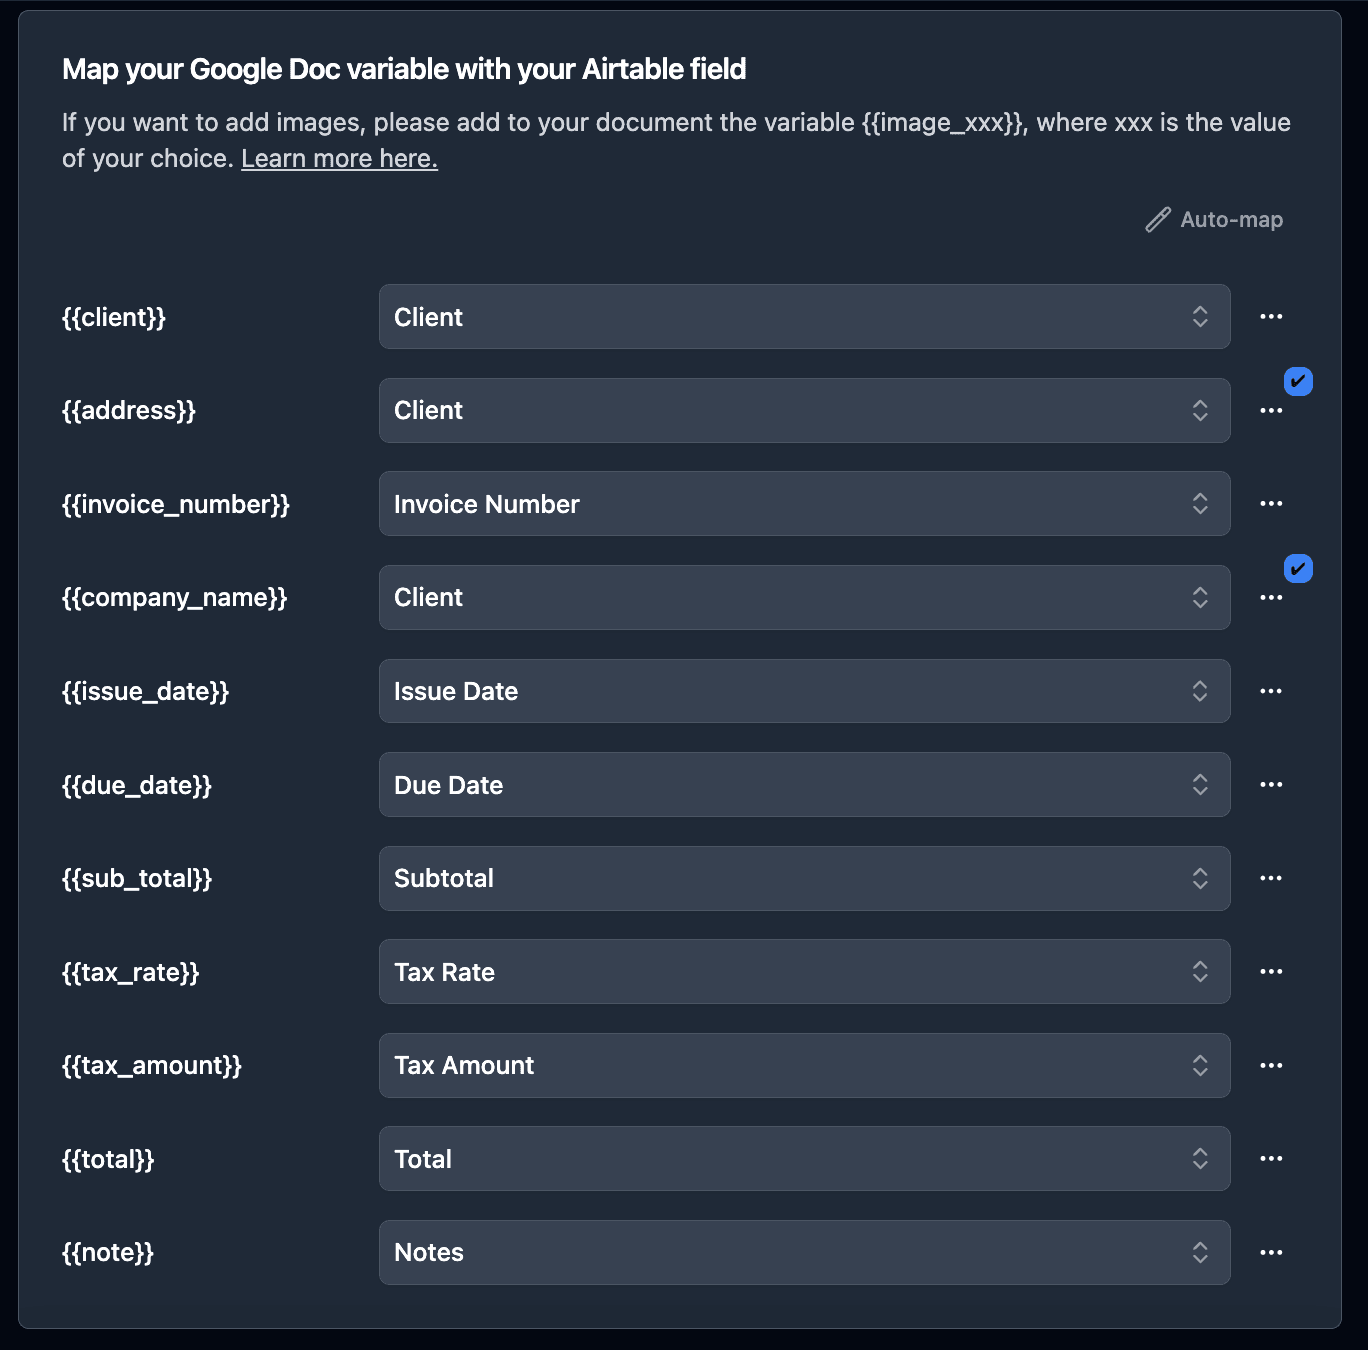
Mapping direct fields:
{{Inspection_ID}}→ Inspection ID field{{Inspection_Date}}→ Inspection Date field{{Pass_Fail}}→ Pass/Fail field
Mapping linked product fields:
For product details, click "Configure Linked Fields" to access nested data:
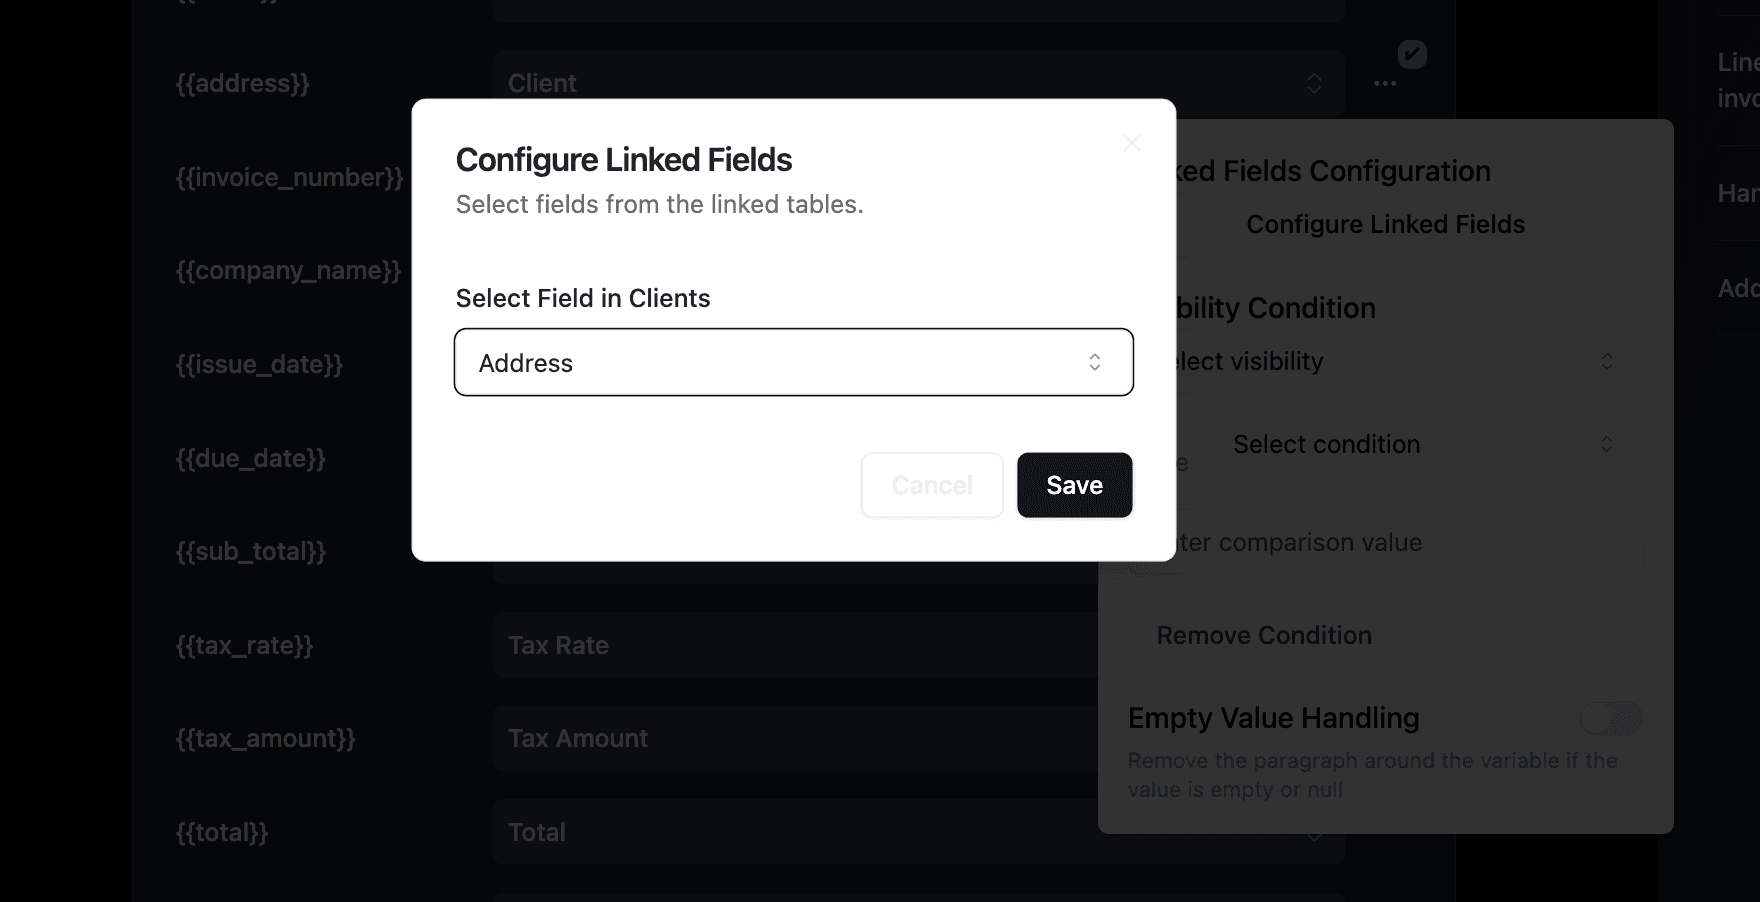
Navigate through: Inspection → Product → Name, SKU, Customer
Mapping defect line items:
For the defects list (loop_1), select your linked Defects field:
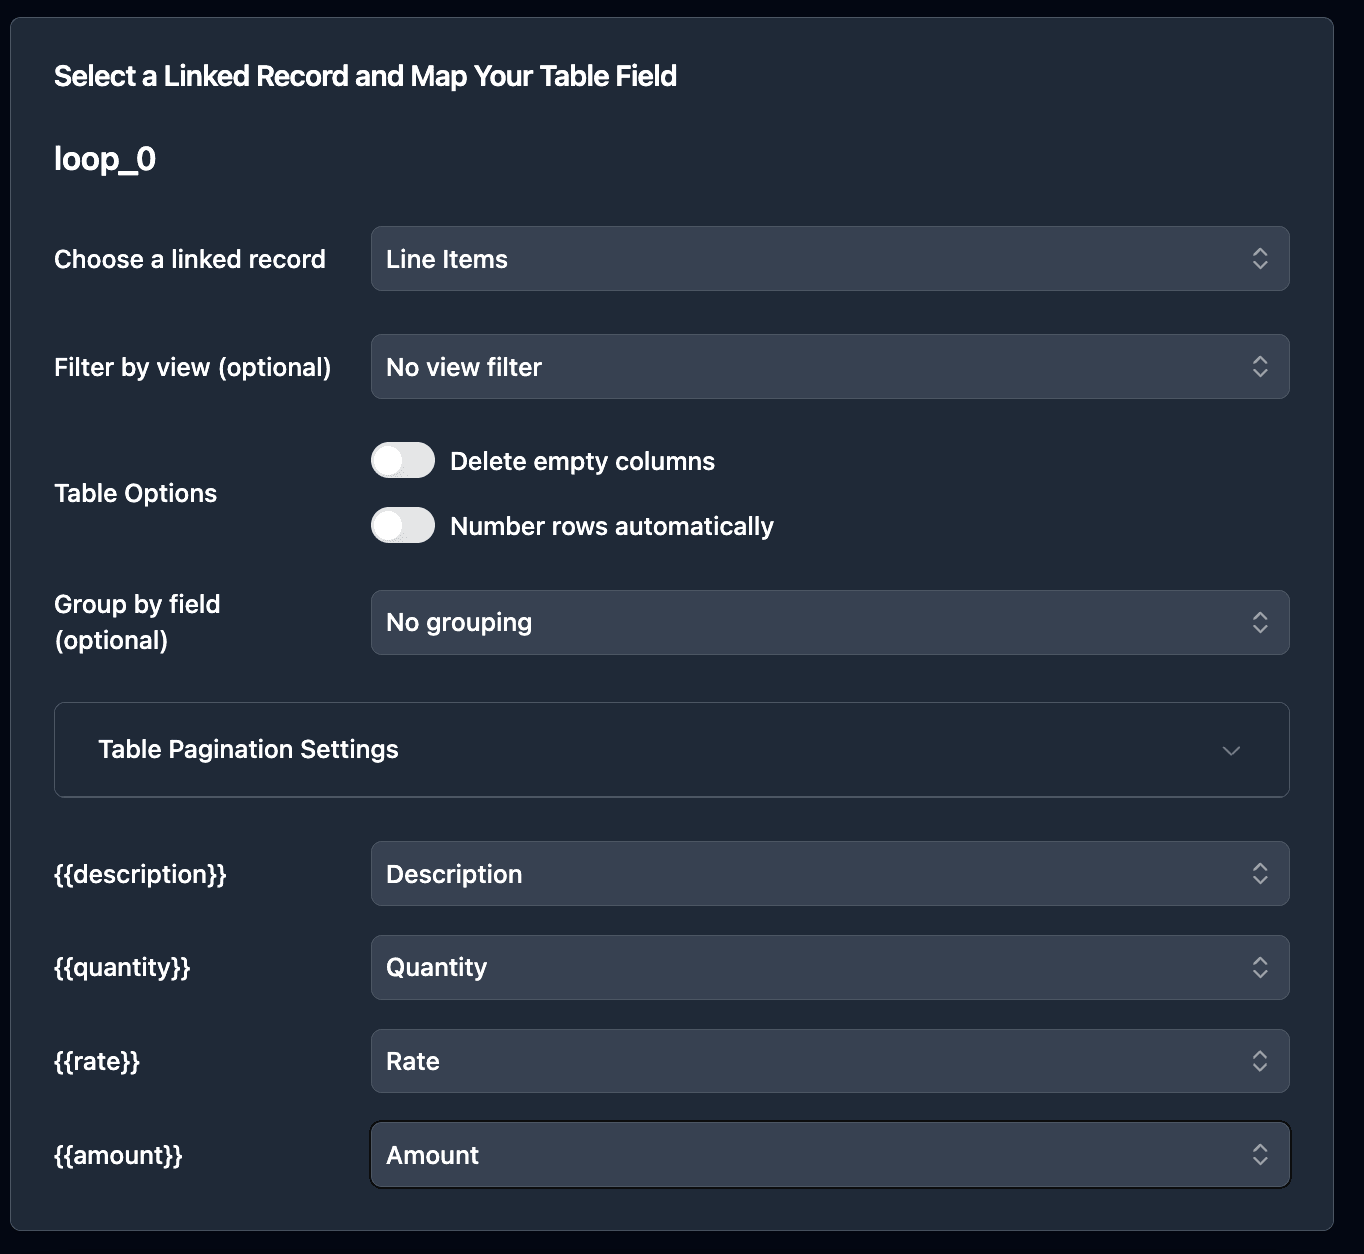
Each linked defect becomes a section in your QC report with description, severity, and corrective action.
Pro Tip: Include Defect Photos
Map attachment fields from your Defects table to image placeholders in your template. Each defect's photo appears directly in the report, providing visual evidence for auditors and clients.
Step 4: Configure Output Settings
Set a custom filename format for easy identification:
QC-{{Inspection_ID}}-{{Product.Name}}-{{Inspection_Date}}
This generates filenames like QC-2026-001-Widget-2026-03-30.pdf.
How to Generate QC Reports
Once your flow is configured, you have three ways to generate QC reports depending on your workflow needs.
Option 1: Manual Generation with Button Field
Add a button field to your Inspections table for quick one-click generation:
- In Airtable, create a new Button field called "Generate QC Report"
- Set the action to "Open URL"
- In TypeFlow, copy the generation URL from your flow settings
- Paste the URL in the button configuration
Click the button on any inspection record to generate the PDF instantly. The document saves to your attachment field within seconds.
Best for: Inspectors generating reports after completing inspections, testing your flow before automation, or inspections requiring manual review before report generation.
Option 2: Bulk Generation for Audits
When auditors request all QC reports for a date range or product line, generate them all at once.
- Install the TypeFlow extension from Airtable's extension marketplace
- Enter your API key (found in your flow settings)
- Filter your view to the inspections needed
- Select all records
- Click Generate
The extension creates PDFs for all selected records and saves them to your configured attachment field. Generate hundreds of QC reports in one action.
Best for: Audit preparation, customer documentation packages, or end-of-week report batches.
Option 3: Automated Generation with Airtable Automations
Full automation removes manual steps entirely. Trigger QC report generation automatically when inspections are completed.
According to Gartner research, 80% of executives believe automation can be applied to any business decision. QC report generation is a prime candidate.
In this example, we'll trigger the automation when an inspection status changes to "Complete."
-
Go to Automation in Airtable
-
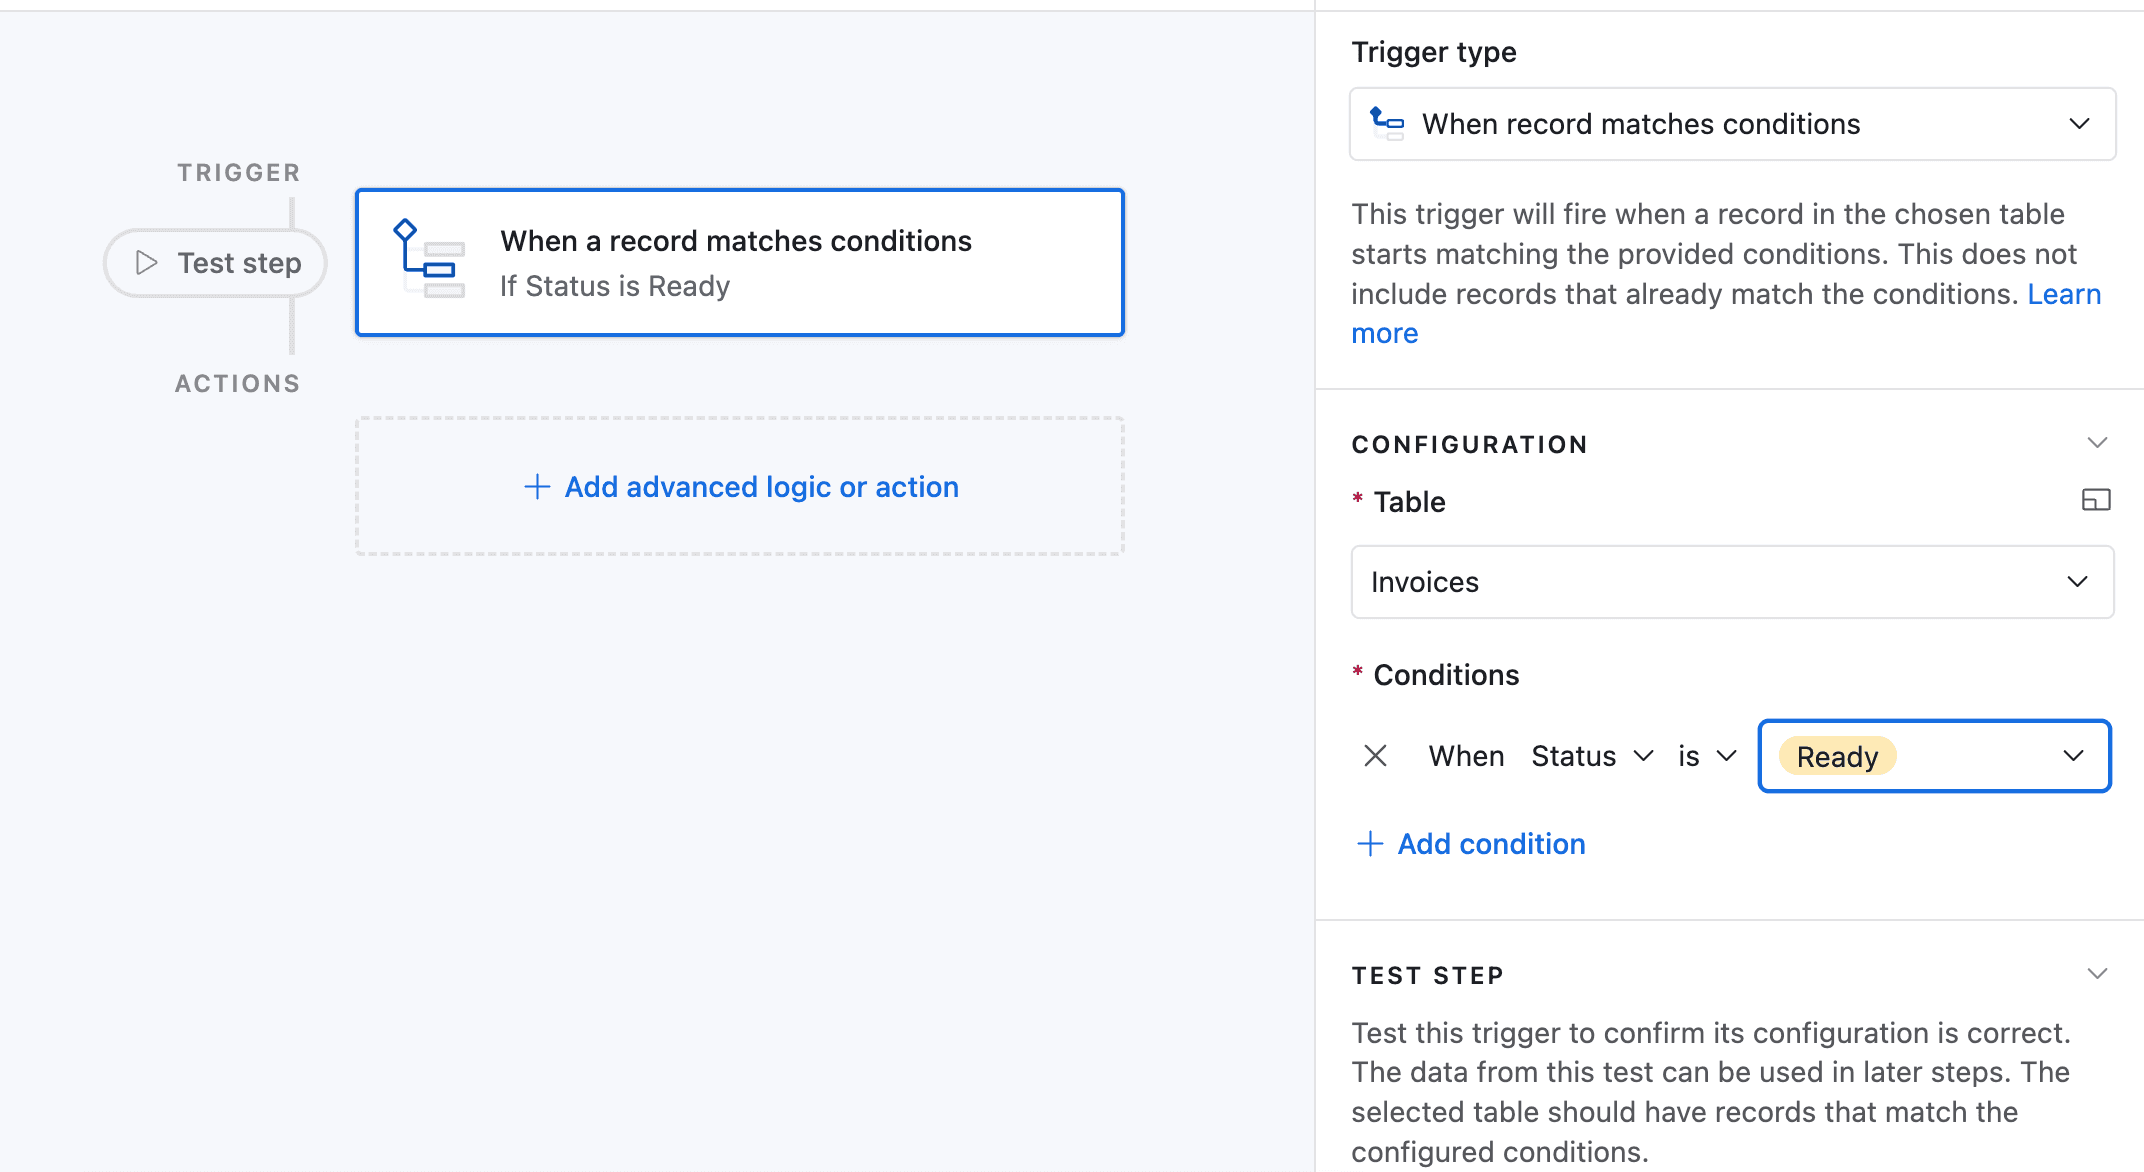
Click on "Add a trigger" and choose When a Record matches a condition
-
Select the table you want to trigger the automation on (in this case the Inspections table)
-
Select the field you want to trigger the automation on (in this case the Status field)
-
Select the condition you want to trigger the automation on (in this case "is")
-
Select the value you want to trigger the automation on (in this case "Complete")
-
Now choose a record that matches the condition
-
Click on Add an advanced logic or action
-
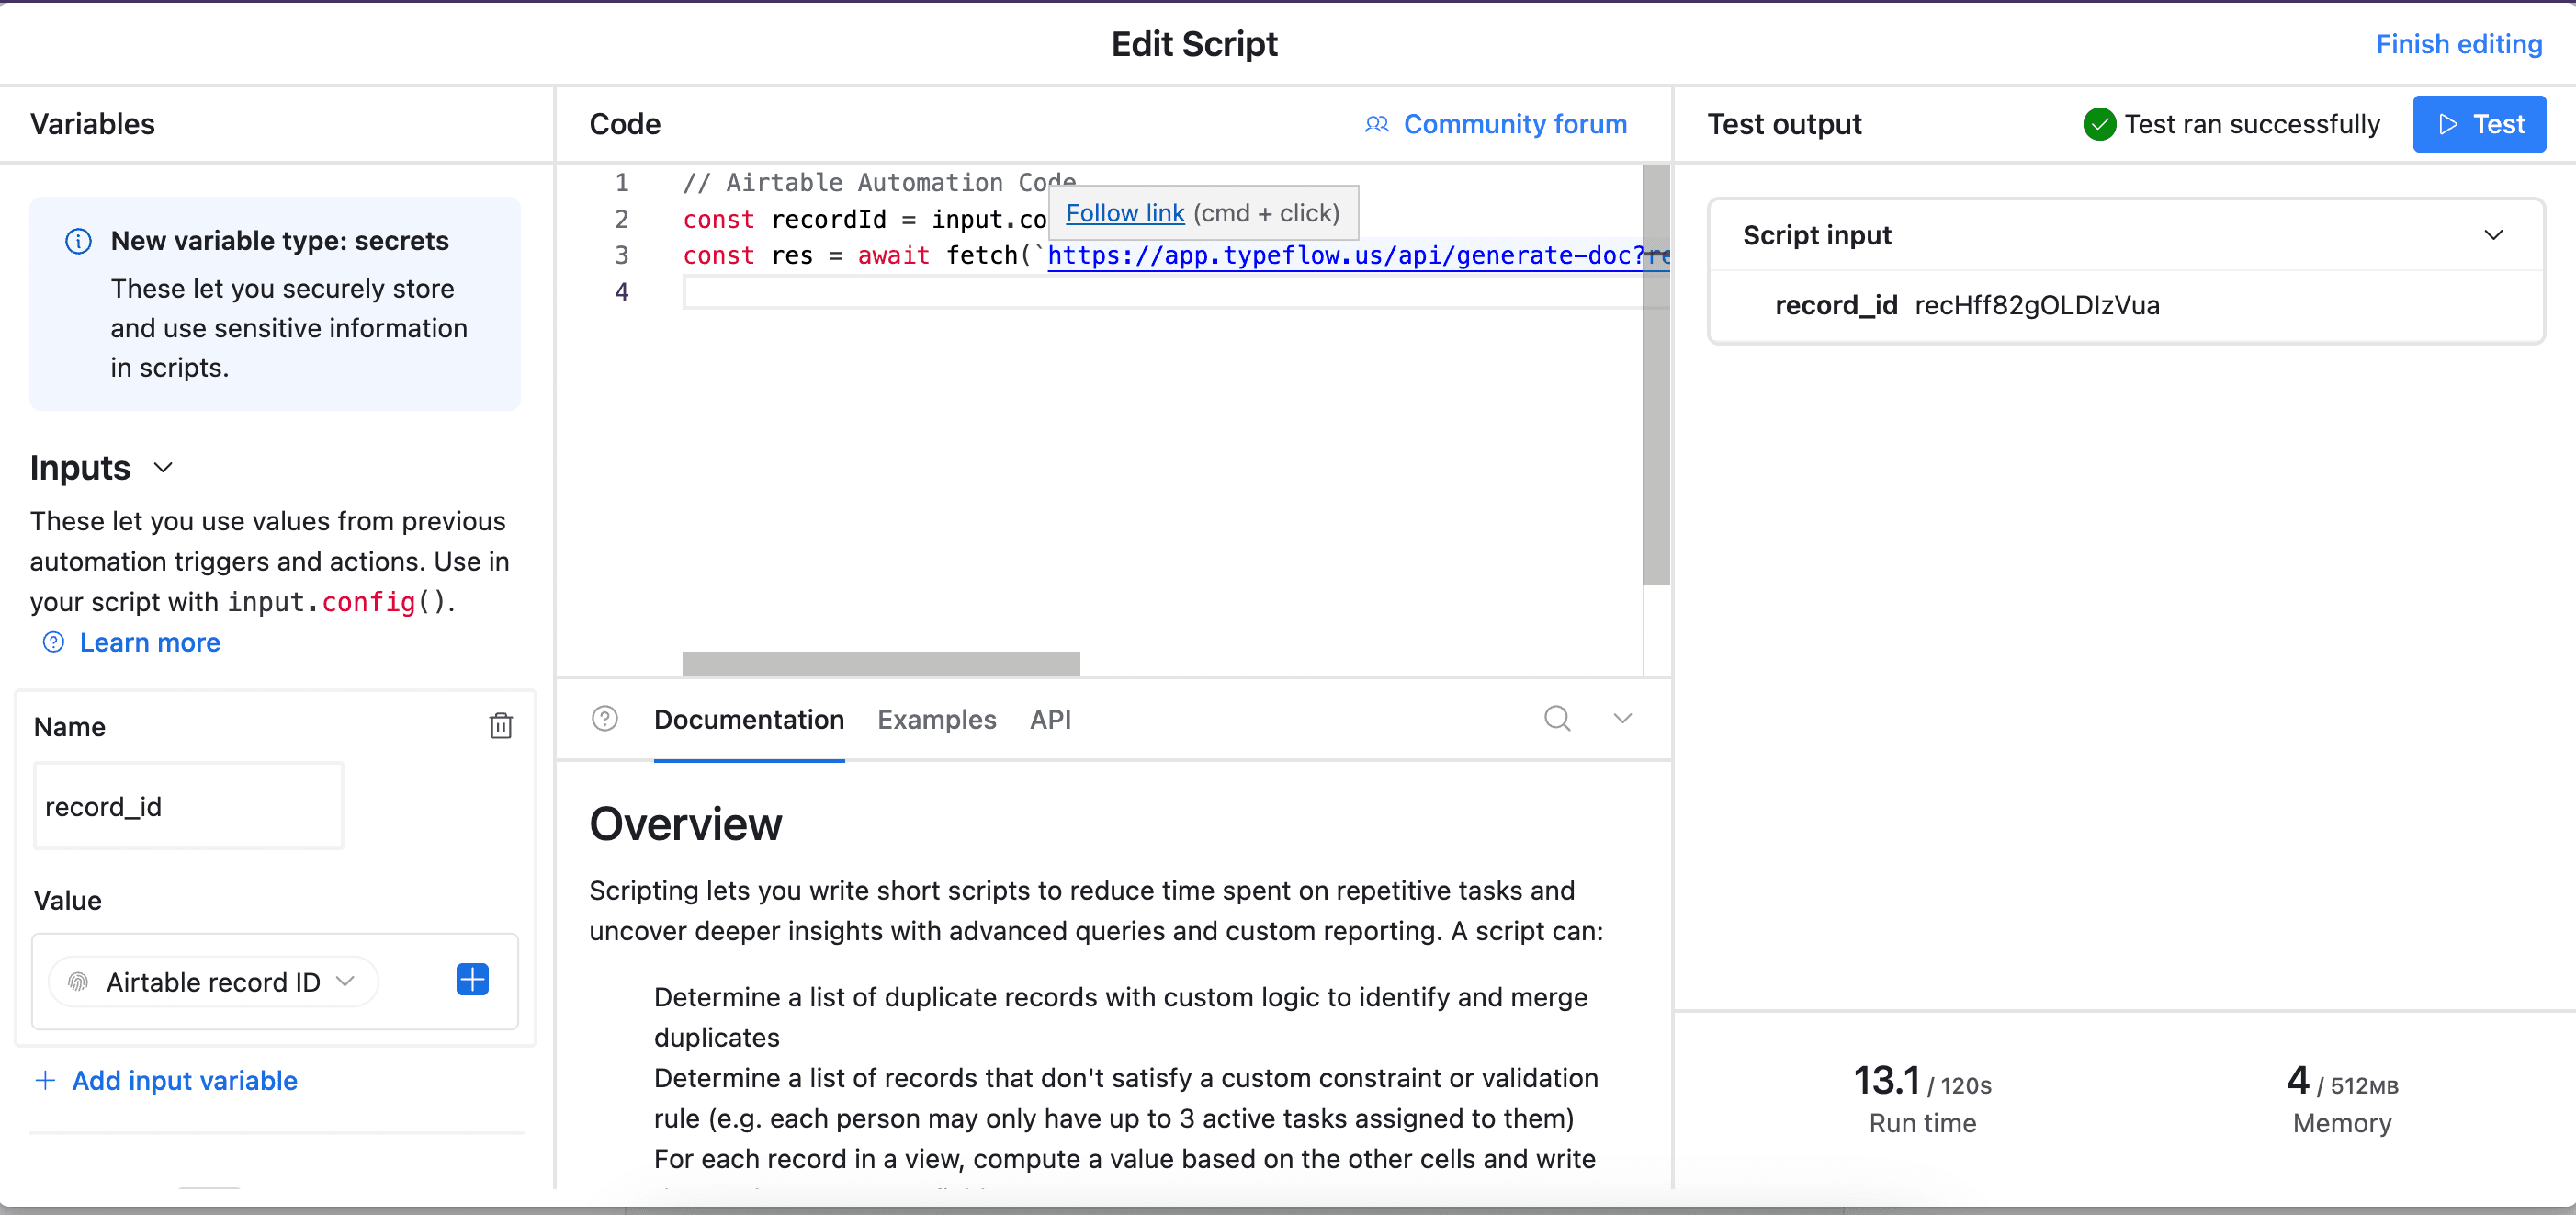
Pick Run Script. A new popup appears.
-
Go back to TypeFlow and select Automation in Airtable. Copy the script.
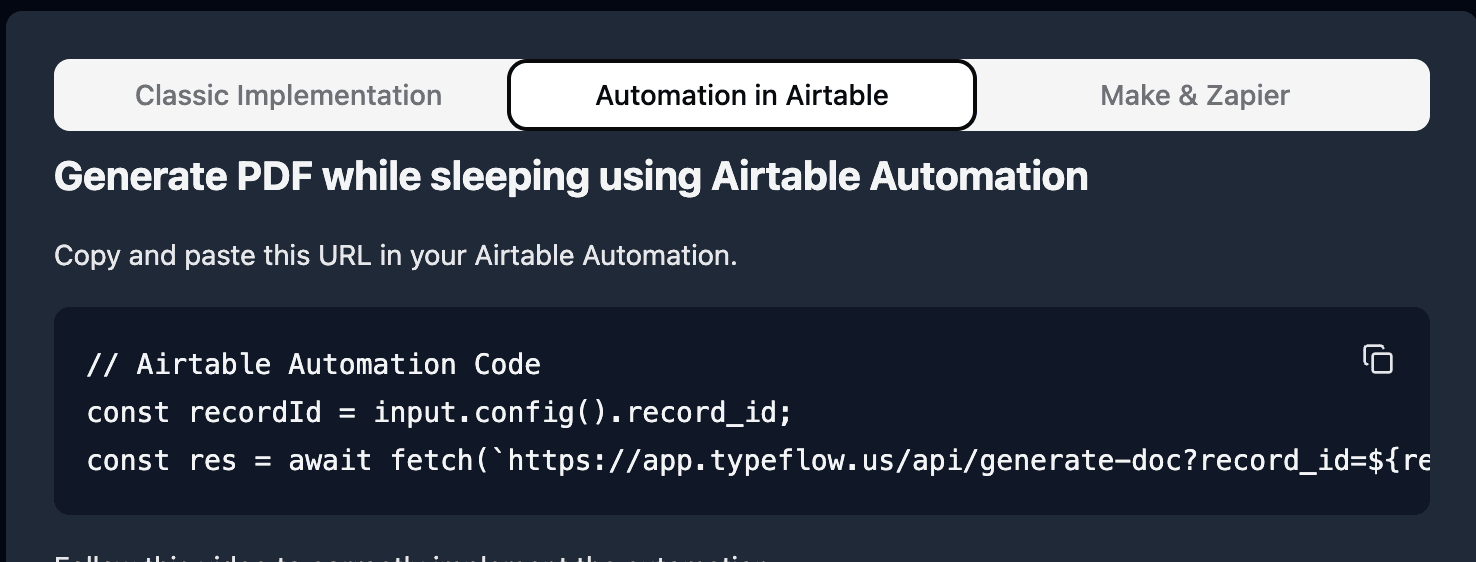
- Paste the script in the popup.
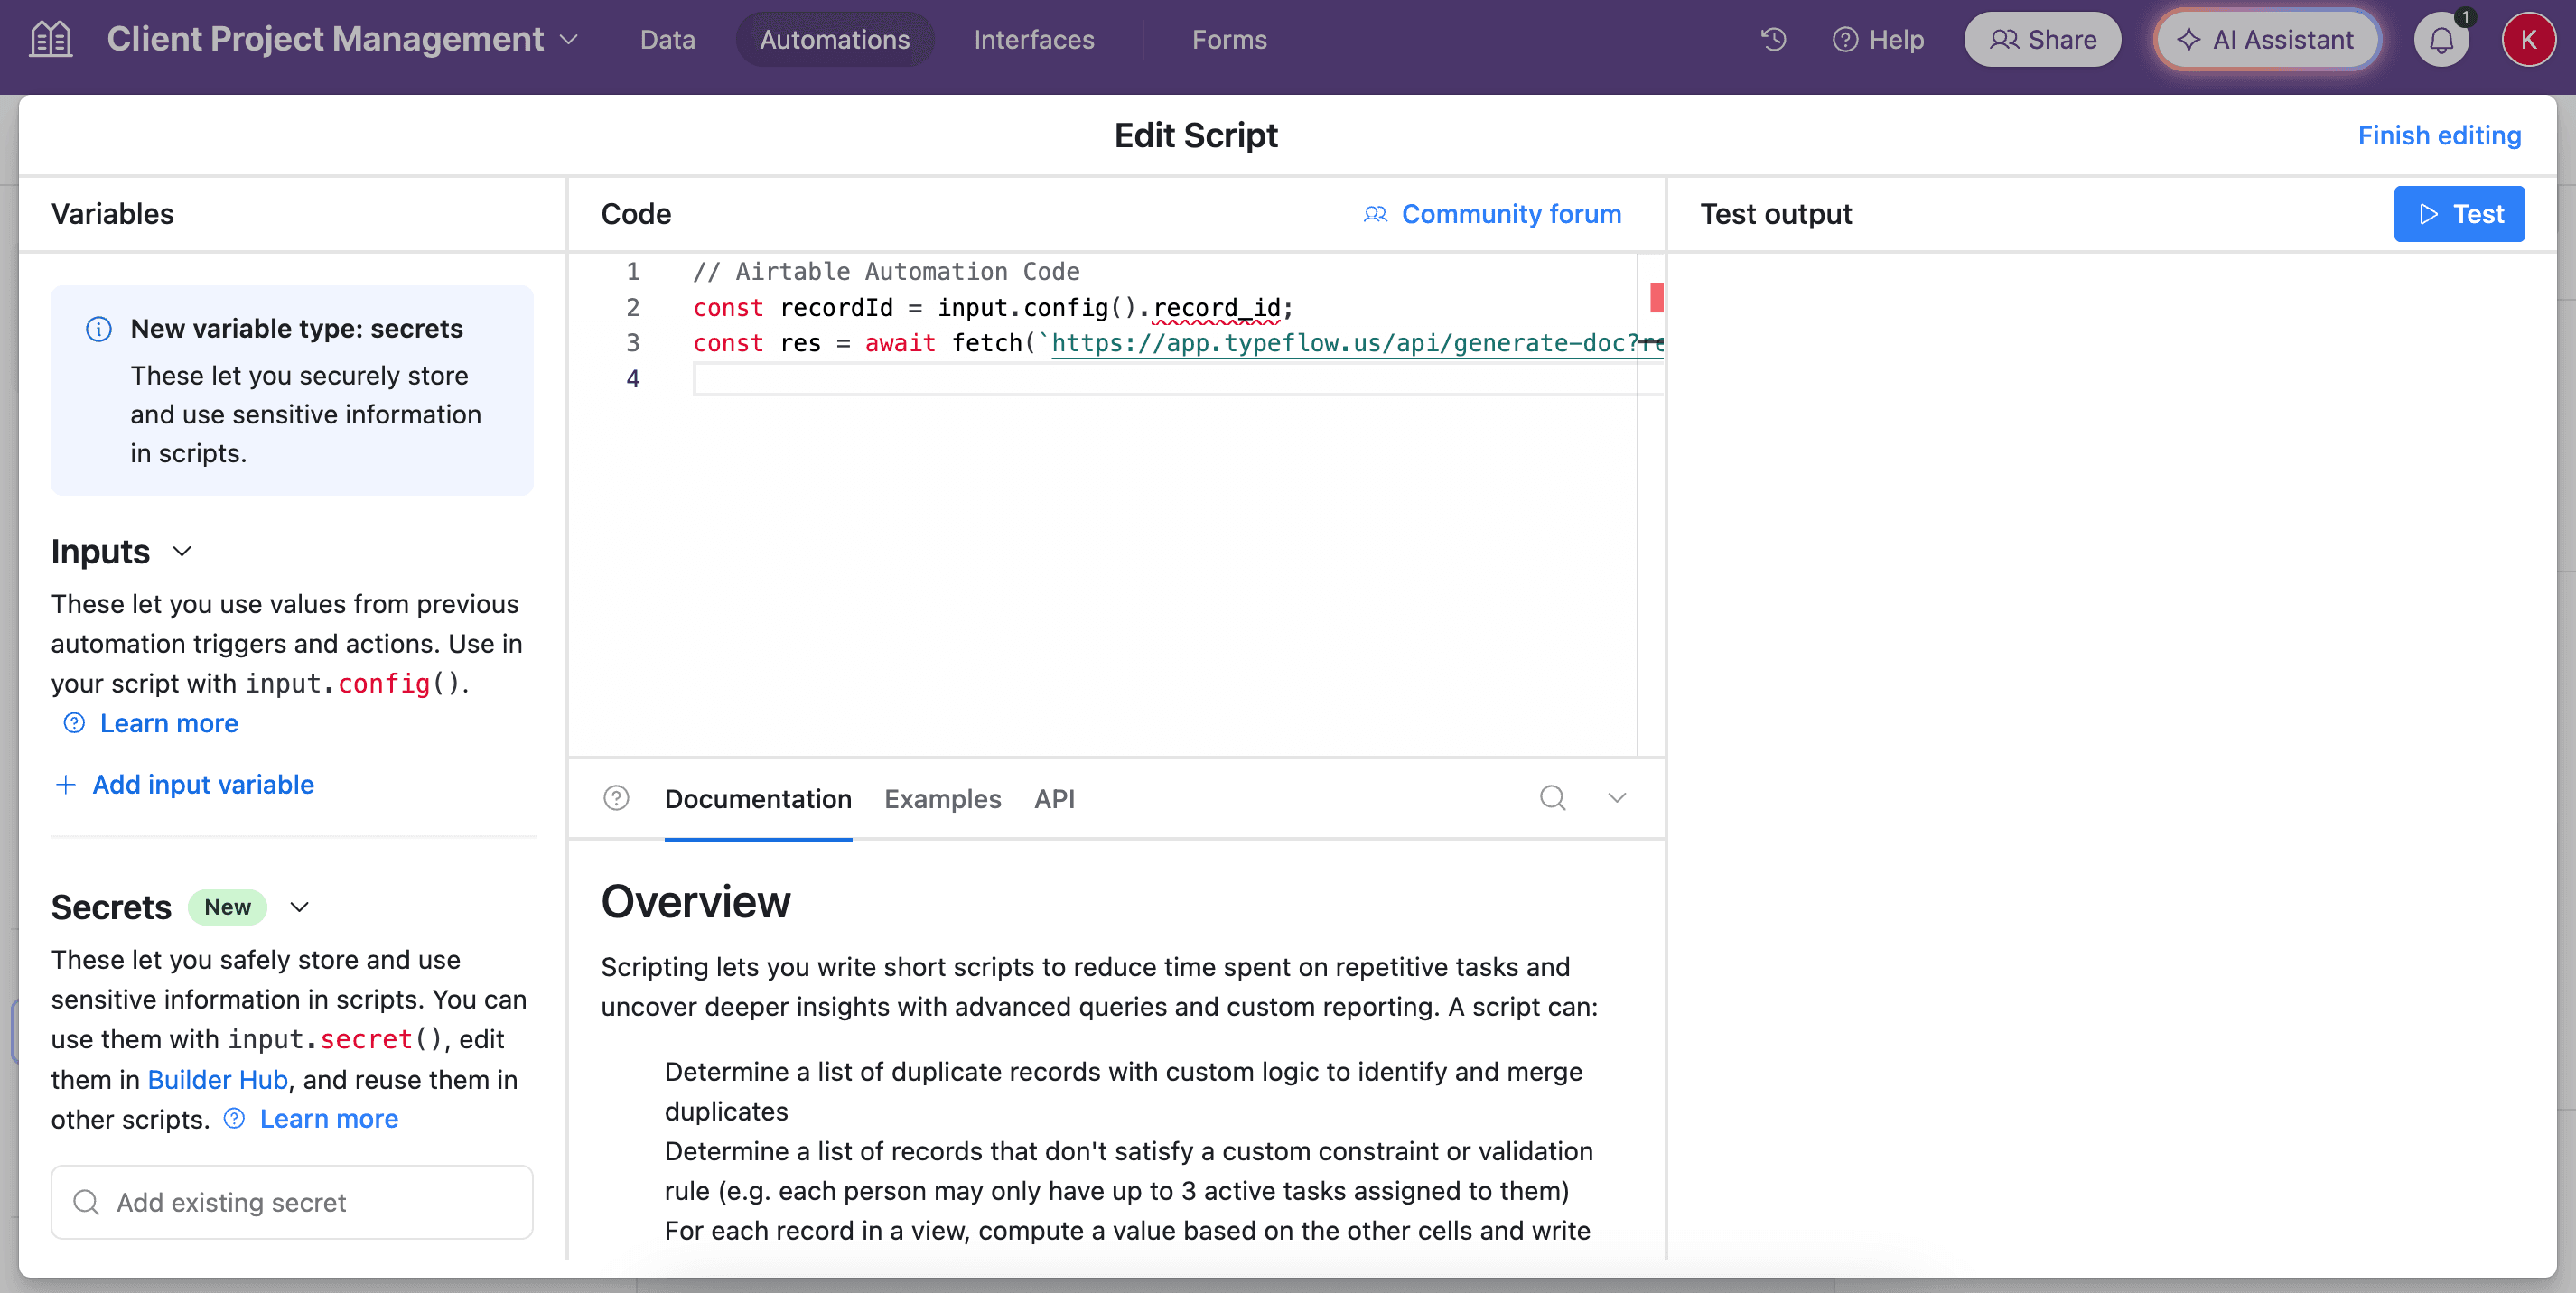
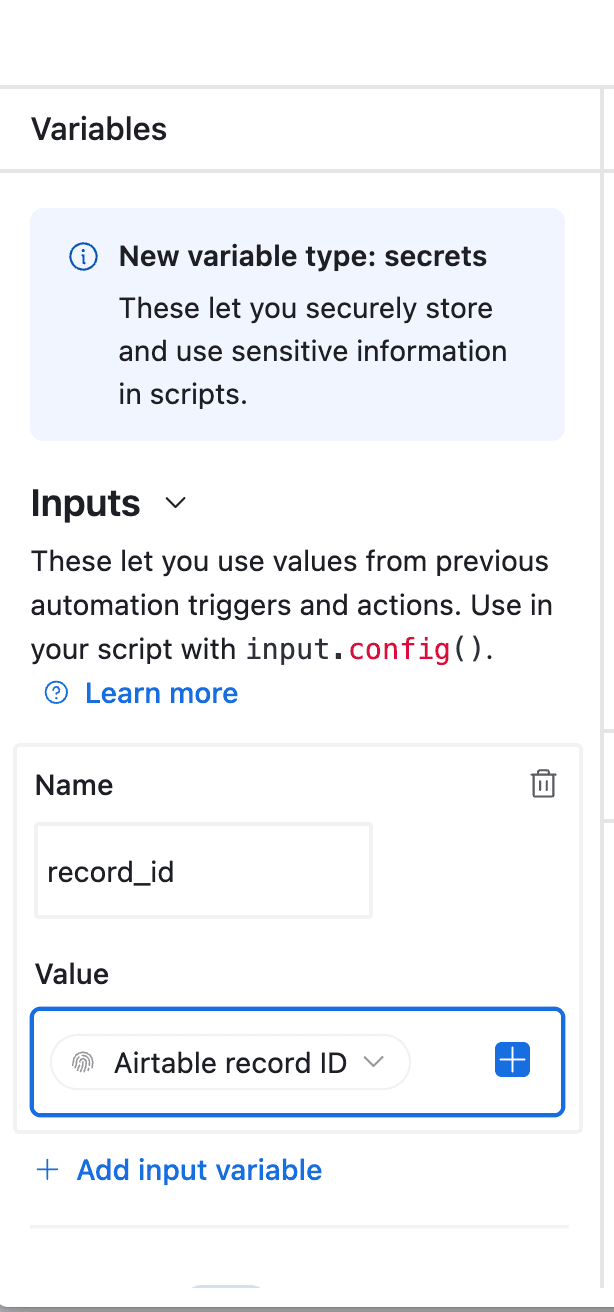
- In the left-side of the popup, configure the variable input
record_id. Select Airtable Record ID from the dropdown.
- Test your script and verify it works. Most errors come from the record_id variable not being configured correctly (see step 12).
Best for: High-volume inspection workflows, real-time report generation as inspections complete, or compliance requirements needing immediate documentation.
Sending QC Reports to Stakeholders
Once your QC report PDF is generated, you can automatically distribute it. TypeFlow includes integrated email delivery.
- Open your flow and click the Email tab
- Toggle Enable Email Delivery to ON
- Set the Recipient to your Customer Email or QA Manager field from Airtable
- Configure subject:
QC Report {{Inspection_ID}} - {{Product.Name}}
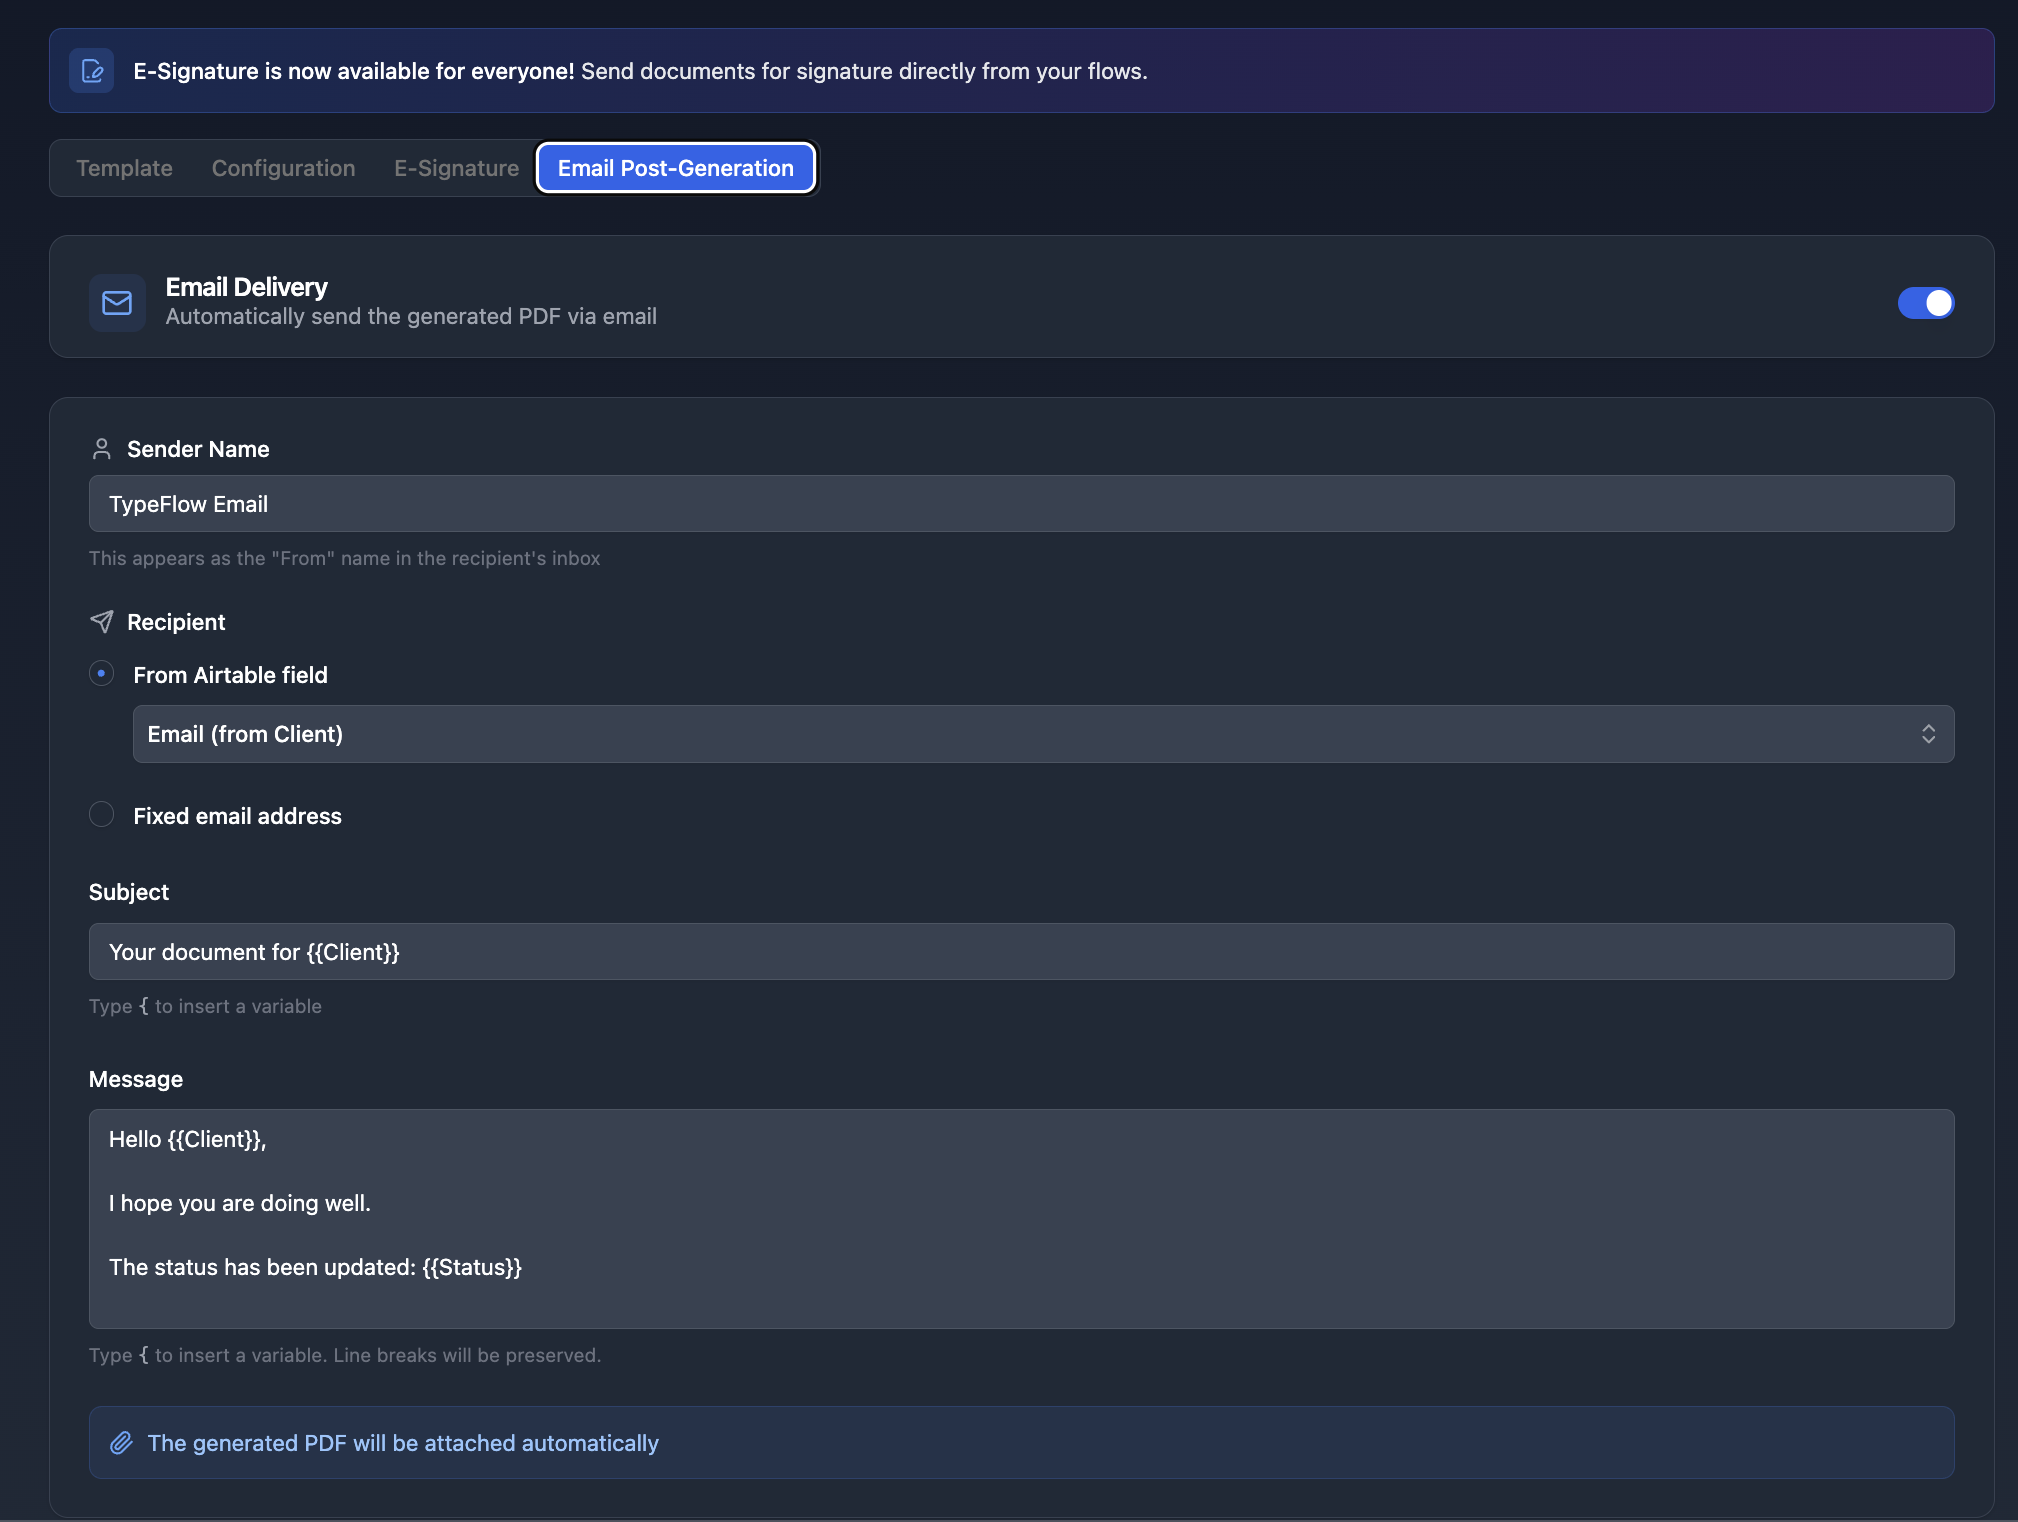
After each generation, the QC report is automatically sent as a PDF attachment. Works with all three generation methods.
Use cases:
- Send to customers with each shipment alongside a certificate of conformity
- Email to QA managers for review and approval
- Distribute to production teams for corrective actions
- Archive to compliance department
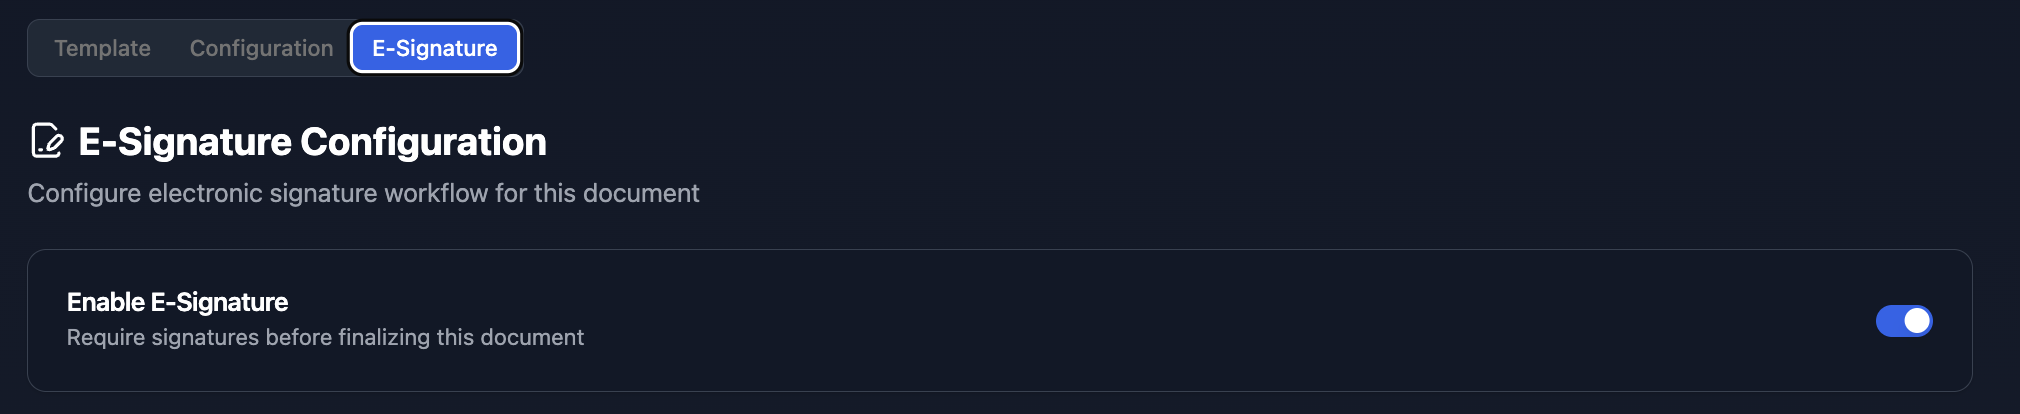
Adding E-Signatures to QC Reports
Many QC reports require formal sign-off for compliance and audit trails. TypeFlow includes built-in e-signature that is legally compliant under eIDAS and the ESIGN Act.
Single Signer Workflow
For inspector-only sign-off:
INSPECTOR APPROVAL

Signature: {{e-signature.signature_1}}
Name: {{e-signature.text_1}}
Date: {{e-signature.date_1}}
Enable e-signature in TypeFlow, configure the signer, and the inspector receives an email to sign digitally.
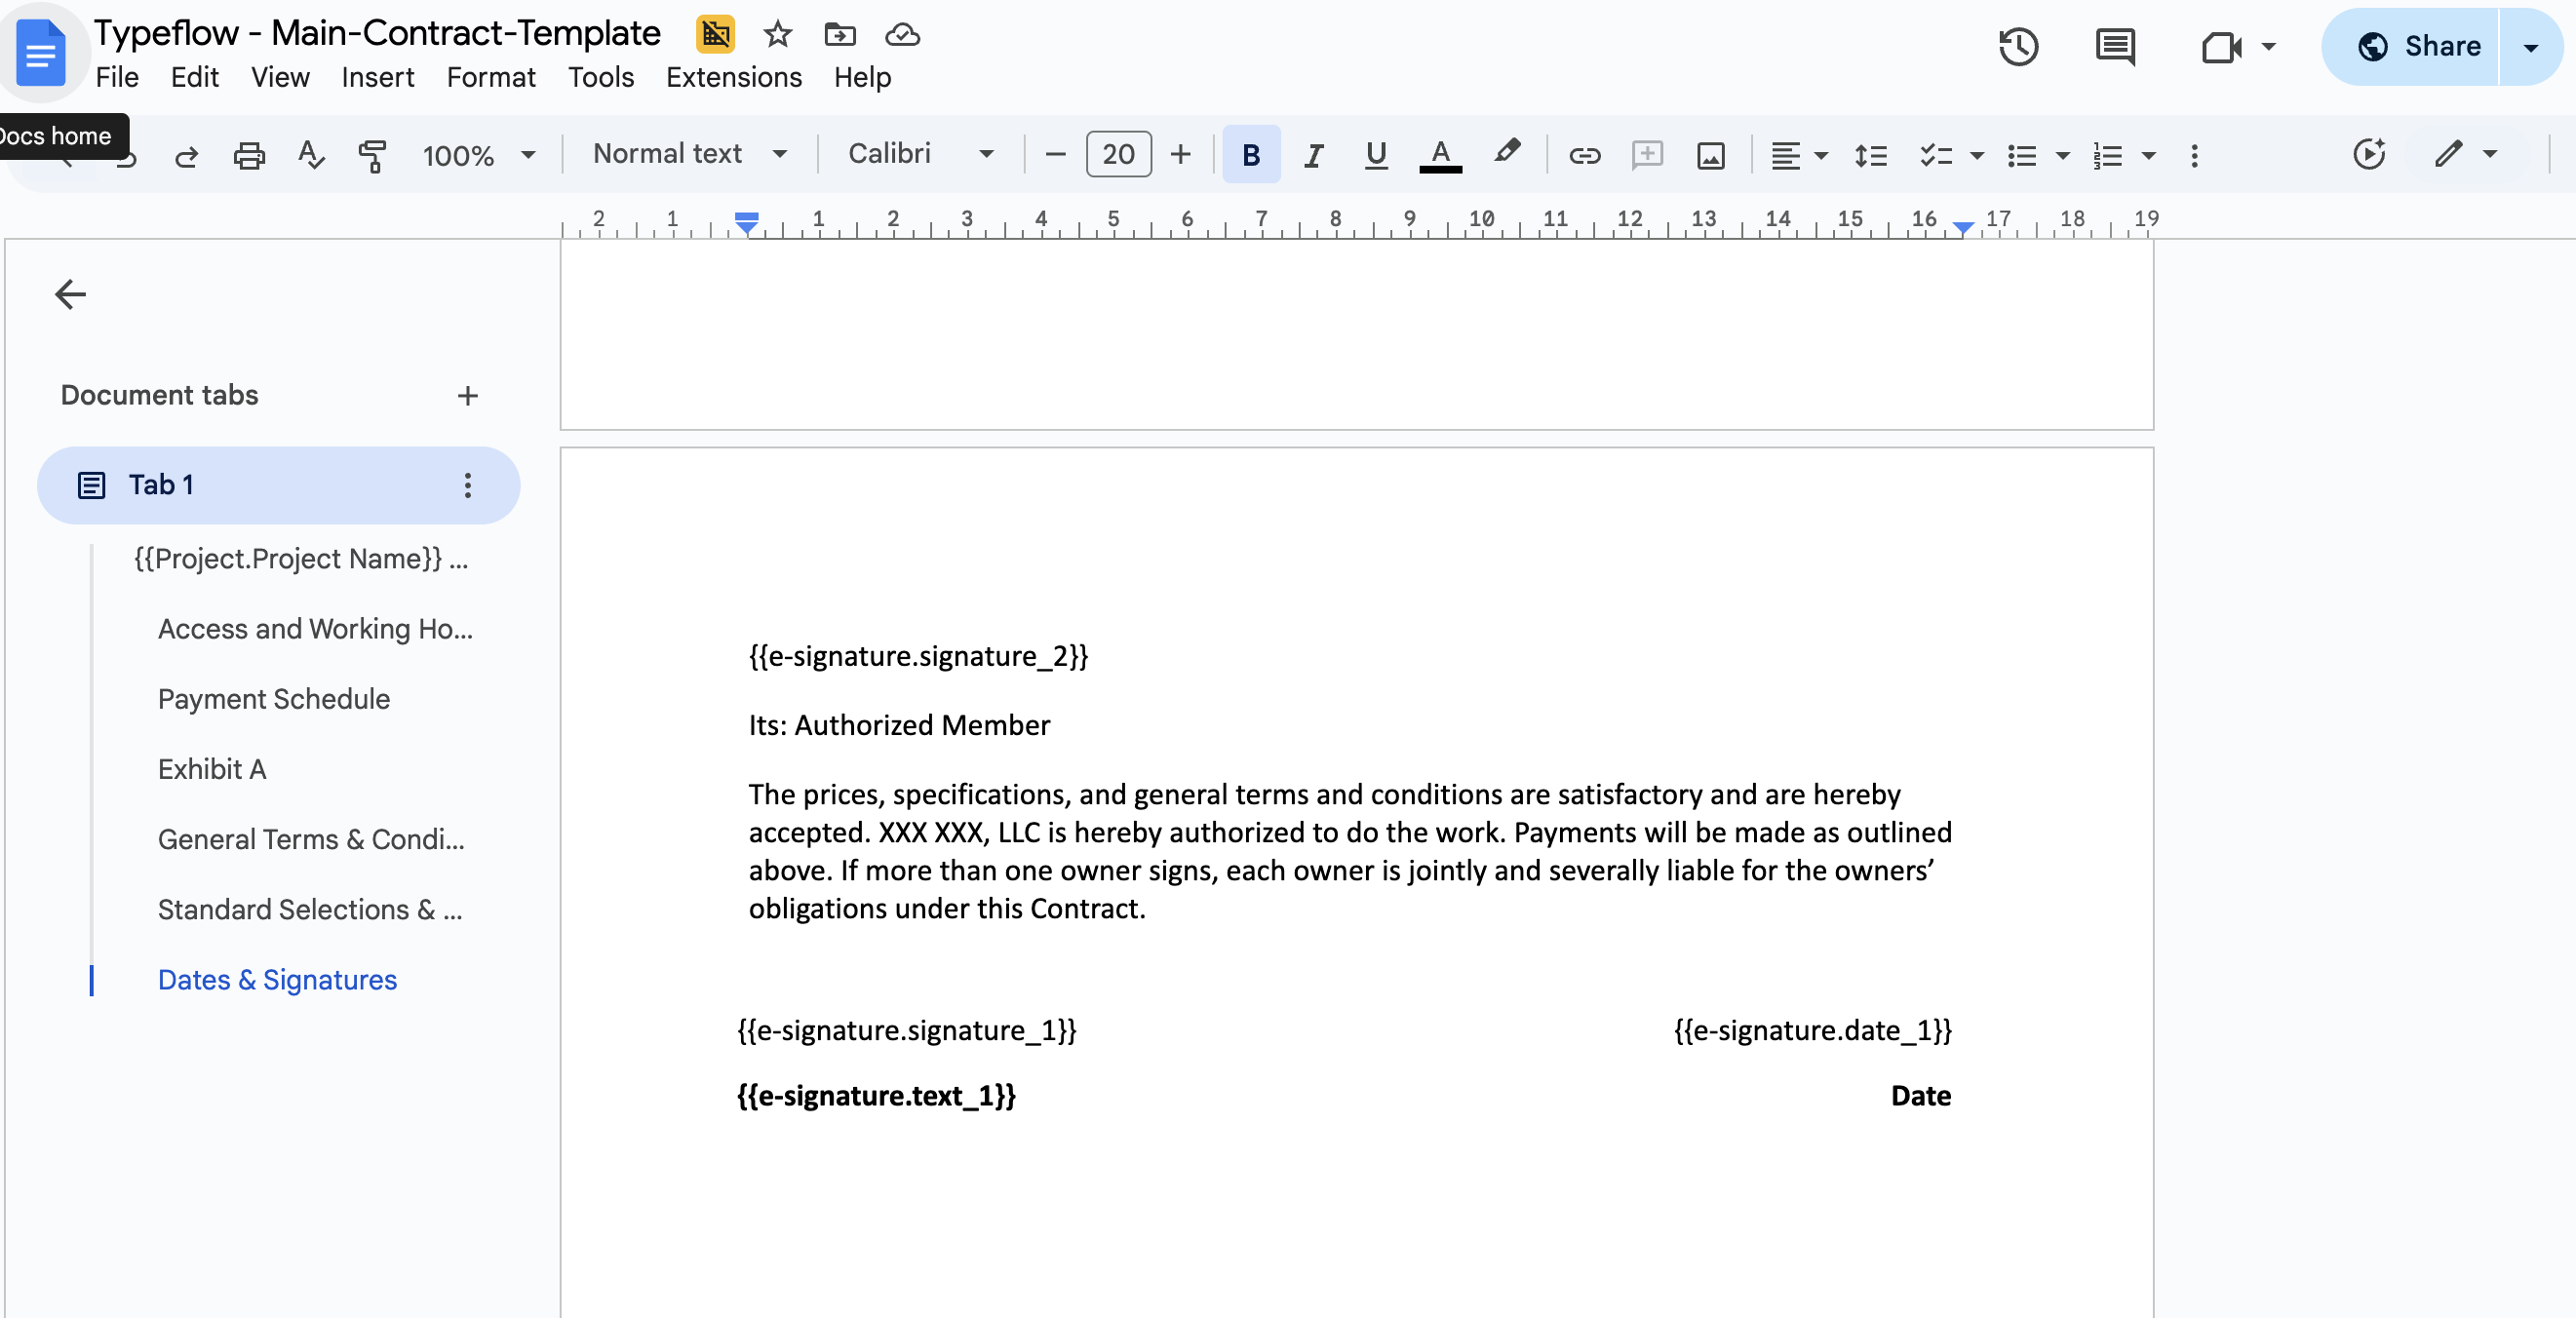
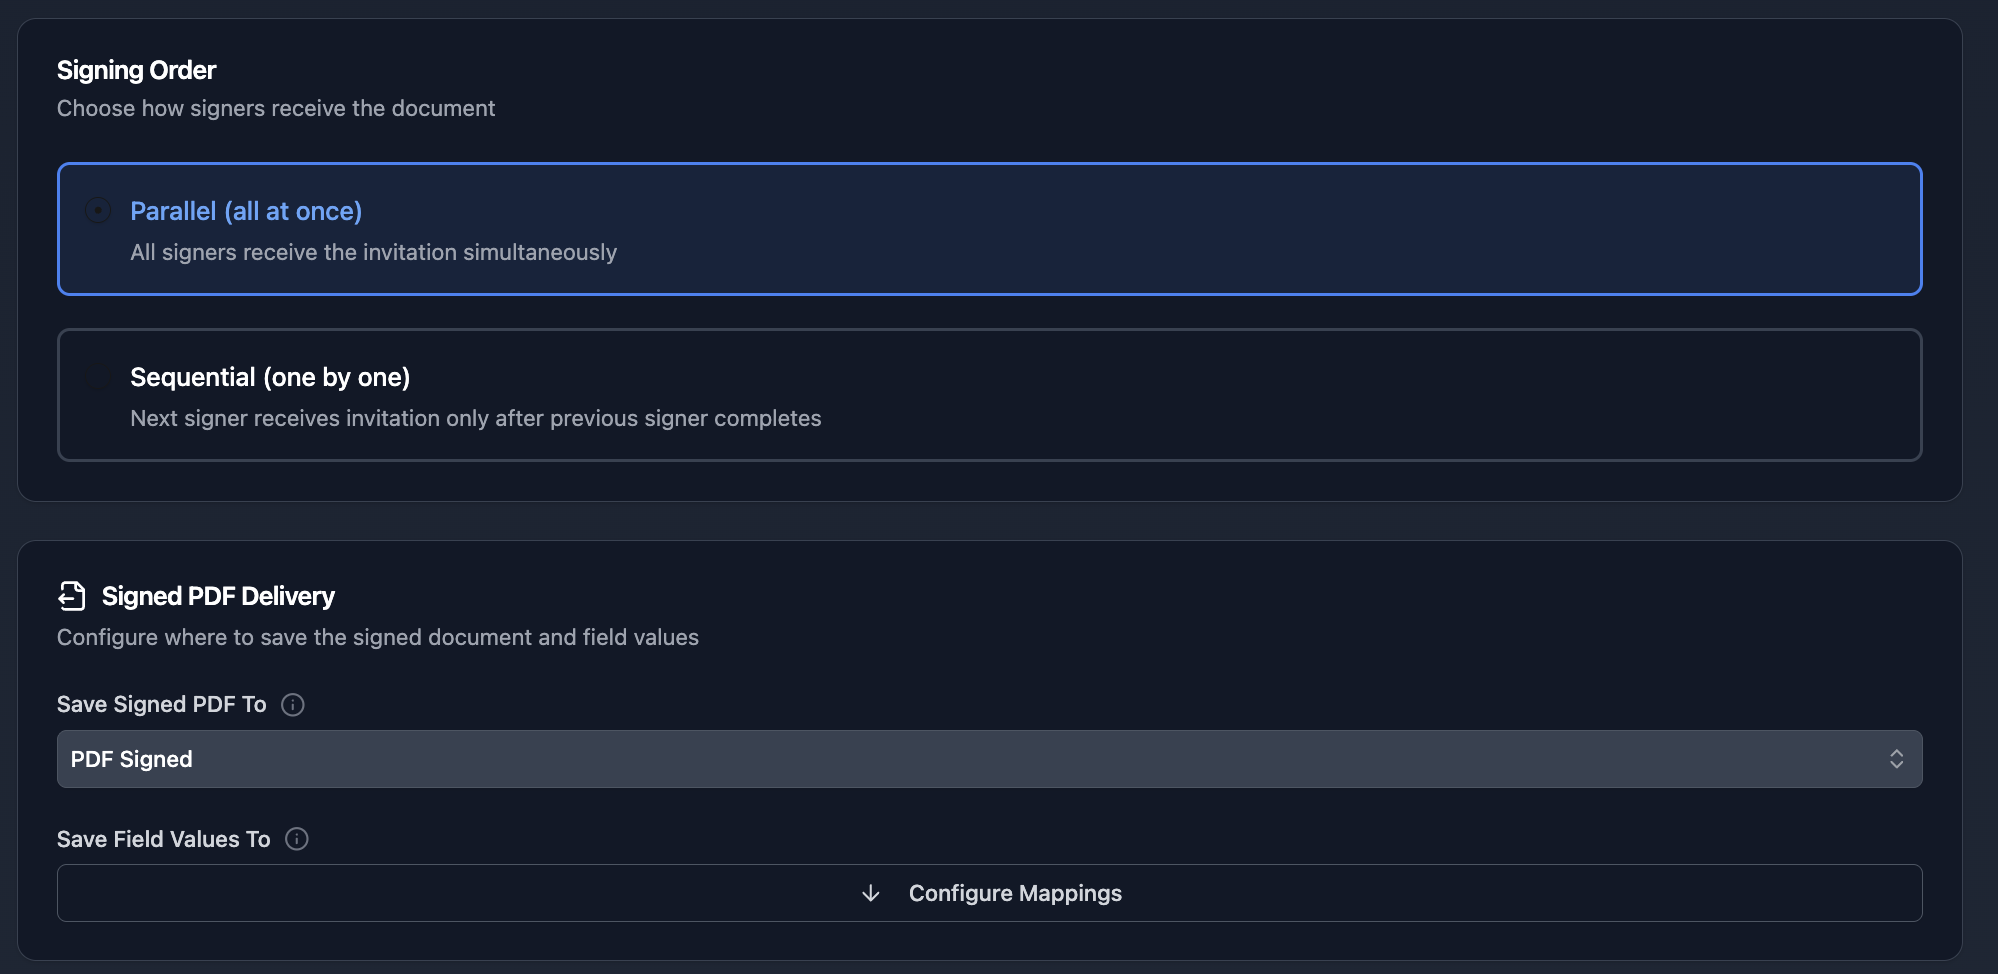
Multi-Level Approval Workflow
For organizations requiring inspector and supervisor sign-off:
INSPECTOR VERIFICATION

Signature: {{e-signature.signature_1}}
Name: {{e-signature.text_1}}
Date: {{e-signature.date_1}}

SUPERVISOR APPROVAL

Signature: {{e-signature.signature_2}}
Name: {{e-signature.text_2}}
Date: {{e-signature.date_2}}
Configure sequential signing so the inspector signs first, then the supervisor receives the request.
Certificate of Completion
The signed PDF includes a Certificate of Completion with:
- Timestamps for each signing action
- IP addresses and geographic location
- SHA-256 document hash for integrity verification
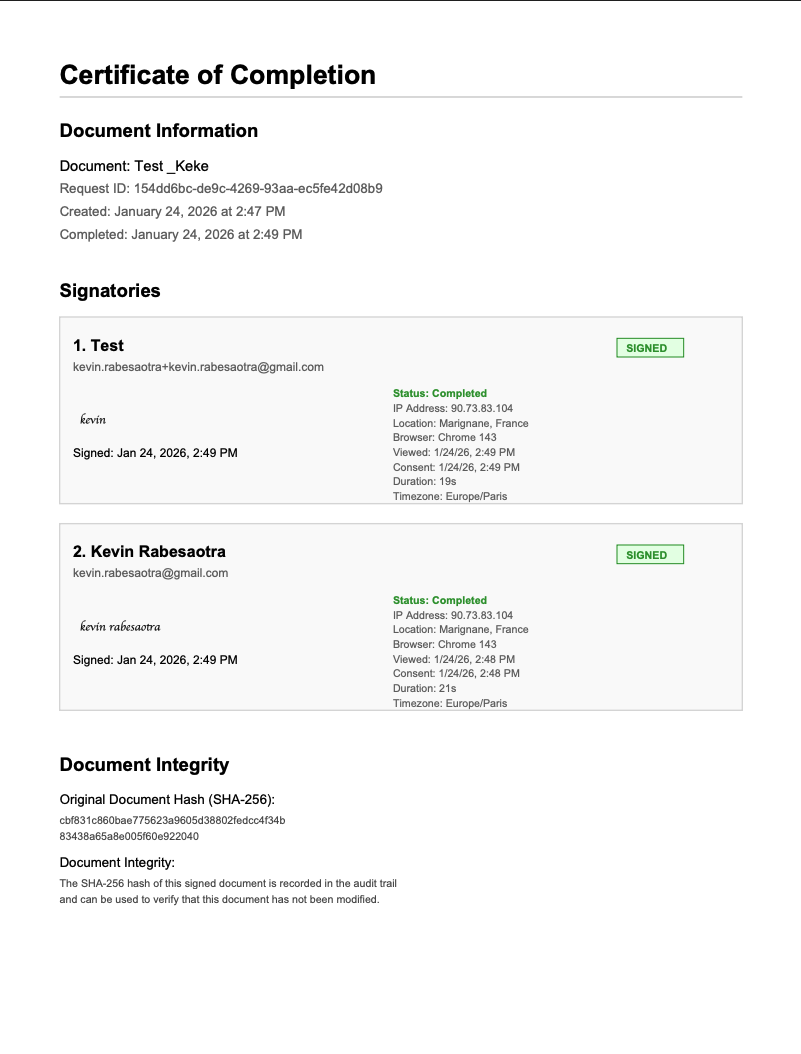
This audit trail satisfies compliance requirements for ISO, FDA, and customer audits.
Automate your document generation
Start with 20 free documents. Built for businesses using Airtable.
Best Practices for QC Report Automation
Standardize Your Data Structure
Use consistent field names and single-select options across your base:
| Instead of | Use |
|---|---|
| Pass, Passed, OK | Pass |
| Fail, Failed, Reject | Fail |
| Insp. Date | Inspection_Date |
Create Status-Based Views
Filter inspections by workflow stage:
- In Progress - Active inspections
- Complete - Ready for report generation
- Approved - Reports signed and finalized
- Sent - Reports delivered to customers
Use Consistent Report Naming
Establish a clear pattern: QC-{{Inspection_ID}}-{{Product}}-{{Date}}
This makes reports searchable in Airtable attachments and downloaded folders.
Track Report Generation Status
Add a "Report Generated" checkbox that updates automatically when TypeFlow creates the PDF. Use this to identify inspections missing documentation.
Start Generating QC Reports
Transform QC reporting from a manual bottleneck into an automated system that runs reliably. Stop copying data between systems, stop generating reports one at a time, and stop worrying about formatting inconsistencies.
For exporting full QC tables as branded, signable PDFs, see our audit-ready reports guide.
With TypeFlow, you set up your template once and generate professional QC reports with defect tables and photos for every inspection. Rated by quality and operations teams on G2.
Start for Free - 20 documents included, no credit card required.
Related Manufacturing Documents
- How to Generate Production Orders in Airtable - Automate production order PDFs with BOM line items
- How to Create Traceability Document PDFs from Airtable - Generate audit-ready traceability PDFs from batch data
- How to Generate Spec Sheet PDFs from Airtable - Create professional product spec sheets at scale
- How to Create Certificates of Conformity in Airtable - Automate CoC PDFs with test results and e-signatures
Frequently Asked Questions
Find answers to the most common questions about this feature.
Popular Questions
All Questions
Need more help?
Our team is here to help you solve all your problems and answer your questions.
Contact Us
Kevin from TypeFlow
•AuthorKevin Rabesaotra is a growth engineer and automation specialist with 8+ years of experience building no-code solutions. As Founder & CEO of TypeFlow, he has helped hundreds of businesses automate document generation and streamline workflows with Airtable integrations. Previously, Kevin was a Product Lead specializing in growth engineering, running experiments to drive revenue, retention, and lead generation.
More articles
How to Print Labels from Airtable with Quantity Control (Step by Step)
Print multiple labels per Airtable record based on a quantity field. Step-by-step guide for linked records mode and quantity repeat mode with barcodes and Avery sheets.
Read articleHow to Print Avery Mailing Labels from Airtable
Print Avery mailing labels (5160, 5161, 5162) from Airtable without Word mail merge. Step-by-step guide with print label mode, automation, and bulk generation.
Read articleHow to Create Inventory Labels with Barcodes in Airtable
Create inventory labels with Code 128, EAN-13, or QR barcodes from Airtable. Step-by-step guide for warehouse, retail, and asset tracking with thermal and Avery printers.
Read article