How to Generate Proof of Delivery Documents from Airtable Data
You can generate proof of delivery (POD) documents directly from your Airtable delivery data - recipient details, itemized lists, delivery timestamps, and e-signature for recipient confirmation. Connect TypeFlow, use a Google Docs or HTML/CSS template, and automate POD creation whenever a delivery status changes in Airtable.
PODs are the final step in the fulfillment chain - after packing lists and shipping documents. For the full picture, see our complete guide to shipping and fulfillment document automation in Airtable.
What You Need Before Starting
Before you begin, ensure you have:
- An Airtable base with delivery data - A table tracking deliveries with recipient information and items delivered
- A Google account - For creating your POD template in Google Docs
- A TypeFlow account - The service that connects Airtable to your template and generates PDFs
Set Up Your Airtable Base for Delivery Tracking
Your Airtable base needs specific fields to generate complete proof of delivery documents.
Delivery Information Fields
| Field Name | Field Type | Purpose |
|---|---|---|
| Delivery ID | Auto-number or Formula | Unique identifier for tracking |
| Delivery Date | Date | When delivery occurred |
| Delivery Time | Single line text | Time of delivery |
| Status | Single select | Track delivery stage |
| Driver Name | Single line text | Who made the delivery |
| Vehicle/Route | Single line text | Delivery vehicle or route info |
Recipient and Address Fields
| Field Name | Field Type | Purpose |
|---|---|---|
| Recipient Name | Single line text | Person who received goods |
| Company Name | Single line text | Business name if applicable |
| Street Address | Single line text | Delivery street address |
| City | Single line text | Delivery city |
| Postal Code | Single line text | ZIP/postal code |
| Phone | Phone number | Contact for delivery issues |
| For sending POD documents |
Line Items and Products
| Field Name | Field Type | Purpose |
|---|---|---|
| Items Delivered | Linked record | Products included in delivery |
| Item Description | Single line text | Description of each item |
| Quantity | Number | Number of units delivered |
| Condition | Single select | Item condition on delivery |
Signature and Confirmation Fields
| Field Name | Field Type | Purpose |
|---|---|---|
| Signature | Attachment | Image of recipient signature |
| Confirmed | Checkbox | Marks delivery as complete |
| Confirmation Notes | Long text | Any notes from recipient |
| POD Document | Attachment | Where generated PDF is saved |
Pro Tip: Capture Digital Signatures
Use mobile apps like Airtable's mobile interface, JotForm, or dedicated signature capture tools to collect signatures directly into Airtable Attachment fields. Drivers can capture signatures on tablets or phones during delivery.
Create Your Proof of Delivery Template in Google Docs
Design your POD template with placeholders that TypeFlow will replace with actual delivery data.
Step 1: Design Your POD Layout
Create a professional layout with these sections:
[Company Logo]
[Company Name]
[Company Address]
[Phone | Email]

---

PROOF OF DELIVERY

Delivery #: {{Delivery ID}}
Date: {{Delivery Date}}
Time: {{Delivery Time}}

---

DELIVERED TO:
{{Recipient Name}}
{{Company Name}}
{{Street Address}}
{{City}}, {{Postal Code}}

---

DELIVERED BY:
Driver: {{Driver Name}}
Vehicle/Route: {{Vehicle Route}}
Step 2: Add the Items Delivered Section
Use loop syntax to list all delivered items:
ITEMS DELIVERED:

| Description | Qty | Condition |
|-------------|-----|-----------|
{{loop_0}}
| {{Item Description}} | {{Quantity}} | {{Condition}} |

---
Step 3: Include Signature and Confirmation
Add the signature placeholder and confirmation section:
RECIPIENT CONFIRMATION

I confirm receipt of the above items in the condition noted.

Signature:
{{Signature}}

Printed Name: {{Recipient Name}}
Date: {{Delivery Date}}

Notes: {{Confirmation Notes}}

---

This document serves as proof that the listed items were delivered
to the recipient at the address shown above.

Document generated: {{Current Date}}
Pro Tip: Size Your Signature Placeholder
In TypeFlow, you can specify the size for image attachments. Set your signature placeholder to a reasonable size (e.g., 200x100 pixels) so signatures appear professional and don't dominate the document.
Connect TypeFlow to Your Airtable Base
Install TypeFlow and link it to your delivery data.
Step 1: Authorize TypeFlow
Go to app.typeflow.us and connect your Google account, then authorize access to your Airtable account.
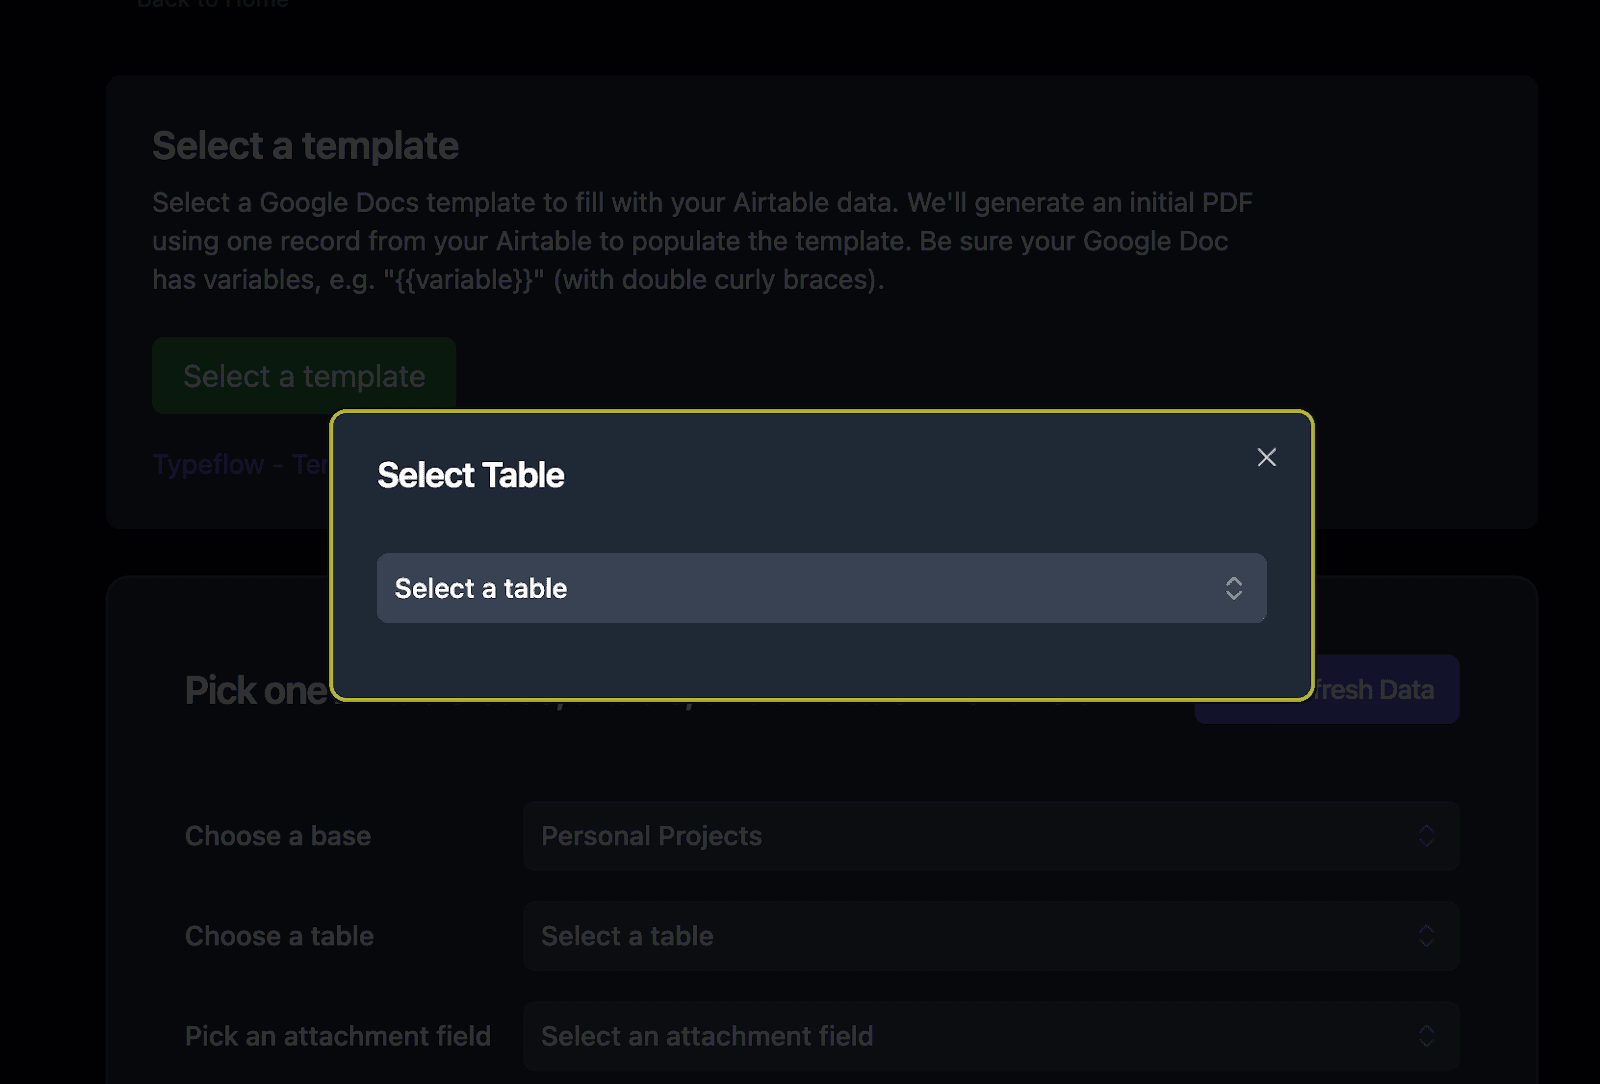
Step 2: Select Your Delivery Table
Choose the table containing your delivery records.
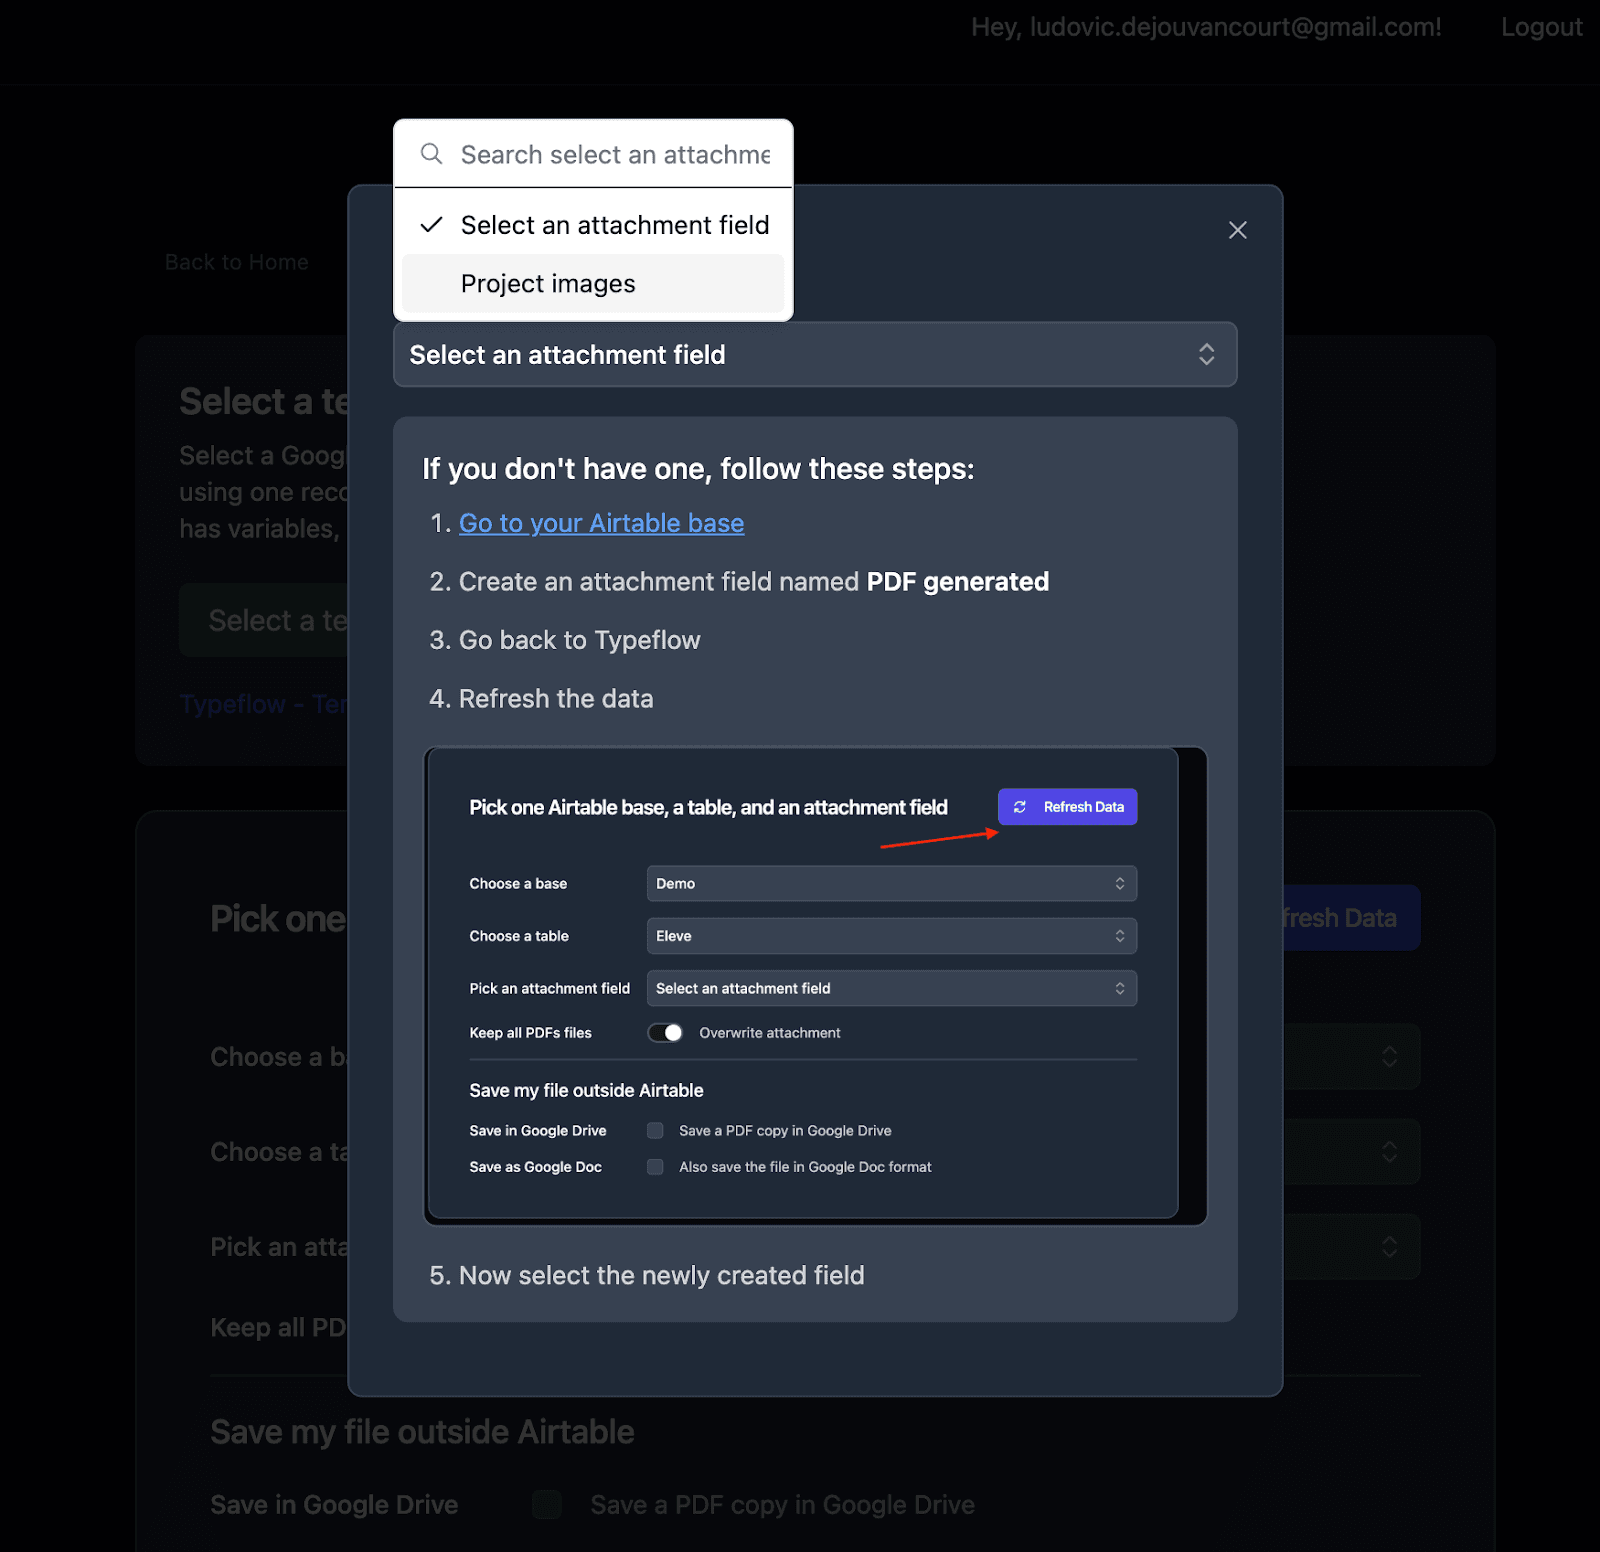
Step 3: Configure Output Settings
Select the attachment field where generated POD documents should be saved.
Set Up Your Proof of Delivery Generation Flow
Map your Airtable fields to the template placeholders.
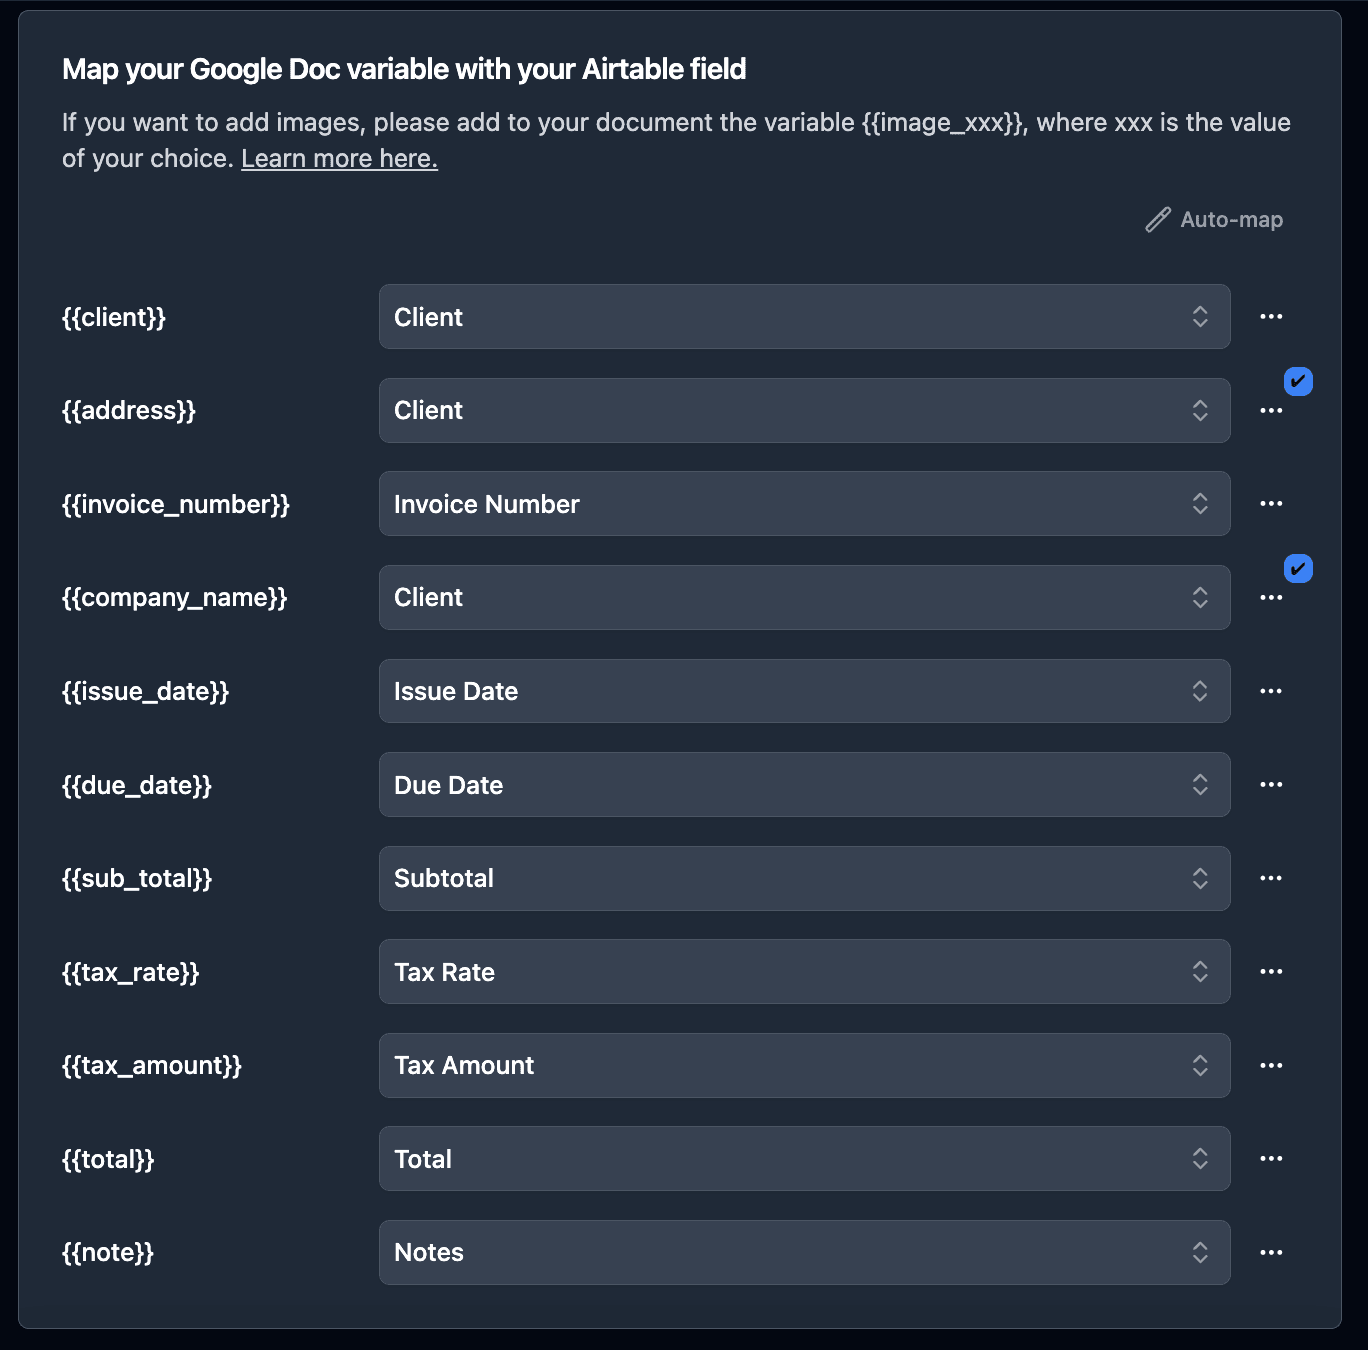
Map Basic Delivery Fields
Connect delivery information to template variables:
{{Delivery ID}}→ Delivery ID field{{Delivery Date}}→ Delivery Date field{{Delivery Time}}→ Delivery Time field{{Driver Name}}→ Driver Name field
Map Recipient Fields
Connect address information:
{{Recipient Name}}→ Recipient Name field{{Company Name}}→ Company Name field{{Street Address}}→ Street Address field{{City}}→ City field{{Postal Code}}→ Postal Code field
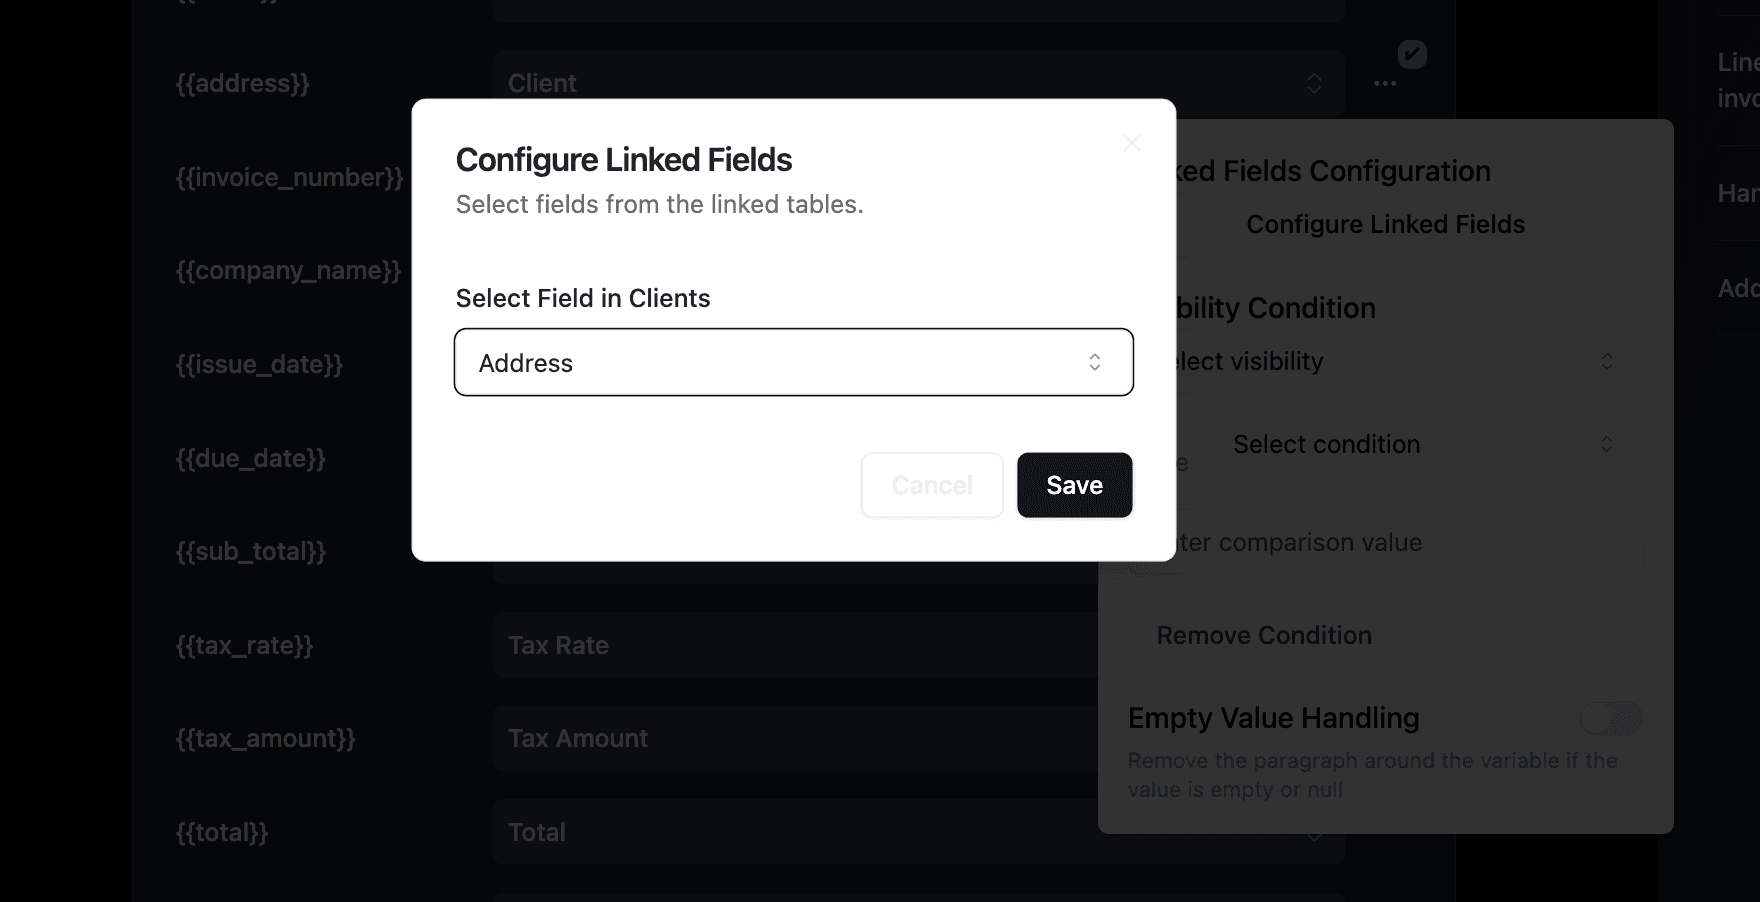
Map Line Items
Configure the linked record field to pull all delivered items.
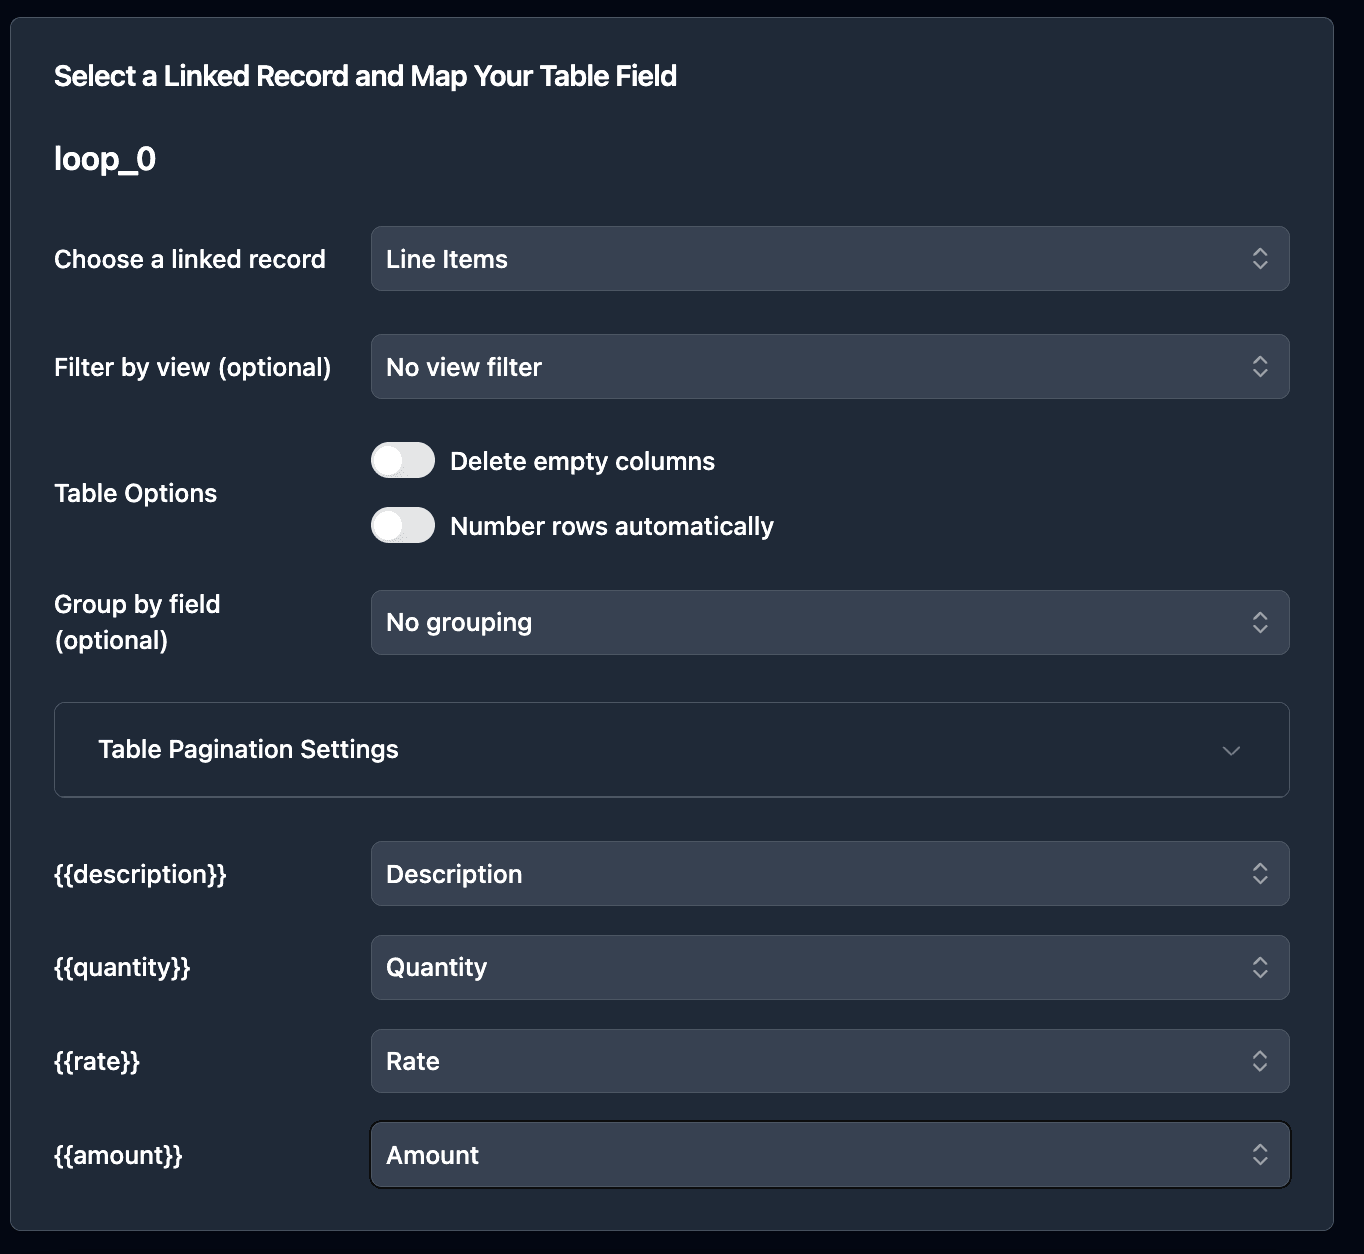
Map Signature Attachment
Map the Signature attachment field to the {{Signature}} placeholder. TypeFlow will embed the signature image directly in the generated PDF.
Generate Proof of Delivery Documents: 3 Options
Once configured, you have multiple ways to generate POD documents.
Option 1: Button Field (On-Demand Generation)
Add a button field for one-click POD generation.
Workflow:
- Driver confirms delivery and captures signature
- Click "Generate POD" button
- PDF generates with all delivery details and signature
- Document saves to the record
Best for: Operations where drivers or dispatchers manually confirm each delivery.
Option 2: Bulk Generation (End-of-Day Processing)
Generate POD documents for all confirmed deliveries at once.
Workflow:
- Filter view to show deliveries where Confirmed = checked
- Select all records needing POD documents
- Click "Generate PDFs"
- All documents generate in parallel
Best for: End-of-day batch processing where PODs are generated after all deliveries are confirmed.
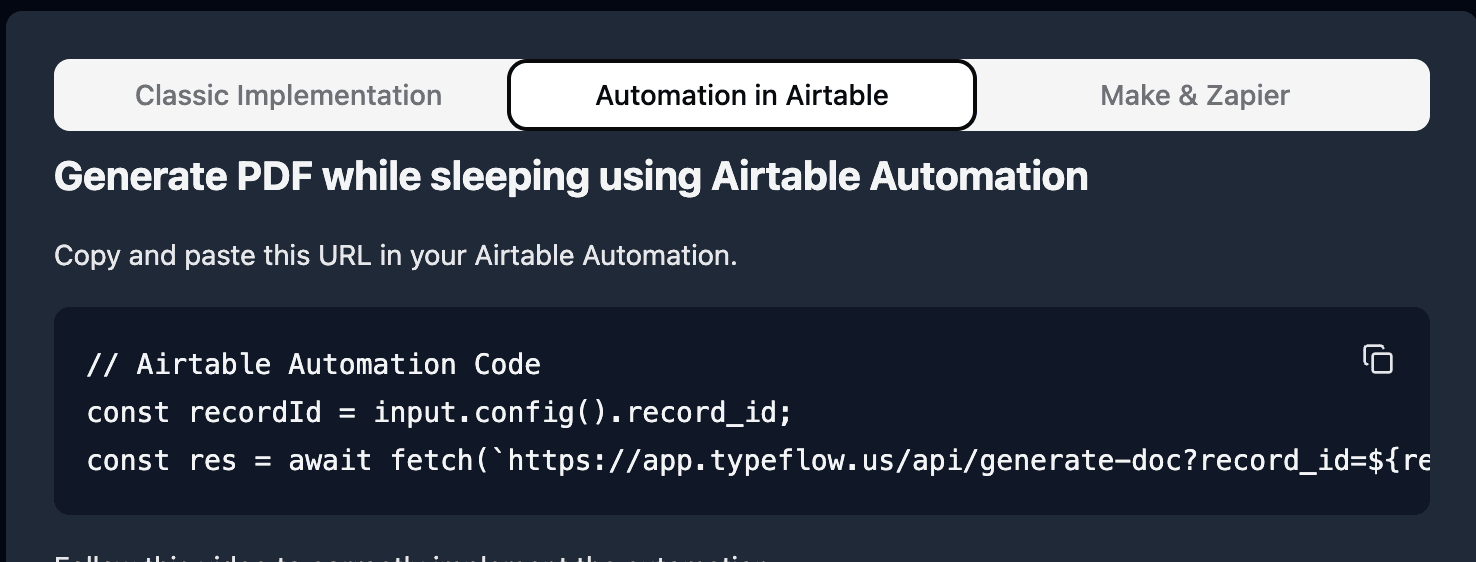
Option 3: Airtable Automations (Automatic Generation)
Trigger POD generation automatically when deliveries are confirmed.
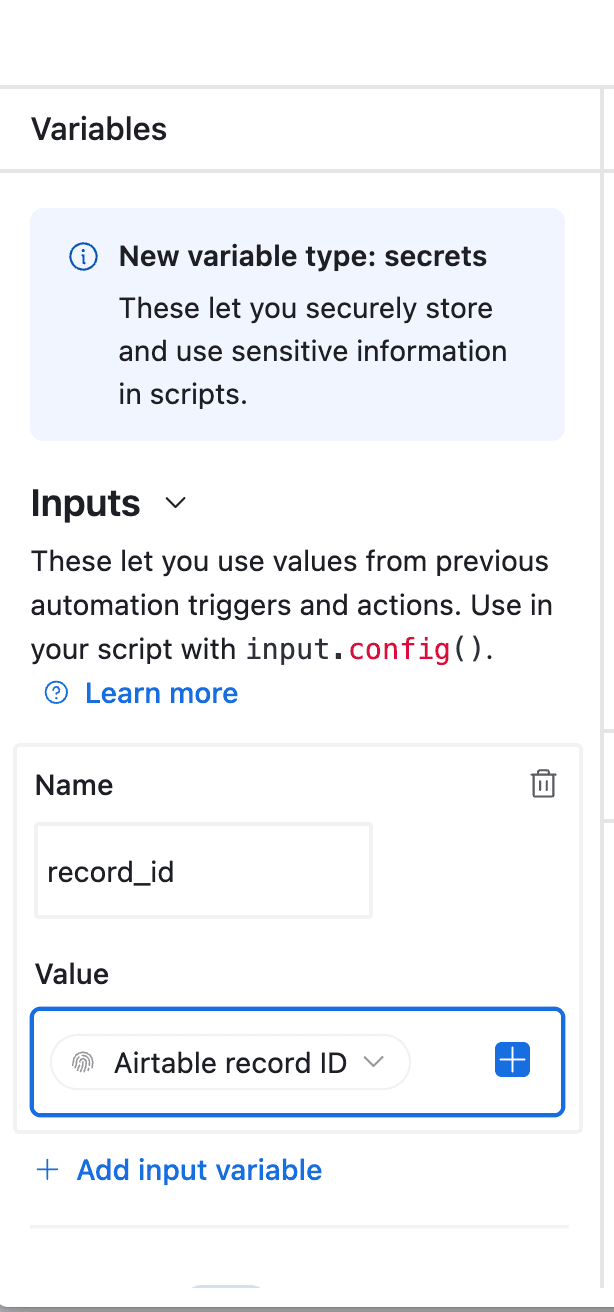
Setup steps:
- Create a new Automation in Airtable
- Set trigger: "When record matches conditions" (Confirmed = checked)
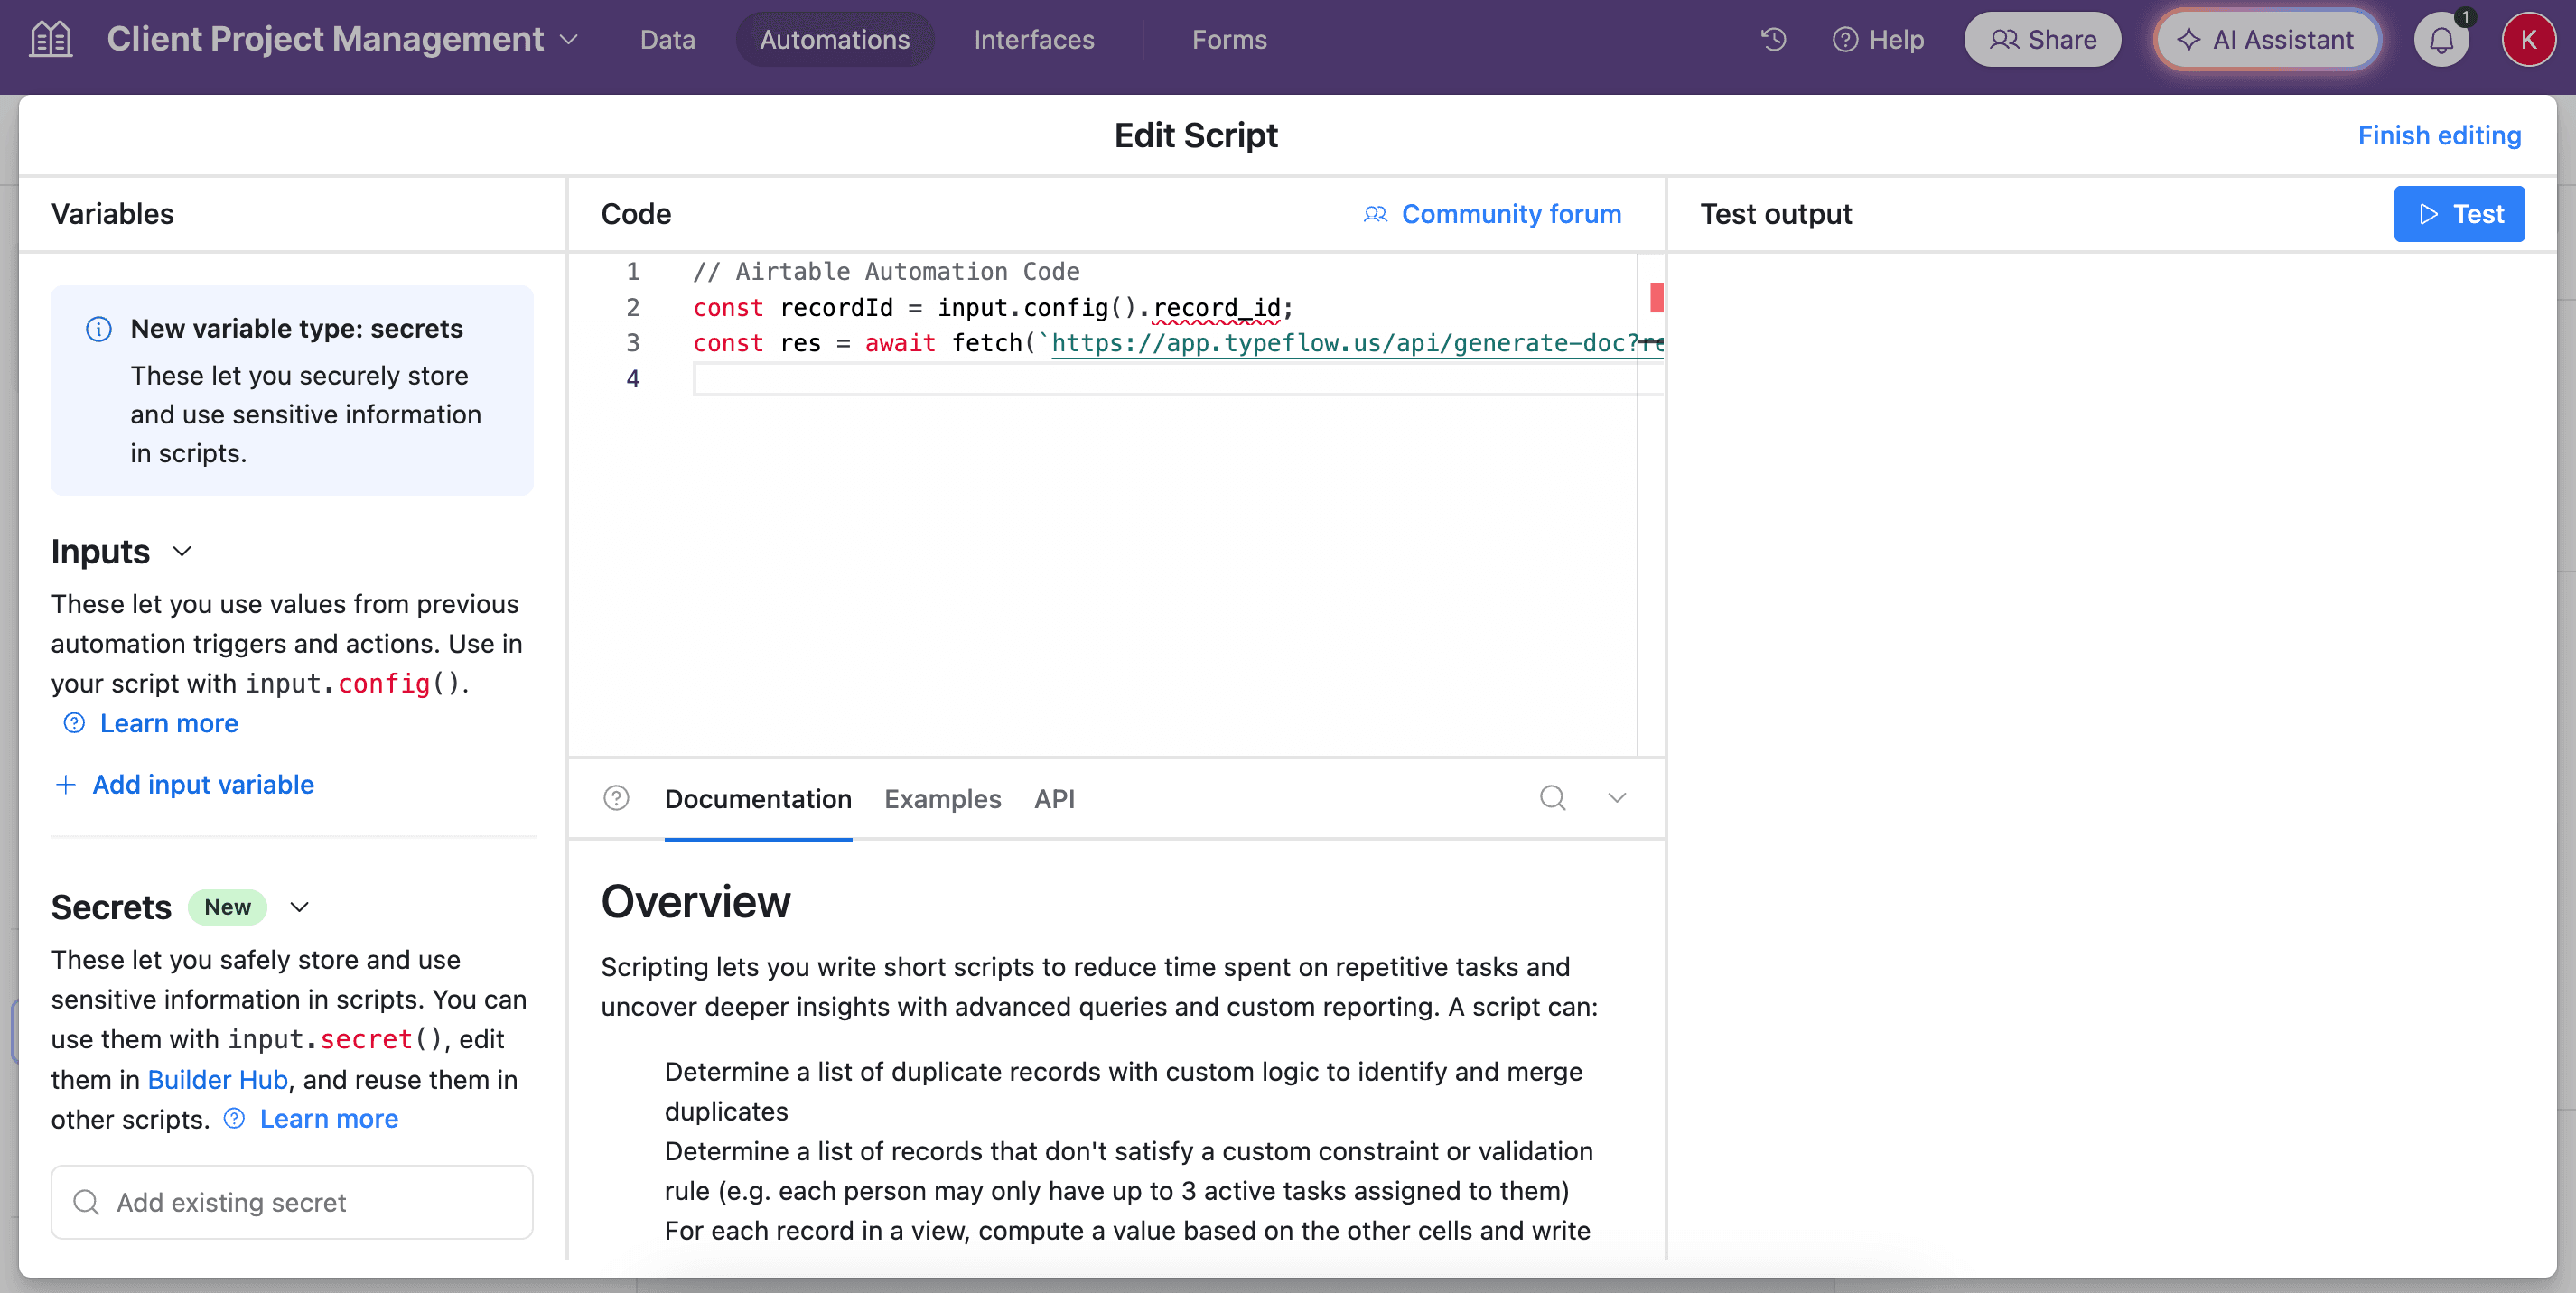
- Add action: "Run script"
- Paste the TypeFlow script
Pro Tip: Auto-Email to Recipients
Add a second automation step to email the generated POD to the recipient. Use the Email field from your delivery record as the destination and attach the PDF from the POD Document field.
Automate your document generation
Start with 20 free documents. Built for businesses using Airtable.
Automate Your Proof of Delivery Workflow
Trigger Generation on Delivery Confirmation
The most common workflow triggers POD generation when the Confirmed checkbox is checked:
- Driver completes delivery
- Driver captures signature on mobile device
- Signature uploads to Airtable Attachment field
- Driver checks Confirmed checkbox
- Automation triggers TypeFlow
- POD generates with all data including signature
- PDF saves to record attachment field
Send Documents via Email Automatically
Add an email step to your automation:
- After POD generates, automation continues
- Send email to recipient using Email field
- Attach the generated PDF
- Include delivery confirmation message
Store and Organize Generated Documents
All generated PODs save directly to the delivery record's attachment field. This creates:
- Complete audit trail for each delivery
- Easy access when disputes arise
- Searchable archive in Airtable
Best Practices for Proof of Delivery Documents
Include All Required Legal Information
Your POD should contain:
- Company name and address
- Delivery date and time
- Complete item list with quantities
- Recipient signature
- Any required legal disclaimers for your industry
Use Consistent Branding
Add your company logo and use brand colors. Professional-looking PODs build trust with recipients and look better in case of disputes.
Handle Delivery Exceptions
Create fields for:
- Partial deliveries (note which items were delivered)
- Refused deliveries (capture reason)
- Damaged items (note condition)
- Signature refused (capture alternative confirmation)
Set Up Proper File Naming
Configure TypeFlow to name files consistently:
POD_{{Delivery ID}}_{{Delivery Date}}.pdf- Makes documents easy to find and reference
You can apply the same naming pattern to labels and other shipping paperwork.
Common Issues and Solutions
Signature Images Not Appearing
Problem: The signature doesn't show in the generated POD.
Solution:
- Verify the Attachment field contains an image file (PNG, JPG)
- Check the placeholder syntax matches exactly
- Ensure the image isn't corrupted or too large
Missing Data in Generated Documents
Problem: Some fields show as blank in the POD.
Solution:
- Check field names in template match Airtable field names exactly
- Verify the delivery record has data in those fields
- Review field mapping in TypeFlow
Automation Not Triggering
Problem: PODs don't generate when deliveries are confirmed.
Solution:
- Verify automation is turned on
- Check trigger conditions (Confirmed = checked)
- Review automation run history for errors
- Ensure TypeFlow has proper permissions
Generate Professional POD Documents in Minutes
With TypeFlow, automating proof of delivery generation from Airtable takes minutes to set up. Stop creating documents manually and start generating professional PODs that include signatures, delivery details, and itemized lists - automatically. See what users say about TypeFlow on G2.
Related Shipping & Fulfillment Documents
- Generate Packing Lists from Airtable - Automated packing list PDFs for warehouse workflows
- Generate Shipping Documents from Airtable - Bills of lading, packing slips, and commercial invoices
- Print Labels from Airtable - Product, shipping, and inventory labels with barcodes
Automate your document generation
Start with 20 free documents. Built for businesses using Airtable.
Frequently Asked Questions
Find answers to the most common questions about this feature.
Popular Questions
All Questions
Need more help?
Our team is here to help you solve all your problems and answer your questions.
Contact Us
Kevin from TypeFlow
•AuthorKevin Rabesaotra is a growth engineer and automation specialist with 8+ years of experience building no-code solutions. As Founder & CEO of TypeFlow, he has helped hundreds of businesses automate document generation and streamline workflows with Airtable integrations. Previously, Kevin was a Product Lead specializing in growth engineering, running experiments to drive revenue, retention, and lead generation.
More articles
How to Print Labels from Airtable with Quantity Control (Step by Step)
Print multiple labels per Airtable record based on a quantity field. Step-by-step guide for linked records mode and quantity repeat mode with barcodes and Avery sheets.
Read articleHow to Print Avery Mailing Labels from Airtable
Print Avery mailing labels (5160, 5161, 5162) from Airtable without Word mail merge. Step-by-step guide with print label mode, automation, and bulk generation.
Read articleHow to Create Inventory Labels with Barcodes in Airtable
Create inventory labels with Code 128, EAN-13, or QR barcodes from Airtable. Step-by-step guide for warehouse, retail, and asset tracking with thermal and Avery printers.
Read article